C# - EXE/DLL로부터 추출한 이미지/아이콘의 배경색 투명 처리
지난번에 EXE/DLL로부터 이미지 추출하는 방법을 설명했는데요.
프로그램에 보여지는 리소스(예: 아이콘) 추출하는 방법
; https://www.sysnet.pe.kr/2/0/1524
실제로 해보니, 아이콘은 투명 처리가 잘 되어 있는데 이미지의 경우에는 BMP 파일로 저장되어 불투명 이미지가 나왔습니다. 그래서 투명 처리가 필요했는데요. 그래픽 툴을 사용하는 것보다 명령행 도구가 없나 해서 검색해 보았더니 다음의 도구가 나오는군요. ^^
ImageMagick  - Convert, Edit, and Compose Images
; http://www.imagemagick.org

Windows Binary Release
; http://www.imagemagick.org/script/binary-releases.php#windows
압축 버전도 제공하므로 이를 내려받아 해제합니다. exe 파일이 몇 개 나오는데, 그중에서 convert.exe 실행 파일을 이용하면 됩니다.
예를 들어 BMP 이미지에서 0xFF00FF RGB 색을 투명으로 처리하고 싶다면 이렇게 실행해 줍니다.
convert file.bmp -transparent #ff00ff file.png
그런데, EXE/DLL로부터 추출된 이미지 같은 경우에는 가끔 다음과 같은 식으로 오류가 발생하면서 처리가 안 될 때가 있습니다.
C:temp>convert file.bmp -transparent #ff00ff file.png
convert.exe: Length and filesize do not match `file.bmp' @ error/bmp.c/ReadBMPImage/817.
혹시나 싶어, convert.exe 폴더에 있는 다른 실행 파일인 imdisplay.exe로 파일을 열어도 역시 마찬가지의 오류가 발생합니다.
IMDisplayDoc function [DoReadImage] reported an error.
IMDisplay.exe: length and filesize do not match '...' @ error/bmp.c/ReadBMPImage/817
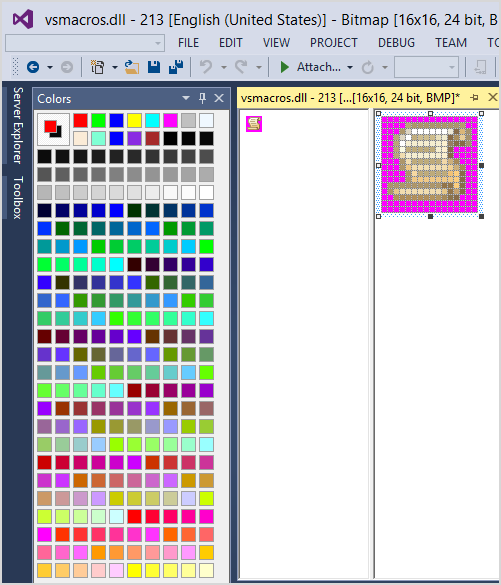
가만보니, palette가 구성된 이미지인 경우인데 Visual Studio로 확인하면 다음과 같이 왼쪽에 팔렛트가 펼쳐집니다.

이런 BMP 파일은 그냥 그림판(mspaint.exe)으로 열어서 24bit BMP 파일로 저장해 주고 convert 프로그램을 실행하면 됩니다.
ImageMagick의 convert.exe에는 많은 옵션이 있지만 투명 처리 정도는 C#으로도 간단히 할 수 있습니다. 다음은 이에 대한 코드를 담고 있는 글입니다.
Setting transparency in an image
; http://blogs.msdn.com/b/jmstall/archive/2007/08/06/setting-transparency-in-an-image.aspx
나중에 찾아 보기 쉽도록 여기다 코드를 그대로 복사해 두죠. ^^
// Simple tool to mark a color on the bitmap transparent.
// http://blogs.msdn.com/jmstall
using System;
using System.Collections.Generic;
using System.Text;
using System.Drawing;
using System.IO;

namespace MakeTransparent
{
    class Program
    {
        static void Main(string[] args)
        {
            if (args.Length == 0)
            {
                Console.WriteLine(
@"Usage:
    MakeTransparent <filename>

Makes the background color in the image transparent.
This assumes the pixel at 0,0 is the background color.

This saves it as a new file appended with '.t', so that it doesn't erase
the original filename.  For example 'c:\dir\a.bmp' becomes 'c:\dir\a.t.bmp'.
Callers can rename as needed.
");
                return;
            }

            string filename = args[0];
            filename = Path.GetFullPath(filename);
            Console.WriteLine("Loading image from:{0}", filename);

            Bitmap myBitmap = new Bitmap(filename);

            // Get the color of a background pixel.
            // Assume upper left corner is opaque.
            Color backColor = myBitmap.GetPixel(0, 0);

            Console.WriteLine("Choosing background color based of pixel at (0,0). Color ={0}", backColor.ToString());

            // Make backColor transparent for myBitmap. This is the heart of the program.
            myBitmap.MakeTransparent(backColor);

            // Change "c:\dir\thing.bmp" to "c:\dir\thing.t.bmp"
            string left = Path.ChangeExtension(filename, null);
            string ext = Path.GetExtension(filename); // includes period ".bmp"

            string outFile = left + ".t" + ext;
            Console.WriteLine("Saving back to file: {0}", outFile);

            myBitmap.Save(outFile);
        }
    }
}
주석에도 달려 있지만, (0,0) 위치의 색을 투명색으로 지정할 뿐 별다르게 특별한 처리는 없습니다.
// https://twitter.com/PR0GRAMMERHUM0R/status/1773122861487575208/photo/1

from rembg import remove
from PIL import Image

input = Image.open('cl.jpg')
output = remove(input)
output.save('output.png')
[이 글에 대해서 여러분들과 의견을 공유하고 싶습니다. 틀리거나 미흡한 부분 또는 의문 사항이 있으시면 언제든 댓글 남겨주십시오.]