기존 github 프로젝트를 Azure Devops의 빌드 Pipeline에 연결하는 방법
지난 글에 이어,
기존 github 프로젝트를 Azure Devops의 Board에 연결하는 방법
; https://www.sysnet.pe.kr/2/0/12523
이번에는 빌드 pipeline을 설정해 보겠습니다.
Key concepts for new Azure Pipelines users
; https://docs.microsoft.com/en-us/azure/devops/pipelines/get-started/key-pipelines-concepts
재미있는 것은, Azure Devops의 "프로젝트"는 "Boards"로 관리하는 repo와 "Pipelines"의 대상이 되는 repo가 별개일 수 있다는 점입니다. 실제로 다음과 같이 좌측 하단의 "Project settings"를 펼친 후, "Pipelines" 아이콘을 통해 새로운 파이프라인을 만들려고 하면,
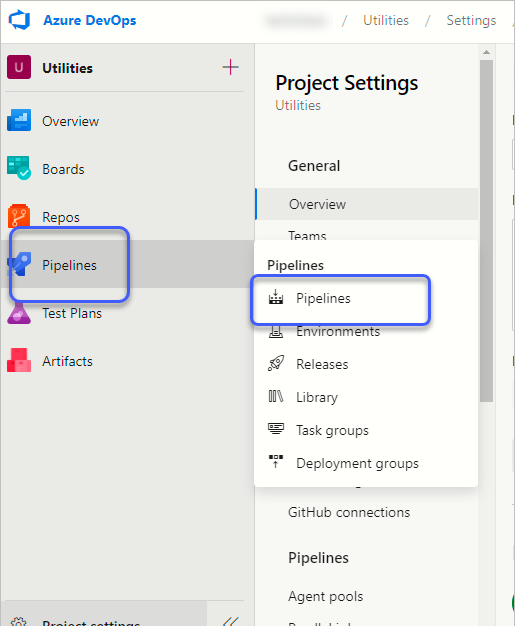
다시 이렇게 repo를 선택하는 화면이 나옵니다.

(사실 Boards와 pipeline 대상 repo를 다르게 하는 경우는 많지 않을 것입니다.) 어쨌든, 이번 글에서는 같은 프로젝트를 선택할 것이므로 "GitHub (YAML)" 항목으로 "Boards"를 연결할 때와 동일한 과정을 거쳐 github repo에 연결한 후, 해당 응용 프로그램의 환경에 맞는 빌드 파이프라인을 생성합니다.
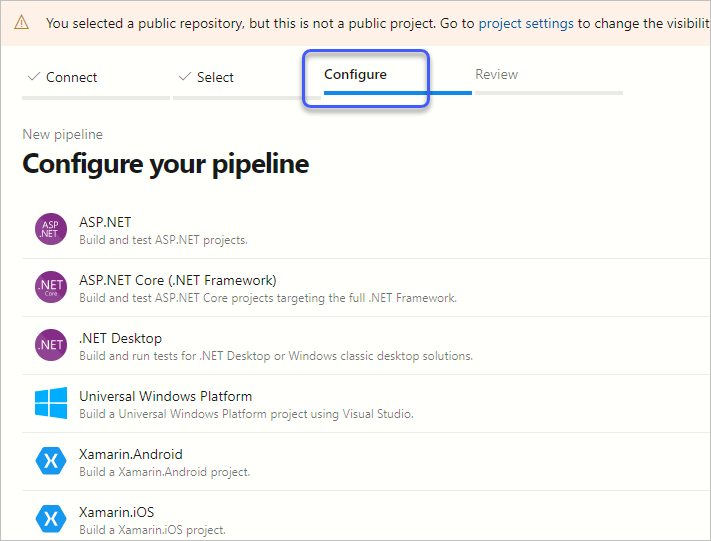
참고로, 위의 그림에 다 나오지 못한 파이프라인 종류를 다음의 문서에서 확인할 수 있습니다.
Build and release tasks
; https://docs.microsoft.com/ko-kr/azure/devops/pipelines/tasks/?view=azure-devops

Azure Pipelines ecosystem support
; https://docs.microsoft.com/en-us/azure/devops/pipelines/ecosystems/ecosystems
제가 선택한 github repo의 응용 프로그램 유형은 .NET Framework을 대상으로 한 콘솔 프로젝트의 모음이므로 ".NET Desktop"으로 구성했고, 그러면 기본적으로 생성되는 다음의 yaml 파일 편집으로 넘어갑니다.
# .NET Desktop
# Build and run tests for .NET Desktop or Windows classic desktop solutions.
# Add steps that publish symbols, save build artifacts, and more:
# https://docs.microsoft.com/azure/devops/pipelines/apps/windows/dot-net

trigger:
- main

pool:
  vmImage: 'windows-latest'

variables:
  solution: '**/*.sln'
  buildPlatform: 'Any CPU'
  buildConfiguration: 'Release'

steps:
- task: NuGetToolInstaller@1

- task: NuGetCommand@2
  inputs:
    restoreSolution: '$(solution)'

- task: VSBuild@1
  inputs:
    solution: '$(solution)'
    platform: '$(buildPlatform)'
    configuration: '$(buildConfiguration)'

- task: VSTest@2
  inputs:
    platform: '$(buildPlatform)'
    configuration: '$(buildConfiguration)'
위의 yaml을 잠깐 해석해 보면, 우선
trigger는 빌드 파이프라인을 구동할 사건인데
github의 경우 대상 브랜치가 변경된 경우를 일컫습니다. 즉, 위와 같은 경우에는 'main' 브랜치가 변경되면 빌드 파이프라인이 도는 것입니다. (기존 github 프로젝트의 경우 기본 브랜치가 master이므로 둘 중의 하나는 브랜치 이름을 바꿔야 합니다.)
pool은
빌드를 담당할 에이전트를 의미하는데, "Pipelines" / "Agent pools"에서도 확인할 수 있습니다. 여기서 지정된 vmImnage로 'windows-latest' 문자열은 "Microsoft-hosted agents"의 하나입니다.
Microsoft-hosted agents
; https://docs.microsoft.com/en-us/azure/devops/pipelines/agents/hosted#software
현재는 "windows-2019"와 동일한 의미를 가지며 이로 인해 사용되는 VM Image는 "Windows Server 2019 with Visual Studio 2019"가 됩니다.
그다음 variables는,
Define variables
; https://docs.microsoft.com/en-us/azure/devops/pipelines/process/variables
빌드 스크립트 내에서 사용할 변수를 지정하는 것이므로 그냥 감각적으로 알 수 있을 것입니다. 또한 이 값들은 환경 변수로 설정이 되므로 여러분들의 빌드 과정 중에 이 값을 사용하는 것이 가능합니다.
이하 steps에 있는 것은 나열된 task 순으로 작업이 처리됩니다. 각각의 이름에 따라 유추할 수 있는데 이 중에서 VSBuild의 경우 inputs에 제공한 변수에 따라, 그리고 그보다 먼저 설정한 "variables:"에 따라 실행 시 다음과 같은 식으로 명령에 반영이 됩니다.
##[command]"C:\Program Files (x86)\Microsoft Visual Studio\2019\Enterprise\MSBuild\Current\Bin\msbuild.exe" "D:\a\1\s\Utilities.sln" /nologo /nr:false /dl:CentralLogger,"D:\a\_tasks\VSBuild_71a9a2d3-a98a-4caa-96ab-affca411ecda\1.166.2\ps_modules\MSBuildHelpers\Microsoft.TeamFoundation.DistributedTask.MSBuild.Logger.dll";"RootDetailId=4a4dc47e-70e3-4aca-983c-72ba05dad9bd|SolutionDir=D:\a\1\s"*ForwardingLogger,"D:\a\_tasks\VSBuild_71a9a2d3-a98a-4caa-96ab-affca411ecda\1.166.2\ps_modules\MSBuildHelpers\Microsoft.TeamFoundation.DistributedTask.MSBuild.Logger.dll" /p:platform="Any CPU" /p:configuration="Release" /p:VisualStudioVersion="16.0" /p:_MSDeployUserAgent="VSTS_ef889581-7fb9-440f-94f7-8841a7ce550f_build_1_0"
이 정도면 대충 기본적인 사용법은 느낌으로 아시겠죠?!!! ^^
이렇게 빌드 스크립트를 정하고 "Save and run" 버튼을 누르면 위의 yaml 파일을 "azure-pipelines.yml" 이름으로 github repo에 commit 하고 빌드를 진행합니다. 물론 이후로는 trigger에 지정한 브랜치가 변경되면 파이프라인이 구동되는, CI로서의 기능을 담당합니다.
빌드 스크립트에 사용하는 yaml의 전체 스키마는 다음의 문서에서 설명하고 있습니다.
YAML schema reference
; https://docs.microsoft.com/en-us/azure/devops/pipelines/yaml-schema
[이 글에 대해서 여러분들과 의견을 공유하고 싶습니다. 틀리거나 미흡한 부분 또는 의문 사항이 있으시면 언제든 댓글 남겨주십시오.]