C# - Azure AD 인증을 지원하는 데스크톱 애플리케이션 예제(Windows Forms)
전에 한번 ASP.NET Core/5+ 예제로 다뤄본 적이 있는데요,
C# - Azure AD 인증을 지원하는 ASP.NET Core/5+ 웹 애플리케이션 예제 구성
; https://www.sysnet.pe.kr/2/0/12614
이번엔 데스크톱 프로그램에서 어떻게 Azure AD 인증을 처리할 수 있는지 알아보겠습니다. 그리고, 이에 대한 내용은 다음의 글을 그대로 참고했으니,
Modern authentication with Azure AD for WinForms (native) apps
; https://cmatskas.com/modern-authentication-with-azure-ad-for-winforms-native-apps-2/
그냥 저 링크의 글을 읽으셔도 무방합니다. ^^
일단, 데스크톱 프로그램의 경우에도
"Azure Active Directory"에서 "App Registrations"를 통해 App 유형을 하나 등록해야 하는 것에는 변함이 없습니다. (혹은,
지난 글에 만들어 둔 "test-auth-webapp"을 재사용해도 됩니다.)
그다음, "Authentication" 메뉴로 "Add a platform" 버튼을 이용해 "Mobile and desktop applications" 항목을 추가합니다. 그럼, 다음과 같이 "Redirect URIs"를 묻는 메뉴로 바뀌는데요,
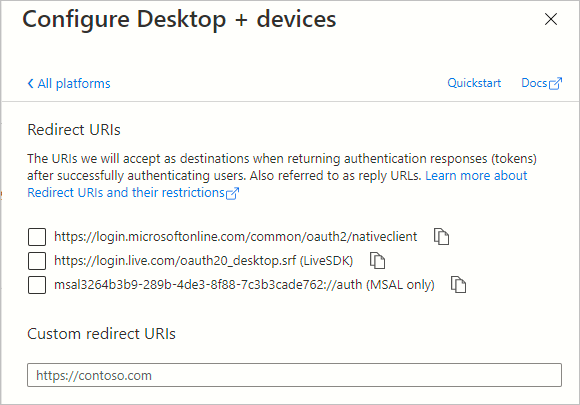
Web App의 경우에는 Redirect를 web application에서 처리했기 때문에 (로컬 테스트였으므로) "https://localhost:44356/signin-oidc"라는 식으로 지정을 했지만 Desktop 응용 프로그램이라면 사정이 좀 달라집니다. 즉, Redirect 받을 URL이 없는데요 이를 위해 별도의 사이트를 만들어 처리한다면 "Custom redirect URIs"를 지정하는 것도 가능하겠지만 재미있게도 AAD의 경우 인증 용도로 사용할 수 있는 Redirect Endpoint를 제공하기 때문에 그것을 이용해도 좋습니다.
여기서는 가장 상단의 "
https://login.microsoftonline.com/common/oauth2/nativeclient" 항목을 선택해 진행합니다. (물론, 나중에도 바꿀 수 있기 때문에 편하게 선택해 줍니다. ^^)
Azure AD 측의 준비는 이게 끝입니다. (지난번에는 "API permissions"도 지정하고 그랬는데 그건 부가적인 작업이었던 듯합니다.)
자, 그럼 이제 Windows Forms 프로젝트를 하나 생성합니다. 그다음, 웹 환경에서는 다음과 같이 2개의 패키지를 추가했었는데,
Install-Package Microsoft.AspNetCore.Authentication.OpenIdConnect
Install-Package Microsoft.Identity.Web
Desktop Application 환경에서는 Microsoft.Identity.Client(MSAL: Microsoft Authentication Library)만 추가하면 됩니다. (물론, 원한다면
순수 REST API를 호출하는 방식도 있습니다.)
Install-Package Microsoft.Identity.Client
또한, ASP.NET Core/5+에서 Startup.cs의 ConfigureServices 메서드 내에서 확장 메서드를 호출했던 것처럼, Desktop 응용 프로그램의 경우에도 "Microsoft.Identity.Client" 패키지 나름의 방식으로 래핑해 주는 메서드 호출을 해야 합니다. 이것을 Program.cs에서 다음과 같이 코딩을 해줍니다.
using AuthDemoWinForms;
using Microsoft.Identity.Client;
using System;
using System.IO;
using System.Linq;
using System.Windows.Forms;

namespace WindowsFormsApp1
{
    static class Program
    {
        /// <summary>
        /// The main entry point for the application.
        /// </summary>
        [STAThread]
        static void Main()
        {
            InitializeAuth();

            Application.EnableVisualStyles();
            Application.SetCompatibleTextRenderingDefault(false);
            Application.Run(new Form1());
        }

        public static string ClientId = "...your_client_id...";
        public static string Tenant = "...your_tenant_id...";

        private static IPublicClientApplication clientApp;
        public static IPublicClientApplication PublicClientApp { get { return clientApp; } }

        // Logging in MSAL.NET
        // ; https://docs.microsoft.com/en-us/azure/active-directory/develop/msal-logging-dotnet

        // Initialize client applications using MSAL.NET
        // ; https://docs.microsoft.com/en-us/azure/active-directory/develop/msal-net-initializing-client-applications
        private static void InitializeAuth()
        {
            clientApp = PublicClientApplicationBuilder.Create(ClientId)
                    .WithRedirectUri("https://login.microsoftonline.com/common/oauth2/nativeclient")
                    .WithAuthority(AzureCloudInstance.AzurePublic, Tenant)
                    .Build();

            // Token cache serialization in MSAL.NET
            // ; https://docs.microsoft.com/en-us/azure/active-directory/develop/msal-net-token-cache-serialization
            // 아래의 방법은 위의 문서에서 "Write your own cache" 방법을 사용
            TokenCacheHelper.EnableSerialization(clientApp.UserTokenCache);
        }
    }
}
남은 것은, 이제 로그인/로그아웃 기능인데요, 우선 로그인부터 구현해 볼까요? ^^
이를 위해 Form1에 로그인 버튼을 추가하고 이벤트 핸들러에 다음과 같이 코드를 추가합니다.
private async void btnLogin_Click(object sender, EventArgs e)
{
    AuthenticationResult result = await Login();
    label1.Text = result.Account.Username;
}

// Get a token from the token cache using MSAL.NET
// https://docs.microsoft.com/en-us/azure/active-directory/develop/msal-net-acquire-token-silently
private async Task<AuthenticationResult> Login()
{
    AuthenticationResult authResult = null;
    var accounts = await Program.PublicClientApp.GetAccountsAsync();
    var firstAccount = accounts.FirstOrDefault();

    string[] scopes = { };

    try
    {
        authResult = await Program.PublicClientApp.AcquireTokenSilent(scopes, firstAccount)
            .ExecuteAsync();
    }
    catch (MsalUiRequiredException ex)
    {
        // A MsalUiRequiredException happened on AcquireTokenSilent.
        // This indicates you need to call AcquireTokenInteractive to acquire a token
        System.Diagnostics.Debug.WriteLine($"MsalUiRequiredException: {ex.Message}");
        try
        {
            authResult = await Program.PublicClientApp.AcquireTokenInteractive(scopes)
                .WithAccount(accounts.FirstOrDefault())
                .WithPrompt(Prompt.SelectAccount)
                .ExecuteAsync();
        }
        catch (MsalException msalex)
        {
            label1.Text = $"Error Acquiring Token:{System.Environment.NewLine}{msalex}";
        }
    }
    catch (Exception ex)
    {
        label1.Text = $"Error Acquiring Token Silently:{System.Environment.NewLine}{ex}";
    }
    return authResult;
}
코드가 좀 낯설어서 그렇지 위의 동작 순서는 간단합니다. 우선 Program.PublicClientApp.GetAccountsAsync(); 메서드 호출 시 TokenCacheHelper.BeforeAccessNotification 메서드가 콜백됩니다.
public static void BeforeAccessNotification(TokenCacheNotificationArgs args)
{
    lock (FileLock)
    {
        args.TokenCache.DeserializeMsalV3(File.Exists(CacheFilePath)
                ? ProtectedData.Unprotect(File.ReadAllBytes(CacheFilePath),
                                            null, DataProtectionScope.CurrentUser)
                : null);
    }
}
하지만, 최초 호출에는 "CacheFilePath"에 캐시된 token 정보가 없으므로 null을 반환합니다. 그럼, Program.PublicClientApp.GetAccountsAsync 메서드는 0개의 accounts를 반환하게 되고 이로 인해 이후에 호출하는 "Program.PublicClientApp.AcquireTokenSilent" 메서드에서 예외가 발생합니다.
ex  {"No account or login hint was passed to the AcquireTokenSilent call. "}    Microsoft.Identity.Client.MsalUiRequiredException
   at Microsoft.Identity.Client.Internal.Requests.Silent.SilentRequest.<ExecuteAsync>d__5.MoveNext()
   at System.Runtime.ExceptionServices.ExceptionDispatchInfo.Throw()
   at Microsoft.Identity.Client.Internal.Requests.Silent.SilentRequest.<ExecuteAsync>d__5.MoveNext()
   at System.Runtime.CompilerServices.TaskAwaiter.ThrowForNonSuccess(Task task)
   at System.Runtime.CompilerServices.TaskAwaiter.HandleNonSuccessAndDebuggerNotification(Task task)
   at System.Runtime.CompilerServices.ConfiguredTaskAwaitable`1.ConfiguredTaskAwaiter.GetResult()
   at Microsoft.Identity.Client.Internal.Requests.RequestBase.<RunAsync>d__12.MoveNext()
   at System.Runtime.CompilerServices.TaskAwaiter.ThrowForNonSuccess(Task task)
   at System.Runtime.CompilerServices.TaskAwaiter.HandleNonSuccessAndDebuggerNotification(Task task)
   at System.Runtime.CompilerServices.ConfiguredTaskAwaitable`1.ConfiguredTaskAwaiter.GetResult()
   at Microsoft.Identity.Client.ApiConfig.Executors.ClientApplicationBaseExecutor.<ExecuteAsync>d__2.MoveNext()
   at System.Runtime.CompilerServices.TaskAwaiter.ThrowForNonSuccess(Task task)
   at System.Runtime.CompilerServices.TaskAwaiter.HandleNonSuccessAndDebuggerNotification(Task task)
   at System.Runtime.CompilerServices.TaskAwaiter`1.GetResult()
   at WindowsFormsApp1.Form1.<Login>d__3.MoveNext()
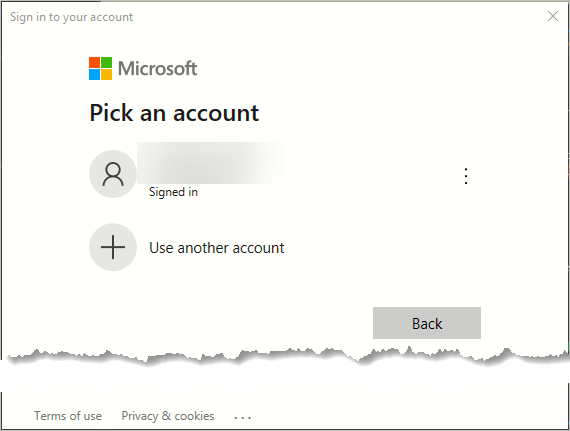
(메시지에 나오듯이) 당연한 결과이니 무시하시고, 이후 catch 내의 Program.PublicClientApp.AcquireTokenInteractive 메서드가 호출되면 이때 아래 화면과 같이 로그인할 Microsoft Account를 선택하는 창이 뜹니다.
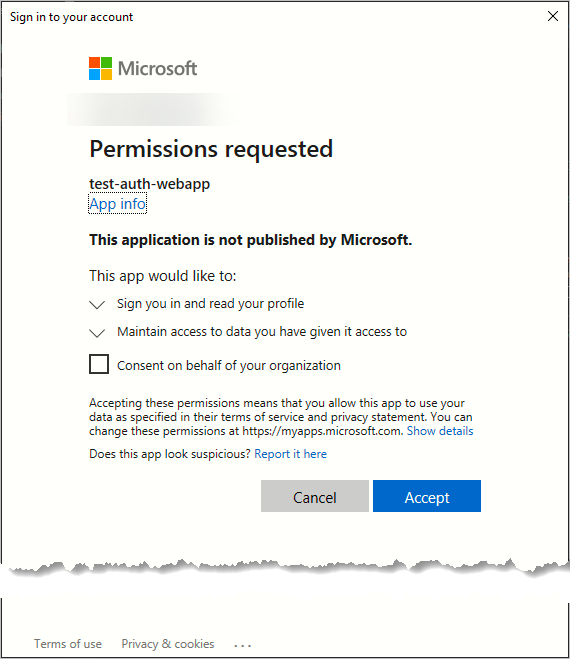
또한 권한 요청도 확인하고,
정상적으로 로그인 절차를 밟았으면 TokenCacheHelper.AfterAccessNotification의 실행으로,
public static void AfterAccessNotification(TokenCacheNotificationArgs args)
{
    // if the access operation resulted in a cache update
    if (args.HasStateChanged)
    {
        lock (FileLock)
        {
            // reflect changesgs in the persistent store
            File.WriteAllBytes(CacheFilePath,
                                ProtectedData.Protect(args.TokenCache.SerializeMsalV3(),
                                null, DataProtectionScope.CurrentUser));
        }
    }
}
로컬에는 EXE가 위치한 경로에 "WindowsFormsApp1.exe.msalcache.bin3" 파일이 암호화된 토큰 내용을 캐시하게 됩니다. 물론, 이후 다시 로그인을 시도하면 로컬에 캐시된 토큰을 복원해 Program.PublicClientApp.AcquireTokenSilent 호출이 (전에는 실패했지만) 성공하게 됩니다.
참고로, Program.PublicClientApp.AcquireTokenInteractive의 결과로는 다음과 같은 내용을 담고 있습니다.
-       authResult  {Microsoft.Identity.Client.AuthenticationResult}    Microsoft.Identity.Client.AuthenticationResult
        AccessToken "ey...[생략]...1x6g"  string
+       Account {Account username: testusr@test.com environment login.windows.net home account id: AccountId: 0000...[생략]...b66dad} Microsoft.Identity.Client.IAccount {Microsoft.Identity.Client.Account}
+       AuthenticationResultMetadata    {Microsoft.Identity.Client.AuthenticationResultMetadata}    Microsoft.Identity.Client.AuthenticationResultMetadata
+       ClaimsPrincipal {System.Security.Claims.ClaimsPrincipal}    System.Security.Claims.ClaimsPrincipal
+       CorrelationId   {97...[생략]...ce}    System.Guid
+       ExpiresOn   {2021-...[생략]...}  System.DateTimeOffset
+       ExtendedExpiresOn   {2021-...[생략]...}  System.DateTimeOffset
        IdToken "ey...[생략]...LYHQ"  string
        IsExtendedLifeTimeToken false   bool
+       Scopes  Count = 4   System.Collections.Generic.IEnumerable<string> {System.Collections.Generic.HashSet<string>}
        TenantId    "35...[생략]...70"    string
        TokenType   "Bearer"    string
        UniqueId    "2a...[생략]...58"    string
로그 아웃도 마저 구현해야겠지요.
private async void btnLogout_Click(object sender, EventArgs e)
{
    await Logout();
}

// Clear the token cache using MSAL.NET
// ; https://docs.microsoft.com/en-us/azure/active-directory/develop/msal-net-clear-token-cache
private async Task Logout()
{
    var accounts = await Program.PublicClientApp.GetAccountsAsync();
    if (accounts.Any())
    {
        try
        {
            await Program.PublicClientApp.RemoveAsync(accounts.FirstOrDefault());
            this.label1.Text = "User has signed-out";
        }
        catch (MsalException ex)
        {
            throw new Exception($"Error signing-out user: {ex.Message}");
        }
    }
}
단순히, 로컬에 캐시된 토큰 정보를 Program.PublicClientApp.GetAccountsAsync로 가져와서 있으면 Program.PublicClientApp.RemoveAsync를 호출합니다. 재미있는 것은, 여기서 RemoveAsync는 서버로의 호출을 포함하지 않고 단순히 TokenCacheHelper.AfterAccessNotification 메서드를 콜백해 토큰값이 삭제된 args.TokenCache.SerializeMsalV3() 데이터를 다시 캐시 파일에 쓰는 것으로 완료가 됩니다.
어쨌든, 도대체 내부에 어떤 일이 벌어지고 있는지는 알 수 없으나 ^^ 이렇게 Microsoft.Identity.Client 라이브러리의 도움으로 AAD와의 계정 연동을 쉽게 해결할 수 있습니다.
(
첨부 파일은 이 글의 예제 코드를 포함합니다.)
한 가지 개인적으로 풀리지 않는 문제가 있는데요, AcquireTokenSilent/AcquireTokenInteractive 호출이 성공했을 때 반환되는 AuthenticationResult의 Scopes 속성에는 다음의 4가지 값을 확인할 수 있습니다.
[0] "openid"    string
[1] "profile"   string
[2] "User.Read" string
[3] "email" string
여기서 문제는, 제가 설정한 "test-auth-webapp"에는 다음과 같이 API Permissions를 5개 추가했는데,
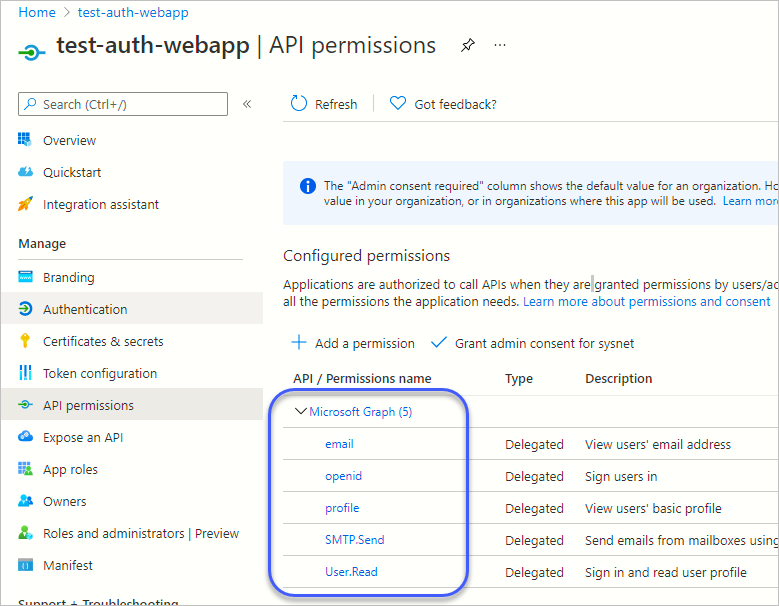
"SMTP.Send"가 빠져 있는 것입니다. 이후 계속해서 "test-auth-webapp"의 권한 조정을 해도 그 결과가 반영되지 않습니다. 아니... 그렇다면 권한 조정을 위해서는 기존 "test-auth-webapp"을 아예 삭제하고 다른 걸로 새로 만들어 응용 프로그램 측의 "Application (client) ID"를 다시 배포해야 하는 걸까요? (혹시 이에 대해 아시는 분은 덧글 부탁드립니다.)
또는, 권한 확인을 다시 한번 받도록 해야 하는데, Logout 후 다시 Login을 하면 언제나 로그인 창만 뜰 뿐 권한 확인을 묻는 창은 두 번 다시 뜨지 않습니다. 음... 권한 설정을 무효화시켜 다시 로그인을 할 때 권한 설정을 하는 창이 뜨도록 만들어야 하는데... 방법을 못 찾겠군요. ^^;
[이 글에 대해서 여러분들과 의견을 공유하고 싶습니다. 틀리거나 미흡한 부분 또는 의문 사항이 있으시면 언제든 댓글 남겨주십시오.]