C# - Azure AD 인증을 지원하는 ASP.NET Core/5+ 웹 애플리케이션 예제 구성
미리 말씀드리면, 이번엔 다음 글의 실습을 정리한 것입니다. ^^
How to implement Azure AD Authentication in ASP.NET Core 5.0 Web Application
; https://www.faciletechnolab.com/blog/2021/4/13/how-to-implement-azure-ad-authentication-in-aspnet-core-50-web-application
Azure AD는, 달리 말해서 기존의 Windows 서버에 있던 Active Directory의 Azure 버전이라고 보면 됩니다. 즉, Active Directory의 SaaS 버전이라고 볼 수 있는데 이에 대한 OAuth 인증 방식도 포함하고 있기 때문에 다른 응용 프로그램에서도 기존의 OAuth 방식대로 Azure AD의 인증 시스템을 연동할 수 있는 것입니다.
단지, 우리가 일반적으로 알고 있는 OAuth 인증을 제공하는 서비스(예를 들어, Facebook, Twitter, Kakao)들의 경우 대부분 해당 서비스에 가입하고 있는 사용자를 모두 인증해 주는 것인 반면, Azure AD의 경우에는 해당 Active Directory에 등록된 사용자들만 인증해준다는 차이점이 있습니다. 그런 관점에서 보면, 언제든 아주 쉽게 구성할 수 있는 OAuth 인증 서버라고 봐도 무방합니다.
Azure AD 프리 버전의 가격정책을 보면,
Azure Active Directory 가격
; https://azure.microsoft.com/ko-kr/pricing/details/active-directory/
가장 중요한 "디렉터리 개체"의 제한이 500,000개라고 하니 이는 웬만한 규모의 중소기업은 모두 소화할 수 있을 정도의 수치입니다. (50만 개까지 가능하지만, 그래도 기본 사용량은 5만 개로 제한되어 있으며 그 이상 필요하면 직접 문의를 해야 한다고 합니다.)
자, 그럼 우리도 무료 OAuth 인증 서버와 간단한 테스트 웹 앱을 하나 가져볼까요? ^^
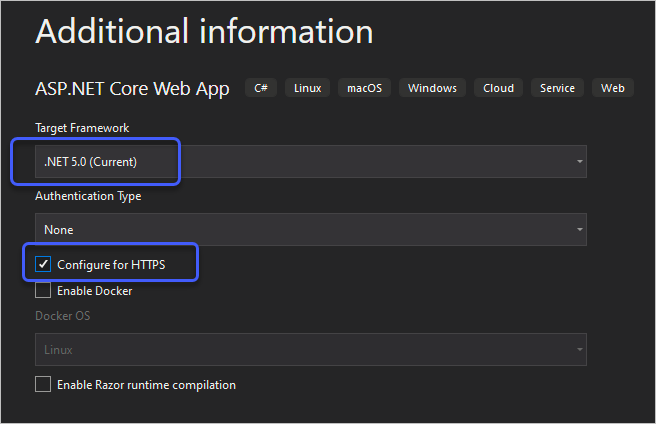
우선, 제목에서처럼 ASP.NET Core Web App을 .NET 5.0, "Configure for HTTPS" 옵션을 켜서 생성합니다.
이후 곧바로 F5 키를 눌러 실행하면 웹 브라우저가 뜨고 그때의 주소창에 있는 URL을 기억해 둡니다. (이 글에서의 예제는 "https://localhost:44356"이었습니다.)
그다음, Azure Portal에 방문해,
Microsoft Azure portal
; https://azure.microsoft.com/en-us/features/azure-portal/
; https://portal.azure.com/
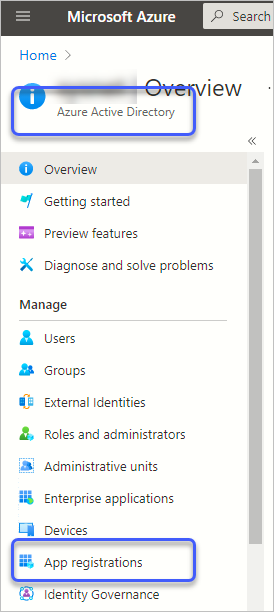
로그인하고 "Azure Active Directory"로 이동 후 좌측의 패널에서 (예전에는 "
Microsoft - My applications"로 제공하던) "App registrations" 메뉴를 선택해,
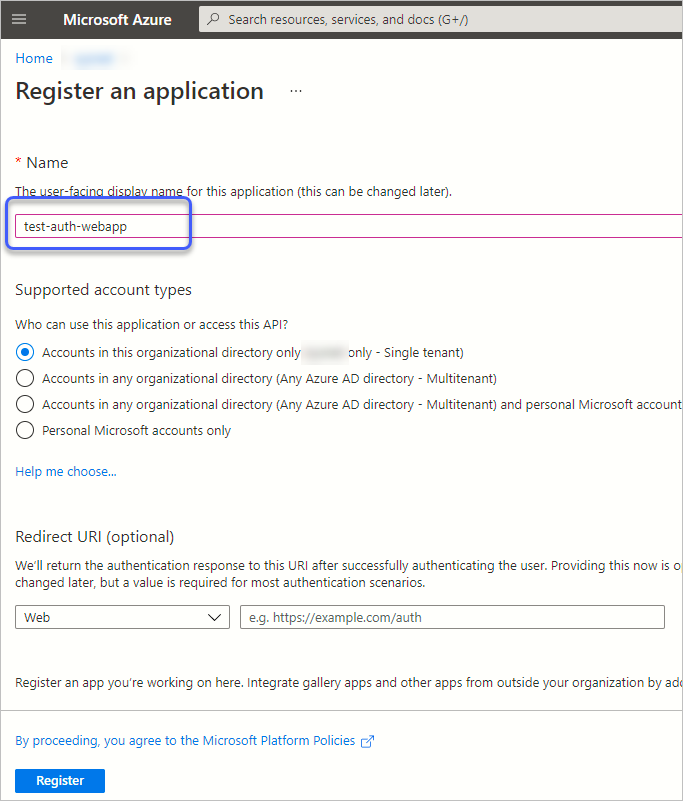
나오는 화면에서 "New registration" 링크를 클릭 후 "Name" 필드만 입력하고 "Register" 버튼을 누릅니다. (이때의 Name 필드에 입력한 값은, 이후 여러분이 만든 웹 사이트에서 로그인할 때 방문하는 Azure AD 측의 페이지에 출력됩니다.)
그럼 아래와 같은 화면으로 전환이 되고, 여기서 "Application (client) ID"와 "Directory (tenant) ID"를 복사합니다. (경험 많은 분은 아시겠지만, 바로 이 값들이 여타 OAuth 인증에서 필요로 하는 토큰 값들입니다.)
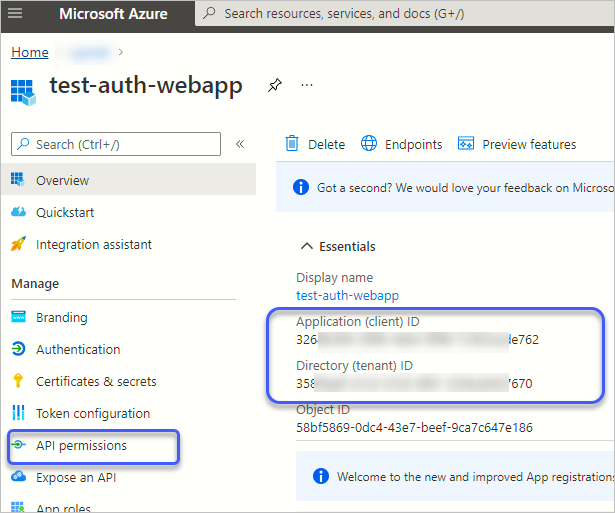
이제 좌측 패널의 "API permissions" 링크를 눌러 나오는 화면에서 "Microsoft Graph" 링크를 누르면,
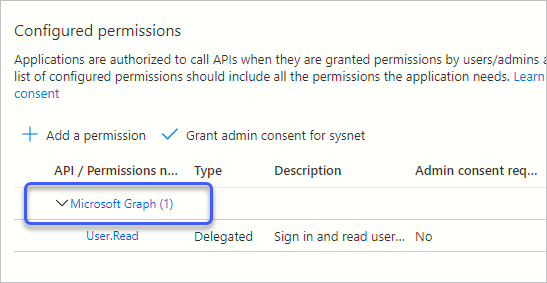
권한 편집을 할 수 있는데, 여기서 "OpenId permissions" 범주의 "openid"와 "profile" 옵션을 체크해 업데이트를 합니다.

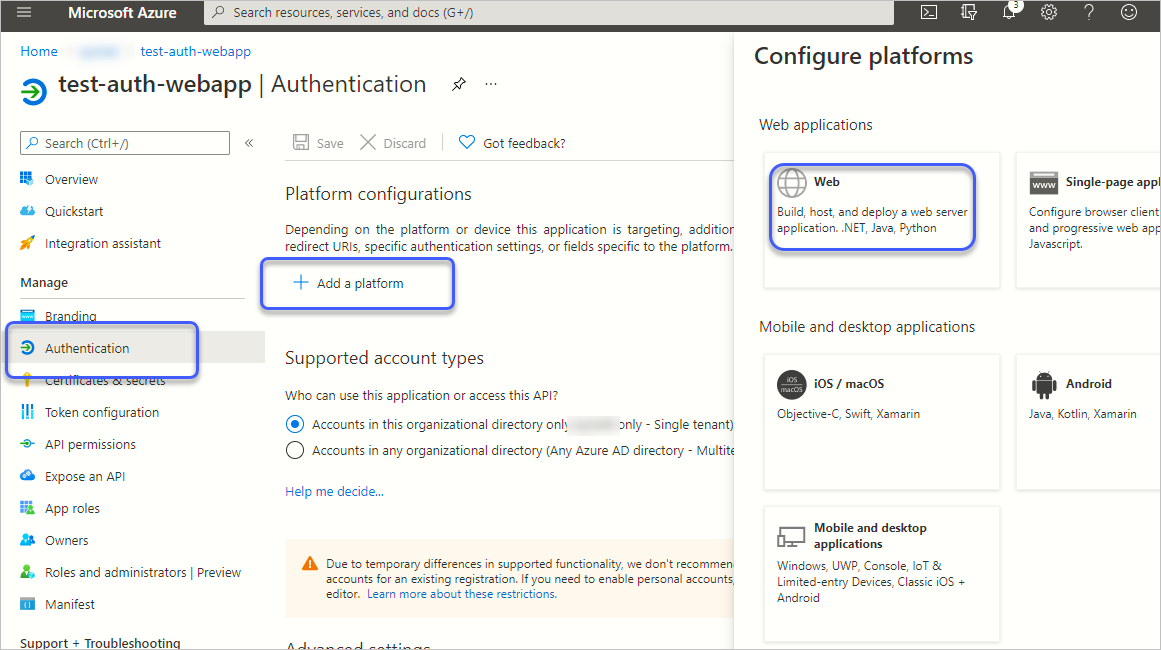
자, 이제 마지막 단계입니다. 좌측 패널에서 "Authentication"을 선택, "Platform configurations"에서 "Add a platform" 링크를 누르면 펼쳐지는 선택 항목에서 "Web"을 선택하고,
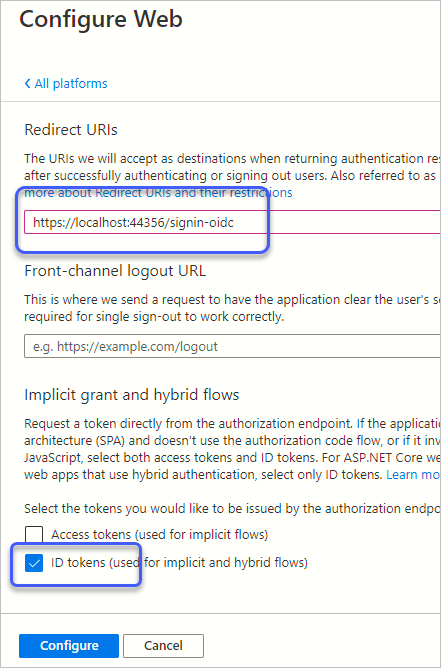
하단의 "ID tokens" 옵션과 함께 여러분이 개발하고 있는 웹 사이트의 URL에 "signin-oidc"를 더해 "Redirect URIs" 란에 입력합니다. (이 글의 테스트 앱은 "https://localhost:44356"으로 실행되므로 "https://localhost:44356/signin-oidc")
AAD(Azure Active Directory)의 설정을 마쳤으면, 다시 프로젝트로 돌아와 "appsettings.json" 파일에 AAD 인증에서 복사해 두었던 "Application (client) ID"와 "Directory (tenant) ID"를 다음과 같이 설정해 줍니다.
{
    "Logging": {
        "LogLevel": {
            "Default": "Information",
            "Microsoft": "Warning",
            "Microsoft.Hosting.Lifetime": "Information"
        }
    },
    "AllowedHosts": "*",
    "AzureAd": {
        "Instance": "https://login.microsoftonline.com/",
        "ClientId": "...your-client-id...",
        "TenantId": "...your-tenant-id..."
    }
}
그리고 AAD 인증에 대한 코드를 이미 구현하고 있는 패키지 2개를 추가하고,
// Microsoft identity platform and OpenID Connect protocol
// https://learn.microsoft.com/en-us/azure/active-directory/develop/v2-protocols-oidc

Install-Package Microsoft.AspNetCore.Authentication.OpenIdConnect
Install-Package Microsoft.Identity.Web
Startup.cs 파일에 ConfigureServices 메서드 내의 services.AddRazorPages 호출 이전 단계에 AddAuthentication, AddControllersWithViews 메서드 호출 코드를 추가합니다.
using Microsoft.AspNetCore.Authentication.OpenIdConnect;
using Microsoft.Identity.Web;

...[생략]...

        public void ConfigureServices(IServiceCollection services)
        {
            services.AddAuthentication(OpenIdConnectDefaults.AuthenticationScheme)
                    .AddMicrosoftIdentityWebApp(Configuration.GetSection("AzureAd"));

            services.AddControllersWithViews(options =>
            {
                var policy = new AuthorizationPolicyBuilder()
                    .RequireAuthenticatedUser()
                    .Build();
                options.Filters.Add(new AuthorizeFilter(policy));
            });

            services.AddRazorPages();
        }
...[생략]...
그다음 Configure 내에서는 app.UseAuthorization 호출 이전에 app.UseAuthentication 호출을 추가합니다.
public void Configure(IApplicationBuilder app, IWebHostEnvironment env)
{
    if (env.IsDevelopment())
    {
        app.UseDeveloperExceptionPage();
    }
    else
    {
        app.UseExceptionHandler("/Error");
        // The default HSTS value is 30 days. You may want to change this for production scenarios, see https://aka.ms/aspnetcore-hsts.
        app.UseHsts();
    }

    app.UseHttpsRedirection();
    app.UseStaticFiles();

    app.UseRouting();

    app.UseAuthentication();
    app.UseAuthorization();

    app.UseEndpoints(endpoints =>
    {
        endpoints.MapRazorPages();
    });
}
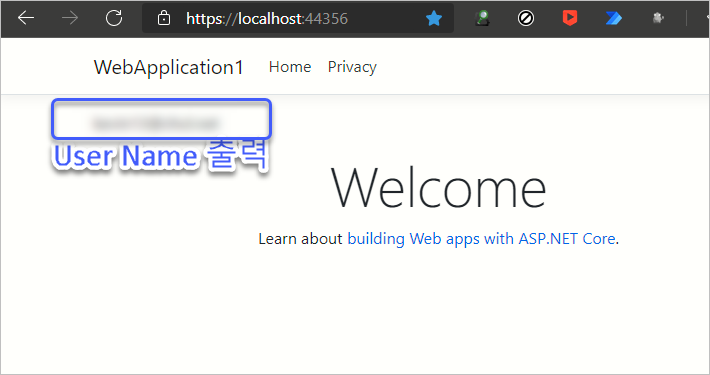
이게 끝입니다. 인증이 정상적으로 되었는지 테스트하기 위해 Index.cshtml에 로그인 계정의 이름을 출력하는 코드를 추가하고,
@page
@model IndexModel
@{
    ViewData["Title"] = "Home page";
}

@if(User.Identity.IsAuthenticated)
{
    <p>
        @User.Identity.Name
    </p>
}

<div class="text-center">
    <h1 class="display-4">Welcome</h1>
    <p>Learn about <a href="https://docs.microsoft.com/aspnet/core?WT.mc_id=DT-MVP-4038148">building Web apps with ASP.NET Core</a>.</p>
</div>
빌드 후 실행하면 app.UseAuthentication 호출로 인해 곧바로 인증 페이지로 넘어가는데, AAD에 등록된 계정으로 로그인이 되면 최초에는 이러한 승인을 허가하는 다음의 화면이 보이게 됩니다.
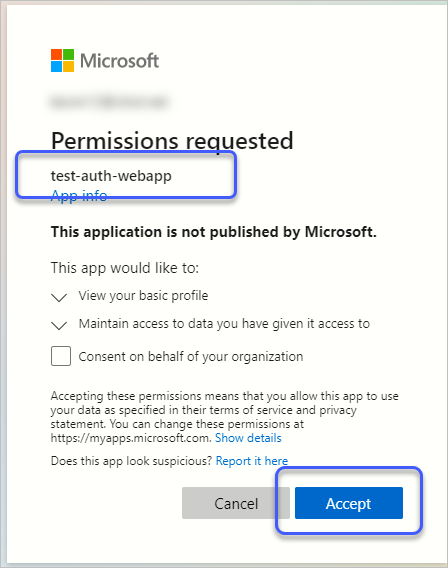
"Accept"를 눌러 진행하면 화면은 다시 웹 애플리케이션으로 넘어가 index.cshtml에 추가해 두었던 User.Identity.Name 항목에 값이 들어가게 됩니다.
이후에는 보관된 auth cookie로 인해 해당 페이지를 재방문하면 곧바로 로그인이 완료된 페이지로 진입이 됩니다. 만약 로그아웃을 명시적으로 하고 싶다면 다음과 같이 "HttpContext.SignOutAsync" 메서드를 호출하면 됩니다.
using Microsoft.AspNetCore.Authentication;
using Microsoft.AspNetCore.Mvc.RazorPages;
using Microsoft.Extensions.Logging;
using System.Threading.Tasks;

namespace WebApplication1.Pages
{
    public class IndexModel : PageModel
    {
        private readonly ILogger _logger;

        public IndexModel(ILogger logger)
        {
            _logger = logger;
        }

        public async Task OnGet()
        {
            if (this.Request.Query.ContainsKey("o") == true)
            {
                // CookieAuthenticationDefaults.AuthenticationScheme == "Cookies"
                await HttpContext.SignOutAsync(CookieAuthenticationDefaults.AuthenticationScheme);
                await HttpContext.SignOutAsync("OpenIdConnect");
                return;
            }

            foreach (System.Security.Claims.Claim claim in User.Claims)
            {
                string text = claim.Value;
                System.Diagnostics.Trace.WriteLine($"{claim.Type}: {claim.Value}");
            }
            /* 출력 결과
            aio: AW...[136 글자 생략]..../u
            http://schemas.microsoft.com/identity/claims/identityprovider: https://sts.windows.net/91...[guid_중간_생략]...ad/
            name: TestUsr
            http://schemas.microsoft.com/identity/claims/objectidentifier: 2a...[guid_중간_생략]...58
            preferred_username: testusr@test.net
            prov_data: {"at":true,"prov":"...","altsecid":"HUE...[36 글자 생략]...R4nw"}
            rh: 0...[50 글자 생략]...IA.
            http://schemas.xmlsoap.org/ws/2005/05/identity/claims/nameidentifier: FN....[39 글자 생략]...i8
            http://schemas.microsoft.com/identity/claims/tenantid: 3...[tenant_id 생략]...0
            uti: _A...[19 글자 생략]...A
            */
        }
    }
}
위와 같이 구현했으니, "https://localhost:44356/?o"로 호출을 하면 SignOutAsync가 호출되고 아래와 같은 화면으로 넘어가 어떤 계정을 로그아웃 시킬지 선택하게 됩니다. (하나밖에 없는데, 굳이 선택을... ^^;)
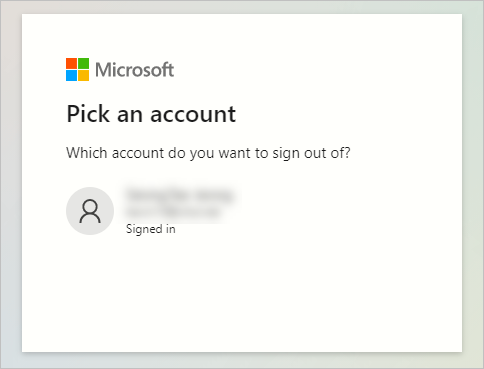
이것은, 해당 웹 사이트에서만 로그아웃 되는 정도가 아니라 그 계정 자체가 로그아웃되므로 Single-Sign-On이 되는 다른 사이트를 방문하려는 경우에도 이젠 다시 로그인을 진행해야 합니다.
(
첨부 파일은 이 글의 예제 코드를 포함합니다.)
로그인 화면에서 다음과 같은 오류가 발생한다면?
AADSTS700054: response_type 'id_token' is not enabled for the application.
Azure AD의 Authentication 설정에서 "Platform configurations"의 "Add a platform"으로 "Web" 설정이 등록되지 않았기 때문입니다.
동일한 오류 번호(AADSTS700054)이지만 위의 오류가 로그인 화면이 아닌, 로그인 처리 중에 발생할 수도 있습니다.
OpenIdConnectProtocolException: Message contains error: 'unsupported_response_type', error_description: 'AADSTS700054: response_type 'id_token' is not enabled for the application. Trace ID: 3904a6e0-e3ed-40f5-8e84-b7899b985700 Correlation ID: def94a1b-0a07-40c7-b60f-7b344c90fcc9 Timestamp: 2021-04-23 13:02:32Z', error_uri: '
https://login.microsoftonline.com/error?code=700054'.
이런 경우에는, Authentication 설정의 platform 등록 시 "ID tokens" 옵션을 선택하지 않았기 때문입니다. 따라서 해당 옵션을 활성화시키면 됩니다. (이 글에서 "Configure Web" 화면이 있는 그림의 하단에 있는 "ID tokens (used for implicit and hybrid flows)" 옵션입니다.)
로그인 시 다음과 같은 오류가 발생한다면?
AADSTS50020: User account 'testusr@testdomain.com' from identity provider 'live.com' does not exist in tenant '...' and cannot access the application '3264...[생략]...e762'(test-auth-webapp) in that tenant. The account needs to be added as an external user in the tenant first. Sign out and sign in again with a different Azure Active Directory user account.
선택한 사용자 계정이 테넌트 '...'에 없어 이 테넌트의 애플리케이션 '3264...[생략]...e762'에 액세스할 수 없습니다. 이 계정은 테넌트의 외부 사용자로 먼저 추가되어야 합니다. 다른 계정을 사용하세요.
메시지의 의미에 따라, 해당 Microsoft 계정은 여러분의 Azure AD에 등록되지 않은 계정이기 때문입니다. 추가하고 나면 이 문제는 해결됩니다.
[이 글에 대해서 여러분들과 의견을 공유하고 싶습니다. 틀리거나 미흡한 부분 또는 의문 사항이 있으시면 언제든 댓글 남겨주십시오.]