.NET으로 구현하는 OpenGL (7), (8) - Matrices and Uniform Variables, Model, View & Projection Matrices
아래의 글에 이어,
.NET으로 구현하는 OpenGL (6) - Texturing
; https://www.sysnet.pe.kr/2/0/11775
7회 강좌는,
OpenGL 3D Game Tutorial 7: Matrices & Uniform Variables
; https://youtu.be/oc8Yl4ZruCA
shader에 VAO의 슬롯을 통해 전달한 데이터 외에 또 다른 변수를 전달하는 방법을 설명하고 있습니다. 가령, 지난 예제의 vertex shader에 다음과 같은 추가 변수를 전달하려는 경우,
#version 400 core

/* layout(location = 0) */ in vec3 _position;
/* layout(location = 1) */ in vec2 _textureCoords;

out vec2 _pass_textureCoords;

uniform mat4 _transformationMatrix;

void main(void)
{
    gl_Position  = vec4(_position, 1.0);
    _pass_textureCoords = _textureCoords;
}
방법은, 해당
"uniform" 형식의 변수 이름으로 위치를 반환받아 그것과 연결해주는 것입니다. 따라서 ShaderProgram 타입에 다음의 메서드를 추가합니다.
// ShaderProgram.cs

protected abstract void getAllUniformLocations();

protected int getUniformLocation(string uniformName)
{
    return Gl.GetUniformLocation(_programID, uniformName);
}
그리고 getUniformLocation으로 반환받은 위치 정숫값에 값을 설정할 수 있는 래퍼 함수들도 함께 ShaderProgram.cs에 만들어 줍니다.
// ShaderProgram.cs

protected void loadFloat(int location, float value)
{
    Gl.Uniform1f(location, 1, ref value);
}

protected void loadVector(int location, Vertex3f value)
{
    Gl.Uniform3f(location, 1, ref value);
}

protected void loadBoolean(int location, bool value)
{
    float toLoad = (value == true) ? 1.0f : 0.0f;
    Gl.Uniform1f(location, 1, ref toLoad);
}

protected void loadMatrix(int location, Matrix4x4 matrix)
{
    Gl.UniformMatrix4(location, false, matrix.Buffer);
}
(*
기억나실지 모르겠지만 VAO로 전달한 값도 Gl.GetAttribLocation으로 layout의 location 값을 가져와 그걸로 바인딩할 수도 있습니다.)
기반 메서드가 준비되었으니, 이제 원하는 값을 shader에 전달할 수 있습니다. 전달할 값들을 관리하기 위해 ShaderProgram 타입에 getAllUniformLocations 추상 메서드를 둔 것이니, 이를 상속받은 StaticShader에서 다음과 같이 구현해 줄 수 있습니다.
// StaticShader.cs

private int _loc_transformationMatrix;

protected override void getAllUniformLocations()
{
    _loc_transformationMatrix  = base.getUniformLocation("_transformationMatrix");
}

public void loadTransformationMatrix(Matrix4x4 matrix)
{
    base.loadMatrix(_loc_transformationMatrix, matrix);
}
이제 외부에서 StaticShader.loadTransformationMatrix 메서드를 호출해 4x4 행렬 값을 설정할 수 있고 이를 GLSL shader 코드에서 사용할 수 있습니다.
7회 강좌에서는 이와 함께 VAO를 공유해 다수의 3D 객체를 그리는 방법을 설명하고 있습니다. 그러니까, "positions", "textureCoords" 슬롯으로 초기화된 한 개의 VAO 객체를 마련하고, 그것을 이용해 좌표만 달리해 여러 개의 3D 객체를 화면에 그리는 것입니다. 그러니까, 이제부터 VAO 내의 "positions" 값은 해당 3D 객체의 Local 좌표계를 따르는 값이 담겨 있는 것이고, 외부에서 World 행렬을 shader에 전달해 동일한 VAO로 다수의 객체를 그리는 작업을 한다는 것입니다.
이를 위해 우선,
TRS 값을 담는 World 행렬을 구성하는 메서드를 하나 준비합니다.
// Maths.cs

using OpenGL;

namespace GameApp.Helper
{
    public class Maths
    {
        static Matrix4x4 _identityMatrix4x4;
        public static Matrix4x4 IdentityMatrix4x4
        {
            get { return _identityMatrix4x4; }
        }

        static Maths()
        {
            _identityMatrix4x4 = new Matrix4x4();
            _identityMatrix4x4.SetIdentity();
        }

        public static Matrix4x4 createTransformationMatrix(Vertex3f translation, float rx, float ry, float rz, float scale)
        {
            ModelMatrix matrix = new ModelMatrix(IdentityMatrix4x4);

            matrix.Translate(translation);
            matrix.RotateX(rx);
            matrix.RotateY(ry);
            matrix.RotateZ(rz);
            matrix.Scale(scale);

            return matrix;
        }
    }
}
그리고 shader 코드에 이 행렬을 전달할 것이고, 당연히 그 행렬을 반영한 3D 객체를 그리도록 코드가 변경되어야 합니다.
#version 400 core

/* layout(location = 0) */ in vec3 _position;
/* layout(location = 1) */ in vec2 _textureCoords;

out vec2 _pass_textureCoords;

uniform mat4 _transformationMatrix;

void main(void)
{
    gl_Position  = _transformationMatrix * vec4(_position, 1.0);
    _pass_textureCoords = _textureCoords;
}
여기까지의 코드 진행을 담은 것이 7회 강좌입니다. 정리해 보면, shader에 외부 변수를 전달할 수 있는 방법과 함께 그 첫 번째 사례로 World 행렬을 다루고 있는 것입니다. (물론 아직 연결 고리가 마무리된 것은 아니기 때문에 현재의 코드 변경으로는 실행해도 별다른 변화가 없습니다.)
8회 강좌는,
OpenGL 3D Game Tutorial 8: Model, View & Projection Matrices
; https://www.youtube.com/watch?v=50Y9u7K0PZo

Full code download for this episode:
; https://www.dropbox.com/sh/1glu6x4ajd6y4mw/AAB2jWQk3AuCnVQfORhmSPiXa?dl=0
7회의 World 행렬을 반영한 코드를 마무리하고 이어서 나머지 View(Camera), Projection 행렬을 역순으로 다룹니다. 자, 그럼 어서 지난 7회의 실행 결과를 눈으로 확인할 수 있도록 마저 코드를 완성해 보겠습니다.
일단 (texture와 연결된) VAO와 연결해 TRS 정보를 담고 있는 Entity 타입을 만드는 것으로 시작합니다.
// Entity.cs

using GameApp.Model;
using OpenGL;

namespace GameApp.Entities
{
    public class Entity
    {
        TextureModel _model;
        public TextureModel Model { get { return _model; } }

        Vertex3f _position;
        public Vertex3f Position { get { return _position; } }

        float _rotX;
        public float RotX { get { return _rotX; } }

        float _rotY;
        public float RotY { get { return _rotY; } }

        float _rotZ;
        public float RotZ { get { return _rotZ; } }

        float _scale;
        public float Scale { get { return _scale; } }

        public Entity(TextureModel model, Vertex3f position, float rotX, float rotY, float rotZ, float scale)
        {
            _model = model;
            _position = position;
            _rotX = rotX;
            _rotY = rotY;
            _rotZ = rotZ;
            _scale = scale;
        }

        public void increasePosition(float dx, float dy, float dz)
        {
            _position.x += dx;
            _position.y += dy;
            _position.z += dz;
        }

        public void increaseRotation(float dx, float dy, float dz)
        {
            _rotX += dx;
            _rotY += dy;
            _rotZ += dz;
        }
    }
}
그리고 Renderer에서는 당연히 위의 Entity를 그릴 수 있어야 하며 이때 World 행렬을 shader에 넘겨주는 일도 함께 합니다.
public void Render(Entity entity, StaticShader shader)
{
    TextureModel model = entity.Model;
    RawModel rawModel = model.RawModel;

    Gl.BindVertexArray(rawModel.VaoID);
    Gl.EnableVertexAttribArray(0);
    Gl.EnableVertexAttribArray(1);

    Matrix4x4 transformationMatrix = Maths.createTransformationMatrix(entity.Position, entity.RotX, entity.RotY, entity.RotZ, entity.Scale);
    shader.loadTransformationMatrix(transformationMatrix);

    Gl.ActiveTexture(TextureUnit.Texture0);
    Gl.BindTexture(TextureTarget.Texture2d, model.Texture.ID);
    Gl.DrawElements(PrimitiveType.Triangles, rawModel.VertexCount, DrawElementsType.UnsignedInt, IntPtr.Zero);

    Gl.DisableVertexAttribArray(0);
    Gl.DisableVertexAttribArray(1);
    Gl.BindVertexArray(0);
}
마지막으로 Game Loop 측에서는 Entity를 생성해 이것저것 제어를 해줍니다.
Entity _entity;

private void glControl_ContextCreated(object sender, OpenGL.GlControlEventArgs e)
{
    // ...[생략]...

    _entity = new Entity(_staticModel, new Vertex3f(-1, 0, 0), 0, 0, 0, 1);
}

private void glControl_ContextUpdate(object sender, GlControlEventArgs e)
{
    _entity.increasePosition(0.002f, 0f, 0f);
    _entity.increaseRotation(0, 1, 0);
}

private void glControl_Render(object sender, OpenGL.GlControlEventArgs e)
{
    Control senderControl = (Control)sender;
    Gl.Viewport(0, 0, senderControl.ClientSize.Width, senderControl.ClientSize.Height);

    _renderer.Prepare();
    _shader.Start();
    _renderer.Render(_entity, _shader);
    _shader.Stop();

    _displayManager.updateDisplay();
}
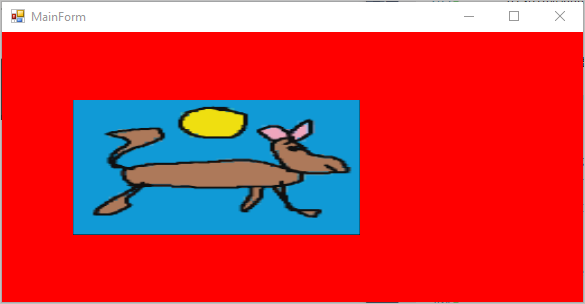
위와 같이 하면, 최초 (-1, 0, 0) 좌표에 객체가 생성되고 시간이 흐르면서 x-축 방향으로 0.002만큼 y-축을 기준으로 회전하면서 이동합니다.
이것으로 7회부터 이어진 코드 변경이 일단락되었고 8회 내용의 나머지는 Projection, View 행렬을 소개합니다.
World 행렬을 다룬 마지막 코드에서, z 축 방향으로 멀어지도록 다음과 같이 코드를 변경해 봅니다.
Entity _entity;

private void glControl_ContextCreated(object sender, OpenGL.GlControlEventArgs e)
{
    // ...[생략]...

    _entity = new Entity(_staticModel, new Vertex3f(0, 0, 0), 0, 0, 0, 1);
}

private void glControl_ContextUpdate(object sender, GlControlEventArgs e)
{
    _entity.increasePosition(0, 0, -0.002f);
}
하지만 실제로 저렇게 바꾸고 실행해 보면 그림은 중앙에서 고정한 체로 움직이지 않습니다. 사실 3D 좌표의 z 값은 World 행렬에 있는 값일 뿐, 이를 2D 윈도우 상에 반영하려면 투영 변환을 거쳐야만 합니다. 그래서 이제 원근을 반영하기 위한
Projection 구현으로 넘어갑니다. 먼저 vertex shader의 변경을 시작으로,
#version 400 core

/* layout(location = 0) */ in vec3 _position;
/* layout(location = 1) */ in vec2 _textureCoords;

out vec2 _pass_textureCoords;

uniform mat4 _transformationMatrix;
uniform mat4 _projectionMatrix;

void main(void)
{
    gl_Position  = _projectionMatrix * _transformationMatrix * vec4(_position, 1.0);
    _pass_textureCoords = _textureCoords;
}
StaticShader 타입에도 바인딩 변수 관련 코드를 넣고,
namespace GameApp
{
    public class StaticShader : ShaderProgram
    {
        // ...[생략]...

        int _loc_transformationMatrix;
        int _loc_projectionMatrix;

        public StaticShader() : base(VERTEX_FILE, FRAGMENT_FILE)
        {
        }

        // ...[생략]...

        protected override void getAllUniformLocations()
        {
            _loc_transformationMatrix  = base.getUniformLocation("_transformationMatrix");
            _loc_projectionMatrix = base.getUniformLocation("_projectionMatrix");
        }

        // ...[생략]...

        public void loadProjectionMatrix(Matrix4x4 matrix)
        {
            base.loadMatrix(_loc_projectionMatrix, matrix);
        }
    }
}
Projection Matrix의 경우 3D 객체마다 바뀌는 것은 아니므로 행렬 자체의 관리는 Renderer에서 처리합니다.
// Renderer.cs

namespace GameApp
{
    class Renderer
    {
        const float FOV = 70;
        const float NEAR_PLANE = 0.1f;
        const float FAR_PLANE = 1000f;

        ProjectionMatrix _projectionMatrix;
        int _clientWidth;
        int _clientHeight;

        float AspectRatio
        {
            get { return (float)_clientWidth / (float)_clientHeight; }
        }

        public Renderer(StaticShader shader, int width, int height)
        {
            SetViewRect(width, height);

            shader.Start();
            shader.loadProjectionMatrix(_projectionMatrix);
            shader.Stop();
        }

        public void SetViewRect(int width, int height)
        {
            if (_clientWidth == width && _clientHeight == height)
            {
                return;
            }

            _clientWidth = width;
            _clientHeight = height;

            createProjectionMatrix();
        }

        public void Prepare()
        {
            Gl.ClearColor(1, 0, 0, 1);
            Gl.Clear(ClearBufferMask.ColorBufferBit);

            Gl.Viewport(0, 0, _clientWidth, _clientHeight);
        }

        void createProjectionMatrix()
        {
            _projectionMatrix = new PerspectiveProjectionMatrix(FOV, AspectRatio, NEAR_PLANE, FAR_PLANE);
        }

        public void Render(Entity entity, StaticShader shader)
        {
            TextureModel model = entity.Model;
            RawModel rawModel = model.RawModel;

            Gl.BindVertexArray(rawModel.VaoID);
            Gl.EnableVertexAttribArray(0);
            Gl.EnableVertexAttribArray(1);

            Matrix4x4 transformationMatrix = Maths.createTransformationMatrix(entity.Position, entity.RotX, entity.RotY, entity.RotZ, entity.Scale);
            shader.loadTransformationMatrix(transformationMatrix);

            Gl.ActiveTexture(TextureUnit.Texture0);
            Gl.BindTexture(TextureTarget.Texture2d, model.Texture.ID);
            Gl.DrawElements(PrimitiveType.Triangles, rawModel.VertexCount, DrawElementsType.UnsignedInt, IntPtr.Zero);

            Gl.DisableVertexAttribArray(0);
            Gl.DisableVertexAttribArray(1);
            Gl.BindVertexArray(0);
        }
    }
}
개별 3D 객체의 경우 GAME LOOP인 Render 메서드에서 매번 생성했던 반면, 투영 행렬은 뷰 자체의 정보에 기반을 두므로 한 번만 생성해 주면 됩니다. (또는 윈도우의 크기와 같은 뷰에 해당하는 정보가 바뀌었을 때.)
마지막으로 이를 MainForm에 반영하면,
private void glControl_ContextCreated(object sender, OpenGL.GlControlEventArgs e)
{
    GlControl glControl = (GlControl)sender;
    _displayManager.createDisplay(glControl);

    bool result = Soil.NET.WrapSOIL.Initialize();
    if (result == false)
    {
        MessageBox.Show("SOIL: Not initialized: " + Soil.NET.WrapSOIL.GetSoilLastError());
        return;
    }

    _loader = new Loader();
    _model = _loader.loadToVAO(_vertices, _textureCoords, _indices);
    _texture = new ModelTexture(_loader.loadTexture("image"));
    _staticModel = new TextureModel(_model, _texture);
    _shader = new StaticShader();
    _renderer = new Renderer(_shader, glControl.ClientSize.Width, glControl.ClientSize.Height);

    _entity = new Entity(_staticModel, new Vertex3f(0, 0, -1), 0, 0, 0, 1);
}

private void glControl_ContextUpdate(object sender, GlControlEventArgs e)
{
    Control glControl = (Control)sender;

    _renderer.SetViewRect(glControl.ClientSize.Width, glControl.ClientSize.Height);
    _entity.increasePosition(0, 0, -0.1f);
}

private void glControl_Render(object sender, OpenGL.GlControlEventArgs e)
{
    _renderer.Prepare();
    _shader.Start();
    _renderer.Render(_entity, _shader);
    _shader.Stop();

    _displayManager.updateDisplay();
}
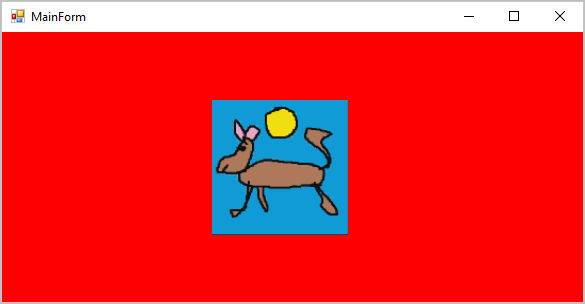
실행했을 때 물체가 중앙에 나타난 이후 시간이 지나면서 화면 안쪽(z 축)으로 멀어져 가는 것을 볼 수 있습니다. 이것으로 Projection 행렬도 다루게 된 것입니다.
자, 이제 8회 강좌의 마지막으로 View(Camera) 행렬이 나옵니다. 이를 위해 Camera 타입을 추가하고,
using OpenGL;
using SFML.Window;

namespace GameApp.Entities
{
    public class Camera
    {
        Vertex3f _position = new Vertex3f(0, 0, 0);
        public Vertex3f Position { get { return _position; } }

        float _pitch;
        public float Pitch { get { return _pitch; } }

        float _yaw;
        public float Yaw { get { return _yaw; } }

        float _roll;
        public float Roll { get { return _roll; } }

        public Camera()
        {
        }

        public void Move()
        {
            if (Keyboard.IsKeyPressed(Keyboard.Key.W))
            {
                _position.z -= 0.02f;
            }

            if (Keyboard.IsKeyPressed(Keyboard.Key.S))
            {
                _position.z += 0.02f;
            }

            if (Keyboard.IsKeyPressed(Keyboard.Key.D))
            {
                _position.x += 0.02f;
            }

            if (Keyboard.IsKeyPressed(Keyboard.Key.A))
            {
                _position.x -= 0.02f;
            }
        }
    }
}
이 정보를 바탕으로 View 행렬을 생성하는 메서드를 만듭니다.
// Maths.cs

public static Matrix4x4 createViewMatrix(Camera camera)
{
    ModelMatrix matrix = new ModelMatrix(IdentityMatrix4x4);

    matrix.Rotate(new Quaternion(new Vertex3f(1, 0, 0), camera.Pitch));
    matrix.Rotate(new Quaternion(new Vertex3f(0, 1, 0), camera.Yaw));

    Vertex3f cameraPos = camera.Position;
    Vertex3f negativeCameraPos = new Vertex3f(-cameraPos.x, -cameraPos.y, -cameraPos.z);
    matrix.Translate(negativeCameraPos);

    return matrix;
}
남은 작업은 View 행렬을 shader 코드에서 사용하고,
#version 400 core

/* layout(location = 0) */ in vec3 _position;
/* layout(location = 1) */ in vec2 _textureCoords;

out vec2 _pass_textureCoords;

uniform mat4 _transformationMatrix;
uniform mat4 _projectionMatrix;
uniform mat4 _viewMatrix;

void main(void)
{
    gl_Position  = _projectionMatrix * _viewMatrix * _transformationMatrix * vec4(_position, 1.0);
    _pass_textureCoords = _textureCoords;
}
연결해 주면 됩니다.
namespace GameApp
{
    public class StaticShader : ShaderProgram
    {
        // ...[생략]...

        int _loc_transformationMatrix;
        int _loc_projectionMatrix;
        int _loc_viewMatrix;

        // ...[생략]...

        protected override void getAllUniformLocations()
        {
            _loc_transformationMatrix  = base.getUniformLocation("_transformationMatrix");
            _loc_projectionMatrix = base.getUniformLocation("_projectionMatrix");
            _loc_viewMatrix = base.getUniformLocation("_viewMatrix");
        }

        // ...[생략]...

        public void loadViewMatrix(Camera camera)
        {
            Matrix4x4 viewMatrix = Maths.createViewMatrix(camera);
            base.loadMatrix(_loc_viewMatrix, viewMatrix);
        }
    }
}
준비가 모두 끝났으니, 실제 camera 객체를 생성/사용합니다.
namespace GameApp
{
    public partial class MainForm : Form
    {
        Camera _camera;

        // ...[생략]...

        private void glControl_ContextCreated(object sender, OpenGL.GlControlEventArgs e)
        {
            // ...[생략]...

            _camera = new Camera();
            _entity = new Entity(_staticModel, new Vertex3f(0, 0, -1), 0, 0, 0, 1);
        }

        private void glControl_ContextUpdate(object sender, GlControlEventArgs e)
        {
            Control glControl = (Control)sender;

            _renderer.SetViewRect(glControl.ClientSize.Width, glControl.ClientSize.Height);
            _camera.Move();
        }

        // ...[생략]...

        private void glControl_Render(object sender, OpenGL.GlControlEventArgs e)
        {
            _renderer.Prepare();
            _shader.Start();

            _shader.loadViewMatrix(_camera);

            _renderer.Render(_entity, _shader);
            _shader.Stop();

            _displayManager.updateDisplay();
        }
    }
}
실행하고 W 키를 누르면 대상으로부터 멀어지고, S 키를 누르면 가까워집니다. A 키를 누르면 시각적으로 왼쪽으로 움직이는 것처럼 이동하고 D 키를 누르면 오른쪽으로 이동하는 효과가 납니다.
이번 회는 내용이 길군요. ^^ 8회의 마지막에서는 보너스라고 해야 할지, 다음의 Cube Model 데이터로,
// https://www.dropbox.com/s/xcq0xa3yqr4vmh8/cube vertices data.txt?dl=0

float[] vertices = {
				-0.5f,0.5f,-0.5f,
				-0.5f,-0.5f,-0.5f,
				0.5f,-0.5f,-0.5f,
				0.5f,0.5f,-0.5f,

				-0.5f,0.5f,0.5f,
				-0.5f,-0.5f,0.5f,
				0.5f,-0.5f,0.5f,
				0.5f,0.5f,0.5f,

				0.5f,0.5f,-0.5f,
				0.5f,-0.5f,-0.5f,
				0.5f,-0.5f,0.5f,
				0.5f,0.5f,0.5f,

				-0.5f,0.5f,-0.5f,
				-0.5f,-0.5f,-0.5f,
				-0.5f,-0.5f,0.5f,
				-0.5f,0.5f,0.5f,

				-0.5f,0.5f,0.5f,
				-0.5f,0.5f,-0.5f,
				0.5f,0.5f,-0.5f,
				0.5f,0.5f,0.5f,

				-0.5f,-0.5f,0.5f,
				-0.5f,-0.5f,-0.5f,
				0.5f,-0.5f,-0.5f,
				0.5f,-0.5f,0.5f
		};

float[] textureCoords = {

				0,0,
				0,1,
				1,1,
				1,0,
				0,0,
				0,1,
				1,1,
				1,0,
				0,0,
				0,1,
				1,1,
				1,0,
				0,0,
				0,1,
				1,1,
				1,0,
				0,0,
				0,1,
				1,1,
				1,0,
				0,0,
				0,1,
				1,1,
				1,0
		};


int[] indices = {
				0,1,3,
				3,1,2,
				4,5,7,
				7,5,6,
				8,9,11,
				11,9,10,
				12,13,15,
				15,13,14,
				16,17,19,
				19,17,18,
				20,21,23,
				23,21,22
		};
회전을 시키는 예제가 나옵니다.
private void glControl_ContextCreated(object sender, OpenGL.GlControlEventArgs e)
{
    // ...[생략]...
    _entity = new Entity(_staticModel, new Vertex3f(0, 0, -5), 0, 0, 0, 1);
}

private void glControl_ContextUpdate(object sender, GlControlEventArgs e)
{
    Control glControl = (Control)sender;

    // ...[생략]...

    _entity.increaseRotation(1, 1, 0);

    _camera.Move();
}
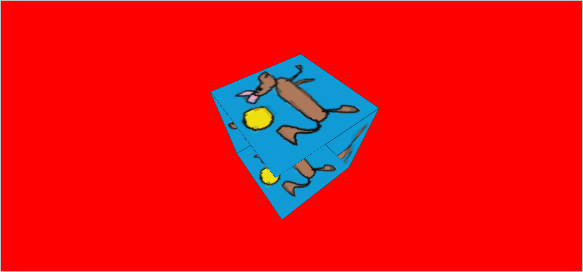
코드 변경 후 실행하면, 다음과 같이 큐브의 앞면에 가려진 뒷면까지 모두 그려져서 의도치 않은 결과를 얻게 됩니다.
이런 문제를 없애려면 DepthBuffer를 도입해야 하는데, 다음과 같이 DepthTest 옵션과 DepthBufferBit를 설정해야 합니다.
public void Prepare()
{
    Gl.Viewport(0, 0, _clientWidth, _clientHeight);

    Gl.Enable(EnableCap.DepthTest);
    Gl.Clear(ClearBufferMask.ColorBufferBit | ClearBufferMask.DepthBufferBit);
    Gl.ClearColor(1, 0, 0, 1);
}

// DepthTest 옵션이 설정되어 있는지 검사하는 코드
public bool IsEnabledDepthTest()
{
    ulong[] values = new ulong[1];
    Gl.GetIntegerNV((int)GetPName.DepthTest, values);

    return values[0] == 1;
}
이와 함께 OpenGL.NET의 경우 GlControl의 DepthBits 속성을 바꿔야만 합니다.
public MainForm()
{
    InitializeComponent();
    // 이렇게 코드로 설정하거나, 또는 Form 위의 컨트롤에 대해 속성 창을 통해 변경
    this.glControl.DepthBits = ((uint)(24u));
}
이제 실행해 주면, DepthTest에 의해 앞쪽에서 렌더링된 물체의 후방에 있는 객체는 그려지지 않게 되어 다음과 같이 의도한 바로 그 큐브가 그려집니다.
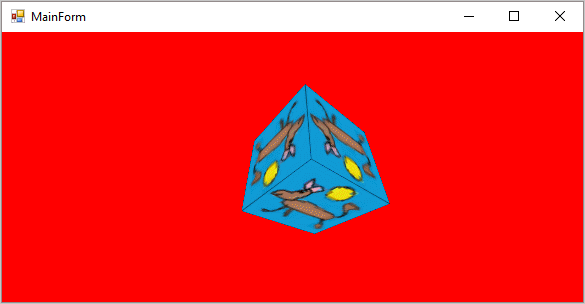
(
첨부 파일은 이 글의 예제 프로젝트를 포함합니다.)
참고로, GlControl.DepthBits 속성은 Context 생성 이후에 바꾸려고 하면 아무런 효과가 없습니다. 가령 다음과 같이 ContextCreated 이벤트 시점에 바꾸면,
private void glControl_ContextCreated(object sender, OpenGL.GlControlEventArgs e)
{
    GlControl glControl = (GlControl)sender;
    this.glControl.DepthBits = ((uint)(24u)); // not work here

    _displayManager.createDisplay(glControl);
    // ...[생략]...
}
EnableCap.DepthTest, ClearBufferMask.DepthBufferBit를 설정에 상관없이 Depth 테스트가 동작하지 않습니다.
[이 글에 대해서 여러분들과 의견을 공유하고 싶습니다. 틀리거나 미흡한 부분 또는 의문 사항이 있으시면 언제든 댓글 남겨주십시오.]