"Visual Studio Code + Remote Development"로 윈도우 환경에서 리눅스(CentOS 7) C/C++ 개발
정말이지, "Visual Studo Code"는 명작입니다. ^^; Python, node.js, Java, C# 등의 다양한 언어 지원은 물론이고, 게다가 "Remote Development"도 가능해서 윈도우 환경임에도 전혀 불편하지 않게 리눅스 프로그램 개발을 아주 매끄럽게 할 수 있습니다. 어설픈 ssh 클라이언트 도구로 연결해 불편하게 개발을 해야 했던 시절과 비교하면 정말 천국과 다름없는 ^^ 환경입니다.
자, 그럼 이번에는 C++ 소스 코드를 윈도우에서 실행한 Visual Studio Code로 원격 리눅스에 연결해 작업을 해보겠습니다. 이를 위해 우선 C/C++ 확장을 설치합니다.
C/C++ for Visual Studio Code (Preview)
; https://code.visualstudio.com/docs/languages/cpp
그런 다음 "Remote Development"로 CentOS에 연결해,
로컬의 Visual Studio Code로 원격 리눅스 머신에 접속해 개발하는 방법
; https://www.sysnet.pe.kr/2/0/11942
관련 개발 도구를 설치해 줍니다.
/* 아래의 구성 요소 없이 Visual Studio에서 빌드하면 오류 발생
error : Could not find the specified C/C++ compiler 'g++'. Please make sure that a default C/C++ compiler is installed on the Linux system '...'. You can install a compiler using your system's package manager. If overriding the default compilers, please check that the compiler is installed in the specified path.
*/

$ sudo yum install gcc gcc-c++ make gdb
그럼, 준비는 모두 끝입니다. 이제 C++ 소스 코드 파일 하나 만들어서,
#include <cstdio>

int main()
{
    printf("hello from app1!\n");
    return 0;
}
"Ctrl + Shift + B"를 눌러 빌드 작업을 수행하려고 하면 다음과 같은 선택 메뉴가 뜹니다.
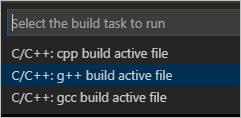
"C/C++: g++ build active file"을 수행하면 현재 에디터에서 선택한 test.cpp 파일이 빌드가 됩니다. ^^ 이제 같은 폴더에 보면 "test" 파일이 생성되어 있고 TERMINAL을 이용해 실행해 볼 수 있습니다.
$ ./test
hello from app1!
당연히 Ctrl + F5 또는 F5를 누르면 디버거로 "C++ (GDB/LLDB)" 항목을 선택해 BreakPoint가 지원되는 환경을 누릴 수 있습니다. 참고로, 디버깅을 하는 경우 tasks.json 파일과 launch.json 파일이 함께 생성됩니다.
디버깅 시도와 함께 생성된 tasks.json 파일을 사용하면 출력 파일명도 바꿀 수 있습니다. 예를 들어, "test"를 "test.out"으로 변경하고 싶다면 관련 "args"를 수정하면 됩니다.
{
    // See https://go.microsoft.com/fwlink/?LinkId=733558
    // for the documentation about the tasks.json format
    "version": "2.0.0",
    "tasks": [
        {
            "type": "shell",
            "label": "g++ build active file",
            "command": "/usr/bin/g++",
            "args": [
                "-g",
                "${file}",
                "-o",
                "${fileDirname}/${fileBasenameNoExtension}.out"
            ],
            "options": {
                "cwd": "/usr/bin"
            },
            "problemMatcher": [
                "$gcc"
            ]
        }
    ]
}
또한, launch.json에 이런 변경 사항을 반영해야 디버깅 시작 시 정상적으로 .out 파일이 실행됩니다.
{
    // Use IntelliSense to learn about possible attributes.
    // Hover to view descriptions of existing attributes.
    // For more information, visit: https://go.microsoft.com/fwlink/?linkid=830387
    "version": "0.2.0",
    "configurations": [
        {
            "name": "g++ build and debug active file",
            "type": "cppdbg",
            "request": "launch",
            "program": "${fileDirname}/${fileBasenameNoExtension}.out",
            "args": [],
            "stopAtEntry": false,
            "cwd": "${workspaceFolder}",
            "environment": [],
            "externalConsole": false,
            "MIMode": "gdb",
            "setupCommands": [
                {
                    "description": "Enable pretty-printing for gdb",
                    "text": "-enable-pretty-printing",
                    "ignoreFailures": true
                }
            ],
            "preLaunchTask": "g++ build active file",
            "miDebuggerPath": "/usr/bin/gdb"
        }
    ]
}
외부 라이브러리를 추가하는 경우, 가령 다음의 소스 코드를 빌드하면,
#include <cstdio>
#include <dlfcn.h>

#define RTLD_DELAY 0x00001

int main()
{
    printf("hello from app1!\n");

    dlopen("libsayhello.so", RTLD_DELAY);
    return 0;
}
dlopen 함수로 인해 오류 메시지가 발생하는데,
Executing task: /usr/bin/g++ -g /home/tusr/testapp/test.cpp -o /home/tusr/testapp/test <

/tmp/ccGSwEUW.o: In function `main':
/home/tusr/testapp/test.cpp:10: undefined reference to `dlopen'
collect2: error: ld returned 1 exit status
The terminal process terminated with exit code: 1
역시 tasks.json의 "args" 항목에 다음과 같이 g++ 실행 시의 라이브러리 의존 추가 옵션을 넣으면 됩니다.
{
    // See https://go.microsoft.com/fwlink/?LinkId=733558
    // for the documentation about the tasks.json format
    "version": "2.0.0",
    "tasks": [
        {
            "type": "shell",
            "label": "g++ build active file",
            "command": "/usr/bin/g++",
            "args": [
                "-g",
                "${file}",
                "-o",
                "${fileDirname}/${fileBasenameNoExtension}.out",
                "-ldl"
            ],
            "options": {
                "cwd": "/usr/bin"
            },
            "problemMatcher": [
                "$gcc"
            ]
        }
    ]
}
참고로, 빌드(Ctrl + Shift + B)는 반드시 해당 파일이 선택된 상태에서 해야 합니다. 만약, tasks.json 파일을 선택한 상태에서 빌드를 하면 다음과 같은 식으로 test.cpp 파일 대신 tasks.json 파일이 인자로 전달됩니다.
> Executing task: /usr/bin/g++ -g /home/kevin/testcpp/.vscode/tasks.json -o /home/kevin/testcpp/.vscode/tasks -ldl <

/usr/bin/ld:/home/kevin/testcpp/.vscode/tasks.json: file format not recognized; treating as linker script
/usr/bin/ld:/home/kevin/testcpp/.vscode/tasks.json:1: syntax error
collect2: error: ld returned 1 exit status
The terminal process terminated with exit code: 1
물론, tasks.json에 다음과 같이 명시적으로 파일 명을 기록해 주는 것으로 우회할 수는 있습니다.
{
    "tasks": [
        {
            "type": "shell",
            "label": "g++ build active file",
            "command": "/usr/bin/g++",
            "args": [
                "-g",
                "${workspaceFolder}/test.cpp",
                "-o",
                "${workspaceFolder}/test.out",
                "-ldl"
            ],
            "options": {
                "cwd": "/usr/bin"
            },

            // 아래의 옵션을 추가하면 Ctrl + Shift + B를 누른 경우, 메뉴 선택 없이 곧바로 빌드가 수행됨
            "group": {
                "kind": "build",
                "isDefault": true
            }
        }
    ],
    "version": "2.0.0"
}
이 정도면, 대충 어떤 식인지 감이 오셨겠죠?! ^^
tasks.json 등의 파일에서 사용할 수 있는 변수는 다음의 공식 문서를 참고할 수 있습니다.
Variables Reference
; https://code.visualstudio.com/docs/editor/variables-reference
물론 복잡한 프로젝트라면 make 파일 등를 만들어 관리하거나 비주얼 스튜디오를 이용하는 것도 좋겠습니다.
Visual Studio 2019 - 리눅스 프로젝트를 이용한 공유/실행(so/out) 프로그램 개발 환경 설정
; https://www.sysnet.pe.kr/2/0/11844
반면, 저렇게 간단한 코드를 빠르게 테스트하고 싶을 때는 비주얼 스튜디오 코드가 좋은 선택이 될 것입니다. ^^
[이 글에 대해서 여러분들과 의견을 공유하고 싶습니다. 틀리거나 미흡한 부분 또는 의문 사항이 있으시면 언제든 댓글 남겨주십시오.]