C# - SharpDX + DXGI를 이용한 윈도우 화면 캡처 소스 코드 + Direct2D 출력
지난번 소스 코드는,
C# - SharpDX + DXGI를 이용한 윈도우 화면 캡처 소스 코드
; https://www.sysnet.pe.kr/2/0/11400
DXGI로 캡처한 화면을 byte[] 배열로 받은 후 이것을 System.Drawing.Bitmap으로 다시 변환해 GDI 기반의 Graphics.DrawImage로 출력했습니다.
이번에는 DXGI로 캡처하는 것은 동일한데 이것을 DirectX 기반의 Direct2D를 이용해 직접 화면으로 출력하는 것을 해봤습니다. SharpDX의 경우 SharpDX.Direct2D1 모듈에서 Direct2D 기능을 제공하기 때문에 다음과 같이 Nuget으로부터 참조를 추가해야 합니다.
Install-Package SharpDX.Direct2D1 -Version 4.0.1
이후 나머지 변경 코드는 출력 부분이 대다수를 차지합니다. 참고로, Direct2D의 사용법은 다음의 글들에서 자세하게 다루고 있습니다.
Your first DirectX 11 Metro application using SharpDX
; https://english.r2d2rigo.es/2012/05/28/your-first-directx-11-metro-application-using-sharpdx/

Basic Direct2D drawing with SharpDX
; https://english.r2d2rigo.es/2012/07/04/basic-direct2d-drawing-with-sharpdx/

Loading and drawing bitmaps with Direct2D using SharpDX
; https://english.r2d2rigo.es/2014/08/12/loading-and-drawing-bitmaps-with-direct2d-using-sharpdx/
또한 관련 코드는 SharpDX의 예제에서도 구할 수 있습니다.
SharpDX-Samples/Desktop/Direct2D1/BitmapApp/
; https://github.com/sharpdx/SharpDX-Samples/tree/master/Desktop/Direct2D1/BitmapApp
Direct2D로 그리기 위해서는 우선 Direct3D device 객체와 SwapChain을 구한 후 그것으로부터 2D 렌더링을 할 수 있는 RednerTarget을 구하는 순입니다. 또한 Direct3D device 객체는 Windows Forms 프로젝트의 경우 Window를 대상으로 생성하면 됩니다. 다음은 이에 관한 코드입니다.
public void Initialize(IntPtr windowHandle, int width, int height)
{
    _width = width;
    _height = height;

    var desc = new SwapChainDescription()
    {
        BufferCount = 1,
        ModeDescription = new ModeDescription(width, height,
                                    new Rational(60, 1), Format.B8G8R8A8_UNorm),
        IsWindowed = true,
        OutputHandle = windowHandle,
        SampleDescription = new SampleDescription(1, 0),
        SwapEffect = SwapEffect.Discard,
        Usage = Usage.RenderTargetOutput,
    };

    _viewPort = new SharpDX.Mathematics.Interop.RawViewportF
    {
        X = 0,
        Y = 0,
        Width = width,
        Height = height,
    };

    SharpDX.Direct3D11.Device.CreateWithSwapChain(SharpDX.Direct3D.DriverType.Hardware,
            SharpDX.Direct3D11.DeviceCreationFlags.BgraSupport,
            new[] { SharpDX.Direct3D.FeatureLevel.Level_10_0 }, desc, out _drawDevice, out _swapChain);

    _backBuffer = Texture2D.FromSwapChain<Texture2D>(_swapChain, 0);
    _backBufferView = new RenderTargetView(_drawDevice, _backBuffer);

    using (SharpDX.Direct2D1.Factory factory = new SharpDX.Direct2D1.Factory())
    {
        using (var surface = _backBuffer.QueryInterface<Surface>())
        {
            _renderTarget2D = new RenderTarget(factory, surface,
                new RenderTargetProperties(new SharpDX.Direct2D1.PixelFormat(Format.Unknown, SharpDX.Direct2D1.AlphaMode.Premultiplied)));
            _renderTarget2D.AntialiasMode = AntialiasMode.PerPrimitive;
        }
    }
}
RenderTarget을 생성했으면 이제 그리기 함수를 호출해야 하는데 이와 같은 작업은 다음과 같이 BeginDraw / EndDraw 사이에 넣게 됩니다.
public void Render(Action<RenderTarget> render)
{
    _drawDevice.ImmediateContext.Rasterizer.SetViewport(_viewPort);
    _drawDevice.ImmediateContext.OutputMerger.SetTargets(_backBufferView);

    _renderTarget2D.BeginDraw();

    render(_renderTarget2D);

    _renderTarget2D.EndDraw();

    _swapChain.Present(0, PresentFlags.None);
}
가령, Bitmap을 그리고 싶다면 SharpDX.Direct2D1.Bitmap을 생성해야 하는데,
var bitmapProperties = new BitmapProperties(new SharpDX.Direct2D1.PixelFormat(Format.B8G8R8A8_UNorm,
                    SharpDX.Direct2D1.AlphaMode.Premultiplied));

if (_renderTarget2D == null)
{
    return null;
}

SharpDX.Direct2D1.Bitmap bitmap = new SharpDX.Direct2D1.Bitmap(_renderTarget2D, new Size2(_width, _height), stream,
            _width * sizeof(int), bitmapProperties);
이에 앞서 Bitmap에 전달되는 DataStream 타입의 stream 객체에 이미지 데이터가 채워져 있어야 합니다. DXGI 화면 캡처의 경우, AcquireNextFrame/Map으로 구하게 되는 버퍼로부터 DataStream의 PositionPointer 주소로 내용을 복사하면 됩니다. 일단 Bitmap만 제대로 구성하게 되면 이후 화면 출력은 RenderTarget의 DrawBitmap 메서드를 이용해 다음과 같이 간단하게 출력할 수 있습니다.
_renderTarget2D.DrawBitmap(bitmap, 1.0f, BitmapInterpolationMode.Linear);
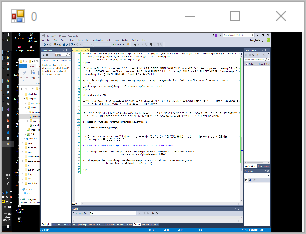
그런데, RenderTarget.DrawBitmap으로 그리면 대상이 되는 Window의 크기에 딱 맞게 Width/Height가 스케일링되어 출력이 됩니다. 즉, 1920 * 1080 화면을 캡처했는데 Direct3D device 객체와 연결된 Window의 크기가 300 * 200이면 다음과 같은 식으로 창 크기에 맞춰 나오기 때문에 화면이 알아볼 수 없을 정도로 축소가 됩니다.

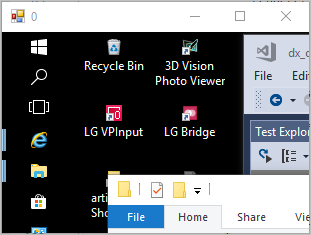
축소를 원하지 않고 그냥 다음과 같은 식으로 출력하고 싶은데... 그 방법을 모르겠습니다. ^^; (혹시 아시는 분은 덧글 부탁드립니다.)

위의 문제를 해결하기 위해 할 수 없이 Window 안에 화면 캡처 크기 만큼의 자식 컨트롤을 넣는 것으로 우회했습니다.
또 한가지 문제는, Direct3D device가 Window와 연결되기 때문에 Control.Invalidate 메서드를 이용해 출력 지시를 하는 경우 깜빡임 문제가 발생한다는 것입니다. 왜냐하면, Window는 OnPaint로 화면을 그리기 전에 해당 화면을 전부 윈도우 기본 배경색으로 지우는 작업을 하기 때문입니다. 따라서, 매끄러운 화면 출력을 위해서는 지우는 작업을 없애야 하는데 이는 다음과 같이 OnPaintBackground를 재정의하는 것으로 가능합니다.
protected override void OnPaintBackground(PaintEventArgs e)
{
    // base.OnPaintBackground(e);
}
마지막으로, 알아야 할 것이 컬러 데이터의 저장 순서입니다. 캡처 데이터 원본은 B-G-R-A 순으로 픽셀 하나에 대해 4바이트가 연속하는 구조입니다. 재미있는 것은 이것이 Little-endian 구조의 CPU(인텔/AMD)에서는 해당 메모리를 int (4바이트로)로 읽어내면 역순이 되어 0xAARRGGBB 순으로 배열된다는 것입니다.
지난 글에서 DXGI 화면 캡처 데이터를 GDI로 출력하면서 System.Drawing.Bitmap을 이용했는데, System.Drawing.Bitmap의 내부 데이터 저장 순서가 바로 B-G-R-A순이기 때문에 그대로 복사하는 것으로 컬러 데이터를 유지할 수 있습니다.
그런데, Direct2D의 BitmapProperties는 이 순서를 정할 수 있습니다. 만약에 다음과 같이 R-G-B-A 순으로 저장하도록 SharpDX.Direct2D1.Bitmap을 생성한다면,
var bitmapProperties = new BitmapProperties(new SharpDX.Direct2D1.PixelFormat(Format.R8G8B8A8_UNorm,
                                SharpDX.Direct2D1.AlphaMode.Premultiplied));
화면 캡처 데이터가 B-G-R-A 순이기 때문에 데이터 순서를 R-G-B-A로 맞춰주기 위해 다음과 같이 전체 데이터를 순회하면서 직접 써야 합니다.
for (int y = 0; y < _renderTarget.Height; y++)
{
    for (int x = 0; x < _renderTarget.Width; x++)
    {
        IntPtr dstPixel = dstPtr + x * 4;
        IntPtr srcPixel = srcPtr + x * 4;

        // B-G-R-A 순의 바이트를 하나씩 읽어서,
        byte B = Marshal.ReadByte(srcPixel + 0);
        byte G = Marshal.ReadByte(srcPixel + 1);
        byte R = Marshal.ReadByte(srcPixel + 2);
        byte A = Marshal.ReadByte(srcPixel + 3);

        // SharpDX.Direct2D1.Bitmap의 R-G-B-A순으로 변환해서 저장
        Marshal.WriteByte(dstPixel + 0, R);
        Marshal.WriteByte(dstPixel + 1, G);
        Marshal.WriteByte(dstPixel + 2, B);
        Marshal.WriteByte(dstPixel + 3, A);

        /*
        // 1바이트씩 쓰기보다 다음과 같이 4바이트씩 쓰면 좀 더 효율적임
        int xabgr = R | (G << 8) | (B << 16) | (A << 24);
        Marshal.WriteInt32(dstPixel, xabgr); // little-endian 방식으로 저장되므로 aa-bb-gg-rr 4바이트가 rr-gg-bb-aa 순으로 저장됨
        */
    }

    srcPtr = IntPtr.Add(srcPtr, srcPitch);
    dstPtr = IntPtr.Add(dstPtr, _renderTarget.Width * 4);
}
실제로 아래의 소스 코드를 보면,
SharpDX-Samples/Desktop/Direct2D1/BitmapApp/Program.cs
; https://raw.githubusercontent.com/sharpdx/SharpDX-Samples/master/Desktop/Direct2D1/BitmapApp/Program.cs
LoadFromFile 메서드에서 B-G-R-A로 저장된 데이터를 y*x for 루프를 돌면서 R-G-B-A로 변환하는 것을 볼 수 있습니다.
물론, 위와 같이 하면 블록 단위의 메모리 복사보다 속도가 더 느립니다. 따라서 화면 캡처 데이터 순서가 B-G-R-A이기 때문에 SharpDX.Direct2D1.Bitmap도 그 순서에 맞게 생성하면,
var bitmapProperties = new BitmapProperties(new SharpDX.Direct2D1.PixelFormat(Format.B8G8R8A8_UNorm,
                                SharpDX.Direct2D1.AlphaMode.Premultiplied));
좀 더 빠르게 블록 단위 복사가 가능합니다.
(
첨부 파일은 이 글의 코드를 구현합니다.)
[이 글에 대해서 여러분들과 의견을 공유하고 싶습니다. 틀리거나 미흡한 부분 또는 의문 사항이 있으시면 언제든 댓글 남겨주십시오.]