Nuget Facebook 라이브러리를 이용해 ASP.NET 웹 폼과 로그인 연동하는 방법
Visual Studio의 Nuget 패키지 관리자를 통해 Facebook 라이브러리를 설치할 수 있습니다.
Install-Package Facebook
당연히 소스 코드도 공개한 상태입니다.
Facebook - The Facebook SDK for .NET helps developers build web, desktop, phone and Windows Store applications that integrate with Facebook.
; https://github.com/facebook-csharp-sdk/facebook-csharp-sdk
위의 라이브러리를 이용한 ASP.NET 최소 예제도 다음의 글에서 공개했습니다.
Facebook Login with ASP.NET Web Forms
; https://learn.microsoft.com/en-us/archive/blogs/nickpinheiro/facebook-login-with-asp-net-web-forms
예제 소스 코드는 다음의 github에 있습니다.
nickpinheiro/FacebookLoginASPnetWebForms
; https://github.com/nickpinheiro/FacebookLoginASPnetWebForms
그런데, 실제로 위의 코드를 다운로드해 실행해 보면 다음과 같은 예외가 발생합니다.
Server Error in '/' Application.

The remote server returned an error: (400) Bad Request.
Description: An unhandled exception occurred during the execution of the current web request. Please review the stack trace for more information about the error and where it originated in the code.

Exception Details: System.Net.WebException: The remote server returned an error: (400) Bad Request.

Source Error:


Line 46:             HttpWebRequest eat = (HttpWebRequest)HttpWebRequest.Create(eatTargetUri);
Line 47:
Line 48:             StreamReader eatStr = new StreamReader(eat.GetResponse().GetResponseStream());
Line 49:             string eatToken = eatStr.ReadToEnd().ToString().Replace("access_token=", "");
Line 50:

Source File: D:\MyGit\FacebookGraph\Account\user.aspx.cs ?? Line: 48

Stack Trace:


[WebException: The remote server returned an error: (400) Bad Request.]
   System.Net.HttpWebRequest.GetResponse() +1322
   FacebookLoginASPnetWebForms.account.user.GetFacebookUserData(String code) in D:\MyGit\FacebookGraph\Account\user.aspx.cs:48
   FacebookLoginASPnetWebForms.account.user.Page_Load(Object sender, EventArgs e) in D:\MyGit\FacebookGraph\Account\user.aspx.cs:24
   System.Web.Util.CalliEventHandlerDelegateProxy.Callback(Object sender, EventArgs e) +51
   System.Web.UI.Control.OnLoad(EventArgs e) +95
   System.Web.UI.Control.LoadRecursive() +59
   System.Web.UI.Page.ProcessRequestMain(Boolean includeStagesBeforeAsyncPoint, Boolean includeStagesAfterAsyncPoint) +678
문제가 되는 코드를 보면,
Uri targetUri = new Uri("https://graph.facebook.com/oauth/access_token?client_id=" + ...);
HttpWebRequest at = (HttpWebRequest)HttpWebRequest.Create(targetUri);

System.IO.StreamReader str = new System.IO.StreamReader(at.GetResponse().GetResponseStream());
string token = str.ReadToEnd().ToString().Replace("access_token=", "");

string[] combined = token.Split('&');
string accessToken = combined[0];

Uri eatTargetUri = new Uri("https://graph.facebook.com/oauth/access_token?grant_type=fb_exchange_token&client_id=" + ... "&fb_exchange_token=" + accessToken);
HttpWebRequest eat = (HttpWebRequest)HttpWebRequest.Create(eatTargetUri);
최초의 "/oauth/access_token?client_id="으로의 요청은 값을 잘 반환하는데, 두 번째인 "/oauth/access_token?grant_type=" 요청에서 "Bad Request"라는 오류가 발생한 것입니다. 원인은 간단한데요, 첫 번째 요청의 반환값으로 받은 "accessToken" 변수의 값이 다음과 같이 설정되어 있기 때문입니다.
{
	"access_token":"...[생략]...",
	"token_type":"bearer",
	"expires_in":5182206
}
즉, 두 번째 요청의 URL에 전달되는 "fb_exchange_token=" + accessToken의 문자열로 JSON 텍스트 전체가 할당되기 때문에 당연히 Bad Request 오류가 발생하게 됩니다. 따라서, JSON 반환값 안에 있는 "access_token"의 값을 풀어내 그 값을 전달해야 합니다. 이를 위해 간단하게 AccessToken 클래스 하나 만들어 주고,
public class AccessToken
{
    public string access_token { get; set; }
    public string token_type { get; set; }
    public int expires_in { get; set; }
}
다음과 같이 역 직렬화 한 다음 사용해 주시면 됩니다.
string accessToken = combined[0];

JavaScriptSerializer sr = new JavaScriptSerializer();
Facebook.AccessToken accessTokenInfo = sr.Deserialize<Facebook.AccessToken>(accessToken);

// 이하, access_token 인자가 필요한 요청마다 accessTokenInfo.access_token을 전달
다음은 GetFacebookUserData를 이렇게 해서 바꾼 전체 소스 코드입니다.
protected List<Facebook.User> GetFacebookUserData(string code)
{
    // Exchange the code for an access token
    Uri targetUri = new Uri("https://graph.facebook.com/oauth/access_token?client_id=" + ConfigurationManager.AppSettings["FacebookAppId"] + "&client_secret=" + ConfigurationManager.AppSettings["FacebookAppSecret"] + "&redirect_uri=http://" + Request.ServerVariables["SERVER_NAME"] + ":" + Request.ServerVariables["SERVER_PORT"] + "/account/user.aspx&code=" + code);
    HttpWebRequest at = (HttpWebRequest)HttpWebRequest.Create(targetUri);

    System.IO.StreamReader str = new System.IO.StreamReader(at.GetResponse().GetResponseStream());
    string token = str.ReadToEnd().ToString().Replace("access_token=", "");

    // Split the access token and expiration from the single string
    string[] combined = token.Split('&');
    string accessToken = combined[0];

    JavaScriptSerializer sr = new JavaScriptSerializer();
    Facebook.AccessToken accessTokenInfo = sr.Deserialize<Facebook.AccessToken>(accessToken);

    // Exchange the code for an extended access token
    Uri eatTargetUri = new Uri("https://graph.facebook.com/oauth/access_token?grant_type=fb_exchange_token&client_id="
        + ConfigurationManager.AppSettings["FacebookAppId"]
        + "&client_secret="
        + ConfigurationManager.AppSettings["FacebookAppSecret"]
        + "&fb_exchange_token=" + accessTokenInfo.access_token);
    HttpWebRequest eat = (HttpWebRequest)HttpWebRequest.Create(eatTargetUri);

    StreamReader eatStr = new StreamReader(eat.GetResponse().GetResponseStream());
    string eatToken = eatStr.ReadToEnd().ToString().Replace("access_token=", "");

    // Split the access token and expiration from the single string
    string[] eatWords = eatToken.Split('&');
    string extendedAccessToken = eatWords[0];

    // Request the Facebook user information
    Uri targetUserUri = new Uri("https://graph.facebook.com/me?fields=first_name,last_name,gender,locale,link&access_token="
        + accessTokenInfo.access_token);
    HttpWebRequest user = (HttpWebRequest)HttpWebRequest.Create(targetUserUri);

    // Read the returned JSON object response
    StreamReader userInfo = new StreamReader(user.GetResponse().GetResponseStream());
    string jsonResponse = string.Empty;
    jsonResponse = userInfo.ReadToEnd();

    // Deserialize and convert the JSON object to the Facebook.User object type
    string jsondata = jsonResponse;
    Facebook.User converted = sr.Deserialize<Facebook.User>(jsondata);

    // Write the user data to a List
    List<Facebook.User> currentUser = new List<Facebook.User>();
    currentUser.Add(converted);

    // Return the current Facebook user
    return currentUser;
}
참고로, "nickpinheiro/FacebookLoginASPnetWebForms" 프로젝트를 fork한 제 github repo에 위의 변경 사항을 적용해 두었으니 참고하시면 됩니다.
stjeong/FacebookLoginASPnetWebForms
; https://github.com/stjeong/FacebookLoginASPnetWebForms
위의 예제 프로젝트를 테스트하려면 우선 facebook 개발자 사이트에 접속해,
facebook for developers
; https://developers.facebook.com/apps
"새 앱 추가"를 누른 다음 "앱 ID"와 "앱 시크릿 코드"를 받아 예제 프로젝트의 web.config에 각각 값을 채워야 합니다.
<appSettings>
    <add key="FacebookAppId" value="...앱 ID..."/>
    <add key="FacebookAppSecret" value="...앱 시크릿 코드..."/>
</appSettings>
그다음 localhost에서 테스트할 수 있도록 "Facebook 로그인" / "설정" 메뉴에 가서 "유효한 OAuth 리디렉션 URI"로 자신의 테스트 URL을 등록해 주시면 됩니다.
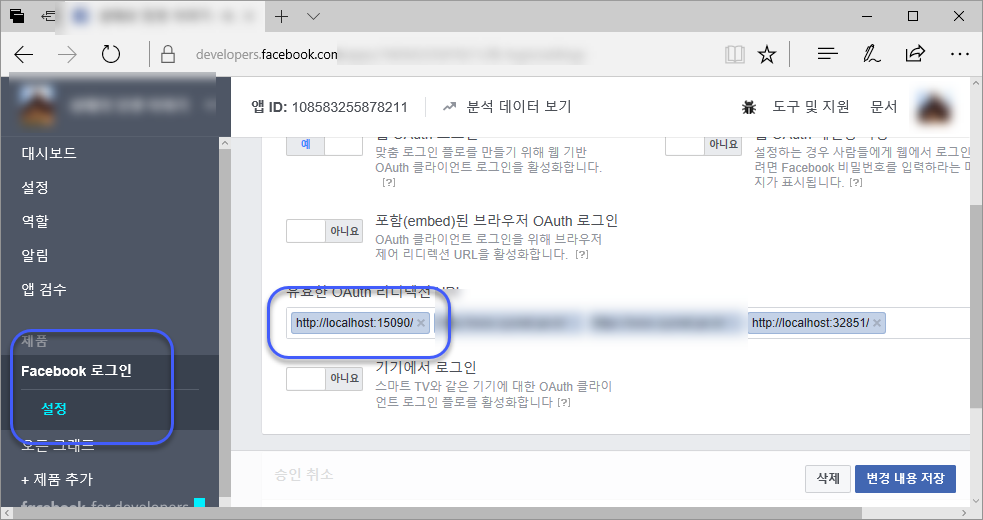
그나저나... 좋아졌군요. ^^ 예전에서는 localhost 등록이 안되어서 테스트 전용으로 "새 앱 추가"를 다시 해 URI를 등록해야 했었는데, 이젠 그럴 필요가 없어졌습니다. ^^
[이 글에 대해서 여러분들과 의견을 공유하고 싶습니다. 틀리거나 미흡한 부분 또는 의문 사항이 있으시면 언제든 댓글 남겨주십시오.]