Visual Studio 2010 - Device Driver 제작- Hello World 예제
친숙한 Visual Studio 개발환경을 떠나지 않고 ^^ "Hello World" 예제를 만들어 볼까요?
저도 밑바닥부터는 "스스로" 알 수는 없으니, 방법을 찾아보았는데 다음의 글이 눈에 띄었습니다. ^^
How to Configure Visual Studio 2008 for Compiling Drivers
; https://www.codeproject.com/Articles/31865/How-to-Configure-Visual-Studio-2008-for-Compiling
정확한 해결 방법이 될 것 같죠? ^^
일단, 기본적인 단계는 위의 글을 따르긴 했는데, Visual Studio 2010이기 때문에 나름대로 변경된 것이 있습니다. (Visual Studio 2008이라면, 위의 글에 나온 순서대로 따라하시면 됩니다.)
또한, x64 빌드를 기준으로 설정이 되었습니다.
1. Visual Studio 2010 설치
2. WDK 설치
;
http://www.microsoft.com/downloads/details.aspx?displaylang=en&FamilyID=36a2630f-5d56-43b5-b996-7633f2ec14ff
3. "Win32 Project" 유형의 새 프로젝트를 생성하고,
; Applicaiton type - Windows application
; Additional Options: Empty project
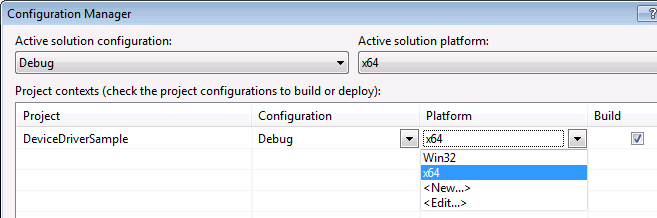
4. 솔루션의 "Configuration Manager"를 통해서 'x64' 플랫폼을 추가
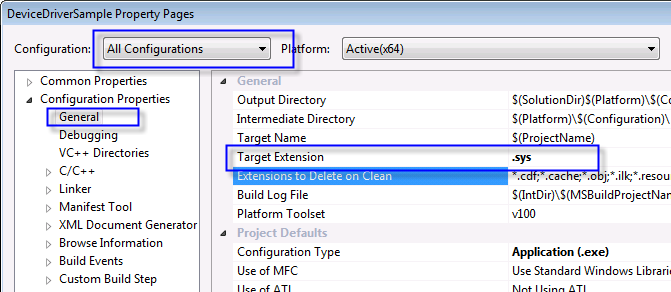
5. "Configuration Properties" / "General"
; Target Extension: .sys
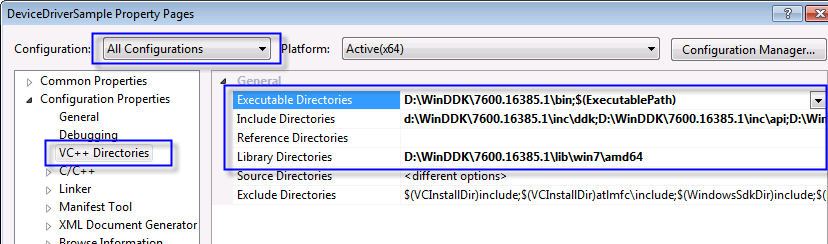
6. "Configuration Properties" / "VC++ Directories"에 DDK의 include, lib, bin 폴더를 추가
; Executable Directories: D:\WinDDK\7600.16385.1\bin;$(ExecutablePath)
; Include Directories: D:\WinDDK\7600.16385.1\inc\ddk;D:\WinDDK\7600.16385.1\inc\api;D:\WinDDK\7600.16385.1\inc\crt
; Library Directories: D:\WinDDK\7600.16385.1\lib\win7\amd64
7. "Configuration Properties"에서 "Configuration" 설정을 "All Configurations"로 바꾼 후,
1. C/C++ - General - Debug Information Format = Program Database (/Zi)
2. C/C++ - Preprocessor - Preprocessor Definitions = _AMD64_
3. C/C++ - Code Generation - Enable C++ Exceptions = No
4. C/C++ - Code Generation - Basic Runtime Checks = Default
5. C/C++ - Code Generation - Buffer Security Check = No (/GS-)
6. C/C++ - Advanced - Calling Convention = __stdcall (/Gz)
7. C/C++ - Advanced - Compile As = Compile as C Code (/TC) [if you are going to use plain C]
8. Linker - General - Enable Incremental Linking = [
빈 문자열]
9. Linker - Input - Additional Dependencies = ntoskrnl.lib;hal.lib (상속 받지 않음을 체크)
10. Linker - Input - Ignore All Default Libraries = Yes (/NODEFAULTLIB)
11. Linker - Manifest File - Generate Manifest = No
12. Linker - System - SubSystem = Native (/SUBSYSTEM:NATIVE)
13. Linker - System - Driver = Driver (/DRIVER)
14. Linker - Advanced - Entry Point = DriverEntry
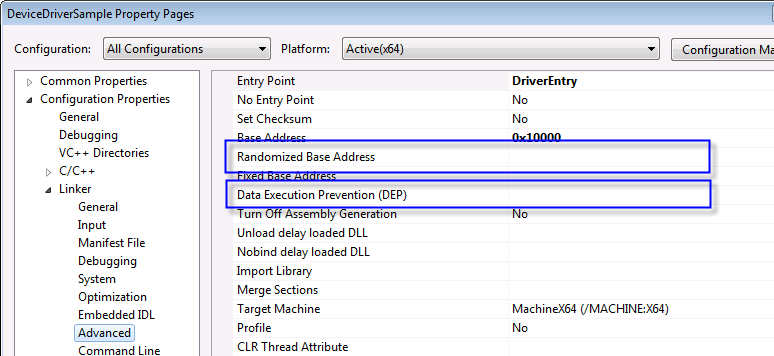
15. Linker - Advanced - Base Address = 0x10000
16-1. Linker - Advanced - Randomized Base Address = [
빈 문자열]
16-2. Linker - Advanced - Data Execution Prevention (DEP) = [
빈 문자열]
6. 예제 코드 작성으로 마무리
#include <ntddk.h>

VOID DriverUnload( PDRIVER_OBJECT pDriverObject )
{
    DbgPrint("Driver Unload\n" );
}

NTSTATUS DriverEntry(PDRIVER_OBJECT pDriverObject, PUNICODE_STRING pRegistryPath)
{
    DbgPrint("DriverEntry\n");

    pDriverObject->DriverUnload = DriverUnload;

    return STATUS_SUCCESS;
}
7. 빌드!
사실, 코딩을 Visual Studio 2010이라는 편집기를 이용하고 컴파일만 하는 것에 의미가 있을 뿐 "F5 디버깅"이 되는 것은 아니기 때문에 어차피 별도의 배포 스크립트는 만드는 것이 좋습니다. (설령 된다고 해도, Blue Screen이 자신의 개발 PC에서 뜨는 것이 유쾌하지는 않죠. ^^)
[이 토픽에 대해서 여러분들과 의견을 공유하고 싶습니다. 틀리거나 미흡한 부분 또는 의문 사항이 있으시면 언제든 댓글 남겨주십시오.]