왜? Button 컨트롤에는 MouseDown/MouseUp 이벤트가 발생하지 않을까요?
마침, 질문해 주신 분도 있고 ^^
Mouse이벤트 관련해서 질문있습니다.
; https://www.sysnet.pe.kr/3/0/983
오랜만에 WPF에 대한 감각도 되찾을 겸 ^^ 살펴보았답니다.
질문의 요지는, WPF의 "Button" 컨트롤에 MouseDown/MouseUp 이벤트를 걸어두었는데, 왜? 발생하지 않느냐는 것입니다.
다소 허무하긴 하지만, 검색해 보니 ^^ 금방 답이 나오더군요.
MouseDown event not working WPF
; http://social.msdn.microsoft.com/Forums/eu/wpf/thread/61807025-d4c4-41e0-b648-b11183065009
Here MouseDown is a bubbling event so it will be fired only when it won't be handled at child level.

To capture the same you need to use PreviewMouseDown event which is a tunneling event.

OR

Paste below line in constructor of Window1 class:

InitializeComponent();
AddHandler(FrameworkElement.MouseDownEvent, new MouseButtonEventHandler(Button_MouseDown), true);
WPF의 이벤트 순서는 다음의 글에서 잘 설명했듯이,
WPF Input Events
; https://docs.microsoft.com/en-us/dotnet/desktop/wpf/advanced/routed-events-overview#how_event_processing_works
제일 바깥쪽의 요소에서부터 안쪽으로 Preview... 유의 이벤트가 발생한 다음, 다시 반대로 안쪽에서부터 바깥쪽으로 Preview가 없는 이벤트가 발생합니다. 전자의 경우를 Tunneling이라고 하고, 후자의 경우를 Bubbling이라고 합니다. (이 외에, MouseEnter/Leave처럼 다른 요소로 전파되지 않는 Direct 유형이 있습니다.)
재미있는 점은, Bubbling 이벤트의 경우 해당 요소에서 "처리되었다는 표시"를 하면 더 이상 이벤트 전달을 하지 않습니다.
실제로 그런지 예제 코드를 한번 구성해 보겠습니다. 우선, WPF 프로젝트를 생성하고, TestElement라는 WPF UserControl을 하나 추가한 후 빌드를 합니다. 그럼, 도구 상자에 빌드된 "TestElement" 사용자 컨트롤이 추가되고 드래그 & 드롭으로 윈도우에 쉽게 추가할 수 있습니다.
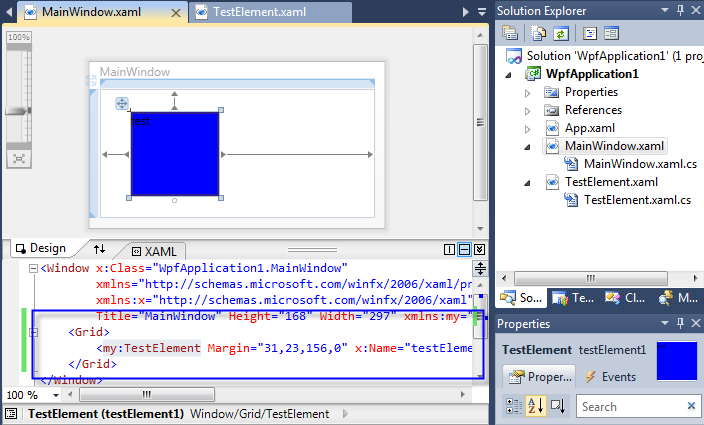
<Window x:Class="WpfApplication1.MainWindow"
        xmlns="http://schemas.microsoft.com/winfx/2006/xaml/presentation"
        xmlns:x="http://schemas.microsoft.com/winfx/2006/xaml"
        Title="MainWindow" Height="168" Width="297" xmlns:my="clr-namespace:WpfApplication1">
    <Grid>
        <my:TestElement Margin="31,23,156,0" x:Name="testElement1" VerticalAlignment="Top" Height="84" MouseDown="testElement1_MouseDown" />
    </Grid>
</Window>
위에 보시면, MouseDown 이벤트도 같이 걸어두었는데요. MainWindow.xaml.cs에서는 간단하게 다음과 같이 이벤트 핸들러를 작성해 줍니다.
public partial class MainWindow : Window
{
    public MainWindow()
    {
        InitializeComponent();
    }

    private void testElement1_MouseDown(object sender, MouseButtonEventArgs e)
    {
        System.Diagnostics.Trace.WriteLine("testElement1_MouseDown");
    }
}
여기까지 작성하고 실행한 후, TestElement 영역에서 마우스를 클릭하면 정상적으로 MouseDown 이벤트가 발생하는 것을 Debug Output 창을 통해서 확인할 수 있습니다.
자, 이제 그럼 Bubbling을 막아볼까요?
<UserControl x:Class="WpfApplication1.TestElement"
             xmlns="http://schemas.microsoft.com/winfx/2006/xaml/presentation"
             xmlns:x="http://schemas.microsoft.com/winfx/2006/xaml"
             xmlns:mc="http://schemas.openxmlformats.org/markup-compatibility/2006"
             xmlns:d="http://schemas.microsoft.com/expression/blend/2008"
             mc:Ignorable="d"
             Background="Blue"
             MouseDown="UserControl_MouseDown"
             d:DesignHeight="300" d:DesignWidth="300">
    <Grid>
        <TextBlock Text="test" />
    </Grid>
</UserControl>
public partial class TestElement : UserControl
{
    public TestElement()
    {
        InitializeComponent();
    }

    private void UserControl_MouseDown(object sender, MouseButtonEventArgs e)
    {
        e.Handled = true;
    }
}
이렇게 해주고 나면, MainWindow에서 걸어두었던 MouseDown 이벤트 핸들러는 더 이상 동작하지 않습니다. 즉, Button의 MouseDown/Up 이벤트가 발생하지 않는 것은 버튼의 특성이 아니라, 위와 같이 '마우스 이벤트를 처리했다'라고 표시해두기 때문에 일어난 상황입니다.
참고로, MouseLeftButtonDown이 MouseDown 이전에 발생하며 LeftButtonDown을 "e.Handled = true" 처리하는 경우 MouseDown도 발생하지 않도록 되어 있군요. ^^
(
첨부된 파일은 위의 코드를 포함한 예제 프로젝트입니다.)
[이 글에 대해서 여러분들과 의견을 공유하고 싶습니다. 틀리거나 미흡한 부분 또는 의문 사항이 있으시면 언제든 댓글 남겨주십시오.]