C# - 파일 확장자에 연결된 프로그램을 등록하는 방법 (1) - 기본
특정 확장자와 응용 프로그램을 연결하는 방법은 레지스트리를 통해서 이뤄집니다. 다음의 글에도 잘 나오는데요.
Create registry entry to associate file extension with application in C++
; http://stackoverflow.com/questions/1387769/create-registry-entry-to-associate-file-extension-with-application-in-c
이번 글에서는 가장 단순한 방법만 설명할텐데, 그러니까 아래와 같이 딱 2개의 레지스트리만 등록해 주면 됩니다.
Windows Registry Editor Version 5.00

[HKEY_CURRENT_USER\Software\Classes\blergcorp.blergapp.v1\shell\open\command]
@="c:\path\to\app.exe \"%1\""

[HKEY_CURRENT_USER\Software\Classes\.blerg]
@="blergcorp.blergapp.v1"
C# 코드로 보면 대략 다음과 같이 구현해 줄 수 있습니다.
using System.IO;
using Microsoft.Win32;

namespace YourExtRegister
{
    class Program
    {
        static string ext = ".1myext";
        static string fileTypeDesc = "my ext sample";
        static string extType = "yourext" + ext + ".v1";
        static string assocExeFileName = "YourExt.exe";

        static void Main(string[] args)
        {
            bool register = true;

            if (args.Length >= 1)
            {
                if (args[0] == "-u")
                {
                    register = false;
                }
            }

            ProcessFileExtReg(register);
        }

        private static void ProcessFileExtReg(bool register)
        {
            using (RegistryKey classesKey = Registry.CurrentUser.OpenSubKey(@"Software\Classes", true))
            {
                if (register == true)
                {
                    using (RegistryKey extKey = classesKey.CreateSubKey(ext))
                    {
                        extKey.SetValue(null, extType);
                    }

                    // or, use Registry.SetValue method
                    using (RegistryKey typeKey = classesKey.CreateSubKey(extType))
                    {
                        typeKey.SetValue(null, fileTypeDesc);
                        using (RegistryKey shellKey = typeKey.CreateSubKey("shell"))
                        {
                            using (RegistryKey openKey = shellKey.CreateSubKey("open"))
                            {
                                using (RegistryKey commandKey = openKey.CreateSubKey("command"))
                                {
                                    string assocExePath = GetProcessPath();
                                    string assocCommand = string.Format("\"{0}\" \"%1\"", assocExePath);

                                    commandKey.SetValue(null, assocCommand);
                                }
                            }
                        }
                    }
                }
                else
                {
                    DeleteRegistryKey(classesKey, ext, false);
                    DeleteRegistryKey(classesKey, extType, true);
                }
            }
        }

        private static void DeleteRegistryKey(RegistryKey classesKey, string subKeyName, bool deleteAllSubKey)
        {
            if (CheckRegistryKeyExists(classesKey, subKeyName) == false)
            {
                return;
            }

            if (deleteAllSubKey == true)
            {
                classesKey.DeleteSubKeyTree(subKeyName);
            }
            else
            {
                classesKey.DeleteSubKey(subKeyName);
            }
        }

        private static bool CheckRegistryKeyExists(RegistryKey classesKey, string subKeyName)
        {
            RegistryKey regKey = null;

            try
            {
                regKey = classesKey.OpenSubKey(subKeyName);
                return regKey != null;
            }
            finally
            {
                if (regKey != null)
                {
                    regKey.Close();
                }
            }
        }

        private static string GetProcessPath()
        {
            string path = Path.GetDirectoryName(typeof(Program).Assembly.Location);
            return Path.Combine(path, assocExeFileName);
        }
    }
}
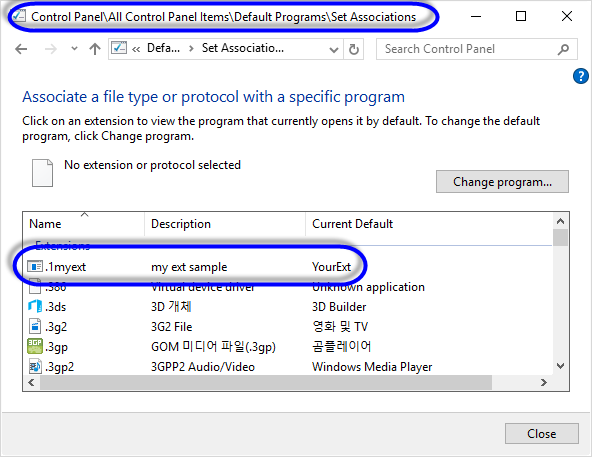
참고로, 레지스트리가 아닌 윈도우 제어판에서 "Default Programs"를 선택해 "Associate a file type or protocol with a program" 링크를 통해서도 다음과 같이 확인할 수 있습니다.

이제부터는, (예제에서는 확장자가 .1myext 이므로) test.1myext와 같은 파일을 탐색기에서 더블 클릭하면 등록된 EXE 프로그램이 실행됩니다. 그리고, 그 프로그램에서는 넘겨진 인자 정보를 통해 파일을 처리해 주시면 됩니다.
using System.Windows.Forms;

namespace YourExt
{
    class Program
    {
        static void Main(string[] args)
        {
            if (args.Length < 1)
            {
                return;
            }

            MessageBox.Show("Viewer Runs: " + args[0]);
        }
    }
}
(
첨부한 파일은 이 글의 예제 코드를 포함합니다.)
[이 글에 대해서 여러분들과 의견을 공유하고 싶습니다. 틀리거나 미흡한 부분 또는 의문 사항이 있으시면 언제든 댓글 남겨주십시오.]