Microsoft MVP성태의 닷넷 이야기
글쓴 사람
정성태 (techsharer at outlook.com)
홈페이지
첨부 파일
 

(시리즈 글이 6개 있습니다.)
개발 환경 구성: 284. "Let's Encrypt"에서 제공하는 무료 SSL 인증서를 IIS에 적용하는 방법 (1)
; https://www.sysnet.pe.kr/2/0/10958

개발 환경 구성: 287. Let's Encrypt 인증서 업데이트 주기: 90일
; https://www.sysnet.pe.kr/2/0/11005

개발 환경 구성: 288. SSL 인증서를 Azure Cloud Service에 적용하는 방법
; https://www.sysnet.pe.kr/2/0/11006

개발 환경 구성: 301. "Let's Encrypt" SSL 인증서를 Azure Cloud Services(classic)에 업데이트하는 방법
; https://www.sysnet.pe.kr/2/0/11054

개발 환경 구성: 358. "Let's Encrypt"에서 제공하는 무료 SSL 인증서를 IIS에 적용하는 방법 (2)
; https://www.sysnet.pe.kr/2/0/11483

개발 환경 구성: 370. Azure VM/App Services(Web Apps)에 Let's Encrypt 무료 인증서 적용 방법
; https://www.sysnet.pe.kr/2/0/11502


SSL 인증서를 Azure Cloud Service에 적용하는 방법

지난 글에 설명한 대로 했다면,

"Let's Encrypt"에서 제공하는 무료 SSL 인증서를 IIS에 적용하는 방법 (1)
; https://www.sysnet.pe.kr/2/0/10958

인증서가 생겼을 것입니다. 이것을 IIS에 적용해 보는 것은 다음의 글을 참고해 쉽게 하실 수 있습니다.

How to Import and Export SSL Certificates in IIS 7
; https://www.digicert.com/ssl-support/pfx-import-export-iis-7.htm

이 글에서는 Azure WebRole 웹 사이트에 SSL 인증서를 설치하는 방법을 알아보겠습니다. 물론, 다음과 같이 역시 문서가 이미 있지만. ^^

Configuring SSL for an application in Azure
; https://azure.microsoft.com/en-gb/documentation/articles/cloud-services-configure-ssl-certificate/


우선, "Let's Encrypt"로부터 구한 .pfx 파일을 Azure에 업로드하는 것부터 시작하면 됩니다.

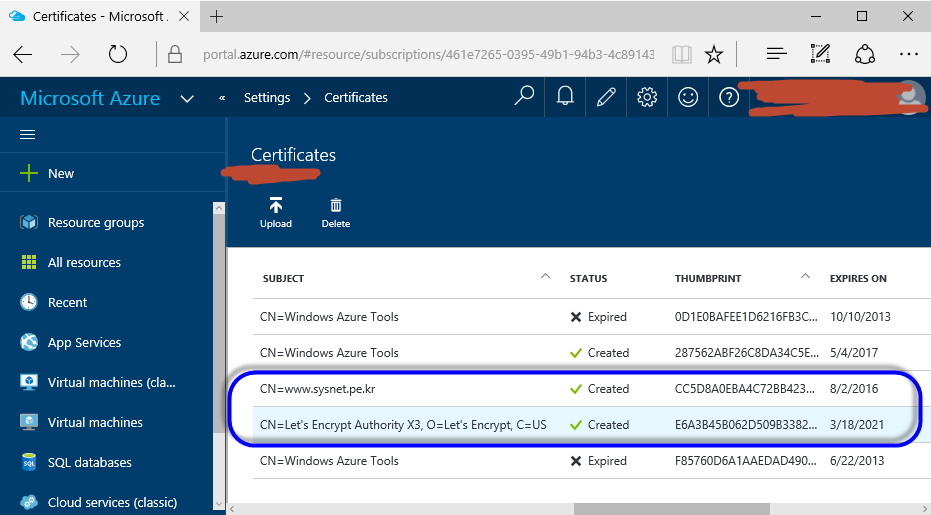
Azure Portal에 연결해 "Cloud service (classic)" 유형의 서비스를 선택한 다음, "Settings" / "Certificates" 링크를 눌러,

ssl_azure_1.png

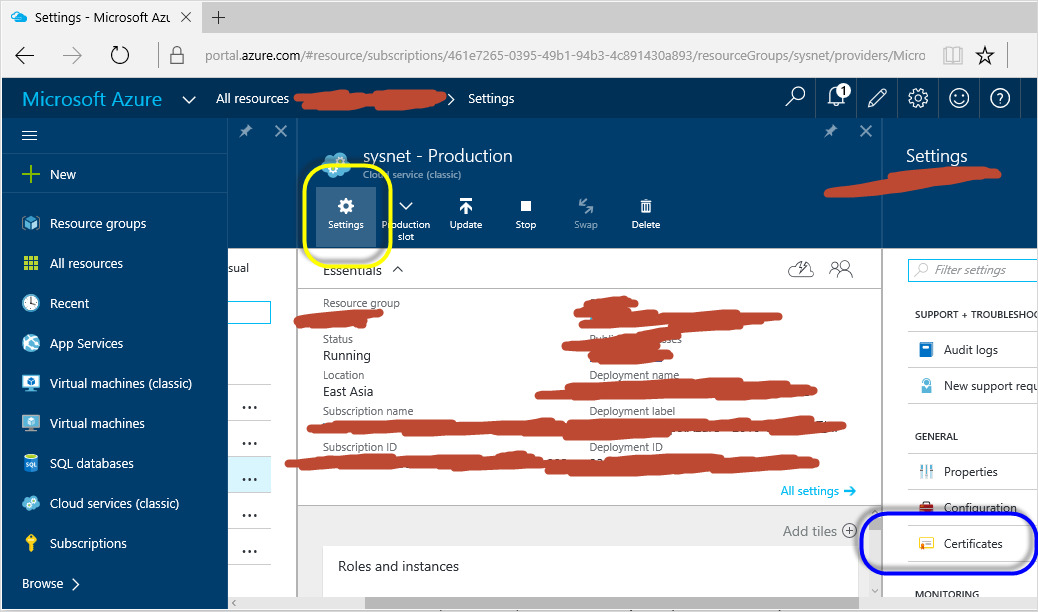
.pfx 파일을 "Upload" 버튼을 이용해 Azure에 등록합니다. 그럼 다음과 같은 결과를 볼 수 있습니다.

ssl_azure_2.png

이제 남은 작업은 여러분들의 배포 프로젝트만 변경해 주시면 됩니다. 먼저 Azure Cloud Service 배포 프로젝트에 포함된 .csdef 파일에 인증서 내용을 추가해야 하는데, 도움말에 써 있는 내용이 예사롭지 않습니다.

<WebRole name="CertificateTesting" vmsize="Small">
...
    <Certificates>
        <Certificate name="SampleCertificate" 
                     storeLocation="LocalMachine" 
                     storeName="My"
                     permissionLevel="limitedOrElevated" />
        <!-- IMPORTANT! Unless your certificate is either
        self-signed or signed directly by the CA root, you
        must include all the intermediate certificates
        here. You must list them here, even if they are
        not bound to any endpoints. Failing to list any of
        the intermediate certificates may cause hard-to-reproduce
        interoperability problems on some clients.-->
        <Certificate name="CAForSampleCertificate"
                     storeLocation="LocalMachine"
                     storeName="CA"
                     permissionLevel="limitedOrElevated" />
    </Certificates>
...
</WebRole>

예를 들어 "Let's encrypt"로부터 받은 SSL 인증서의 경로가 다음과 같은데,
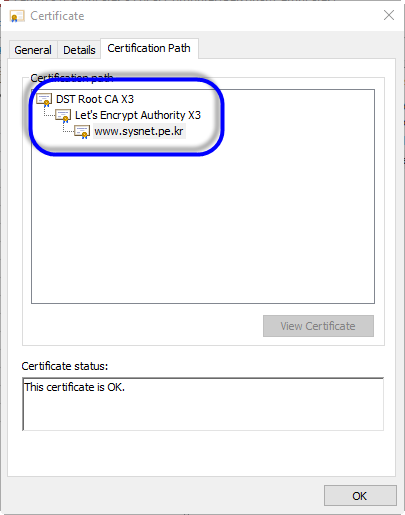
letsencrypt_3.png

  • DST Root CA X3
  • Let's Encrypt Authority X3
  • ...[your cert]....

도움말에 의하면 여러분들의 인증서와 함께 "intermediate certificates"에 해당하는 "Let's Encrypt Authority X3"까지 포함해 2개의 항목을 기재해야 하는 것입니다. 다음은 제 sysnet 웹 사이트의 변경된 내용을 보여줍니다.

<?xml version="1.0" encoding="utf-8"?>
<ServiceDefinition ...[생략]...>
    ...[생략]...

    <Certificates>
        <Certificate name="www.sysnet.pe.kr" 
                     storeLocation="LocalMachine" 
                     storeName="My"
                     permissionLevel="limitedOrElevated" />
        <Certificate name="Let's Encrypt Authority X3"
                     storeLocation="LocalMachine"
                     storeName="CA"
                     permissionLevel="limitedOrElevated" />
    </Certificates>


  </WebRole>
</ServiceDefinition>

그런 다음 역시 동일한 .csdef 파일에 https 접근을 위한 Endpoints와 Binding을 추가해 줍니다.

<?xml version="1.0" encoding="utf-8"?>
<ServiceDefinition ...[생략]...>
    ...[생략]...

    <Sites>
      <Site name="Web">
        <Bindings>
          <Binding name="Endpoint1" endpointName="Endpoint1" />
          <Binding name="HttpsIn" endpointName="HttpsIn" />
        </Bindings>
      </Site>
    </Sites>

    <Endpoints>
      <InputEndpoint name="Endpoint1" protocol="http" port="80" />
      <InputEndpoint name="HttpsIn" protocol="https" port="443" certificate="www.sysnet.pe.kr" />
    </Endpoints>

    <Certificates>
        <Certificate name="www.sysnet.pe.kr" 
                     storeLocation="LocalMachine" 
                     storeName="My"
                     permissionLevel="limitedOrElevated" />
        <Certificate name="LetsEncryptAuthorityX3"
                     storeLocation="LocalMachine"
                     storeName="CA"
                     permissionLevel="limitedOrElevated" />
    </Certificates>


  </WebRole>
</ServiceDefinition>

마지막으로 .csdef 파일이 포함된 배포 프로젝트에 .cscfg 파일을 열어 .csdef에 명시했던 인증서를 추가해줍니다. (thumbprintAlgorithm 값은 인증서의 속성창에서 구할 수 있고, thumbprint 값은 인증서 속성 창뿐만 아니라 Azure Portal에 등록된 인증서 목록에서도 구할 수 있습니다.)

<?xml version="1.0" encoding="utf-8"?>
<ServiceConfiguration  ...[생략]...>
    <Role ...[생략]...>
        ...[생략]...
        <ConfigurationSettings>
            ...[생략]...
        </ConfigurationSettings>
        <Certificates>
            <Certificate name="Microsoft.WindowsAzure.Plugins.RemoteAccess.PasswordEncryption" ...[생략]... />

            <Certificate name="www.sysnet.pe.kr"
                thumbprint="CC5D8A0EBA4C72BB42308A851261A3FBFCBC115E"
                thumbprintAlgorithm="sha1" />
            <Certificate name="LetsEncryptAuthorityX3"
                thumbprint="E6A3B45B062D509B3382282D196EFE97D5956CCB"
                thumbprintAlgorithm="sha1" />"'"

        </Certificates>
    </Role>
</ServiceConfiguration>

여기까지 마치고, 다시 웹 사이트를 Azure에 배포해 주면 끝!!!

확인을 위해 "https://www.sysnet.pe.kr"로 접속해 보세요. ^^


[이 글에 대해서 여러분들과 의견을 공유하고 싶습니다. 틀리거나 미흡한 부분 또는 의문 사항이 있으시면 언제든 댓글 남겨주십시오.]


[최초 등록일: ]
[최종 수정일: 7/23/2016]

Creative Commons License
이 저작물은 크리에이티브 커먼즈 코리아 저작자표시-비영리-변경금지 2.0 대한민국 라이센스에 따라 이용하실 수 있습니다.
by SeongTae Jeong, mailto:techsharer at outlook.com

비밀번호

댓글 작성자


... 151  152  153  154  155  156  157  158  159  160  [161]  162  163  164  165  ...
NoWriterDateCnt.TitleFile(s)
1057정성태6/4/201131751VC++: 49. 소스 코드로부터 php5apache2_2.dll 생성하는 방법파일 다운로드1
1056정성태6/2/201129871VC++: 48. 윈도우에서 Apache Module - Content Handler 컴파일파일 다운로드1
1055정성태6/1/201127130오류 유형: 124. MVC 프로젝트의 Site.Master 관련 오류 정리
1054정성태5/31/201131289.NET Framework: 220. ASP.NET MVC Web Site 프로젝트 - 단위 테스트 작성파일 다운로드1
1053정성태5/31/201133849VC++: 47. Apache Module에 대한 'F5 디버그 (Start with debugging)' [2]
1052정성태5/30/201131485.NET Framework: 219. ASP.NET MVC Web Site 프로젝트 구성하기파일 다운로드1
1051정성태5/28/201139932VC++: 46. 윈도우에서 Apache Module 컴파일 (VC++)파일 다운로드1
1050정성태5/28/201126072오류 유형: 123. Firebird - Exception of type 'FirebirdSql.Data.Common.IscException' was thrown.
1049정성태5/28/201131794.NET Framework: 218. WCF REST 서비스 - 웹 브라우저 측 Ajax 호출 캐시 [1]
1048정성태5/27/201133494개발 환경 구성: 123. Apache 소스를 윈도우 환경에서 빌드하기
1047정성태5/27/201127565.NET Framework: 217. Firebird ALinq Provider - 날짜 필드에 대한 낙관적 동시성 쿼리 오류
1046정성태5/26/201132266.NET Framework: 216. 라이선스까지도 뛰어넘는 .NET Profiler [5]
1045정성태5/24/201133357.NET Framework: 215. 닷넷 System.ComponentModel.LicenseManager를 이용한 라이선스 적용 [1]파일 다운로드1
1044정성태5/24/201133884오류 유형: 122. zlib 빌드 오류 - inflate.obj : error LNK2001: unresolved external symbol _inflate_fast
1043정성태5/24/201133314.NET Framework: 214. 무료 Linq Provider - DbLinq를 이용한 Firebird 접근파일 다운로드1
1042정성태5/23/201139234개발 환경 구성: 122. PHP 소스를 윈도우 환경에서 빌드하기
1041정성태5/22/201130066.NET Framework: 213. Linq To SQL - ALinq Provider를 이용하여 Firebird 사용파일 다운로드1
1040정성태5/21/201140504개발 환경 구성: 121. .NET 개발자가 처음 설치해 본 Apache + PHP [2]
1039정성태5/17/201133255.NET Framework: 212. Firebird 데이터베이스와 ADO.NET [2]파일 다운로드1
1038정성태5/16/201135095개발 환경 구성: 120. .NET 프로그래머에게도 유용한 Firebird 무료 데이터베이스 [2]
1037정성태5/11/201130005개발 환경 구성: 119. Visual Studio Professional 이하 버전에서도 TFS의 정적 코드 분석 정책 연동이 가능할까? [3]
1036정성태5/7/201195962오류 유형: 121. Access DB에 대한 32bit/64bit OLE DB Provider 관련 오류 [11]
1035정성태5/7/201130562오류 유형: 120. File cannot be opened. Ensure it is a valid Data Link file.
1034정성태5/2/201127512.NET Framework: 211. 파일 잠금 없이 .NET 어셈블리의 버전을 구하는 방법 [2]파일 다운로드1
1033정성태5/1/201133285웹: 19. IIS Express - appcmd.exe를 이용한 applicationHost.config 변경 [2]
1032정성태5/1/201129993웹: 18. IIS Express를 NT 서비스로 변경
... 151  152  153  154  155  156  157  158  159  160  [161]  162  163  164  165  ...