Microsoft MVP성태의 닷넷 이야기
글쓴 사람
정성태 (techsharer at outlook.com)
홈페이지
첨부 파일
 

(시리즈 글이 6개 있습니다.)
개발 환경 구성: 284. "Let's Encrypt"에서 제공하는 무료 SSL 인증서를 IIS에 적용하는 방법 (1)
; https://www.sysnet.pe.kr/2/0/10958

개발 환경 구성: 287. Let's Encrypt 인증서 업데이트 주기: 90일
; https://www.sysnet.pe.kr/2/0/11005

개발 환경 구성: 288. SSL 인증서를 Azure Cloud Service에 적용하는 방법
; https://www.sysnet.pe.kr/2/0/11006

개발 환경 구성: 301. "Let's Encrypt" SSL 인증서를 Azure Cloud Services(classic)에 업데이트하는 방법
; https://www.sysnet.pe.kr/2/0/11054

개발 환경 구성: 358. "Let's Encrypt"에서 제공하는 무료 SSL 인증서를 IIS에 적용하는 방법 (2)
; https://www.sysnet.pe.kr/2/0/11483

개발 환경 구성: 370. Azure VM/App Services(Web Apps)에 Let's Encrypt 무료 인증서 적용 방법
; https://www.sysnet.pe.kr/2/0/11502


SSL 인증서를 Azure Cloud Service에 적용하는 방법

지난 글에 설명한 대로 했다면,

"Let's Encrypt"에서 제공하는 무료 SSL 인증서를 IIS에 적용하는 방법 (1)
; https://www.sysnet.pe.kr/2/0/10958

인증서가 생겼을 것입니다. 이것을 IIS에 적용해 보는 것은 다음의 글을 참고해 쉽게 하실 수 있습니다.

How to Import and Export SSL Certificates in IIS 7
; https://www.digicert.com/ssl-support/pfx-import-export-iis-7.htm

이 글에서는 Azure WebRole 웹 사이트에 SSL 인증서를 설치하는 방법을 알아보겠습니다. 물론, 다음과 같이 역시 문서가 이미 있지만. ^^

Configuring SSL for an application in Azure
; https://azure.microsoft.com/en-gb/documentation/articles/cloud-services-configure-ssl-certificate/


우선, "Let's Encrypt"로부터 구한 .pfx 파일을 Azure에 업로드하는 것부터 시작하면 됩니다.

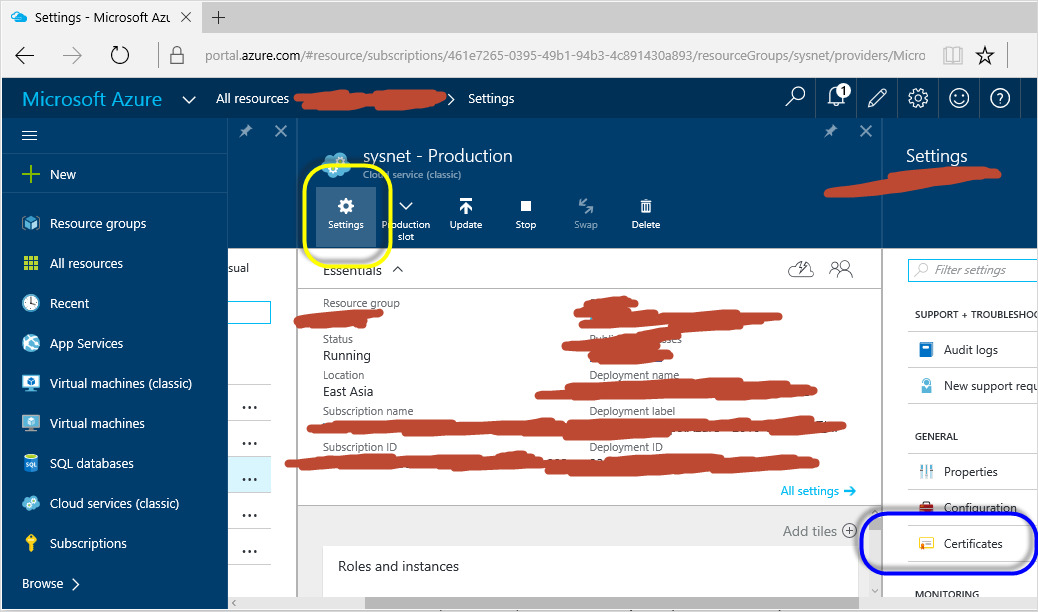
Azure Portal에 연결해 "Cloud service (classic)" 유형의 서비스를 선택한 다음, "Settings" / "Certificates" 링크를 눌러,
ssl_azure_1.png

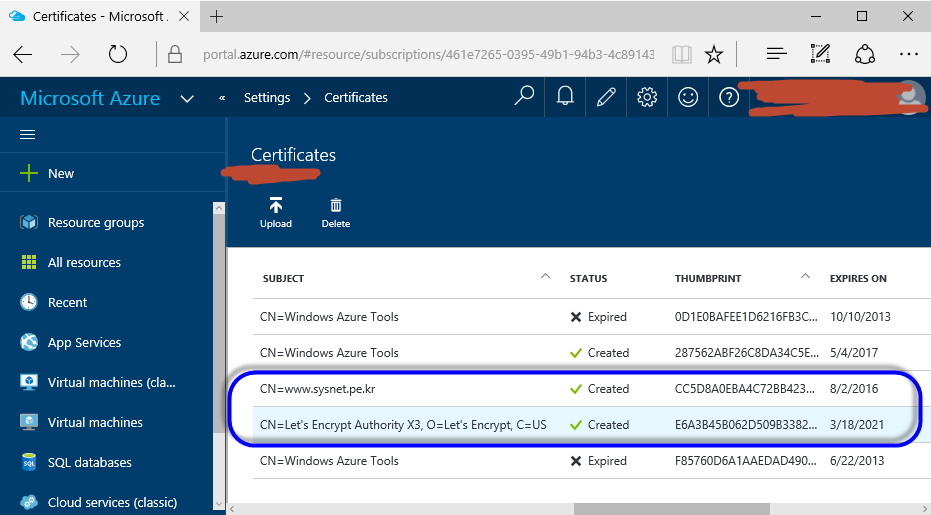
.pfx 파일을 "Upload" 버튼을 이용해 Azure에 등록합니다. 그럼 다음과 같은 결과를 볼 수 있습니다.
ssl_azure_2.png

이제 남은 작업은 여러분들의 배포 프로젝트만 변경해 주시면 됩니다. 먼저 Azure Cloud Service 배포 프로젝트에 포함된 .csdef 파일에 인증서 내용을 추가해야 하는데, 도움말에 써 있는 내용이 예사롭지 않습니다.

<WebRole name="CertificateTesting" vmsize="Small">
...
    <Certificates>
        <Certificate name="SampleCertificate" 
                     storeLocation="LocalMachine" 
                     storeName="My"
                     permissionLevel="limitedOrElevated" />
        <!-- IMPORTANT! Unless your certificate is either
        self-signed or signed directly by the CA root, you
        must include all the intermediate certificates
        here. You must list them here, even if they are
        not bound to any endpoints. Failing to list any of
        the intermediate certificates may cause hard-to-reproduce
        interoperability problems on some clients.-->
        <Certificate name="CAForSampleCertificate"
                     storeLocation="LocalMachine"
                     storeName="CA"
                     permissionLevel="limitedOrElevated" />
    </Certificates>
...
</WebRole>

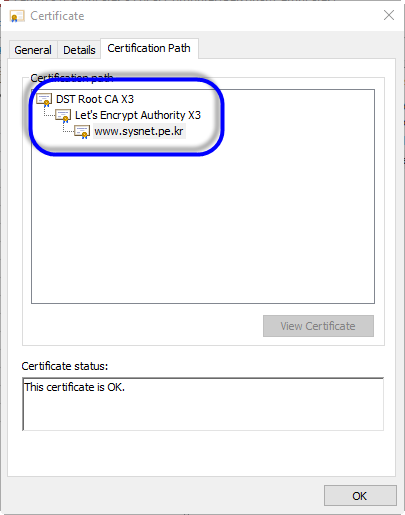
예를 들어 "Let's encrypt"로부터 받은 SSL 인증서의 경로가 다음과 같은데,
letsencrypt_3.png

  • DST Root CA X3
  • Let's Encrypt Authority X3
  • ...[your cert]....

도움말에 의하면 여러분들의 인증서와 함께 "intermediate certificates"에 해당하는 "Let's Encrypt Authority X3"까지 포함해 2개의 항목을 기재해야 하는 것입니다. 다음은 제 sysnet 웹 사이트의 변경된 내용을 보여줍니다.

<?xml version="1.0" encoding="utf-8"?>
<ServiceDefinition ...[생략]...>
    ...[생략]...

    <Certificates>
        <Certificate name="www.sysnet.pe.kr" 
                     storeLocation="LocalMachine" 
                     storeName="My"
                     permissionLevel="limitedOrElevated" />
        <Certificate name="Let's Encrypt Authority X3"
                     storeLocation="LocalMachine"
                     storeName="CA"
                     permissionLevel="limitedOrElevated" />
    </Certificates>


  </WebRole>
</ServiceDefinition>

그런 다음 역시 동일한 .csdef 파일에 https 접근을 위한 Endpoints와 Binding을 추가해 줍니다.

<?xml version="1.0" encoding="utf-8"?>
<ServiceDefinition ...[생략]...>
    ...[생략]...

    <Sites>
      <Site name="Web">
        <Bindings>
          <Binding name="Endpoint1" endpointName="Endpoint1" />
          <Binding name="HttpsIn" endpointName="HttpsIn" />
        </Bindings>
      </Site>
    </Sites>

    <Endpoints>
      <InputEndpoint name="Endpoint1" protocol="http" port="80" />
      <InputEndpoint name="HttpsIn" protocol="https" port="443" certificate="www.sysnet.pe.kr" />
    </Endpoints>

    <Certificates>
        <Certificate name="www.sysnet.pe.kr" 
                     storeLocation="LocalMachine" 
                     storeName="My"
                     permissionLevel="limitedOrElevated" />
        <Certificate name="LetsEncryptAuthorityX3"
                     storeLocation="LocalMachine"
                     storeName="CA"
                     permissionLevel="limitedOrElevated" />
    </Certificates>


  </WebRole>
</ServiceDefinition>

마지막으로 .csdef 파일이 포함된 배포 프로젝트에 .cscfg 파일을 열어 .csdef에 명시했던 인증서를 추가해줍니다. (thumbprintAlgorithm 값은 인증서의 속성창에서 구할 수 있고, thumbprint 값은 인증서 속성 창뿐만 아니라 Azure Portal에 등록된 인증서 목록에서도 구할 수 있습니다.)

<?xml version="1.0" encoding="utf-8"?>
<ServiceConfiguration  ...[생략]...>
    <Role ...[생략]...>
        ...[생략]...
        <ConfigurationSettings>
            ...[생략]...
        </ConfigurationSettings>
        <Certificates>
            <Certificate name="Microsoft.WindowsAzure.Plugins.RemoteAccess.PasswordEncryption" ...[생략]... />

            <Certificate name="www.sysnet.pe.kr"
                thumbprint="CC5D8A0EBA4C72BB42308A851261A3FBFCBC115E"
                thumbprintAlgorithm="sha1" />
            <Certificate name="LetsEncryptAuthorityX3"
                thumbprint="E6A3B45B062D509B3382282D196EFE97D5956CCB"
                thumbprintAlgorithm="sha1" />"'"

        </Certificates>
    </Role>
</ServiceConfiguration>

여기까지 마치고, 다시 웹 사이트를 Azure에 배포해 주면 끝!!!

확인을 위해 "https://www.sysnet.pe.kr"로 접속해 보세요. ^^


[이 글에 대해서 여러분들과 의견을 공유하고 싶습니다. 틀리거나 미흡한 부분 또는 의문 사항이 있으시면 언제든 댓글 남겨주십시오.]


[최초 등록일: ]
[최종 수정일: 7/23/2016]

Creative Commons License
이 저작물은 크리에이티브 커먼즈 코리아 저작자표시-비영리-변경금지 2.0 대한민국 라이센스에 따라 이용하실 수 있습니다.
by SeongTae Jeong, mailto:techsharer at outlook.com

비밀번호

댓글 작성자


1  2  [3]  4  5  6  7  8  9  10  11  12  13  14  15  ...
NoWriterDateCnt.TitleFile(s)
13904정성태3/25/20253177디버깅 기술: 218. Windbg로 살펴보는 Win32 Critical Section파일 다운로드1
13903정성태3/24/20252362VS.NET IDE: 197. (OneDrive, Dropbox 등의 공유 디렉터리에 있는) C++ 프로젝트의 출력 경로 변경하기
13902정성태3/24/20252860개발 환경 구성: 742. Oracle - 테스트용 hr 계정 및 데이터 생성파일 다운로드1
13901정성태3/9/20253195Windows: 280. Hyper-V의 3가지 Thread Scheduler (Classic, Core, Root)
13900정성태3/8/20253966스크립트: 72. 파이썬 - SQLAlchemy + oracledb 연동
13899정성태3/7/20252540스크립트: 71. 파이썬 - asyncio의 ContextVar 전달
13898정성태3/5/20253358오류 유형: 948. Visual Studio - Proxy Authentication Required: dotnetfeed.blob.core.windows.net
13897정성태3/5/20254290닷넷: 2326. C# - PowerShell과 연동하는 방법 (두 번째 이야기)파일 다운로드1
13896정성태3/5/20254094Windows: 279. Hyper-V Manager - VM 목록의 CPU Usage 항목이 항상 0%로 나오는 문제
13895정성태3/4/20254028Linux: 117. eBPF / bpf2go - Map에 추가된 요소의 개수를 확인하는 방법
13894정성태2/28/20253877Linux: 116. eBPF / bpf2go - BTF Style Maps 정의 구문과 데이터 정렬 문제
13893정성태2/27/20253385Linux: 115. eBPF (bpf2go) - ARRAY / HASH map 기본 사용법
13892정성태2/24/20254786닷넷: 2325. C# - PowerShell과 연동하는 방법파일 다운로드1
13891정성태2/23/20253551닷넷: 2324. C# - 프로세스의 성능 카운터용 인스턴스 이름을 구하는 방법파일 다운로드1
13890정성태2/21/20253322닷넷: 2323. C# - 프로세스 메모리 중 Private Working Set 크기를 구하는 방법(Win32 API)파일 다운로드1
13889정성태2/20/20254698닷넷: 2322. C# - 프로세스 메모리 중 Private Working Set 크기를 구하는 방법(성능 카운터, WMI) [1]파일 다운로드1
13888정성태2/17/20253786닷넷: 2321. Blazor에서 발생할 수 있는 async void 메서드의 부작용
13887정성태2/17/20254844닷넷: 2320. Blazor의 razor 페이지에서 code-behind 파일로 코드를 분리 및 DI 사용법
13886정성태2/15/20253661VS.NET IDE: 196. Visual Studio - Code-behind처럼 cs 파일을 그룹핑하는 방법
13885정성태2/14/20254759닷넷: 2319. ASP.NET Core Web API / Razor 페이지에서 발생할 수 있는 async void 메서드의 부작용
13884정성태2/13/20255169닷넷: 2318. C# - (async Task가 아닌) async void 사용 시의 부작용파일 다운로드1
13883정성태2/12/20254858닷넷: 2317. C# - Memory Mapped I/O를 이용한 PCI Configuration Space 정보 열람파일 다운로드1
13882정성태2/10/20253641스크립트: 70. 파이썬 - oracledb 패키지 연동 시 Thin / Thick 모드
13881정성태2/7/20254018닷넷: 2316. C# - Port I/O를 이용한 PCI Configuration Space 정보 열람파일 다운로드1
13880정성태2/5/20255288오류 유형: 947. sshd - Failed to start OpenSSH server daemon.
13879정성태2/5/20255313오류 유형: 946. Ubuntu - N: Updating from such a repository can't be done securely, and is therefore disabled by default.
1  2  [3]  4  5  6  7  8  9  10  11  12  13  14  15  ...