Azure 구독 후 PaaS 서비스 만들어 보기
일단 Azure 구독을 했으면,
Microsoft Azure 서비스의 구독은 반드시 IE로!
; https://www.sysnet.pe.kr/2/0/11002
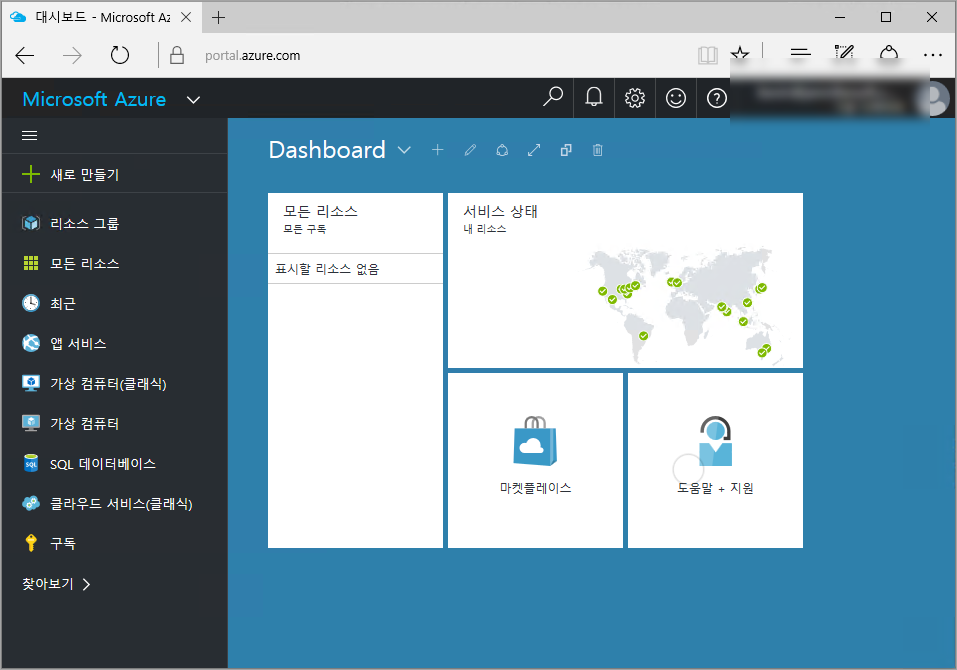
이제 IE는 더 이상 필요없습니다. 아무 웹 브라우저나 사용해서 Azure Portal 사이트를 접속하고,
Microsoft Azure Portal
; https://portal.azure.com
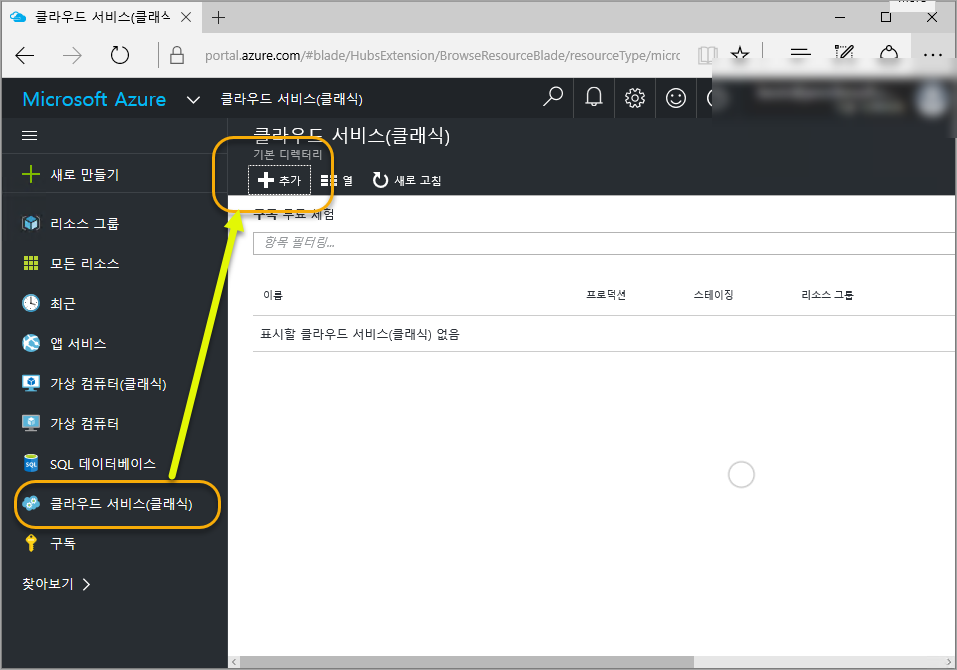
여러분이 원하는 클라우드 서비스를 생성해 주시면 됩니다. 여기서는, 가장 초기부터 제공되었던 PaaS 서비스의 하나인 "클라우드 서비스(클래식)"을 생성해 볼텐데요.
다음과 같이 왼쪽 패널에서 "클라우드 서비스(클래식)"을 선택 후 "추가" 버튼을 눌러줍니다.
그럼, PaaS 서비스를 대표할 DNS 이름, 구독 정보, 리소스 그룹, 위치를 지정합니다.
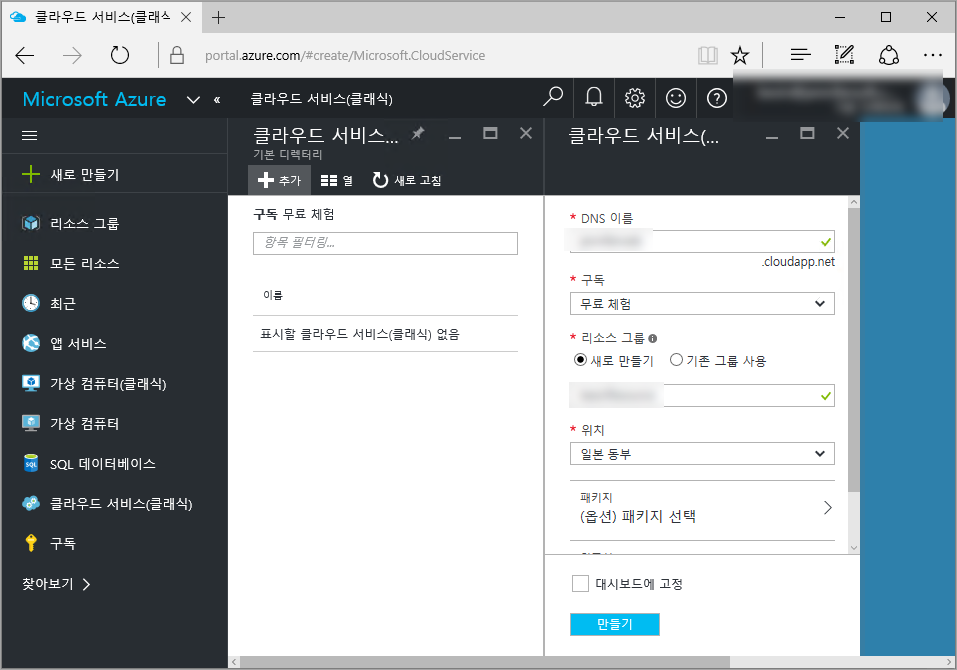
각 필드에 대해 좀 더 설명해 보면 대략 이렇습니다.
이제 "만들기" 버튼을 누르면 "PaaS 서비스" 단위가 하나 만들어지고, "클라우드 서비스(클래식)" 뷰에 다음과 같이 항목이 보입니다.
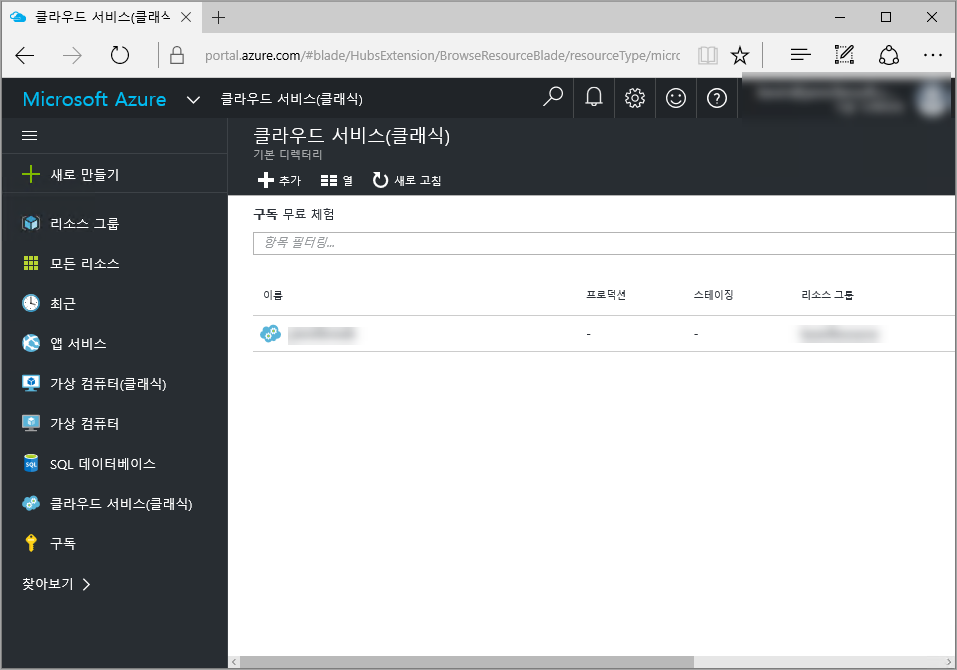
이로써 여러분들의 서비스를 담을 컨테이너 설정이 완료됩니다.
컨테이너 설정은 끝났으니, 거기에 담을 컨텐츠를 작성해야 합니다. 간단하게 ASP.NET 웹 사이트를 하나 만들어도 되고, 기존 웹 사이트 프로젝트를 그대로 사용해도 됩니다. (테스트를 위해 빈 사이트라도 ASP.NET 프로젝트를 하나 만들어 줍니다.)
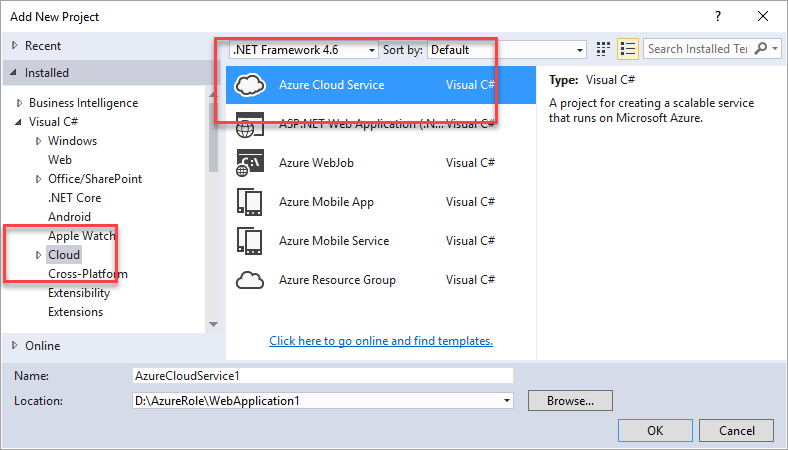
현재의 ASP.NET 프로젝트는 Azure와 아무런 연결 관계가 없는데요. 이 연결을 위해 새 프로젝트 대화창에서 "Cloud" / "Azure Cloud Service" 프로젝트를 현재 솔루션에 추가해 줍니다.
그럼, 다음과 같이 창이 나오는데,
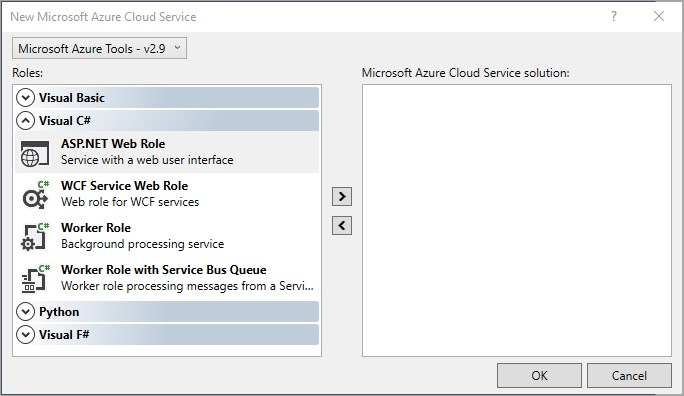
만약 여러분들이 "Azure Cloud Service" 프로젝트와 함께 ASP.NET 웹 사이트를 생성하는 거라면 여기서 "ASP.NET Web Role" 항목을 선택해서 추가하면 됩니다. 반면, 이미 생성해 두었던 ASP.NET 사이트에 "Azure Cloud Service" 배포를 할 거라면 이 단계에서 아무것도 안하고 그냥 "OK"를 누릅니다.
여기서는, 이미 만들어 두었던 사이트를 Azure로 배포할 것이므로 "OK"를 누릅니다.
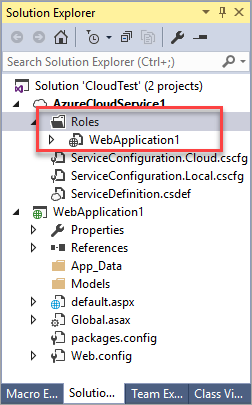
그럼, 프로젝트 구성이 다음과 같이 됩니다.

사실 "Azure Cloud Service" 프로젝트는 Azure로의 배포를 위한 정보를 가지는 것일 뿐 소스 코드를 포함하지는 않습니다.
이제 기존에 만들어진 ASP.NET 프로젝트(그림에서는 WebApplication1)를 AzureCLoudService1 프로젝트에 알려야 하는데, 이를 위해 "Roles" 노드를 우클릭해,
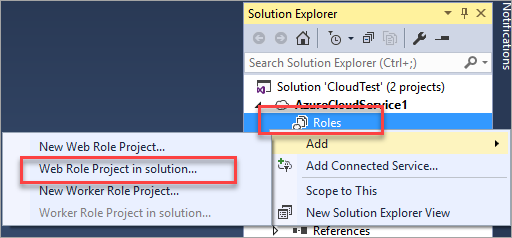
"Add" / "Web Role Project in solution..." 메뉴를 선택해 Azure에 배포될 웹 프로젝트를 선택하면 됩니다. 이것을 마치면 다음과 같이 보입니다.
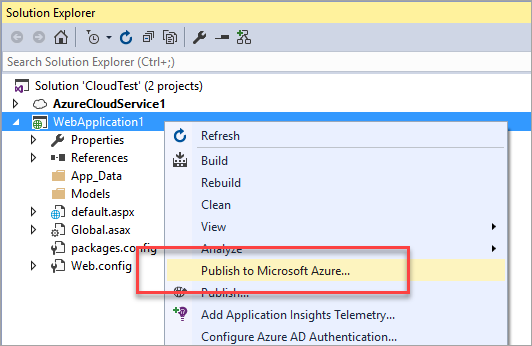
이제 여러분들의 웹 프로젝트는 Azure 배포를 지원하게 되는데요. 이 때문에 웹 프로젝트를 마우스 우클릭하면 "Publish to Microsoft Azure..." 메뉴가 생깁니다.
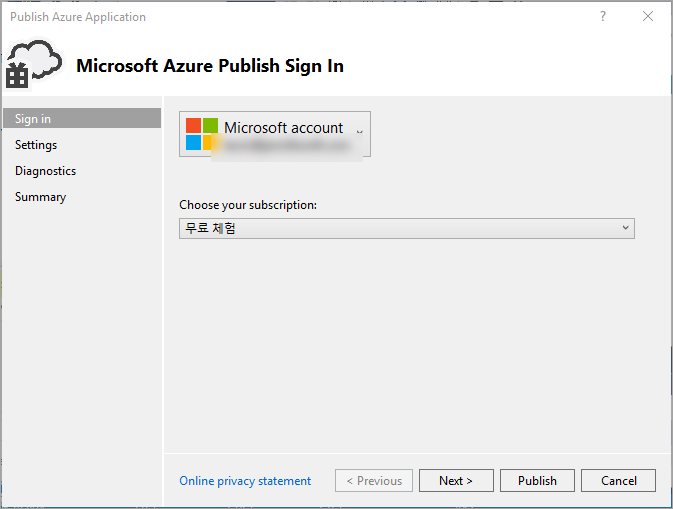
이 메뉴를 선택하면, "Publish Azure Application" 대화창이 뜹니다. 첫 번째는 Azure 구독을 가입한 Microsoft 계정과 구독 이름을 선택하고,
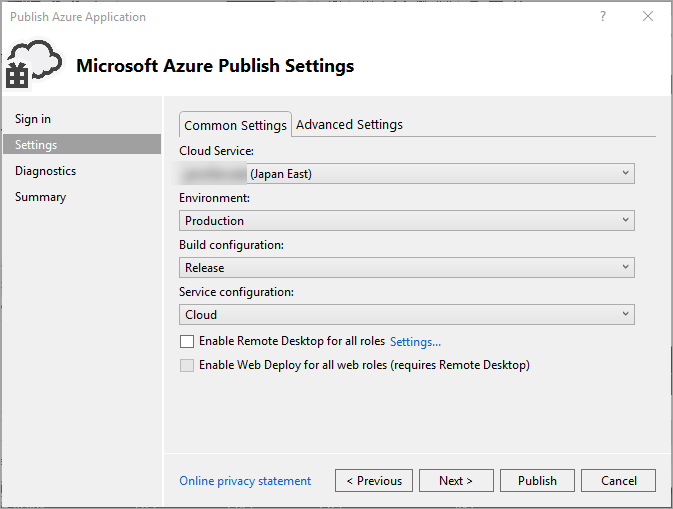
그다음은, Azure Portal에서 여러분이 생성한 클라우드 서비스 이름을 선택합니다.
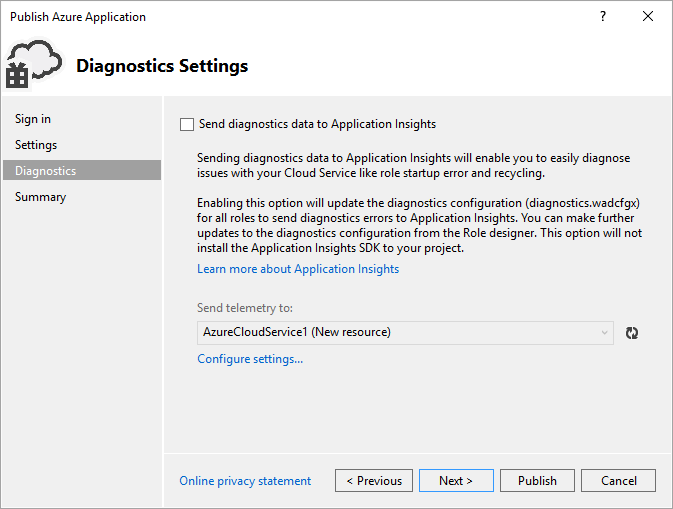
다음의 "Diganostics" 서비스는 원한다면 선택하시고, 여기서는 테스트에 불과하니 그냥 설정을 해제합니다.
모든 입력을 마치고 "Publish" 버튼을 누르면 이제 Azure 클라우드 서비스로 웹 사이트가 배포됩니다. 이후, 웹 사이트가 변경되면 다시 "Publish to Microsoft Azure..." 메뉴를 선택해 배포를 반복하는 식으로 업데이트를 합니다.
이것으로 여러분들의 첫 번째 PaaS 프로젝트 실습이 완료됩니다. ^^
Azure Cloud Service가 좋은 점이 하나 있다면, 바로 RDP 접속이 된다는 것입니다. 추가된 AzureCloudService1 노드를 마우스 우클릭하면 "Configure Remote Desktop..." 메뉴가 나오는데 이를 선택해 현재 웹 응용 프로그램이 배포된 Virtual Machine으로의 RDP 접속을 '허가'할 수 있습니다. 이렇게 설정된 정보는 AzureCloudService1 프로젝트의 ServiceConfiguration.[Cloud/Local].cscfg 파일에 저장됩니다. (참고로, 계정 명을 email 형식으로 넣으면 로그인이 안됩니다.)
<?xml version="1.0" encoding="utf-8"?>
<ServiceConfiguration serviceName="AzureCloudService1" xmlns="http://schemas.microsoft.com/ServiceHosting/2008/10/ServiceConfiguration" osFamily="4" osVersion="*" schemaVersion="2015-04.2.6">
  <Role name="WebApplication1">
    <Instances count="1" />
    <ConfigurationSettings>
      <Setting name="Microsoft.WindowsAzure.Plugins.RemoteAccess.Enabled" value="true" />
      <Setting name="Microsoft.WindowsAzure.Plugins.RemoteAccess.AccountUsername" value="...[생략]..." />
      <Setting name="Microsoft.WindowsAzure.Plugins.RemoteAccess.AccountEncryptedPassword" value="MIIBnQYJKoZIhvcNAQcDoIIBj..[생략]...p7wtJreiJSFV0Bde1Cz" />
      <Setting name="Microsoft.WindowsAzure.Plugins.RemoteAccess.AccountExpiration" value="2017-07-22T23:59:59.0000000+09:00" />
      <Setting name="Microsoft.WindowsAzure.Plugins.RemoteForwarder.Enabled" value="true" />
    </ConfigurationSettings>
    <Certificates>
      <Certificate name="Microsoft.WindowsAzure.Plugins.RemoteAccess.PasswordEncryption" thumbprint="2BE3E581411C442389194D457413385756C015F3" thumbprintAlgorithm="sha1" />
    </Certificates>
  </Role>
</ServiceConfiguration>
따라서, 웹 사이트를 다시 (소스 코드 변경에 상관없이) Azure에 배포해야 그다음부터 RDP 접속이 됩니다.
일단 RDP 접속을 허용했으면, 서버 탐색기에서 해당 서비스가 실행 중인 Azure VM 인스턴스를 찾아 마우스 우클릭해 "Connect using Remote Desktop..." 메뉴를 선택해 RDP 접속을 할 수 있습니다.
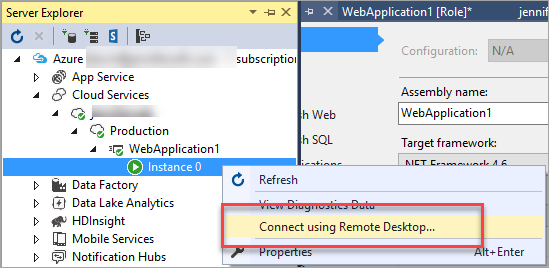
그럼, 여느 RDP 연결과 다름없는 VM 접속 환경이 되어 여러분들이 원하는 작업을 할 수 있습니다.
딱 한 번, 다음과 같은 메시지로 배포 시 오류가 발생했던 적이 있습니다.
Unable to update connection strings in the Service Configuration: Cloud
not get the Microsoft Azure storage account settings for '...' needed to configure an application module. Please check your network connection and verify that the account exists.
그냥 잠시 후 다시 배포를 하니 문제 없이 되었습니다.
Azure Cloud Service로 배포되는 WebRole은 현재 지원되는 .NET 버전이 4.0/4.5입니다. 만약 4.6이 포함된 웹 프로젝트를 배포하는 경우 다음과 같은 식의 빌드 경고가 발생합니다. (2017-01-07 업데이트: osFamily를 5로 지정하면 Windows Server 2016 VM이 사용되어 닷넷 4.6이 가능해집니다.)
2>------ Rebuild All started: Project: AzureCloudService1, Configuration: Debug Any CPU ------
2>..\WebApplication1\WebApplication1.csproj(0,0): warning WAT210: Microsoft Azure Cloud Service projects only support roles that run on .NET Framework versions 4.0 and 4.5.  Please set the Target Framework property in the project settings for project 'WebApplication1' to .NET Framework 4.0, or .NET Framework 4.5.
2>WebApplication1(0,0): warning WAT190: The project 'WebApplication1' targets .NET Framework 4.6. To make sure that the role starts, this version of the .NET Framework must be installed on the virtual machine for this role. You can use a startup task to install the required version, if it is not already installed as part of the Microsoft Azure guest OS. For more details, see http://go.microsoft.com/fwlink/?LinkId=309796.
빌드 시 발생하는 경고 메시지라서 무시할 수 있는데요. 절대 무시해서는 안됩니다. 이런 경우 배포 후 응용 프로그램이 구동되지 않습니다.
"Publish to Microsoft Azure..." 메뉴를 선택해서 배포할 때 마법사 창의 "Diagnostics Settings" 단계에서 "Send diagnostics data to Application Insights" 옵션이 언제나 설정되어 있는 것을 볼 수 있습니다. 원치 않는 경우, 매번 배포할때마다 이 옵션을 꺼야 하는데요. 이게 은근히 귀찮습니다.
다행히, 이 단계를 끄는 방법이 있습니다.
disable send diagnostics data to application insights on publish settings
; http://stackoverflow.com/questions/37052111/disable-send-diagnostics-data-to-application-insights-on-publish-settings
다음과 같이 "Azure Cloud Service" 프로젝트의 "Roles"에 등록된 웹 프로젝트를 마우스 우클릭해 "Add Diagnostic Configuration"을 선택하면 하위에 "diagnostics.wadcfgx" 파일이 생성됩니다. (이미 이 파일이 있다면 다음 단계로 넘어갑니다.)
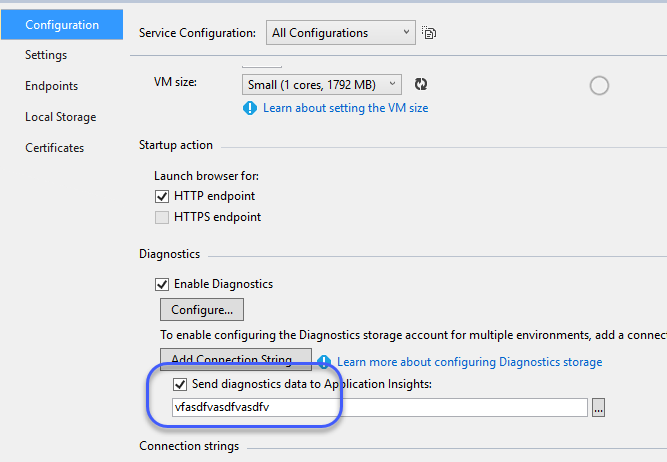
그다음, 다시 "Roles"에 등록된 웹 프로젝트를 마우스 우클릭해 "Properties" 메뉴를 선택하면 다음 화면과 같이 속성 창이 열리고,
위의 화면에서 "Send diagnostics data to Application Insights" 옵션을 체크하면 설정 창이 나옵니다.
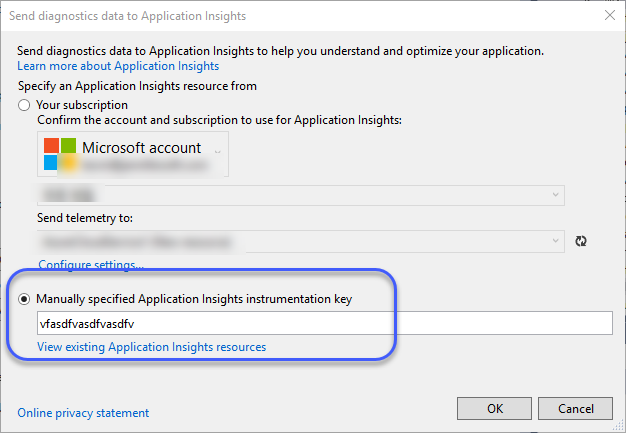
보는 바와 같이 "Manually specified Application Insights instrumentation key" 항목을 선택하고 입력 상자에는 무작위로 의미 없는 값을 입력한 후 "OK" 버튼을 누릅니다.
그럼 속성 창에 다음과 같이 구성되는데,
위에서 무작위로 입력했던 값을 지우고 저장해 줍니다. 이후부터는, "Publish to Microsoft Azure..." 메뉴로 배포 시 "Diagnostics Settings"를 묻지 않으며, "Application Insights instrumentation key" 값도 비어 있기 때문에 아무런 영향을 끼치지 않게 됩니다.
[이 글에 대해서 여러분들과 의견을 공유하고 싶습니다. 틀리거나 미흡한 부분 또는 의문 사항이 있으시면 언제든 댓글 남겨주십시오.]