Windows Server 2016 Nano 서버 VHD 이미지 만드는 방법 - TP5 기준
이 글은 다음의 글에 대한 (미리 말하지만 실패한) 실습입니다.
How to Install Windows Server 2016 Nano in a VM
; https://www.petri.com/how-to-install-windows-server-2016-nano-in-a-vm
(** 이 글의 실습은 Windows 10 또는 Windows Server 2016에서 해야 합니다.)
현재 나노 서버 설치 이미지는 평가판에서만 제공되고,
Windows Server Evaluations
; https://www.microsoft.com/en-us/evalcenter/evaluate-windows-server-technical-preview
MSDN 구독자 다운로드 센터에는 '별개의 항목'으로는 올라오지 않은 상태라서, 대신 Windows Server 2016 ISO를 통해 설치해야 합니다. 따라서, Nano 서버가 아닌 "Windows Server 2016"의 ISO 배포 파일을 다운로드 받아 마운트 시켜 "Nano Server"를 추출해야 합니다.
일단, ISO 파일을 마운트 시켰으면 "\NanoServer" 폴더를 볼 수 있는데 이를 C:\temp 폴더에 복사해 둡니다. 그다음, 아래의 링크에서 PowerShell 스크립트를 다운로드합니다.
Convert-WindowsImage.ps1 - WIM2VHD for Windows 10 (also Windows 8 and 8.1)
; https://gallery.technet.microsoft.com/scriptcenter/Convert-WindowsImageps1-0fe23a8f
관리자 권한으로 PowerShell 명령행을 실행하고 다음의 명령어를 차례로 실행해 줍니다.
PS C:\temp> Set-ExecutionPolicy unrestricted

PS C:\temp> Import-Module .\Convert-WindowsImage.ps1

PS C:\temp> Convert-WindowsImage -WIM 'c:\temp\nanoserver\NanoServer.wim' -VHD 'c:\temp\vhd\nanoserver.vhd' -DiskType Fixed -VHDFormat VHD -SizeBytes 10GB -Edition 1 -VHDPartitionStyle MBR

Windows(R) Image to Virtual Hard Disk Converter for Windows(R) 10
Copyright (C) Microsoft Corporation.  All rights reserved.
Version 10.0.9000.0.amd64fre.fbl_core1_hyp_dev(mikekol).141224-3000 Beta

INFO   : Image 1 selected ()...
INFO   : Creating fixed disk...
INFO   : Attaching VHD...
INFO   : Disk initialized with MBR...
INFO   : Disk partitioned...
INFO   : Volume formatted...
INFO   : Access path (K:\) has been assigned...
INFO   : Applying image to VHD. This could take a while...
INFO   : Signing disk...
INFO   : Image applied. Making image bootable...
INFO   : Fixing the Device ID in the BCD store on VHD...
INFO   : Drive is bootable. Cleaning up...
INFO   : Closing VHD...
INFO   : Done.
위의 명령에서 -VHD 옵션으로 vhd 생성 파일 경로를 지정했는데, c:\temp\vhd 폴더가 미리 마련되어 있어야 합니다. (위의 명령어 실행 시 예외가 발생하면 "
Convert-WindowsImage.ps1 사용 방법 정리" 글을 참고하세요.)
또한 위의 명령은 Gen1 유형의 VM을 위한 VHD 파일을 생성합니다. Gen2 유형의 VM에서 쓴다면 다음과 같이 명령어를 입력하면 됩니다.
Convert-WindowsImage -WIM 'c:\temp\nanoserver\NanoServer.wim' -VHD 'c:\temp\vhd\nanoserver.vhdx' -DiskType Fixed -VHDFormat VHDX -SizeBytes 10GB -Edition 1 -VHDPartitionStyle GPT
남은 작업은 이제 VHD 파일에 미리 원하는 패키지를 넣는 정도입니다. 이를 위해 우선 vhd 파일을 마운트 시키고,
# 그냥 탐색기를 이용해 vhd 파일을 마운트 해도 됩니다.

PS C:\temp> Mount-DiskImage -ImagePath 'c:\temp\vhd\nanoserver.vhd'
탐색기를 실행해 마운트가 어느 드라이브로 되었는지 확인합니다. (제 경우에는 P 드라이브였기 때문에 아래의 스크립트에 "-Path P:\"로 지정했습니다.) 그다음, 해당 드라이브에 NanoServer 폴더에 있던 패키지를 원하는 만큼 추가합니다.
Add-WindowsPackage -Path P:\ -PackagePath C:\temp\NanoServer\Packages\Microsoft-NanoServer-Compute-Package.cab
Add-WindowsPackage -Path P:\ -PackagePath C:\temp\NanoServer\Packages\Microsoft-NanoServer-FailoverCluster-Package.cab
Add-WindowsPackage -Path P:\ -PackagePath C:\temp\NanoServer\Packages\Microsoft-NanoServer-Guest-Package.cab
Add-WindowsPackage -Path P:\ -PackagePath C:\temp\NanoServer\Packages\Microsoft-NanoServer-OEM-Drivers-Package.cab
Add-WindowsPackage -Path P:\ -PackagePath C:\temp\NanoServer\Packages\Microsoft-NanoServer-Storage-Package.cab
Add-WindowsPackage -Path P:\ -PackagePath C:\temp\NanoServer\Packages\Microsoft-NanoServer-IIS-Package.cab
참고로, "
How to Install Windows Server 2016 Nano in a VM" 실습에 나오는 "Microsoft-OneCore-ReverseForwarders-Package.cab" 패키지는 Technical Preview 5 이후 기본 포함된 상태라서 현재는 목록에 없습니다.
나머지 NanoServer에 포함되어 있던 패키지 및 간략한 역할 설명은 다음과 같습니다.
Microsoft-NanoServer-Compute-Package.cab == Hyper-V Role
Microsoft-NanoServer-Containers-Package.cab == Host support for Windows Containers
Microsoft-NanoServer-DCB-Package.cab == Data Center Bridging
Microsoft-NanoServer-Defender-Package.cab == Windows Defender Antimalware, including a default signature file
Microsoft-NanoServer-DNS-Package.cab == DNS Server role
Microsoft-NanoServer-DSC-Package.cab == Desired State Configuration (DSC)
Microsoft-NanoServer-FailoverCluster-Package.cab == Failover Clustering
Microsoft-NanoServer-Guest-Package.cab == Hyper-V guest drivers for hosting Nano Server as a virtual machine (Deploying on a virtual machine)
Microsoft-NanoServer-Host-Package.cab == Deploying on an physical machine
Microsoft-NanoServer-IIS-Package.cab == Internet Information Server (IIS)
Microsoft-NanoServer-OEM-Drivers-Package.cab == Basic drivers for a variety of network adapters and storage controllers. This is the same set of drivers included in a Server Core installation of Windows Server 2016.
Microsoft-NanoServer-SCVMM-Compute-Package.cab == System Center Virtual Machine Manager agent
Microsoft-NanoServer-SCVMM-Package.cab == System Center Virtual Machine Manager agent
Microsoft-NanoServer-SecureStartup-Package.cab
Microsoft-NanoServer-ShieldedVM-Package.cab
Microsoft-NanoServer-SoftwareInventoryLogging-Package.cab
Microsoft-NanoServer-Storage-Package.cab == File Server role and other storage components
완료했으면 VHD 마운팅을 제거합니다.
Dismount-DiskImage -ImagePath 'c:\temp\vhd\nanoserver.vhd'
이제 Hyper-V에 VM으로 올릴 수 있는데요. VM 하나 추가하고 nanoserver.vhd를 가상 HDD 장치로 추가해 주면 끝!!!
VM으로 올린 이후의 동작은 다음의 글에 잘 설명되어 있습니다.
Introducing the Nano Server Recovery Console
; https://docs.microsoft.com/en-us/archive/blogs/nanoserver/introducing-the-nano-server-recovery-console
VM을 시작하면, 잠시 후 다음 화면과 같이 로그인 화면이 뜹니다.
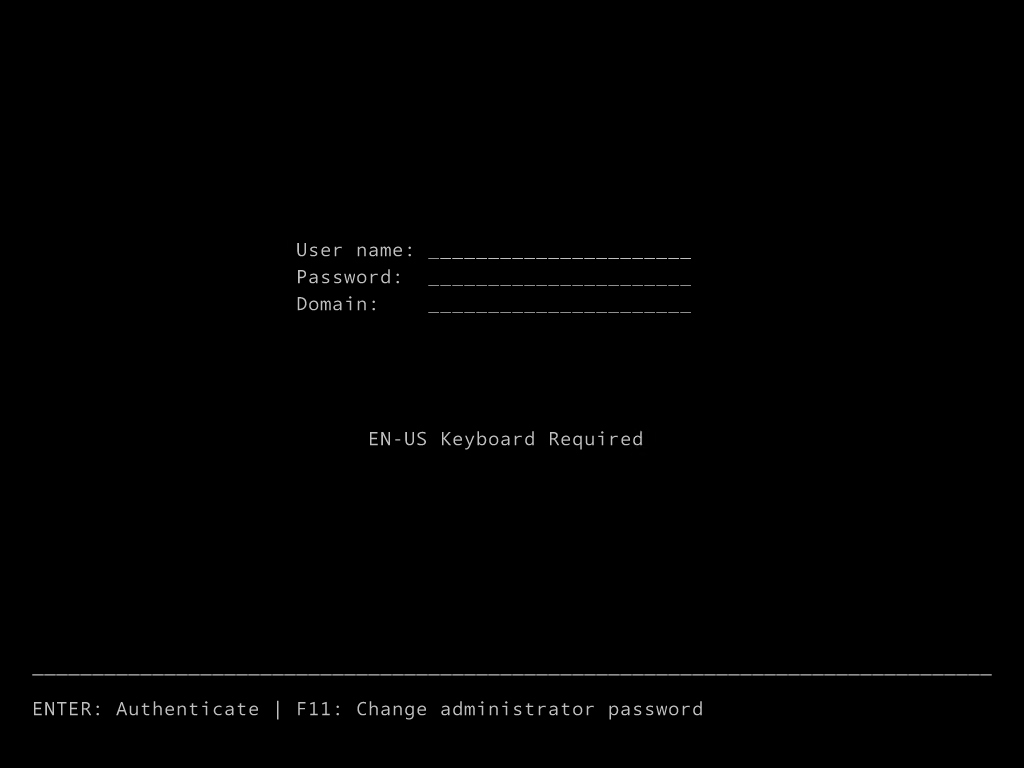
그럼, "User name:" 항목에 "Administrator"를 입력하고 "Password:" 는 원하는 것을 입력하면 됩니다. 엔터를 치면 암호를 다시 한번 입력받는 단계로 넘어가고 방금 전과 동일한 암호를 입력하면 새롭게 "Administrator" 계정으로 로그인이 이뤄집니다.
그다음 화면으로 진행하면 아래와 같이 나옵니다.
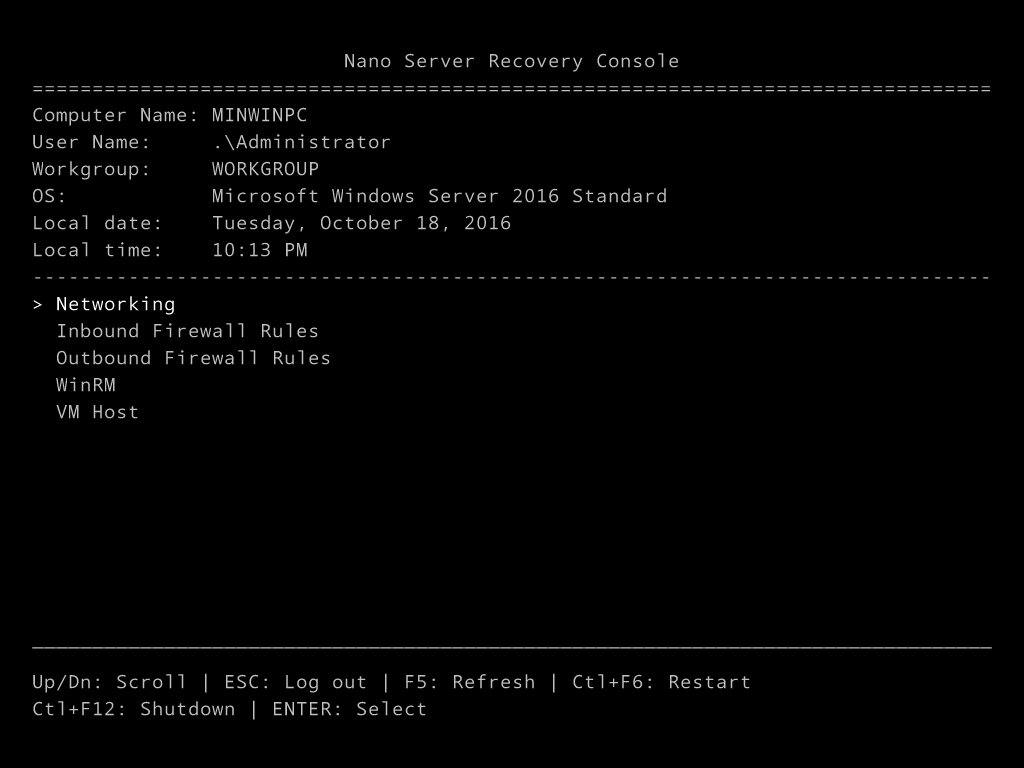
제목을 보시면, Shell을 위한 Console이 아니고 "Nano Server Recovery Console"이라고 나옵니다. (Nano Server는 Shell조차도 없습니다.) "Networking"을 선택하면 IP 주소를 확인할 수 있기 때문에 외부에서 접근하기 위해 필수로 알아두어야 하는 정보입니다.
하지만, 이 글의 첫 머리에서 '실패한 실습'이라고 했는데요. 여기서부터가 문제입니다.
Inbound Firewall Rules / Outbound Firewall Rules를 들어가면 다음과 같은 식으로 빈 화면이 나옵니다.
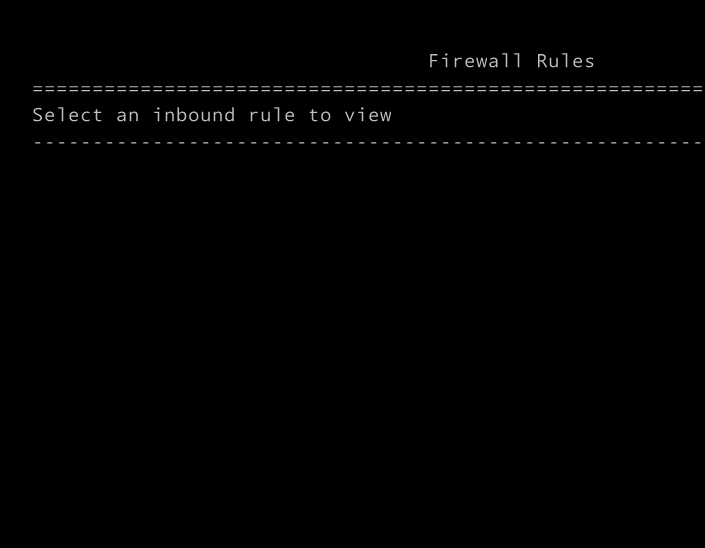
또한 WinRM 메뉴에 들어가 원격 관리를 활성화하려고 선택하면 "Operation failed. Press ENTER or ESC to continue." 오류 메시지가 뜹니다.
이유는 알 수 없지만, "
How to Install Windows Server 2016 Nano in a VM" 글의 내용은 TP5까지만 잘 동작한 듯하고 정식 버전이 나온 지금은 이것과는 다른 무언가가 있는 것 같습니다. (혹시, 나중에 그 차이점을 알아낼 것을 대비해서 이 글의 실습은 실패했지만 기록으로 남기는 것입니다. ^^)
참고로, 위와 같이 직접 만든 VHD 말고, 다음에서 공개하는 Nano Server 평가판 VHD 파일을 받아서 VM에 붙이면 정상적으로 잘 동작합니다.
Windows Server Evaluations
; https://www.microsoft.com/en-us/evalcenter/evaluate-windows-server-technical-preview
이후의 글은 오류가 발생한 것에 대한 정리입니다.
Add-WindowsPackage 명령어 사용 시 Windows 8 / 2012에서 하게 되면 다음과 같은 식의 오류가 발생합니다.
PS C:\temp> Add-WindowsPackage ?Path P:\ ?PackagePath C:\temp\NanoServer\Packages\Microsoft-NanoServer-Compute-Package.cab
Add-WindowsPackage : To service this Windows image requires the latest version of the DISM. See http://go.microsoft.com/fwlink/?LinkId=293395 to find the latest version of DISM,
and http://go.microsoft.com/fwlink/?LinkId=293394 to learn how to install the latest version of DISM from the ADK on your computer.
At line:1 char:1
+ Add-WindowsPackage ?Path P:\ ?PackagePath C:\temp\NanoServer\Packages\Microsoft- ...
+ ~~~~~~~~~~~~~~~~~~~~~~~~~~~~~~~~~~~~~~~~~~~~~~~~~~~~~~~~~~~~~~~~~~~~~~~~~~~~~~~~
    + CategoryInfo          : NotSpecified: (:) [Add-WindowsPackage], COMException
    + FullyQualifiedErrorId : Microsoft.Dism.Commands.AddWindowsPackageCommand
메시지에서는 새로운 ADK 도구를 다운로드하라고 하는데,
Installing the Windows ADK
; https://docs.microsoft.com/en-us/previous-versions/windows/hh825494(v=win.10)
실제로 해봐도 소용없습니다. 왜냐하면 ADK 설치 파일은 "C:\Program Files (x86)\Windows Kits\8.1\Assessment and Deployment Kit"에 풀어놓는 반면 Add-WindowsPackage는 오로지 dism.exe 파일을 c:\windows\system32에서만 찾기 때문입니다.
사실, PowerShell이 새롭게 설치한 dism.exe를 사용한다고 해도 안 되는 것은 마찬가지입니다. 왜냐하면, 현재(2016-10-19) "
http://go.microsoft.com/fwlink/?LinkId=293394"에서 다운로드할 수 있는 dism.exe 버전은 6.3.9600.17031이고 이것은 Windows 8/2012에 설치된 것과 같은 버전입니다.
문제가 안 되는 새로운 버전의 dism.exe는 Windows 10/2016에서 구할 수 있는 "10.0.14393.0"입니다. 또한 윈도우 서버 2016 ISO 파일의 \sources 폴더에 있는데 이것을 PowerShell 스크립트를 실행하는 c:\temp에 복사해도... 여전히 안 됩니다. 웬일인지, PowerShell 환경의 Add-WindowsPackage 명령어는 dism.exe를 반드시 c:\windows\system32의 것만 사용합니다.
아마도 해당 dism.exe 관련 파일들을 c:\windows\system32 폴더로 복사하면 될 것도 같은데, 왠지 system32 폴더의 내용을 바꾸는 것이 불안합니다. ^^
그냥... 속 편하게 Windows 10이나 또 다른 Windows Server 2016에서 Add-WindowsPackage 작업을 하는 것이 권장됩니다.
아래와 같은 오류 메시지가 발생한다면?
PS C:\temp> Convert-WindowsImage -WIM 'c:\temp\nanoserver\NanoServer.wim' -VHD 'c:\temp\vhd\nanoserver.vhd' -DiskType Fixed -VHDFormat VHD -SizeBytes 10GB -Edition 1

Windows(R) Image to Virtual Hard Disk Converter for Windows(R) 10
Copyright (C) Microsoft Corporation.  All rights reserved.
Version 10.0.9000.0.amd64fre.fbl_core1_hypdev(mikekol).141224-3000 Beta


INFO   : Image 1 selected ()...
INFO   : Creating fixed disk...
ERROR  : Exception calling "CreateFixedDisk" with "4" argument(s): "The system cannot find the path speciied"
INFO   : Log folder is %USERPROFILE%\AppData\Local\Temp\Convert-WindowsImage\1c2a2bc0-023b-4b4d-bb35-f6681c8d03ab

INFO   : Closing Windows image...
INFO   : Done.
원인은, vhd 파일이 생성될 대상 폴더가 준비되어 있지 않은 경우에 발생합니다. 위의 경우에서는 "c:\temp\vhd" 폴더가 없기 때문입니다.
VM에 올렸는데 다음과 같이 booting 오류 메시지가 나오는 경우가 있습니다.
Boot failure. Reboot and Select proper Boot device
or Insert Boot Media in selected Boot device
이는 당연한 결과입니다. "
How to Install Windows Server 2016 Nano in a VM" 글에 따라 실습하면 아래와 같은 출력 결과가 나오는데,
PS C:\temp> Convert-WindowsImage -WIM 'c:\temp\nanoserver\NanoServer.wim' -VHD 'c:\temp\vhd\nanoserver.vhd' -DiskType Fixed -VHDFormat VHD -SizeBytes 10GB -Edition 1

Windows(R) Image to Virtual Hard Disk Converter for Windows(R) 10
Copyright (C) Microsoft Corporation.  All rights reserved.
Version 10.0.9000.0.amd64fre.fbl_core1_hyp_dev(mikekol).141224-3000 Beta

INFO   : Image 1 selected ()...
INFO   : Creating fixed disk...
INFO   : Attaching VHD...
INFO   : Disk initialized with GPT...
INFO   : Disk partitioned
INFO   : System Partition created
INFO   : Boot Partition created
INFO   : System Volume formatted (with DiskPart)...
INFO   : Boot Volume formatted (with Format-Volume)...
INFO   : Access path (G:\) has been assigned to the System Volume...
INFO   : Access path (H:\) has been assigned to the Boot Volume...
INFO   : Applying image to VHD. This could take a while...
INFO   : Signing disk...
INFO   : Image applied. Making image bootable...
INFO   : Drive is bootable. Cleaning up...
INFO   : Closing VHD...

INFO   : Closing Windows image...
INFO   : Done.
"
Convert-WindowsImage.ps1 - WIM2VHD for Windows 10 (also Windows 8 and 8.1)" 스크립트가 기본적으로 Disk를 GPT로 초기화하고 있기 때문에 Gen1 유형의 VM에서는 부팅용으로 사용할 수 없기 때문입니다. (GPT로 초기화된 경우 이는 Gen2 유형의 VM에서만 부팅 디스크로 쓸 수 있습니다.)
사실, 위의 명령어가 올바르지 않은 또 다른 면이 있는데, Gen2 유형의 VM은 vhd 파일을 가상 하드 디스크로 쓸 수 없습니다. (Gen2 유형의 VM은 vhdx 유형을 지원합니다.) 따라서 다음과 같이 명시적으로 MBR 파티션을 사용하라고 지정해야 합니다.
Convert-WindowsImage -WIM 'c:\temp\nanoserver\NanoServer.wim' -VHD 'c:\temp\vhd\nanoserver.vhd' -DiskType Fixed -VHDFormat VHD -SizeBytes 10GB -Edition 1 -VHDPartitionStyle MBR
[이 글에 대해서 여러분들과 의견을 공유하고 싶습니다. 틀리거나 미흡한 부분 또는 의문 사항이 있으시면 언제든 댓글 남겨주십시오.]