Raspberry Pi Zero(OTG)를 다른 컴퓨터에 연결해 가상 키보드로 쓰는 방법
지난 글에서 Raspberry Pi Zero의 OTG 기능을 이용해 "유선 USB 이더넷 카드"로 사용하는 방법을 설명했는데요. ^^
Raspberry Pi Zero(OTG)를 다른 컴퓨터에 연결해 가상 이더넷 카드로 쓰는 방법
; https://www.sysnet.pe.kr/2/0/11353
이번에는 그보다 더 재미있는 "가상 키보드(또는 마우스)"로 동작시키는 방법을 소개합니다. ^^
(참고로
지난 글의 이더넷 실습을 했다면 cmdline.txt의 "modules-load=dwc2,g_ether" 내용을 삭제합니다.)
(지난번과 마찬가지로) 먼저 "/boot" 디렉터리의 "config.txt" 파일을 열어 다음의 라인을 추가해줍니다.
dtoverlay=dwc2
그다음 /etc/modules 파일에 다음의 2가지 설정을 추가하고,
dwc2
g_hid
파이를 키보드로써 동작시키는 스크립트를 실행합니다. 이 스크립트 파일의 내용은 다음의 글에서 구할 수 있는데,
Setting up RPi Zero as a g_hid keyboard
; https://www.raspberrypi.org/forums/viewtopic.php?t=151645&f=28
아래에 포함시켜놨으니 사용하시면 됩니다.
#!/bin/bash
# From the README at https://github.com/girst/hardpass

dtoverlay dwc2
modprobe dwc2
modprobe libcomposite
cd /sys/kernel/config/usb_gadget/
mkdir -p g1
cd g1
echo 0x1d6b > idVendor # Linux Foundation
echo 0x0104 > idProduct # Multifunction Composite Gadget
echo 0x0100 > bcdDevice # v1.0.0
echo 0x0200 > bcdUSB # USB2
mkdir -p strings/0x409
echo "fedcba9876543210" > strings/0x409/serialnumber
echo "girst" > strings/0x409/manufacturer
echo "Hardpass" > strings/0x409/product
N="usb0"
mkdir -p functions/hid.$N
echo 1 > functions/hid.usb0/protocol
echo 1 > functions/hid.usb0/subclass
echo 8 > functions/hid.usb0/report_length
echo -ne \\x05\\x01\\x09\\x06\\xa1\\x01\\x05\\x07\\x19\\xe0\\x29\\xe7\\x15\\x00\\x25\\x01\\x75\\x01\\x95\\x08\\x81\\x02\\x95\\x01\\x75\\x08\\x81\\x03\\x95\\x05\\x75\\x01\\x05\\x08\\x19\\x01\\x29\\x05\\x91\\x02\\x95\\x01\\x75\\x03\\x91\\x03\\x95\\x06\\x75\\x08\\x15\\x00\\x25\\x65\\x05\\x07\\x19\\x00\\x29\\x65\\x81\\x00\\xc0 > functions/hid.usb0/report_desc
C=1
mkdir -p configs/c.$C/strings/0x409
echo "Config $C: ECM network" > configs/c.$C/strings/0x409/configuration
echo 250 > configs/c.$C/MaxPower
ln -s functions/hid.$N configs/c.$C/
ls /sys/class/udc > UDC
위의 내용을 virt_key.sh 파일명으로 만들어 저장하고,
$ nano virt_key.sh
실행 권한을 부여한 후 실행합니다.
$ chmod +x ./virt_key.sh
$ sudo ./virt_key.sh
(재부팅하면 스크립트로 설정된 환경이 초기화되므로 .bashrc 등의 파일에 virt_key.sh 명령을 추가하는 것도 좋습니다.)
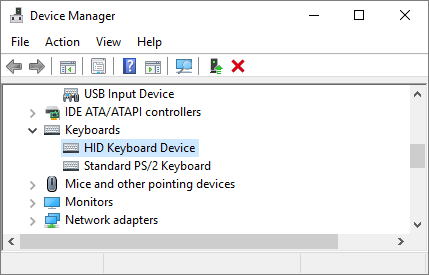
이렇게 하고 USB to Micro B 케이블로 컴퓨터에 연결하면 다음과 같이 "HID Keyboard Device"라는 장치로 인식됩니다.
키보드로 인식되었으니 당연히 대상 컴퓨터에 키보드 입력을 보내야 할 텐데요, 이를 위해 테스트 용으로 다음의 소스 코드를 이용합니다.
Linux USB HID gadget driver
; https://www.kernel.org/doc/Documentation/usb/gadget_hid.txt
/* hid_gadget_test */

#include <pthread.h>
#include <string.h>
#include <stdio.h>
#include <ctype.h>
#include <fcntl.h>
#include <errno.h>
#include <stdio.h>
#include <stdlib.h>
#include <unistd.h>

#define BUF_LEN 512

struct options {
    const char    *opt;
    unsigned char val;
};

static struct options kmod[] = {
    {.opt = "--left-ctrl",      .val = 0x01},
    {.opt = "--right-ctrl",     .val = 0x10},
    {.opt = "--left-shift",     .val = 0x02},
    {.opt = "--right-shift",    .val = 0x20},
    {.opt = "--left-alt",       .val = 0x04},
    {.opt = "--right-alt",      .val = 0x40},
    {.opt = "--left-meta",      .val = 0x08},
    {.opt = "--right-meta",     .val = 0x80},
    {.opt = NULL}
};

static struct options kval[] = {
    {.opt = "--return", .val = 0x28},
    {.opt = "--esc",    .val = 0x29},
    {.opt = "--bckspc", .val = 0x2a},
    {.opt = "--tab",    .val = 0x2b},
    {.opt = "--spacebar",   .val = 0x2c},
    {.opt = "--caps-lock",  .val = 0x39},
    {.opt = "--f1",     .val = 0x3a},
    {.opt = "--f2",     .val = 0x3b},
    {.opt = "--f3",     .val = 0x3c},
    {.opt = "--f4",     .val = 0x3d},
    {.opt = "--f5",     .val = 0x3e},
    {.opt = "--f6",     .val = 0x3f},
    {.opt = "--f7",     .val = 0x40},
    {.opt = "--f8",     .val = 0x41},
    {.opt = "--f9",     .val = 0x42},
    {.opt = "--f10",    .val = 0x43},
    {.opt = "--f11",    .val = 0x44},
    {.opt = "--f12",    .val = 0x45},
    {.opt = "--insert", .val = 0x49},
    {.opt = "--home",   .val = 0x4a},
    {.opt = "--pageup", .val = 0x4b},
    {.opt = "--del",    .val = 0x4c},
    {.opt = "--end",    .val = 0x4d},
    {.opt = "--pagedown",   .val = 0x4e},
    {.opt = "--right",  .val = 0x4f},
    {.opt = "--left",   .val = 0x50},
    {.opt = "--down",   .val = 0x51},
    {.opt = "--kp-enter",   .val = 0x58},
    {.opt = "--up",     .val = 0x52},
    {.opt = "--num-lock",   .val = 0x53},
    {.opt = NULL}
};

int keyboard_fill_report(char report[8], char buf[BUF_LEN], int *hold)
{
    char *tok = strtok(buf, " ");
    int key = 0;
    int i = 0;

    for (; tok != NULL; tok = strtok(NULL, " ")) {

        if (strcmp(tok, "--quit") == 0)
            return -1;

        if (strcmp(tok, "--hold") == 0) {
            *hold = 1;
            continue;
        }

        if (key < 6) {
            for (i = 0; kval[i].opt != NULL; i++)
                if (strcmp(tok, kval[i].opt) == 0) {
                    report[2 + key++] = kval[i].val;
                    break;
                }
            if (kval[i].opt != NULL)
                continue;
        }

        if (key < 6)
            if (islower(tok[0])) {
                report[2 + key++] = (tok[0] - ('a' - 0x04));
                continue;
            }

        for (i = 0; kmod[i].opt != NULL; i++)
            if (strcmp(tok, kmod[i].opt) == 0) {
                report[0] = report[0] | kmod[i].val;
                break;
            }
        if (kmod[i].opt != NULL)
            continue;

        if (key < 6)
            fprintf(stderr, "unknown option: %s\n", tok);
    }
    return 8;
}

static struct options mmod[] = {
    {.opt = "--b1", .val = 0x01},
    {.opt = "--b2", .val = 0x02},
    {.opt = "--b3", .val = 0x04},
    {.opt = NULL}
};

int mouse_fill_report(char report[8], char buf[BUF_LEN], int *hold)
{
    char *tok = strtok(buf, " ");
    int mvt = 0;
    int i = 0;
    for (; tok != NULL; tok = strtok(NULL, " ")) {

        if (strcmp(tok, "--quit") == 0)
            return -1;

        if (strcmp(tok, "--hold") == 0) {
            *hold = 1;
            continue;
        }

        for (i = 0; mmod[i].opt != NULL; i++)
            if (strcmp(tok, mmod[i].opt) == 0) {
                report[0] = report[0] | mmod[i].val;
                break;
            }
        if (mmod[i].opt != NULL)
            continue;

        if (!(tok[0] == '-' && tok[1] == '-') && mvt < 2) {
            errno = 0;
            report[1 + mvt++] = (char)strtol(tok, NULL, 0);
            if (errno != 0) {
                fprintf(stderr, "Bad value:'%s'\n", tok);
                report[1 + mvt--] = 0;
            }
            continue;
        }

        fprintf(stderr, "unknown option: %s\n", tok);
    }
    return 3;
}

static struct options jmod[] = {
    {.opt = "--b1",     .val = 0x10},
    {.opt = "--b2",     .val = 0x20},
    {.opt = "--b3",     .val = 0x40},
    {.opt = "--b4",     .val = 0x80},
    {.opt = "--hat1",   .val = 0x00},
    {.opt = "--hat2",   .val = 0x01},
    {.opt = "--hat3",   .val = 0x02},
    {.opt = "--hat4",   .val = 0x03},
    {.opt = "--hatneutral", .val = 0x04},
    {.opt = NULL}
};

int joystick_fill_report(char report[8], char buf[BUF_LEN], int *hold)
{
    char *tok = strtok(buf, " ");
    int mvt = 0;
    int i = 0;

    *hold = 1;

    /* set default hat position: neutral */
    report[3] = 0x04;

    for (; tok != NULL; tok = strtok(NULL, " ")) {

        if (strcmp(tok, "--quit") == 0)
            return -1;

        for (i = 0; jmod[i].opt != NULL; i++)
            if (strcmp(tok, jmod[i].opt) == 0) {
                report[3] = (report[3] & 0xF0) | jmod[i].val;
                break;
            }
        if (jmod[i].opt != NULL)
            continue;

        if (!(tok[0] == '-' && tok[1] == '-') && mvt < 3) {
            errno = 0;
            report[mvt++] = (char)strtol(tok, NULL, 0);
            if (errno != 0) {
                fprintf(stderr, "Bad value:'%s'\n", tok);
                report[mvt--] = 0;
            }
            continue;
        }

        fprintf(stderr, "unknown option: %s\n", tok);
    }
    return 4;
}

void print_options(char c)
{
    int i = 0;

    if (c == 'k') {
        printf("    keyboard options:\n"
               "        --hold\n");
        for (i = 0; kmod[i].opt != NULL; i++)
            printf("\t\t%s\n", kmod[i].opt);
        printf("\n  keyboard values:\n"
               "        [a-z] or\n");
        for (i = 0; kval[i].opt != NULL; i++)
            printf("\t\t%-8s%s", kval[i].opt, i % 2 ? "\n" : "");
        printf("\n");
    } else if (c == 'm') {
        printf("    mouse options:\n"
               "        --hold\n");
        for (i = 0; mmod[i].opt != NULL; i++)
            printf("\t\t%s\n", mmod[i].opt);
        printf("\n  mouse values:\n"
               "        Two signed numbers\n"
               "--quit to close\n");
    } else {
        printf("    joystick options:\n");
        for (i = 0; jmod[i].opt != NULL; i++)
            printf("\t\t%s\n", jmod[i].opt);
        printf("\n  joystick values:\n"
               "        three signed numbers\n"
               "--quit to close\n");
    }
}

int main(int argc, const char *argv[])
{
    const char *filename = NULL;
    int fd = 0;
    char buf[BUF_LEN];
    int cmd_len;
    char report[8];
    int to_send = 8;
    int hold = 0;
    fd_set rfds;
    int retval, i;

    if (argc < 3) {
        fprintf(stderr, "Usage: %s devname mouse|keyboard|joystick\n",
            argv[0]);
        return 1;
    }

    if (argv[2][0] != 'k' && argv[2][0] != 'm' && argv[2][0] != 'j')
      return 2;

    filename = argv[1];

    if ((fd = open(filename, O_RDWR, 0666)) == -1) {
        perror(filename);
        return 3;
    }

    print_options(argv[2][0]);

    while (42) {

        FD_ZERO(&rfds);
        FD_SET(STDIN_FILENO, &rfds);
        FD_SET(fd, &rfds);

        retval = select(fd + 1, &rfds, NULL, NULL, NULL);
        if (retval == -1 && errno == EINTR)
            continue;
        if (retval < 0) {
            perror("select()");
            return 4;
        }

        if (FD_ISSET(fd, &rfds)) {
            cmd_len = read(fd, buf, BUF_LEN - 1);
            printf("recv report:");
            for (i = 0; i < cmd_len; i++)
                printf(" %02x", buf[i]);
            printf("\n");
        }

        if (FD_ISSET(STDIN_FILENO, &rfds)) {
            memset(report, 0x0, sizeof(report));
            cmd_len = read(STDIN_FILENO, buf, BUF_LEN - 1);

            if (cmd_len == 0)
                break;

            buf[cmd_len - 1] = '\0';
            hold = 0;

            memset(report, 0x0, sizeof(report));
            if (argv[2][0] == 'k')
                to_send = keyboard_fill_report(report, buf, &hold);
            else if (argv[2][0] == 'm')
                to_send = mouse_fill_report(report, buf, &hold);
            else
                to_send = joystick_fill_report(report, buf, &hold);

            if (to_send == -1)
                break;

            if (write(fd, report, to_send) != to_send) {
                perror(filename);
                return 5;
            }
            if (!hold) {
                memset(report, 0x0, sizeof(report));
                if (write(fd, report, to_send) != to_send) {
                    perror(filename);
                    return 6;
                }
            }
        }
    }

    close(fd);
    return 0;
}
라즈베리 파이에 기본 설치되어 있는 gcc를 이용해 컴파일하고,
$ gcc hid_gadget_test.c -o hid_tester
키보드 장치로써 I/O 작업을 수행하도록 다음과 같이 파이에서 실행해 둡니다.
$ sudo ./hid_tester /dev/hidg0 keyboard
(여기서 hidg0 장치명은 "ls /dev" 명령어로 확인할 수 있습니다.)
가상 키보드 입력 테스트를 위해 라즈베리 파이 제로를 연결한 컴퓨터에는 메모장을 띄워 놓고 입력 포커스를 유지합니다. 그다음, 라즈베리 파이의 hid_tester 입력 화면에서 다음의 내용을 타이핑합니다.
t
e
s
t
--return
그럼 라즈베리 파이 제로를 연결한 컴퓨터의 메모장에 "test" + Enter 키가 입력되는 것을 확인할 수 있습니다.
오~~~ 멋지죠? ^^
이것을 이용하면 "
keybd_event, mouse_event, 포트 I/O"를 통한 방법보다 훨씬 더 매끄러운 매크로 입력 프로그램도 가능합니다.
윈도우즈 사용자를 위한 라즈베리 파이 제로 W 모델을 설정하는 방법
; https://www.sysnet.pe.kr/2/0/11372

Raspberry Pi Zero(OTG)를 다른 컴퓨터에 연결해 가상 이더넷 카드로 쓰는 방법
; https://www.sysnet.pe.kr/2/0/11353

Raspberry Pi Zero(OTG)를 다른 컴퓨터에 연결해 가상 키보드로 쓰는 방법
; https://www.sysnet.pe.kr/2/0/11354

Raspberry Pi Zero(OTG)를 다른 컴퓨터에 연결해 가상 마우스로 쓰는 방법
; https://www.sysnet.pe.kr/2/0/11355

Raspberry Pi Zero(OTG)를 다른 컴퓨터에 연결해 가상 마우스 + 키보드로 쓰는 방법
; https://www.sysnet.pe.kr/2/0/11356

Raspberry Pi Zero(OTG)를 다른 컴퓨터에 연결해 가상 마우스로 쓰는 방법 (절대 좌표)
; https://www.sysnet.pe.kr/2/0/11364

Raspberry Pi Zero(OTG)를 다른 컴퓨터에 연결해 가상 키보드 및 마우스로 쓰는 방법 (절대 좌표, 상대 좌표, 휠)
; https://www.sysnet.pe.kr/2/0/11369

라즈베리 파이 용 C++ 프로젝트에 SSL Socket 적용
; https://www.sysnet.pe.kr/2/0/11411

Raspberry Pi/Windows 다중 플랫폼 지원 컴파일 관련 오류 기록
; https://www.sysnet.pe.kr/2/0/11373

Linux 3: 라즈베리 파이 - (윈도우의 NT 서비스처럼) 부팅 시 시작하는 프로그램 설정
; https://www.sysnet.pe.kr/2/0/11374
[이 글에 대해서 여러분들과 의견을 공유하고 싶습니다. 틀리거나 미흡한 부분 또는 의문 사항이 있으시면 언제든 댓글 남겨주십시오.]