Raspberry Pi Zero(OTG)를 다른 컴퓨터에 연결해 가상 마우스로 쓰는 방법
지난 글에서 Raspberry Pi Zero의 OTG 기능을 이용해 "유선 USB 이더넷 카드" / "가상 키보드"로 사용하는 방법을 설명했는데요. ^^
Raspberry Pi Zero(OTG)를 다른 컴퓨터에 연결해 가상 이더넷 카드로 쓰는 방법
; https://www.sysnet.pe.kr/2/0/11353

Raspberry Pi Zero(OTG)를 다른 컴퓨터에 연결해 가상 키보드로 쓰는 방법
; https://www.sysnet.pe.kr/2/0/11354
이번에는 "가상 마우스"로 동작시키는 방법을 소개합니다. ^^
처음 2개의 작업은 가상 마우스로 했을 때와 동일합니다.
먼저 "/boot" 디렉터리의 "config.txt" 파일을 열어 다음의 라인을 추가하고,
dtoverlay=dwc2
/etc/modules 파일에 다음의 2가지 설정을 추가합니다.
dwc2
g_hid
이제 파이를 마우스로써 동작시키는 스크립트를 실행해야 하는데 이것은 키보드를 구현할 때의 것을 참조하면 됩니다.
#!/bin/bash
# From the README at https://github.com/girst/hardpass

dtoverlay dwc2
modprobe dwc2
modprobe libcomposite
cd /sys/kernel/config/usb_gadget/
mkdir -p g1
cd g1
echo 0x1d6b > idVendor # Linux Foundation
echo 0x0104 > idProduct # Multifunction Composite Gadget
echo 0x0100 > bcdDevice # v1.0.0
echo 0x0200 > bcdUSB # USB2
mkdir -p strings/0x409
echo "fedcba9876543210" > strings/0x409/serialnumber
echo "girst" > strings/0x409/manufacturer
echo "Hardpass" > strings/0x409/product
N="usb0"
mkdir -p functions/hid.$N
echo 1 > functions/hid.usb0/protocol
echo 1 > functions/hid.usb0/subclass
echo 8 > functions/hid.usb0/report_length
echo -ne \\x05\\x01\\x09\\x06\\xa1\\x01\\x05\\x07\\x19\\xe0\\x29\\xe7\\x15\\x00\\x25\\x01\\x75\\x01\\x95\\x08\\x81\\x02\\x95\\x01\\x75\\x08\\x81\\x03\\x95\\x05\\x75\\x01\\x05\\x08\\x19\\x01\\x29\\x05\\x91\\x02\\x95\\x01\\x75\\x03\\x91\\x03\\x95\\x06\\x75\\x08\\x15\\x00\\x25\\x65\\x05\\x07\\x19\\x00\\x29\\x65\\x81\\x00\\xc0 > functions/hid.usb0/report_desc
C=1
mkdir -p configs/c.$C/strings/0x409
echo "Config $C: ECM network" > configs/c.$C/strings/0x409/configuration
echo 250 > configs/c.$C/MaxPower
ln -s functions/hid.$N configs/c.$C/
ls /sys/class/udc > UDC
위의 내용에서 강조한 echo -ne로 출력되는
HID Report Descriptors를 마우스용으로 바꿔야 합니다. 참고로, 위의 report descriptor는 다음과 같은 의미가 있습니다.
// "HID Descriptor Tool" from USB.org
// http://www.usb.org/developers/hidpage/dt2_4.zip
// (스크립트의 바이트 배열과 dt.exe의 keybrd.hid 파일의 내용과 일치합니다.)

// Tutorial about USB HID Report Descriptors
// ; https://eleccelerator.com/tutorial-about-usb-hid-report-descriptors/

05, 01, USAGE_PAGE (Generic Desktop)
09, 06, USAGE (Keyboard)
a1, 01, COLLECTION (Application)
05, 07      USAGE_PAGE (Keyboard)
19, e0      USAGE_MINIMUM (Keyboard LeftControl)
29, e7      USAGE_MAXIMUM (Keyboard Right GUI)
15, 00      LOGICAL_MINIMUM (0)
25, 01      LOGICAL_MAXIMUM (1)
75, 01      REPORT_SIZE (1)
95, 08      REPORT_COUNT (8)
81, 02      INPUT (Data, Var, Abs)
95, 01      REPORT_COUNT (1)
75, 08      REPORT_SIZE (8)
81, 03      INPUT (Cnst, Var, Abs)
95, 05      REPORT_COUNT (5)
75, 01      REPORT_SIZE (1)
05, 08      USAGE_PAGE (LEDs)
19, 01      USAGE_MINIMUM (Num Lock)
29, 05      USAGE_MAXIMUM (Kana)
91, 02      OUTPUT (Data, Var, Abs)
95, 01      REPORT_COUNT (1)
75, 03      REPORT_SIZE (3)
91, 03      OUTPUT (Cnst, Var, Abs)
95, 06      REPORT_COUNT (6)
75, 08      REPORT_SIZE (8)
15, 00      LOGICAL_MINIMUM (0)
25, 65      LOGICAL_MAXIMUM (101)
05, 07      USAGE_PAGE (Keyboard)
19, 00      USAGE_MINIMUM (Reserved (no event indicated))
29, 65      USAGE_MAXIMUM (Keyboard Application)
81, 00      INPUT (Data, Ary, Abs)
C0      END_COLLECTION
마우스용은 운이 좋게도 이미 dt.exe의 예제로 mouse.hid가 포함되어 있으므로 그것을 그대로 사용하면 됩니다.
// mouse.hid

05, 01  USAGE_PAGE (Generic Desktop)
09, 02  USAGE (Mouse)
a1, 01  COLLECTION (Application)
09, 01      USAGE (Pointer)
a1, 00      COLLECTION (Physical)
05, 09          USAGE_PAGE (Button)
19, 01          USAGE_MINIMUM (Button 1)
29, 03          USAGE_MAXIMUM (Button 3)
15, 00          LOGICAL_MINIMUM (0)
25, 01          LOGICAL_MAXIMUM (1)
95, 03          REPORT_COUNT (3)
75, 01          REPORT_SIZE (1)
81, 02          INPUT (Data, Var, Abs)
95, 01          REPORT_COUNT (1)
75, 05          REPORT_SIZE (5)
81, 03          INPUT (Cnst, Var, Abs)
05, 01          USAGE_PAGE (Generic Desktop)
09, 30          USAGE (X)
09, 31          USAGE (Y)
15, 81          LOGICAL_MINIMUM (-127)
25, 7f          LOGICAL_MAXIMUM (127)
75, 08          REPORT_SIZE (8)
95, 02          REPORT_COUNT (2)
81, 06          INPUT (Data, Var, Rel)
C0          END_COLLECTION
C0      END_COLLECTION
따라서 위의 내용을 다음과 같이 16진수 바이트 표현으로 변경하고,
\\x05\\x01\\x09\\x02\\xa1\\x01\\x09\\x01\\xa1\\x00\\x05\\x09\\x19\\x01\\x29\\x03\\x15\\x00\\x25\\x01\\x95\\x03\\x75\\x01\\x81\\x02\\x95\\x01\\x75\\x05\\x81\\x03\\x05\\x01\\x09\\x30\\x09\\x31\\x15\\x81\\x25\\x7f\\x75\\x08\\x95\\x02\\x81\\x06\\xC0\\xC0
스크립트에 넣어주면 됩니다. ^^
#!/bin/bash
# From the README at https://github.com/girst/hardpass

dtoverlay dwc2
modprobe dwc2
modprobe libcomposite
cd /sys/kernel/config/usb_gadget/
mkdir -p g1
cd g1
echo 0x1d6b > idVendor # Linux Foundation
echo 0x0104 > idProduct # Multifunction Composite Gadget
echo 0x0100 > bcdDevice # v1.0.0
echo 0x0200 > bcdUSB # USB2
mkdir -p strings/0x409
echo "fedcba9876543210" > strings/0x409/serialnumber
echo "girst" > strings/0x409/manufacturer
echo "Hardpass" > strings/0x409/product
N="usb0"
mkdir -p functions/hid.$N
echo 1 > functions/hid.usb0/protocol
echo 1 > functions/hid.usb0/subclass
echo 8 > functions/hid.usb0/report_length
echo -ne \\x05\\x01\\x09\\x02\\xa1\\x01\\x09\\x01\\xa1\\x00\\x05\\x09\\x19\\x01\\x29\\x03\\x15\\x00\\x25\\x01\\x95\\x03\\x75\\x01\\x81\\x02\\x95\\x01\\x75\\x05\\x81\\x03\\x05\\x01\\x09\\x30\\x09\\x31\\x15\\x81\\x25\\x7f\\x75\\x08\\x95\\x02\\x81\\x06\\xC0\\xC0 > functions/hid.usb0/report_desc
C=1
mkdir -p configs/c.$C/strings/0x409
echo "Config $C: ECM network" > configs/c.$C/strings/0x409/configuration
echo 250 > configs/c.$C/MaxPower
ln -s functions/hid.$N configs/c.$C/
ls /sys/class/udc > UDC
파일명을 mouse.sh로 만들어 저장하고,
$ nano mouse.sh
실행 권한을 부여한 후 실행합니다.
$ chmod +x ./mouse.sh
$ sudo ./mouse.sh
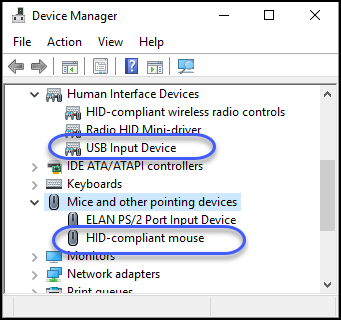
이제 USB to Micro B 케이블로 컴퓨터에 연결하면 다음과 같이 "USB Input Device", "HID-compliant mouse"라는 장치로 인식됩니다.
마우스 제어 역시
지난번 글의 hid_gadget_test 프로그램을 이용하면 됩니다. 마우스 장치로써 I/O 작업을 수행하도록 다음과 같이 파이에서 실행해 두고,
$ sudo ./hid_tester /dev/hidg0 mouse
가상 마우스 입력 테스트를 위해 라즈베리 파이 제로를 연결한 컴퓨터의 마우스 포인터를 중앙 정도에 위치한 후, hid_tester 입력 화면에서 다음의 내용을 타이핑합니다.
50 60
100 -20
--b1
첫 번째 라인을 통해 현재 마우스 위치에서 +50, +60으로 이동한 후 두 번째 명령에서는 +100, -20의 위치로 바뀝니다. 그다음 --b1 명령으로 인해 마우스 좌측 버튼이 클릭되는 효과를 갖는 식으로 테스트가 아~~~~주 잘 됩니다. ^^
참고로 HID report descriptor에서 LOGICAL_MINIMUM (-127), LOGICAL_MAXIMUM (127) 값의 범위로 지정했기 때문에 127이 넘어가는 숫자는 overflow되어 다시 음수 처리되어 마우스 포인터의 이동에 반영됩니다.
윈도우즈 사용자를 위한 라즈베리 파이 제로 W 모델을 설정하는 방법
; https://www.sysnet.pe.kr/2/0/11372

Raspberry Pi Zero(OTG)를 다른 컴퓨터에 연결해 가상 이더넷 카드로 쓰는 방법
; https://www.sysnet.pe.kr/2/0/11353

Raspberry Pi Zero(OTG)를 다른 컴퓨터에 연결해 가상 키보드로 쓰는 방법
; https://www.sysnet.pe.kr/2/0/11354

Raspberry Pi Zero(OTG)를 다른 컴퓨터에 연결해 가상 마우스로 쓰는 방법
; https://www.sysnet.pe.kr/2/0/11355

Raspberry Pi Zero(OTG)를 다른 컴퓨터에 연결해 가상 마우스 + 키보드로 쓰는 방법
; https://www.sysnet.pe.kr/2/0/11356

Raspberry Pi Zero(OTG)를 다른 컴퓨터에 연결해 가상 마우스로 쓰는 방법 (절대 좌표)
; https://www.sysnet.pe.kr/2/0/11364

Raspberry Pi Zero(OTG)를 다른 컴퓨터에 연결해 가상 키보드 및 마우스로 쓰는 방법 (절대 좌표, 상대 좌표, 휠)
; https://www.sysnet.pe.kr/2/0/11369

라즈베리 파이 용 C++ 프로젝트에 SSL Socket 적용
; https://www.sysnet.pe.kr/2/0/11411

Raspberry Pi/Windows 다중 플랫폼 지원 컴파일 관련 오류 기록
; https://www.sysnet.pe.kr/2/0/11373

Linux 3: 라즈베리 파이 - (윈도우의 NT 서비스처럼) 부팅 시 시작하는 프로그램 설정
; https://www.sysnet.pe.kr/2/0/11374
[이 글에 대해서 여러분들과 의견을 공유하고 싶습니다. 틀리거나 미흡한 부분 또는 의문 사항이 있으시면 언제든 댓글 남겨주십시오.]