Raspberry Pi Zero(OTG)를 다른 컴퓨터에 연결해 가상 마우스 + 키보드로 쓰는 방법
지난 글에서 Raspberry Pi Zero의 OTG 기능을 이용해 "유선 USB 이더넷 카드" / "가상 키보드" / "가상 마우스"로 사용하는 방법을 설명했는데요. ^^
Raspberry Pi Zero(OTG)를 다른 컴퓨터에 연결해 가상 이더넷 카드로 쓰는 방법
; https://www.sysnet.pe.kr/2/0/11353

Raspberry Pi Zero(OTG)를 다른 컴퓨터에 연결해 가상 키보드로 쓰는 방법
; https://www.sysnet.pe.kr/2/0/11354

Raspberry Pi Zero(OTG)를 다른 컴퓨터에 연결해 가상 마우스로 쓰는 방법
; https://www.sysnet.pe.kr/2/0/11355
근데, 마우스와 키보드를 모두 에뮬레이션하고 싶은 경우 라즈베리 파이 제로 장치를 2대 구매해야 할까요? 바로 이럴 때, 예전에 봐두었던 책의 내용이 생각났습니다. ^^
윈도우 USB 디바이스 드라이버
 - WDM부터 최신 KMDF와 UMDF까지 윈도우 드라이버 모델 입문과 실전
; http://www.yes24.com/24/goods/4825003?scode=032&OzSrank=1
책의 내용중에 기억에 남는 것이 바로 USB Descriptors의 계층 구조였습니다.
[그림 출처:
http://www.beyondlogic.org/usbnutshell/usb5.shtml]
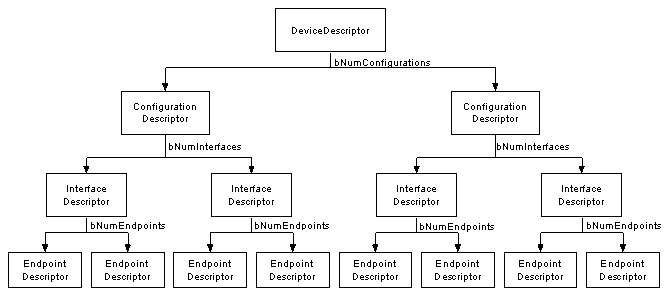
즉, 하나의 라즈베리 파이 제로 장치에 키보드와 마우스 2개의 기능을 갖는 descriptors를 맞춰 주면 된다는 것입니다.
처음 할 2개의 작업은 역시나 가상 마우스/키보드로 했을 때와 동일합니다.
먼저 "/boot" 디렉터리의 "config.txt" 파일을 열어 다음의 라인을 추가하고,
dtoverlay=dwc2
/etc/modules 파일에 다음의 2가지 설정을 추가합니다.
dwc2
g_hid
그다음, 파이를 마우스로써 동작시키는 스크립트를 실행해야 하는데
전체적인 구조는 키보드/마우스를 구현할 때의 것을 참조하면 됩니다.
#!/bin/bash
# From the README at https://github.com/girst/hardpass

dtoverlay dwc2
modprobe dwc2
modprobe libcomposite
cd /sys/kernel/config/usb_gadget/
mkdir -p g1
cd g1
echo 0x1d6b > idVendor # Linux Foundation
echo 0x0104 > idProduct # Multifunction Composite Gadget
echo 0x0100 > bcdDevice # v1.0.0
echo 0x0200 > bcdUSB # USB2
mkdir -p strings/0x409
echo "fedcba9876543210" > strings/0x409/serialnumber
echo "girst" > strings/0x409/manufacturer
echo "Hardpass" > strings/0x409/product
N="usb0"
mkdir -p functions/hid.$N
echo 1 > functions/hid.usb0/protocol
echo 1 > functions/hid.usb0/subclass
echo 8 > functions/hid.usb0/report_length

# [...omitted for brevity... - report descriptors]

C=1
mkdir -p configs/c.$C/strings/0x409
echo "Config $C: ECM network" > configs/c.$C/strings/0x409/configuration
echo 250 > configs/c.$C/MaxPower
ln -s functions/hid.$N configs/c.$C/
ls /sys/class/udc > UDC
가만 보면 /sys/kernel/config/usb_gadget/ 디렉터리 하위에 g1이라는 서브 디렉터리를 만드는데 이것이 USB descriptors의 첫 번째 "Device descriptors" 정보를 담는 걸로 보입니다. 우리가 구현하는 것은 장치가 하나이므로 "device descriptors"는 변경하지 않아도 됩니다.
그다음, g1 디렉터리 하위에 다시 functions/hid.usb0 디렉터리를 만드는데요. 이름이 functions이긴 하지만 USB descriptors의 용어로 보면 이것이 interface descriptors로 보입니다. 그러니까, 우리의 장치는 키보드와 마우스를 제공할 것이므로 2개의 interface를 정의하면 됩니다.
그리고 마지막에 g1 디렉터리 하위에 configs가 만들어지는데 아마도 configuration descriptors를 의미하는 듯합니다. 계층 구조로 보면 configuration descriptors 안에 interface descriptors를 다중 정의할 수 있으니 그럼... 대충 답이 나온 것 같습니다. 다음과 같이 2개의 functions를 정의하고 configs에 연결해 주면 되는 것입니다.
#!/bin/bash
# From the README at https://github.com/girst/hardpass

dtoverlay dwc2
modprobe dwc2
modprobe libcomposite
cd /sys/kernel/config/usb_gadget/
mkdir -p g1
cd g1
echo 0x1d6b > idVendor # Linux Foundation
echo 0x0104 > idProduct # Multifunction Composite Gadget
echo 0x0100 > bcdDevice # v1.0.0
echo 0x0200 > bcdUSB # USB2
mkdir -p strings/0x409
echo "fedcba9876543210" > strings/0x409/serialnumber
echo "girst" > strings/0x409/manufacturer
echo "Hardpass" > strings/0x409/product

N="usb0"
mkdir -p functions/hid.$N
echo 1 > functions/hid.usb0/protocol
echo 1 > functions/hid.usb0/subclass
echo 8 > functions/hid.usb0/report_length
echo -ne \\x05\\x01\\x09\\x06\\xa1\\x01\\x05\\x07\\x19\\xe0\\x29\\xe7\\x15\\x00\\x25\\x01\\x75\\x01\\x95\\x08\\x81\\x02\\x95\\x01\\x75\\x08\\x81\\x03\\x95\\x05\\x75\\x01\\x05\\x08\\x19\\x01\\x29\\x05\\x91\\x02\\x95\\x01\\x75\\x03\\x91\\x03\\x95\\x06\\x75\\x08\\x15\\x00\\x25\\x65\\x05\\x07\\x19\\x00\\x29\\x65\\x81\\x00\\xc0 > functions/hid.usb0/report_desc

N="usb1"
mkdir -p functions/hid.$N
echo 1 > functions/hid.usb1/protocol
echo 1 > functions/hid.usb1/subclass
echo 8 > functions/hid.usb1/report_length
echo -ne \\x05\\x01\\x09\\x02\\xa1\\x01\\x09\\x01\\xa1\\x00\\x05\\x09\\x19\\x01\\x29\\x03\\x15\\x00\\x25\\x01\\x95\\x03\\x75\\x01\\x81\\x02\\x95\\x01\\x75\\x05\\x81\\x03\\x05\\x01\\x09\\x30\\x09\\x31\\x15\\x81\\x25\\x7f\\x75\\x08\\x95\\x02\\x81\\x06\\xC0\\xC0 > functions/hid.usb1/report_desc

C=1
mkdir -p configs/c.$C/strings/0x409
echo "Config $C: ECM network" > configs/c.$C/strings/0x409/configuration
echo 250 > configs/c.$C/MaxPower
ln -s functions/hid.usb0 configs/c.$C/
ln -s functions/hid.usb1 configs/c.$C/

ls /sys/class/udc > UDC
정말 잘 되는지 테스트해 볼까요? ^^ 파일명을 dual.sh로 만들어 저장하고,
$ nano dual.sh
실행 권한을 부여한 후 실행합니다.
$ chmod +x ./dual.sh
$ sudo ./dual.sh
이렇게 하고 USB to Micro B 케이블로 컴퓨터에 연결하면 다음과 같이 2개의 "USB Input Device"와 키보드 쪽으로 "HID Keyboard Device", 마우스 쪽으로 "HID-compliant mouse"라는 장치가 인식됩니다.

키보드/마우스 제어 역시
지난번 글의 hid_gadget_test 프로그램을 이용하면 됩니다.
라즈베리 파이로 SSH 콘솔 연결 창을 2개 띄우고 키보드와 마우스 각각에 대해 I/O 작업을 수행하도록 다음과 같이 파이에서 실행해 둡니다.
$ sudo ./hid_tester /dev/hidg0 keyboard
$ sudo ./hid_tester /dev/hidg1 mouse
가상 마우스/키보드 입력 테스트를 위해 라즈베리 파이 제로를 연결한 컴퓨터의 마우스 포인터를 중앙 정도에 메모장과 함께 위치해 놓고, hid_tester 입력 화면에서 다음의 내용을 타이핑합니다.
50 60
100 -20
--b1
t
e
s
t
--return
제 경우에는 아~~~~주 잘 됩니다. ^^
이제 남은 것은 파이 부팅 시 자동으로 dual.sh를 실행하는 것입니다. 아래에 쓰인 대로,
Two things at once
; http://andrewnicolaou.co.uk/posts/2016/pi-zero-midi-3-two-things-at-once
/etc/systemd/system/ 디렉터리에 create-dual-usb.service 파일을 만들고,
$ cd /etc/systemd/system/
$ sudo nano create-dual-usb.service
다음의 내용으로 채웠습니다.
[Unit]
Description=Create Mouse/Keyboard USB gadgets

[Service]
Type=oneshot
ExecStart=/share/dual.sh
RemainAfterExit=yes

[Install]
WantedBy=multi-user.target
그리고 이것을 활성화시키고,
$ sudo systemctl daemon-reload
$ sudo systemctl enable create-dual-usb
재부팅을 해서,
$ sudo reboot
부팅과 함께 연결된 컴퓨터의 장치 관리자에 키보드/마우스가 정상적으로 등록되는지 확인하면 됩니다. ^^
참고로, 서비스의 오류 로그는 다음의 명령어로 확인할 수 있습니다.
$ sudo systemctl status create-dual-usb
찾아보니 괜찮은 자료들이 있군요. ^^
USB_Gadget_Configfs_API_0.pdf
; https://www.elinux.org/File:USB_Gadget_Configfs_API_0.pdf
pololu/wixel-sdk
; https://github.com/pololu/wixel-sdk/blob/master/libraries/src/usb_hid/usb_hid.c
윈도우즈 사용자를 위한 라즈베리 파이 제로 W 모델을 설정하는 방법
; https://www.sysnet.pe.kr/2/0/11372

Raspberry Pi Zero(OTG)를 다른 컴퓨터에 연결해 가상 이더넷 카드로 쓰는 방법
; https://www.sysnet.pe.kr/2/0/11353

Raspberry Pi Zero(OTG)를 다른 컴퓨터에 연결해 가상 키보드로 쓰는 방법
; https://www.sysnet.pe.kr/2/0/11354

Raspberry Pi Zero(OTG)를 다른 컴퓨터에 연결해 가상 마우스로 쓰는 방법
; https://www.sysnet.pe.kr/2/0/11355

Raspberry Pi Zero(OTG)를 다른 컴퓨터에 연결해 가상 마우스 + 키보드로 쓰는 방법
; https://www.sysnet.pe.kr/2/0/11356

Raspberry Pi Zero(OTG)를 다른 컴퓨터에 연결해 가상 마우스로 쓰는 방법 (절대 좌표)
; https://www.sysnet.pe.kr/2/0/11364

Raspberry Pi Zero(OTG)를 다른 컴퓨터에 연결해 가상 키보드 및 마우스로 쓰는 방법 (절대 좌표, 상대 좌표, 휠)
; https://www.sysnet.pe.kr/2/0/11369

라즈베리 파이 용 C++ 프로젝트에 SSL Socket 적용
; https://www.sysnet.pe.kr/2/0/11411

Raspberry Pi/Windows 다중 플랫폼 지원 컴파일 관련 오류 기록
; https://www.sysnet.pe.kr/2/0/11373

Linux 3: 라즈베리 파이 - (윈도우의 NT 서비스처럼) 부팅 시 시작하는 프로그램 설정
; https://www.sysnet.pe.kr/2/0/11374
[이 글에 대해서 여러분들과 의견을 공유하고 싶습니다. 틀리거나 미흡한 부분 또는 의문 사항이 있으시면 언제든 댓글 남겨주십시오.]