Azure 가상 머신에 Web Application을 배포하는 방법
Azure에서 Web Application을 운영하는 방법으로는 PaaS 유형으로 Cloud Services (classic), Web App (App Service)과 같은 서비스를 이용할 수 있습니다. 또는 IaaS 유형으로 가상 머신(VM)을 하나 생성해 운영하는 것도 가능합니다.
PaaS 유형의 경우 Azure Portal에서 배포를 위한 "profile" 파일을 구해 Visual Studio에서 프로젝트의 "배포" 메뉴로 바로 연결해 쉽게 응용 프로그램을 올릴 수 있습니다. 반면, IaaS 형식의 VM인 경우에는 응용 프로그램에 대한 전용 환경은 아니기 때문에 별도의 배포 프로파일이 제공되지 않으므로 약간 불편한 점이 있습니다.
물론, VM은 단일 PC와 동일하기 때문에 단순히 RDP 화면을 이용해 폴더를 복사하거나 FTP를 열어 배포하는 것도 가능합니다. 그 외에 좀 더 편리한 방식이 있다면 바로 "WebDeploy" 도구를 이용하는 것으로 이에 대해서는 다음의 문서에서 자세하게 설명하고 있습니다.
Publish an ASP.NET Web App to an Azure VM from Visual Studio
; https://learn.microsoft.com/en-us/azure/virtual-machines/windows/publish-web-app-from-visual-studio
간단하게 정리해 볼까요? ^^
우선, VM 쪽에 2가지 준비를 해줘야 합니다. 그 첫 번째로 "Web Deploy" 도구를 설치해야 합니다. 이상한 점이 있다면, 현재 3.6 버전으로 배포되는 "Web Deploy"가 아닌 아래의 글에서 설명하고 있는,
Installing and Configuring Web Deploy on IIS 8.0 or Later
; https://learn.microsoft.com/en-us/iis/install/installing-publishing-technologies/installing-and-configuring-web-deploy-on-iis-80-or-later
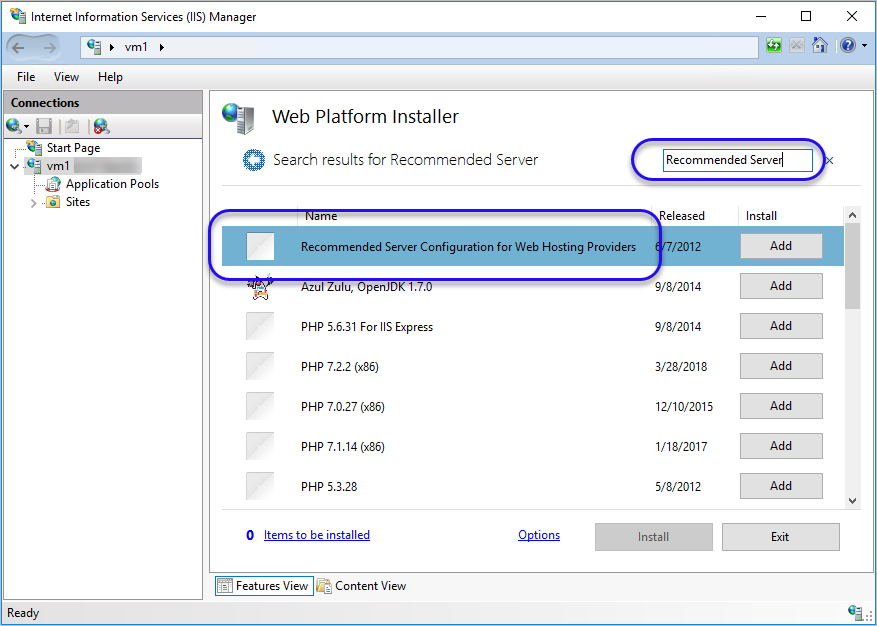
(IIS 관리자에도 제공되는) "Web Platform Installer"를 들어가 다음과 같이 "Recommended"로 검색해 "Recommended Server Configuration for Web Hosting Providers" 항목을 선택해 설치해야 합니다.
설치가 정상적으로 되었으면 VM 측에 8172 번 포트가 열립니다.
C:\>netstat -ano | findstr 8172
  TCP    0.0.0.0:8172           0.0.0.0:0              LISTENING       4
  TCP    [::]:8172              [::]:0                 LISTENING       4
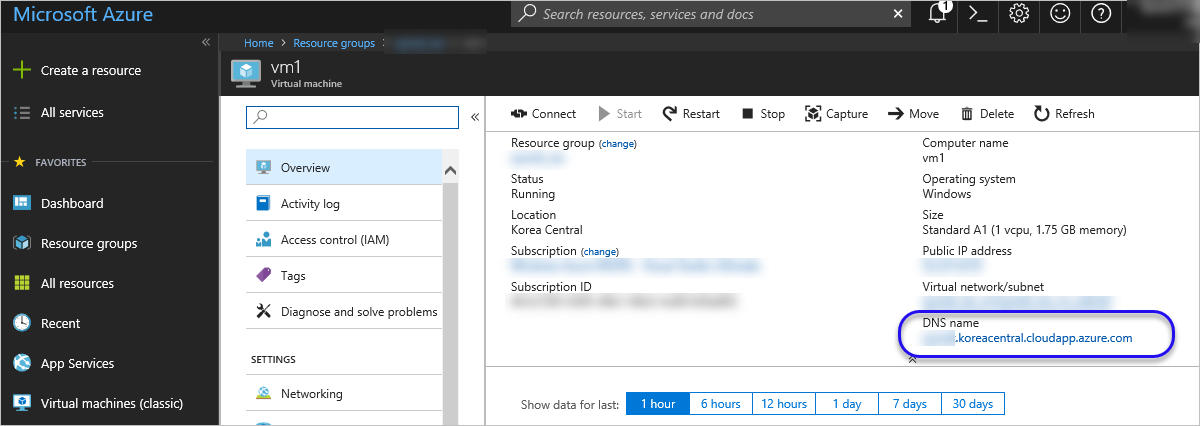
두 번째로 Azure Portal을 통해 해당 VM에 대한 DNS를 갖도록 설정해야 합니다. (별도 DNS를 구매할 필요는 없고 azure에서 기본 제공되는 DNS 설정을 하시면 됩니다.)
Create a fully qualified domain name in the Azure portal for a Windows VM
; https://learn.microsoft.com/en-us/azure/virtual-machines/windows/portal-create-fqdn
그 외에, 만약 해당 VM에 Network Security Group이 설정되어 있다면 "Inbound security rules"에서 8172 포트를 열어야 합니다.
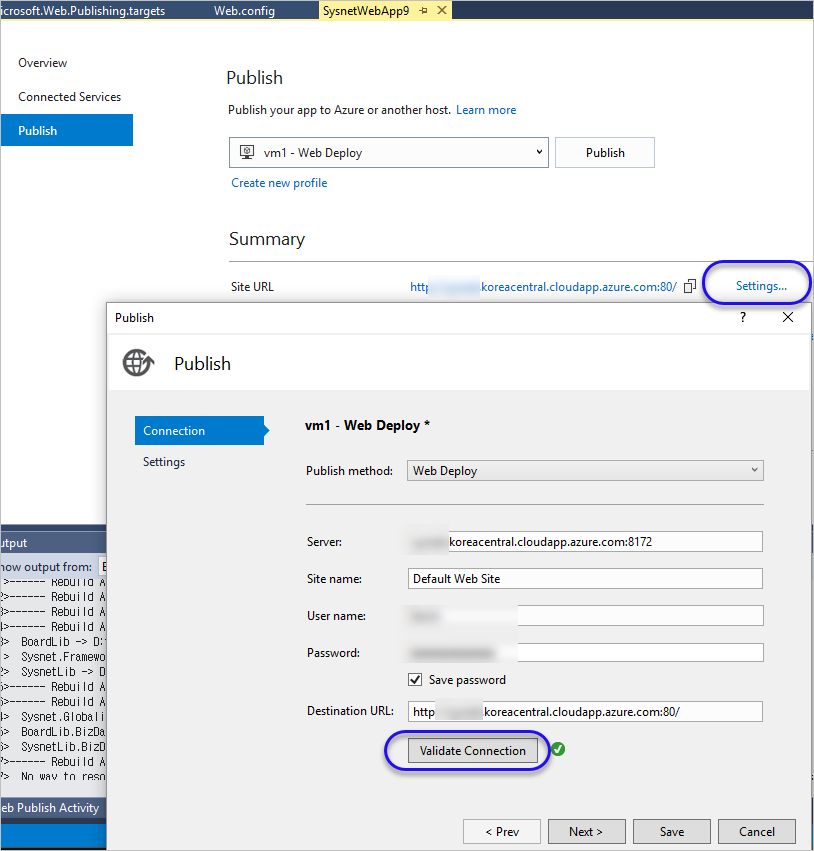
위와 같이 VM 측의 준비가 끝나면 이제 Visual Studio에서 배포할 수 있습니다. Visual Studio에서 웹 프로젝트를 우 클릭해 "Publish..." 메뉴를 선택해 다음과 같이 "Microsoft Azure Virtual Machines" 항목을 선택해 줍니다.

그다음, "Settings..." 링크를 눌러 "웹 사이트" 정보와 계정 정보를 입력 후 "Validate Connection"을 눌러 검증합니다.
이후 배포를 하면 최초 한 번은 다음과 같이 인증서 설치를 묻습니다.
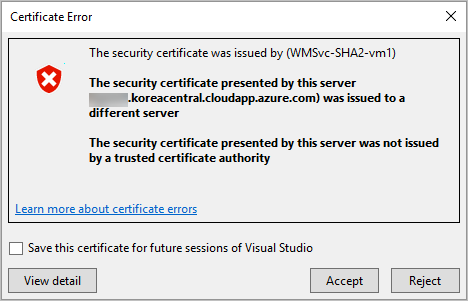
"Save this certificate for future sessions of Visual Studio" 옵션을 체크해 주고 "Accept" 버튼을 누른 후, "Publish" 버튼으로 배포를 하면 됩니다.
참고로, Cloud Services(classic) 유형의 배포는 패키징을 하고 그것을 통째로 업로드하기 때문에 많이 느린데 반해 이 글에서 설명한 Web Deploy 방식은 패키징이 아닌 변경된 파일만 업로드하기 때문에 처음 한 번을 제외하고는 배포가 확실히 빠릅니다.
참고로, "Recommended Server Configuration for Web Hosting Providers"가 아닌 Web Deploy만 설치했다면,
Web Deploy 3.6
; https://www.iis.net/downloads/microsoft/web-deploy
배포 시에 다음과 같은 오류가 발생합니다.
1>------ Build started: Project: Test.Framework, Configuration: Release Any CPU ------
...[생략]...
7>Auto ConnectionString Transformed web.config into obj\Release\CSAutoParameterize\transformed\web.config.
7>Copying all files to temporary location below for package/publish:
7>obj\Release\Package\PackageTmp.
7>Start Web Deploy Publish the Application/package to https://testsite.koreacentral.cloudapp.azure.com:8172/msdeploy.axd?site=Default%20Web%20Site ...
7>C:\Program Files (x86)\Microsoft Visual Studio\2017\Enterprise\MSBuild\Microsoft\VisualStudio\v15.0\Web\Microsoft.Web.Publishing.targets(4292,5): Error ERROR_DESTINATION_NOT_REACHABLE: Web deployment task failed. (Could not connect to the remote computer ("testsite.koreacentral.cloudapp.azure.com"). On the remote computer, make sure that Web Deploy is installed and that the required process ("Web Management Service") is started.  Learn more at: http://go.microsoft.com/fwlink/?LinkId=221672#ERROR_DESTINATION_NOT_REACHABLE.)
7>Publish failed to deploy.
7>
========== Build: 6 succeeded, 0 failed, 1 up-to-date, 0 skipped ==========
========== Publish: 0 succeeded, 1 failed, 0 skipped ==========
확인해 보면 실제로 8172 번 포트가 LISTENING 상태가 아님을 알 수 있습니다.
다음과 같은 오류가 발생하는 경우도 있습니다.
2018-04-12 오후 10:19:16
System.AggregateException: One or more errors occurred. ---> System.Exception: Publish failed due to build errors. Check the error list for more details.
   --- End of inner exception stack trace ---
   at System.Threading.Tasks.Task.ThrowIfExceptional(Boolean includeTaskCanceledExceptions)
   at System.Threading.Tasks.Task.Wait(Int32 millisecondsTimeout, CancellationToken cancellationToken)
   at Microsoft.VisualStudio.Web.Publish.PublishService.VsWebProjectPublish.<>c__DisplayClass40_0.<PublishAsync>b__2()
   at System.Threading.Tasks.Task`1.InnerInvoke()
   at System.Threading.Tasks.Task.Execute()
--- End of stack trace from previous location where exception was thrown ---
   at System.Runtime.CompilerServices.TaskAwaiter.ThrowForNonSuccess(Task task)
   at System.Runtime.CompilerServices.TaskAwaiter.HandleNonSuccessAndDebuggerNotification(Task task)
   at Microsoft.VisualStudio.ApplicationCapabilities.Publish.ViewModel.ProfileSelectorViewModel.<RunPublishTaskAsync>d__108.MoveNext()
---> (Inner Exception #0) System.Exception: Publish failed due to build errors. Check the error list for more details.<---
제 경우에는, 이 글에서 설명한 "Settings..." 링크에 대한 정보를 설정하고 나서는 발생하지 않았습니다.
배포 시 web.config에 connectionStrings 노드에 있던 연결 문자열들에 대해 다음과 같은 오류가 발생할 수 있습니다.
2>C:\Program Files (x86)\Microsoft Visual Studio\2017\Enterprise\MSBuild\Microsoft\VisualStudio\v15.0\Web\Microsoft.Web.Publishing.targets(4292,5): Error : The 'mydb-Web.config Connection String' argument cannot be null or empty.
아래의 글에 보면,
The 'DefaultConnection-Web.config Connection String' argument cannot be null or empty. VS2013
; https://stackoverflow.com/questions/28996604/the-defaultconnection-web-config-connection-string-argument-cannot-be-null-or
DB 연결 문자열 설정마다 "Use this connection string at runtime"과 'Update database" 설정이 있는데 제 경우에는 다음 화면과 같이 이런 체크 박스가 없습니다.
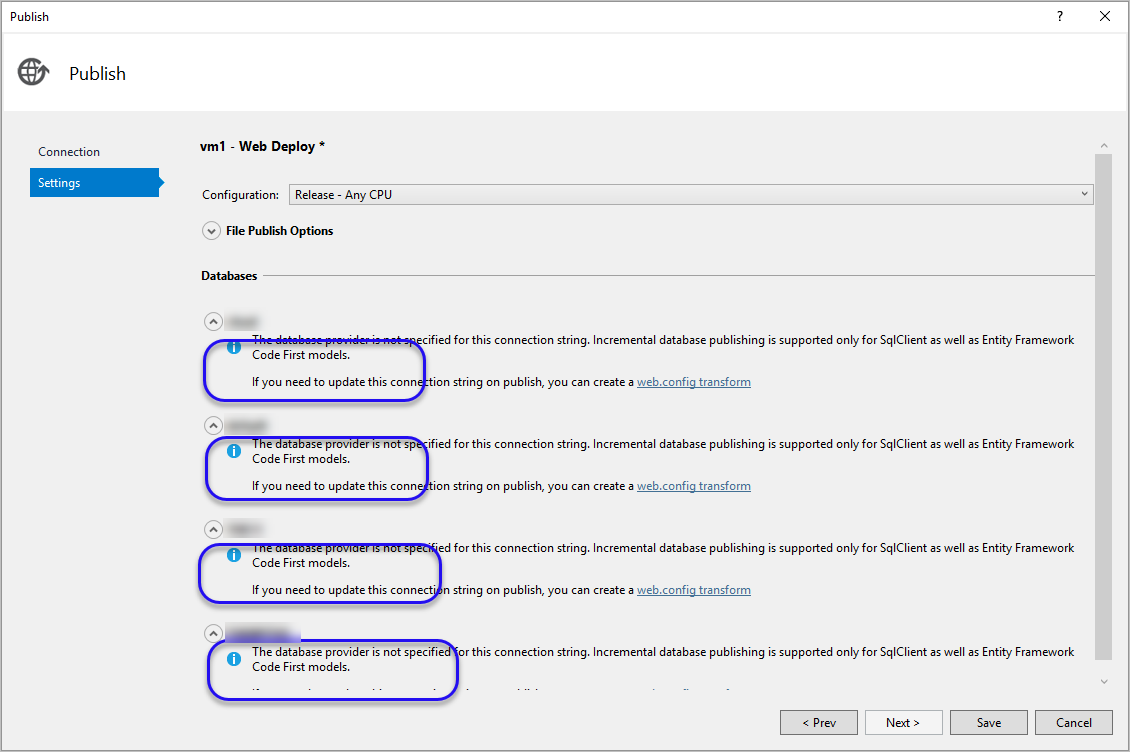
이 옵션이 뜨게 하려면 web.config의 연결 문자열에 providerName을 추가하면 됩니다.
<connectionStrings>
    <add name="db1" providerName="System.Data.SqlClient" connectionString="...[생략]..." />
    <add name="db2" providerName="System.Data.SqlClient"  connectionString="...[생략]..." />
    <add name="db3"  providerName="System.Data.SqlClient" connectionString="...[생략]..." />
    <add name="db4"  providerName="System.Data.SqlClient" connectionString="...[생략]..." />
</connectionStrings>
이렇게 변경하고 다시 배포 화면의 "Settings..." 링크로 들어가면 체크 박스가 나타납니다.
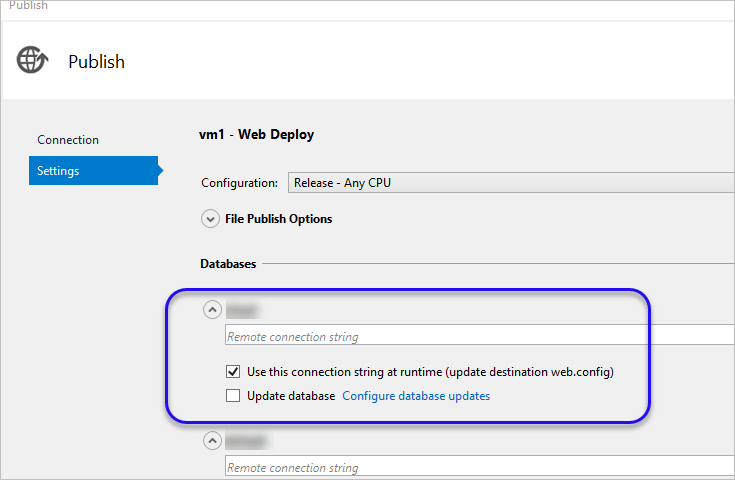
적절하게 "Use this connection string at runtime" 옵션을 설정해 주고 다시 Publish를 하면 이번에는 오류 없이 잘 배포가 됩니다. 이후에는 다시 web.config 연결 문자열 설정에서 providerName을 삭제해도 됩니다. 왜냐하면 배포 프로파일이 ".\Properties\PublishProfiles" 폴더에 .pubxml 확장자의 파일로 만들어지고 설정들이 보존되기 때문입니다.
[이 글에 대해서 여러분들과 의견을 공유하고 싶습니다. 틀리거나 미흡한 부분 또는 의문 사항이 있으시면 언제든 댓글 남겨주십시오.]