C# - JIRA REST API 사용 정리 (1) Basic 인증
JIRA REST API를 사용하는 방법을 간단하게 정리해 봅니다. ^^ 문서는 이미 다음과 같이 잘 공개되어 있습니다.
Jira REST API examples
; https://developer.atlassian.com/server/jira/platform/jira-rest-api-examples/
사용할 수 있는 API 종류는 다음의 경로에서 찾을 수 있습니다.
Index of ./software/jira/docs/api/REST
; https://docs.atlassian.com/software/jira/docs/api/REST/
가령, 여러분들의 회사에 설치된 JIRA 시스템의 버전이 6.1.4라면 다음과 같이 지원 API 문서를 볼 수 있습니다.
JIRA 6.1.4 REST API documentation
; https://docs.atlassian.com/software/jira/docs/api/REST/6.1.4/
이 글에서는 (제 환경이 ^^; 6.1.4 버전이므로) 위의 문서를 대상으로 진행합니다.)
자, 그럼 쿼리를 날려 볼까요? ^^ 예를 들어 다음과 같은 조건에서,
계정: testuser
암호: pass@word
JIRA 서버: jira.test.com
JIRA에 자신에게 할당된 이슈를 확인하는 요청을 (Windows 10에서도 제공하는) curl을 이용해 다음과 같이 확인할 수 있습니다.
[특정 사용자에게 할당된 Issue를 검색하는 쿼리: search]

curl -u [JIRA계정]:[암호] -X GET -H "Content-Type: application/json" http://[JIRA 서버]/rest/api/latest/search?jql=assignee=[사용자]
여기에 -v 옵션을 더하면 요청 및 응답 헤더를 함께 출력으로 보여주기 때문에 C# 코드로 어떻게 인증해야 하는지를 알 수 있습니다.
curl -v -u testuser:pass@word -X GET -H "Content-Type: application/json" http://jira.test.com/rest/api/latest/search?jql=assignee=testuser
위와 같이 실행하면 요청 및 응답 헤더가 다음과 같은 식으로 출력됩니다.
C:\>curl -v -u testuser:pass@word -X GET -H "Content-Type: application/json" http://jira.test.com/rest/api/latest/search?jql=assignee=testuser
Note: Unnecessary use of -X or --request, GET is already inferred.
*   Trying 192.168.100.50...
* TCP_NODELAY set
* Connected to jira.test.com (192.168.100.50) port 80 (#0)
* Server auth using Basic with user 'testuser'
> GET /rest/api/latest/search?jql=assignee=testuser HTTP/1.1
> Host: jira.test.com
> Authorization: Basic dGVzdHVzZXI6cGFzc0B3b3Jk
> User-Agent: curl/7.55.1
> Accept: */*
> Content-Type: application/json
>
< HTTP/1.1 200 OK
< Date: Thu, 28 Jun 2018 00:27:30 GMT
< Server: Apache/2.2.17 (Unix) mod_jk/1.2.31
< X-AREQUESTID: 567x639827x1
< Set-Cookie: JSESSIONID=FA156...[생략]...FD0FA; Path=/; HttpOnly
< X-Seraph-LoginReason: OK
< Set-Cookie: atlassian.xsrf.token=A7M3-BI7E-1YXF-MHP5|3c5ba...[생략]...07747|lin; Path=/
< X-ASESSIONID: 9pof4z
< X-AUSERNAME: testuser
< Cache-Control: no-cache, no-store, no-transform
< Transfer-Encoding: chunked
< Content-Type: application/json;charset=UTF-8
<
...[내용 생략]...
아하... Basic 인증 방식을 사용하고 있고, 응답으로 JSESSIONID, atlassian.xsrf.token을 Cookie로 내려주고 있습니다. 자, 그럼 2가지 방식으로 JIRA REST API를 호출할 수 있습니다.
- 인증을 위한 REST API를 호출 후, 이후의 요청은 JSESSIONID, atlassian.xsrf.token을 전달
- 모든 인증마다 BASIC 인증 헤더를 전달
이 글에서는 1번 방식을 사용할 텐데요, 그런데 딱히 REST API에 대한 로그인 전용 쿼리가 없으므로 이를 대신할 적당한 API 후보를 찾아야 합니다. 문서를 보니, /rest/api/2/myself 정도가 적당한 것 같습니다. 따라서, 우리 나름대로 Login API를 다음과 같이 만들 수 있습니다.
using System;
using System.Collections.Generic;
using System.Linq;
using System.Net;
using System.Net.Http;
using System.Text;
using System.Threading.Tasks;

namespace ConsoleApp1
{
    class Jira
    {
        const string QUERY_URL_FORMAT = "http://{0}/rest/api/latest/{1}";
        string _baseUrl;
        CookieContainer _cookies;
        HttpClient _httpClient;

        public async Task<bool> Login(string jiraServer, string userId, string password)
        {
            string url = string.Format(QUERY_URL_FORMAT, jiraServer, "myself");
            string authHeader = CreateBasicAuth(userId, password);

            HttpClientHandler handler = new HttpClientHandler();
            _cookies = new CookieContainer();
            handler.CookieContainer = _cookies;

            HttpClient hc = new HttpClient(handler);

            hc.DefaultRequestHeaders.Add("Authorization", authHeader);

            HttpResponseMessage hrm = await hc.GetAsync(url);
            if (hrm.StatusCode == System.Net.HttpStatusCode.Unauthorized)
            {
                return false;
            }

            _baseUrl = string.Format(QUERY_URL_FORMAT, jiraServer, "");
            _httpClient = hc;

            return true;
        }

        private string CreateBasicAuth(string userId, string password)
        {
            string text = userId + ":" + password;
            byte[] buf = Encoding.UTF8.GetBytes(text);
            return "Basic " + Convert.ToBase64String(buf);
        }
    }
}
사용은 이렇게 해주면 됩니다.
static async Task Main(string[] args)
{
    (string id, string password) = ("testuser", "pass@word");
    string jiraServer = "jira.test.com";

    Jira jira = new Jira();

    if (await jira.Login(jiraServer, id, password) == false)
    {
        Console.WriteLine("Auth failed: " + id);
        return;
    }

    Console.WriteLine("Connected");
}
자, 그럼 이제 개별 REST API를 C#으로 래핑하는 작업을 하나씩 해주시면 됩니다. 가령, 해당 사용자에게 할당된 모든 이슈를 가져오고 싶다면
6.1.4 버전의 API 문서에 따라, /rest/api/2/search API를 다음과 같이 추가할 수 있습니다.
...[생략]...

namespace ConsoleApp1
{
    class Jira
    {
        // ...[생략]...

        public async Task<string> GetIssuesByAssignee(string projectKey, string assignee)
        {
            string url = _baseUrl + "search?jql=assignee=" + assignee + " and project=" + projectKey;

            HttpResponseMessage hrm = await _httpClient.GetAsync(url);

            string result = await hrm.Content.ReadAsStringAsync();
            return result;
        }
    }
}
사용법은 다음과 같이 해주면 되겠고.
static async Task Main(string[] args)
{
    (string id, string password) = ("testuser", "pass@word");
    string jiraServer = "jira.test.com";

    Jira jira = new Jira();

    if (await jira.Login(jiraServer, id, password) == false)
    {
        Console.WriteLine("Auth failed: " + id);
        return;
    }

    string result = await jira.GetIssuesByAssignee("myProject", id);
    Console.WriteLine(result);
}
이후 원하는 만큼 API 호출을 추가하면 됩니다.
API 호출에서 한 가지 아쉬운 점이 있다면 문자열 반환입니다. 이 부분을 좀 더 멋있게 역직렬화하면 좋을 듯한데요. GetIssuesByAssignee 메서드의 결과물을 보면,
{"expand":"schema,names","startAt":0,"maxResults":50,"total":358,"issues":[{"expand":"editmeta,renderedFields,transitions,changelog,operations",...[생략]...,"versions":[],"environment":null,"timeestimate":null,"customfield_10300":null,"aggregateprogress":{"progress":0,"total":0},"lastViewed":null,"timeoriginalestimate":null,"aggregatetimespent":null}}]}
너무 복잡하므로 이것을 그대로 json 확장자의 파일로 저장해 Visual Studio에서 열고 마우스 우클릭으로 "Format Document" 메뉴를 실행하면 다음과 같이 깔끔하게 포맷팅이 됩니다.
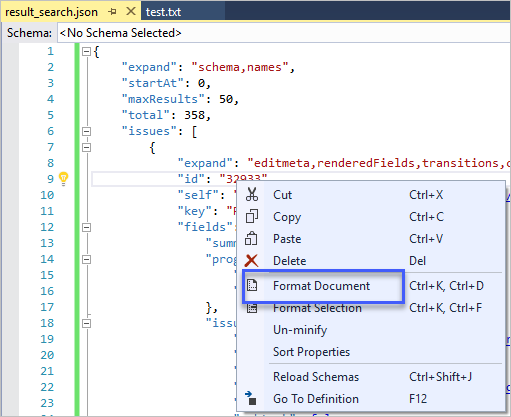
이것을 보고 C# POCO 타입들을 만들어 나갈 수 있습니다. 하지만... 언제 저걸 다 작성하겠습니까? 그냥 다음의 사이트를 방문해서,
json2csharp
; http://json2csharp.com/
위의 json 텍스트를 붙여 넣고 "Generate" 버튼을 누르면 C# 타입들이 자동으로 생성됩니다. ^^ 이것을 프로젝트에 추가하고, 단지 "RootObject" 타입의 이름만 "SearchResult"로 바꾸겠습니다.
자... 그럼 이제 Newtonsoft.Json을 이용해,
Install-Package Newtonsoft.Json -Version 11.0.2
다음과 같이 역직렬화한 클래스를 반환할 수 있게 되었고,
public async Task<SearchResult> GetIssuesByAssignee(string projectKey, string assignee)
{
    string url = _baseUrl + "search?jql=assignee=" + assignee + " and project=" + projectKey;

    HttpResponseMessage hrm = await _httpClient.GetAsync(url);

    string text = await hrm.Content.ReadAsStringAsync();

    SearchResult result = Newtonsoft.Json.JsonConvert.DeserializeObject<SearchResult>(text);
    return result;
}
형식 안정성을 기반으로 한 인텔리센스의 도움으로 좀 더 편리하게 코딩을 할 수 있습니다.
SearchResult result = await jira.GetIssuesByAssignee(projectKey, assignee);

foreach (var issue in result.issues)
{
    Console.WriteLine(issue.key);
}
이 정도면... 대충 설명이 끝난 것 같군요. ^^
(
첨부 파일은 이 글의 예제 코드를 포함합니다.)
물론 소스 코드가 공개되어 있는,
jonas0007/Jira.SDK
; https://github.com/jonas0007/Jira.SDK
라이브러리를 NuGet으로부터 다운로드해,
Jira.SDK
; https://www.nuget.org/packages/Jira.SDK/

Install-Package Jira.SDK -Version 1.2.25
다음과 같이 편안하세 사용하셔도 좋습니다. ^^
// https://github.com/jonas0007/Jira.SDK

Jira jira = new Jira();
//Connect to Jira with username and password. Please be aware that the information returned by the Jira REST API depends on the access rigths of the user.
jira.Connect("{{JIRA URL}}", "{{USERNAME}}", "{{PASSWORD}}");

//You can also connect to Jira anonymously. Please make sure that the information you want to request with the SDK is accessible by unauthenticated users.
jira.Connect("{{JIRA URL}}");

//Gets all of the projects configured in your jira instance
List<Project> projects = jira.GetProjects();

//Gets a specific project by name
Project project = jira.GetProject("{{projectname}}");

//Gets all of users favourite filters
List<IssueFilter> filters = jira.GetFilters();

//Gets a specific filter by name
IssueFilter filter = jira.GetFilter("{{filtername}}");

//Get a list of agile boards configured in your jira instance
List<AgileBoard> agilaboards = jira.GetAgileBoards();

//Get a specific issue with key
Issue issue = jira.GetIssue("{{issuekey}}");

//Add a new issue to a project
Project project = jira.GetProject("{{projectname}}");
Issue newIssue = project.AddIssue(new IssueFields()
{
                Summary = "Summary of the new issue",
                IssueType = new IssueType(0, "Type"),
                CustomFields = new Dictionary<string, CustomField>() {
                    { "customfield_11000", new CustomField(11000, "Value") }
                }
            });
);
[이 글에 대해서 여러분들과 의견을 공유하고 싶습니다. 틀리거나 미흡한 부분 또는 의문 사항이 있으시면 언제든 댓글 남겨주십시오.]