New NodeMCU v3 아두이노 호환 보드의 기본 개발 환경 구성
예전에 .NET Micro Framework이 올라간 넷두이노 플러스를 테스트한 이후,
.NET Micro Framework - 넷두이노 플러스
; https://www.sysnet.pe.kr/2/0/1392
자유도가 좀 더 높은 Raspberry PI도 만져 보고,
윈도우즈 사용자를 위한 라즈베리 파이 제로 W 모델을 설정하는 방법
; https://www.sysnet.pe.kr/2/0/11372

Raspberry Pi Zero(OTG)를 다른 컴퓨터에 연결해 가상 키보드 및 마우스로 쓰는 방법 (절대 좌표, 상대 좌표, 휠)
; https://www.sysnet.pe.kr/2/0/11369
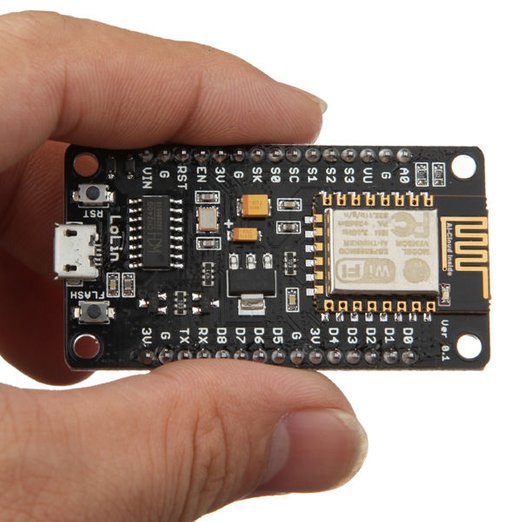
이제는 (아는 분께서 선물로 주신) 아두이노 마이크로 보드를 테스트해 보게 되었습니다. ^^ "LiLon New NodeMCU v3"라고 적혀 있는 걸로 봐서 호환 보드인 것 같은데 보드 뒤에 자그마한 글씨로 다음과 같이 써져 있습니다.
1. Install CH340G driver
2. Use 9600bps baud rate
3. Connect to WiFi
검색해 보니, 다음의 다운로드가 있습니다.
CH340 Drivers for Windows, Mac and Linux
; https://sparks.gogo.co.nz/ch340.html
; https://sparks.gogo.co.nz/assets/_site_/downloads/CH34x_Install_Windows_v3_4.zip
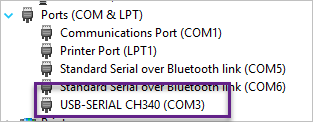
설치 후, 장치 관리자에 가보면 다음과 같이 CH340 장치가 COM3로 잡혀 있습니다. (그런데, 굳이 저 드라이버 설치하지 않아도 장치 관리자에 CH340이 잡히긴 했습니다. 따라서 어쩌면 설치하지 않아도 됩니다.)
자, 그럼 이제 Arduino IDE를 다운로드하고,
Arduino IDE
; https://www.microsoft.com/ko-kr/p/arduino-ide/9nblggh4rsd8?ocid=badge
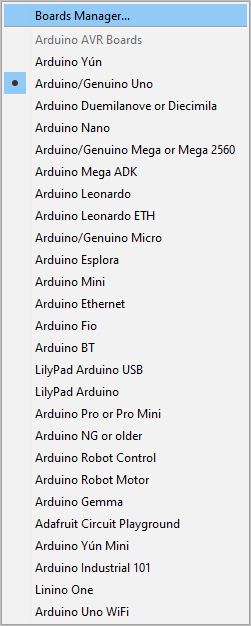
"Tools" / "Board: ..." 메뉴에 "Arduino/Genuino Uno"라고 잡힌 것을 볼 수 있습니다.
"Tools" / "Port: COM[n]" 메뉴를 통해 장치 관리자에서 본 대로 "COM3"로 설정한 후, "Tools" / "Get Board Info" 메뉴를 실행해 보면 다음과 같은 정보가 나옵니다.
BN: Unknown board
VID: 1A86
PID: 7523
SN: Upload any sketch to obtain it
장치 인식은 되었으니, 코드를 실행해 봐야겠죠. ^^ 이를 위해 "File" / "Examples" / "01.Basics" / "Blink" 예제를 선택하고 "Sketch" / "Upload"를 선택했는데 다음과 같은 오류가 발생합니다.
Arduino: 1.8.5 (Windows Store 1.8.10.0) (Windows 10), Board: "Arduino/Genuino Uno"

Sketch uses 928 bytes (2%) of program storage space. Maximum is 32256 bytes.
Global variables use 9 bytes (0%) of dynamic memory, leaving 2039 bytes for local variables. Maximum is 2048 bytes.
avrdude: stk500_getsync() attempt 1 of 10: not in sync: resp=0x30
avrdude: stk500_getsync() attempt 2 of 10: not in sync: resp=0x20
avrdude: stk500_getsync() attempt 3 of 10: not in sync: resp=0x30
avrdude: stk500_getsync() attempt 4 of 10: not in sync: resp=0x20
avrdude: stk500_getsync() attempt 5 of 10: not in sync: resp=0x30
avrdude: stk500_getsync() attempt 6 of 10: not in sync: resp=0x20
avrdude: stk500_getsync() attempt 7 of 10: not in sync: resp=0x30
avrdude: stk500_getsync() attempt 8 of 10: not in sync: resp=0x20
avrdude: stk500_getsync() attempt 9 of 10: not in sync: resp=0x30
avrdude: stk500_getsync() attempt 10 of 10: not in sync: resp=0x20
An error occurred while uploading the sketch

This report would have more information with
"Show verbose output during compilation"
option enabled in File -> Preferences.
혹시나 "Tools" / "Board: ..." 메뉴에서 "Arduino/Genuino Micro"를 선택해도 이번엔 다음과 같은 오류가 발생합니다.
Arduino: 1.8.5 (Windows Store 1.8.10.0) (Windows 10), Board: "Arduino/Genuino Micro"

Build options changed, rebuilding all
Sketch uses 4130 bytes (14%) of program storage space. Maximum is 28672 bytes.
Global variables use 149 bytes (5%) of dynamic memory, leaving 2411 bytes for local variables. Maximum is 2560 bytes.
avrdude: butterfly_recv(): programmer is not responding
avrdude: butterfly_recv(): programmer is not responding
Found programmer: Id = "≪"; type = y
    Software Version = ®.
흠... 아직 뭔가 있어야 하나 봅니다. 검색 결과 다음의 링크를 찾았습니다.
Getting Started With ESP8266(LiLon NodeMCU V3) Complete Guide for IoT Startup With Example(as Server)
; http://www.instructables.com/id/Getting-Started-With-ESP8266LiLon-NodeMCU-V3Flashi/
위의 글에 실린 아래의 그림이 제가 가진 보드와 정확히 일치합니다. ^^
Microcontroller: Tensilica 32-bit RISC CPU Xtensa LX106
Operating Voltage: 3.3V
Input Voltage: 7-12V
Digital I/O Pins (DIO): 16
Analog Input Pins (ADC): 1
UARTs: 1
SPIs: 1
I2Cs: 1
Flash Memory: 4 MB
SRAM: 64 KB (가용 50K+)
Clock Speed: 80 Mhz
Wi-Fi: IEEE 802.11 b/g/n:
    Integrated TR switch, balun, LNA, power amplifier and matching network
    WEP or WPA/WPA2 authentication, or open networks
따라서 저 글을 따라 하면 되겠군요. 그래서 "NodeMCU Flasher Master"와 "NodeMCU Firmware"를 다운로드하고,
NodeMCU Flasher Master
; https://github.com/nodemcu/nodemcu-flasher/archive/master.zip

NodeMCU Firmware
; https://github.com/sleemanj/ESP8266_Simple/raw/master/firmware/ai-thinker-0.9.5.2-115200.bin
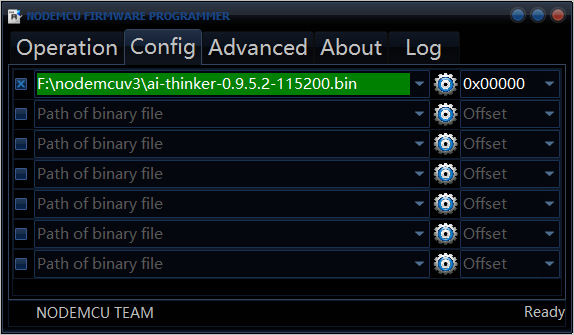
"NodeMCU Flasher Master"를 압축 해제한 폴더의 하위에 있는 "\nodemcu-flasher-master\Win64\Release"의 "ESP8266Flasher.exe" 파일을 실행합니다. (펌웨어 업그레이드 동안에는 Arduino IDE를 종료해줍니다.) 그럼 다음과 같이 뜨는데,
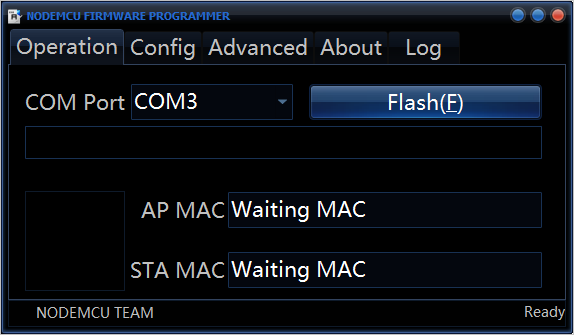
보는 바와 같이 제 경우에는 "COM3"로 잡혔기 때문에 위와 같이 COM Port를 설정해 주었습니다. 또한 "Config" 탭으로 다운로드했던 "NodeMCU Firmware" 파일 (ai-thinker-0.9.5.2-115200.bin)을 설정합니다.
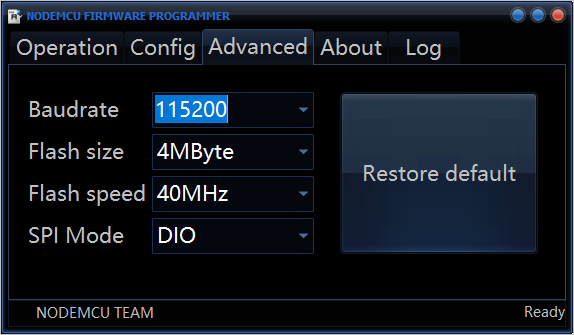
그다음 "Advanced"에서는 Baudrate을 (보드에 적힌 속도를 무시하고) 115200으로 잡았습니다.
설정을 마쳤으면 다시 "Operation" 탭으로 가 "Flash" 버튼으로 펌웨어를 업그레이드합니다. 완료 후, 이제 Arduino IDE를 다시 실행하고, "File" / "Preferences" 메뉴를 실행하면 뜨는 대화창에서 "Additional Boards Manager URLs:" 항목에 다음의 URL을 적어 줍니다.
http://arduino.esp8266.com/stable/package_esp8266com_index.json
그다음, "Tools" / "Board: ..." / "Boards Manager..."를 선택하면 뜨는 대화상자에서 "esp8266"으로 검색한 항목을 선택하고 "Install" 버튼을 누릅니다.
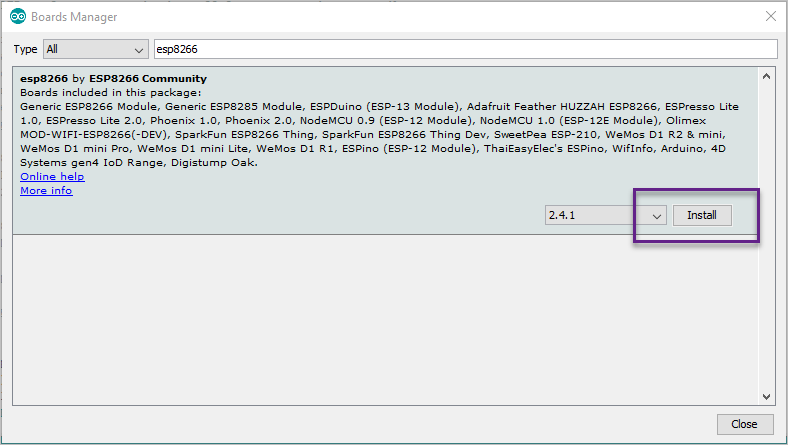
마지막으로 "Tools" / "Board: ..." 메뉴를 펼치면 이제 "NodeMCU 1.0 (ESP-12E Module)"이라는 항목이 나타납니다. 그것을 선택해 주면 설정 끝입니다.
자... 그럼 다시 "Sketch" / "Upload"를 하면 다음과 같은 메시지와 함께 보드에 있는 LED가 깜빡이며 잘 업로드가 됩니다.
Archiving built core (caching) in: %LOCALAPPDATA%\Temp\arduino_cache_95172\core\core_esp8266_esp8266_nodemcuv2_CpuFrequency_80,FlashSize_4M1M,LwIPVariant_v2mss536,Debug_Disabled,DebugLevel_None____,FlashErase_none,UploadSpeed_115200_4f8635a0650ea7b7a41882d7d1a6a6e1.a
Sketch uses 246331 bytes (23%) of program storage space. Maximum is 1044464 bytes.
Global variables use 32288 bytes (39%) of dynamic memory, leaving 49632 bytes for local variables. Maximum is 81920 bytes.
Uploading 250480 bytes from %LOCALAPPDATA%\Temp\arduino_build_903540/Blink.ino.bin to flash at 0x00000000
................................................................................ [ 32% ]
................................................................................ [ 65% ]
................................................................................ [ 97% ]
.....                                                                            [ 100% ]
그런데, 분명히 아무런 문제가 없는데 Blink 프로그램이 동작하지 않습니다. 즉, 보드에 있는 LED가 전혀 깜빡이지 않는 것입니다. 그래도 혹시나 해서, Serial 통신 코드를 추가하고,
void setup() {
  pinMode(LED_BUILTIN, OUTPUT);
  Serial.begin(9600);
}

void loop() {
  digitalWrite(LED_BUILTIN, HIGH);   // turn the LED on (HIGH is the voltage level)
  delay(1000);                       // wait for a second
  digitalWrite(LED_BUILTIN, LOW);    // turn the LED off by making the voltage LOW
  delay(1000);                       // wait for a second
  Serial.println(100);
}
업로드 후, "Tools" / "Serial Monitor"를 통해 "100" 메시지가 찍히는 것을 확인했습니다. 검색해 보면,
Does the Node MCU v3 (LoLin) not have a builtin led?
; https://arduino.stackexchange.com/questions/38477/does-the-node-mcu-v3-lolin-not-have-a-builtin-led
"Node MCU v3" 제품의 경우 기본 LED가 2번이라고 합니다. 따라서 LED_BUILTIN 상수가 (대개의 arduino 제품들에 해당하는) 13번이므로 동작을 안 하던 것입니다. 따라서 다음과 같이 코드를 바꾸면 LED blink 테스트가 잘 됩니다.
void setup() {
  pinMode(2, OUTPUT);
}

void loop() {
  digitalWrite(2, HIGH);   // turn the LED off (HIGH is the voltage level)
  delay(1000);                       // wait for a second
  digitalWrite(2, LOW);    // turn the LED on by making the voltage LOW
  delay(1000);                       // wait for a second
}
그래도 가장 중요한 것은, WiFi 동작 유무이므로 "
Getting Started With ESP8266(LiLon NodeMCU V3) Complete Guide for IoT Startup With Example(as Server)"에 있던 예제를,
#include<ESP8266WiFi>

const char* ssid = "Tenda"; //your WiFi Name
const char* password = "12345678";  //Your Wifi Password
int ledPin = 03;
WiFiServer server(80);

void setup()
{
  Serial.begin(115200);
  delay(10);
  pinMode(ledPin, OUTPUT);
  digitalWrite(ledPin, LOW);
  Serial.println();
  Serial.println();
  Serial.print("Connecting to ");
  Serial.println(ssid);
  WiFi.begin(ssid, password);

  while (WiFi.status() != WL_CONNECTED) {
    delay(500);
    Serial.print(".");
  }

  Serial.println("");
  Serial.println("WiFi connected");
  server.begin();
  Serial.println("Server started");
  Serial.print("Use this URL to connect: ");
  Serial.print("http://");
  Serial.print(WiFi.localIP());
  Serial.println("/");
}

void loop()
{
  WiFiClient client = server.available();
  if (!client) {
    return;
  }
  Serial.println("new client");
  while(!client.available()){
    delay(1);
  }
  String request = client.readStringUntil('\r');
  Serial.println(request);
  client.flush();
  int value = LOW;
  if (request.indexOf("/LED=ON") != -1)  {
    digitalWrite(ledPin, HIGH);
    value = HIGH;
  }
  if (request.indexOf("/LED=OFF") != -1)  {
    digitalWrite(ledPin, LOW);
    value = LOW;
  }
  client.println("HTTP/1.1 200 OK");
  client.println("Content-Type: text/html");
  client.println("");
  client.println("");
  client.println("");
  client.print("Led is : ");
  if(value == HIGH) {
    client.print("On");
  } else {
    client.print("Off");
  }  client.println("");
  client.println(" On ");
  client.println(" Off ");
  client.println(" ");
  delay(1);
  Serial.println("Client disonnected");
  Serial.println("");
} //code copied from link(http://internetofthinking.blogspot.com/)
실행해 봐야 합니다. 이걸 빌드하려면, "Sketch" / "Include Library..." 메뉴를 통해 "ESP8266WiFi"를 선택해 줘야 합니다. 그럼 다음과 같은 위치에 헤더 파일 및 소스코드들이 다운로드됩니다.
%USERPROFILE%\Documents\ArduinoData\packages\esp8266\hardware\esp8266\2.4.1\libraries\ESP8266WiFi\src
이와 함께 include 헤더 파일이 다음과 같이 확장됩니다.
#include <ESP8266WiFi.h>
#include <ESP8266WiFiAP.h>
#include <ESP8266WiFiGeneric.h>
#include <ESP8266WiFiMulti.h>
#include <ESP8266WiFiScan.h>
#include <ESP8266WiFiSTA.h>
#include <ESP8266WiFiType.h>
#include <WiFiClient.h>
#include <WiFiClientSecure.h>
#include <WiFiServer.h>
#include <WiFiServerSecure.h>
#include <WiFiUdp.h>

#include<ESP8266WiFi>
이 중에서 "#include<ESP8266WiFi>" 코드는 "
Getting Started With ESP8266(LiLon NodeMCU V3) Complete Guide for IoT Startup With Example(as Server)" 예제 코드에서 사용했던 것이므로 그냥 주석 처리하거나 삭제해 버립니다.
#include <ESP8266WiFi.h>
#include <ESP8266WiFiAP.h>
#include <ESP8266WiFiGeneric.h>
#include <ESP8266WiFiMulti.h>
#include <ESP8266WiFiScan.h>
#include <ESP8266WiFiSTA.h>
#include <ESP8266WiFiType.h>
#include <WiFiClient.h>
#include <WiFiClientSecure.h>
#include <WiFiServer.h>
#include <WiFiServerSecure.h>
#include <WiFiUdp.h>
그다음, 자신의 환경에 맞게 WiFi의 ssid와 암호를 입력하고,
const char* ssid = "Tenda"; //your WiFi Name
const char* password = "12345678";  //Your Wifi Password
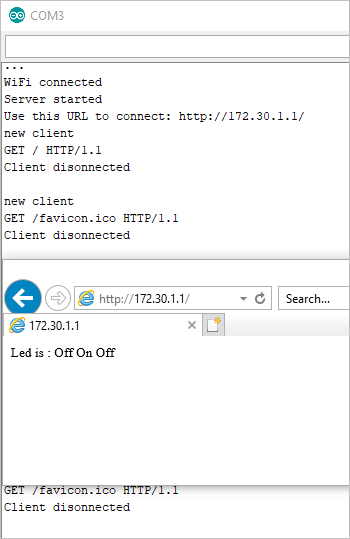
빌드 후 업로드를 하면 "Serial Monitor" 도구에서 다음과 같은 출력을 확인할 수 있습니다.
...
WiFi connected
Server started
Use this URL to connect: http://172.30.1.1/
이제 웹 브라우저를 이용해 저 주소로 접근하면 다음과 같은 결과를 보게 되고.
이 정도면, 일단 기본적인 개발 환경 테스트는 완료됩니다. ^^
"
Getting Started With ESP8266(LiLon NodeMCU V3) Complete Guide for IoT Startup With Example(as Server)" 예제를 "Sketch" / "Include Library..."를 통한 라이브러리 구성 없이 컴파일하면 다음과 같은 오류가 발생합니다.
Arduino: 1.8.5 (Windows Store 1.8.10.0) (Windows 10), Board: "NodeMCU 1.0 (ESP-12E Module), 80 MHz, 4M (1M SPIFFS), v2 Lower Memory, Disabled, None, Only Sketch, 115200"

F:\cloud_drive\Dropbox\articles\arduino_micro\sketch_jul10a\sketch_jul10a.ino:1:23: fatal error: ESP8266WiFi: No such file or directory

 #include<ESP8266WiFi>

                       ^

compilation terminated.

exit status 1
Error compiling for board NodeMCU 1.0 (ESP-12E Module).

This report would have more information with
"Show verbose output during compilation"
option enabled in File -> Preferences.
Firmware 업그레이드 시 동작이 안 되고, "Log" 탭에 다음과 같은 메시지가 남는다면,
Error:Serial port connect failed, please check it.
현재 실행 중인 Arduino IDE가 있는 경우 COM 포트 경합 문제일 수 있으므로 종료해 줍니다.
만약 COM 포트가 틀리면 "Sketch" / "Upload" 메뉴 실행 시 다음과 같은 오류가 발생합니다.
Arduino: 1.8.5 (Windows Store 1.8.10.0) (Windows 10), Board: "Arduino/Genuino Uno"

Sketch uses 928 bytes (2%) of program storage space. Maximum is 32256 bytes.
Global variables use 9 bytes (0%) of dynamic memory, leaving 2039 bytes for local variables. Maximum is 2048 bytes.
avrdude: stk500_recv(): programmer is not responding
avrdude: stk500_getsync() attempt 1 of 10: not in sync: resp=0x09
avrdude: stk500_recv(): programmer is not responding
avrdude: stk500_getsync() attempt 2 of 10: not in sync: resp=0x09
avrdude: stk500_recv(): programmer is not responding
avrdude: stk500_getsync() attempt 3 of 10: not in sync: resp=0x09
avrdude: stk500_recv(): programmer is not responding
avrdude: stk500_getsync() attempt 4 of 10: not in sync: resp=0x09
avrdude: stk500_recv(): programmer is not responding
avrdude: stk500_getsync() attempt 5 of 10: not in sync: resp=0x09
avrdude: stk500_recv(): programmer is not responding
avrdude: stk500_getsync() attempt 6 of 10: not in sync: resp=0x09
avrdude: stk500_recv(): programmer is not responding
avrdude: stk500_getsync() attempt 7 of 10: not in sync: resp=0x09
avrdude: stk500_recv(): programmer is not responding
avrdude: stk500_getsync() attempt 8 of 10: not in sync: resp=0x09
avrdude: stk500_recv(): programmer is not responding
avrdude: stk500_getsync() attempt 9 of 10: not in sync: resp=0x09
avrdude: stk500_recv(): programmer is not responding
avrdude: stk500_getsync() attempt 10 of 10: not in sync: resp=0x09
Problem uploading to board.  See http://www.arduino.cc/en/Guide/Troubleshooting#upload for suggestions.

This report would have more information with
"Show verbose output during compilation"
option enabled in File -> Preferences.
또한, "Tools" / "Get Board Info" 메뉴를 선택해도 "Native serial port, can't obtain info"라는 오류 메시지만 나옵니다.
[이 글에 대해서 여러분들과 의견을 공유하고 싶습니다. 틀리거나 미흡한 부분 또는 의문 사항이 있으시면 언제든 댓글 남겨주십시오.]