Unity로 실습하는 Shader (6) - Mosaic Shading
flat shading에 이어,
Unity로 실습하는 Shader (5) - Flat Shading
; https://www.sysnet.pe.kr/2/0/11613
모자이크(mosaic)도 가능하지 않을까...라는 생각이 들어 검색해 봤습니다.
fragment shader of mosaic filter
; https://gist.github.com/ykob/08f335981f2f95dcf8d8d525a9a9e7b6
uniform vec2 resolution;
uniform sampler2D texture;

varying vec2 vUv;

const float mosaic = 12.0;

void main() {
  vec4 color = vec4(0.0);
  vec2 offset = vec2(mod(gl_FragCoord.x, mosaic), mod(gl_FragCoord.y, mosaic));

  for (float x = 0.0; x < mosaic; x++){
    for (float y = 0.0; y < mosaic; y++){
      color += texture2D(texture, vUv - (offset + vec2(x, y)) / resolution);
    }
  }
  gl_FragColor = color / pow(mosaic, 2.0);
}
위의 코드를 분석해 볼까요? 우선 gl_FragCoord 변수는,
gl_FragCoord ? contains the window-relative coordinates of the current fragment
; https://www.khronos.org/registry/OpenGL-Refpages/gl4/html/gl_FragCoord.xhtml
gl_FragCoord assumes a lower-left origin for window coordinates and assumes pixel centers are located at half-pixel centers.
라고 설명하는데, 원점 위치가 다음과 같이 좌하단이 (0,0)이라고 합니다.
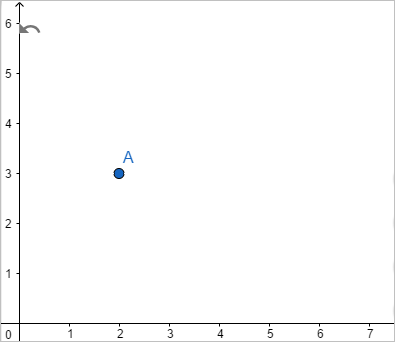
따라서 위의 경우 점 A는 (2, 3)이지만 gl_FragCoord로는 (2.5, 3.5)라는 것이고, pixel_center_integer 모드인 경우 (2.0, 3.0)이 됩니다. 그다음, mod 함수와 floor 함수를 익혀 두고,
mod ? compute value of one parameter modulo another
; https://www.khronos.org/registry/OpenGL-Refpages/gl4/html/mod.xhtml

mod(x, y) == x - y * floor(x/y)

floor ? find the nearest integer less than or equal to the parameter
; https://www.khronos.org/registry/OpenGL-Refpages/gl4/html/floor.xhtml
mosaic 변수의 값이 5라는 가정으로 offset 변수의 값을,
vec2 offset = vec2(mod(gl_FragCoord.x, mosaic), mod(gl_FragCoord.y, mosaic));
추적해 보면 다음과 같이 정리됩니다.
gl_FragCoord             offset

(0,0) 0 - 5 * floor(0/5)  (0,0)
(1,0) 1 - 5 * floor(1/5)  (1,0)
(2,0) 2 - 5 * floor(2/5)  (2,0)
(3,0) 3 - 5 * floor(3/5)  (3,0)
(4,0) 4 - 5 * floor(4/5)  (4,0)
(5,0) 5 - 5 * floor(5/5)  (0,0)
(6,0) 6 - 5 * floor(6/5)  (1,0)
그리고 위의 offset을 for 루프에 적용하면,
for (float x = 0.0; x < 5; x++)
{
  vec2 uvOffset = (offset + vec2(x, 0)) / resolution;
  color += texture2D(texture, vUv - uvOffset);
}
아래의 값들이 나열됩니다.
gl_FragCoord == (0,0)
uvOffset((0,0) + (0,0)) / resolution = (+x0 pixel 위치의 uv 값,0)
uvOffset((0,0) + (1,0)) / resolution = (+x1 pixel 위치의 uv 값,0)
uvOffset((0,0) + (2,0)) / resolution = (+x2 pixel 위치의 uv 값,0)
uvOffset((0,0) + (3,0)) / resolution = (+x3 pixel 위치의 uv 값,0)
uvOffset((0,0) + (4,0)) / resolution = (+x4 pixel 위치의 uv 값,0)

gl_FragCoord == (1,0)
uvOffset((1,0) + (0,0)) / resolution = (+x1 pixel 위치의 uv 값,0)
uvOffset((1,0) + (1,0)) / resolution = (+x2 pixel 위치의 uv 값,0)
uvOffset((1,0) + (2,0)) / resolution = (+x3 pixel 위치의 uv 값,0)
uvOffset((1,0) + (3,0)) / resolution = (+x4 pixel 위치의 uv 값,0)
uvOffset((1,0) + (4,0)) / resolution = (+x5 pixel 위치의 uv 값,0)

...[생략]...

gl_FragCoord == (4,0)
uvOffset((4,0) + (0,0)) / resolution = (+x4 pixel 위치의 uv 값,0)
uvOffset((4,0) + (1,0)) / resolution = (+x5 pixel 위치의 uv 값,0)
uvOffset((4,0) + (2,0)) / resolution = (+x6 pixel 위치의 uv 값,0)
uvOffset((4,0) + (3,0)) / resolution = (+x7 pixel 위치의 uv 값,0)
uvOffset((4,0) + (4,0)) / resolution = (+x8 pixel 위치의 uv 값,0)

gl_FragCoord == (5,0)
uvOffset((0,0) + (0,0)) / resolution = (+x0 pixel 위치의 uv 값,0)
uvOffset((0,0) + (1,0)) / resolution = (+x1 pixel 위치의 uv 값,0)
uvOffset((0,0) + (2,0)) / resolution = (+x2 pixel 위치의 uv 값,0)
uvOffset((0,0) + (3,0)) / resolution = (+x3 pixel 위치의 uv 값,0)
uvOffset((0,0) + (4,0)) / resolution = (+x4 pixel 위치의 uv 값,0)

gl_FragCoord == (6,0)
uvOffset((1,0) + (0,0)) / resolution = (+x1 pixel 위치의 uv 값,0)
uvOffset((1,0) + (1,0)) / resolution = (+x2 pixel 위치의 uv 값,0)
uvOffset((1,0) + (2,0)) / resolution = (+x3 pixel 위치의 uv 값,0)
uvOffset((1,0) + (3,0)) / resolution = (+x4 pixel 위치의 uv 값,0)
uvOffset((1,0) + (4,0)) / resolution = (+x5 pixel 위치의 uv 값,0)
대충 분석이 끝났군요. 위와 같이 구해진 uv 값을 vUv 값에서 빼는 형식이기 때문에 mosaic 값의 범위마다 같은 값을 갖게 됩니다.
위의 코드에서 resolution은 지난번의 글에 따라,
Unity Shader - Texture의 UV 좌표에 대응하는 Pixel 좌표
; https://www.sysnet.pe.kr/2/0/11614
_MainTex_TexelSize 변수를 이용하면 됩니다. 따라서 "
fragment shader of mosaic filter" 코드는 Unity로 대략 다음과 같이 포팅할 수 있습니다.
fixed4 frag(v2f i) : SV_Target
{
    float mosaic = 24.0; // 외부 변수 처리
    float2 texelSize = _MainTex_TexelSize;

    float4 color = float4(0.0, 0.0, 0.0, 0.0);

    float2 offset = fmod(UVtoXY(i.uv, texelSize), mosaic);

    for (float x = 0.0; x < mosaic; x++) {
        for (float y = 0.0; y < mosaic; y++) {
            color += tex2D(_MainTex, i.uv -
                XYtoUV(offset + float2(x, y), texelSize)
            );
        }
    }

    color = color / pow(mosaic, 2.0);

    return (color * i.diffuse) + i.specular;
}
위의 코드를 지난번 고로 셰이딩과 합쳐 보면,
Unity로 실습하는 Shader (2) - 고로 셰이딩(gouraud shading) + 퐁 모델(Phong model)
; https://www.sysnet.pe.kr/2/0/11609
다음과 같이 코딩할 수 있고,
Shader "My/mosaicShader"
{
    Properties
    {
        _MainTex("Texture", 2D) = "white" {}
        _Ka("Ambient Reflectance", Float) = 1.0
    }
    SubShader
    {
        Pass
        {
            CGPROGRAM
        #pragma vertex vert
        #pragma fragment frag

        #include "UnityCG.cginc"
        #include "Lighting.cginc"

            uniform float _Ka;
            sampler2D _MainTex;

            struct appdata
            {
                float4 vertex : POSITION;
                float3 normal : NORMAL;
                float2 uv : TEXCOORD0;
            };

            struct v2f
            {
                float4 vertex : SV_POSITION;
                float4 diffuse : COLOR0;
                float4 specular : COLOR1;
                float2 uv : TEXCOORD0;
            };

            v2f vert(appdata v)
            {
                v2f o;
                o.vertex = UnityObjectToClipPos(v.vertex);
                o.uv = v.uv;

                // 주변광
                float4 ambientReflection = 1.0 * UNITY_LIGHTMODEL_AMBIENT;

                // 확산광
                float3 worldNormal = UnityObjectToWorldNormal(v.normal);
                float3 lightDir = normalize(_WorldSpaceLightPos0); /* float4 _WorldSpaceLightPos0; */
                float3 diffuseReflection = 1.0 * _LightColor0.rgb * saturate(dot(worldNormal, lightDir));

                // 반사광
                float3 reflectedDir = reflect(-lightDir, worldNormal);
                float3 viewDir = normalize(_WorldSpaceCameraPos - worldNormal); /* float3 _WorldSpaceCameraPos; */
                float reflectIntensity = saturate(dot(reflectedDir, viewDir));

                float n = 4.0;
                reflectIntensity = pow(reflectIntensity, n);
                float3 specularReflection = 1.0 * _LightColor0 * reflectIntensity;

                o.diffuse = float4(ambientReflection + diffuseReflection, 1.0);
                o.specular = float4(specularReflection, 1.0);

                return o;
            }

            float4 _Color;
            float2 _MainTex_TexelSize;

            float2 UVtoXY(float2 uv, float2 texelSize)
            {
                return float2(uv.x / texelSize.x, uv.y / texelSize.y);
            }

            float2 XYtoUV(float2 pos, float2 texelSize)
            {
                return float2(pos.x * texelSize.x, pos.y * texelSize.y);
            }

            float2 imod(float2 xyPos, float mosaic)
            {
                return xyPos - mosaic * floor(xyPos / mosaic);
            }

            fixed4 frag(v2f i) : SV_Target
            {
                float mosaic = 24.0;
                float4 color = float4(0.0, 0.0, 0.0, 0.0);
                float2 texelSize = _MainTex_TexelSize;

                float2 offset = fmod(UVtoXY(i.uv, texelSize), mosaic);

                for (float x = 0.0; x < mosaic; x++) {
                    for (float y = 0.0; y < mosaic; y++) {
                        color += tex2D(_MainTex, i.uv -
                            XYtoUV(offset + float2(x, y), texelSize)
                        );
                    }
                }
                color = color / pow(mosaic, 2.0);

                return (color * i.diffuse) + i.specular;
            }

            ENDCG
        }
    }
}
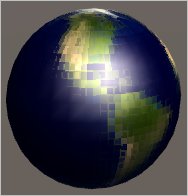
적용 후의 렌더링 결과는 다음과 같습니다.
그런데, 사실 mosaic에 for 루프가 쓰였다는 것이 걸립니다. mosaic 자체가 그다지 정밀하게 보여줄 필요는 없으므로 for 루프에 따른 평균 색을 출력하기보다 그냥 단순하게 그 구획의 색상 하나를 대표색으로 출력해도 괜찮은 상황이 더 많을 것 같기 때문입니다. 그래서 다음과 같이 for 루프를 없앨 수 있습니다.
fixed4 frag(v2f i) : SV_Target
{
    float mosaic = 24.0; // 외부 변수 처리
    float4 color = float4(0.0, 0.0, 0.0, 0.0);
    float2 texelSize = _MainTex_TexelSize;

    float2 offset = fmod(UVtoXY(i.uv, texelSize), mosaic);
    color = tex2D(_MainTex, i.uv + XYtoUV(offset, texelSize));

    return (color * i.diffuse) + i.specular;
}
실제로 이 결과를 적용하면 평균을 낸 이전 예제보다 크게 차이가 나지 않습니다.
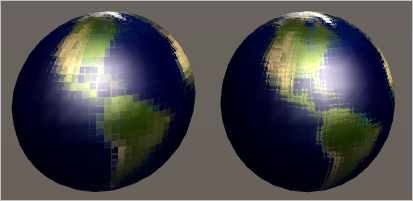
위의 화면에서 왼쪽은 구간 평균이고, 오른쪽은 대표 색입니다.
[이 글에 대해서 여러분들과 의견을 공유하고 싶습니다. 틀리거나 미흡한 부분 또는 의문 사항이 있으시면 언제든 댓글 남겨주십시오.]