C# - Unity에서 캐릭터가 바라보는 방향을 기준으로 카메라의 위치 이동 및 회전하는 방법
shader 실습을 하다 보면 카메라를 움직이고 싶을 때가 좀 있습니다. ^^
Unity로 실습하는 Shader
; https://www.sysnet.pe.kr/2/0/11607
이를 위해 화면의 Main Camera 객체에 C# 스크립트 코드를 얹는 것으로 시작할 수 있습니다.
카메라가 이동한다는 것은, 예를 들어 MMORPG 같은 게임에서 사용자가 움직이는 것과 같은 효과를 내고 싶은 것입니다. 가령, 다음과 같이 하면 키보드에서 좌측 화살표 키를 눌렀을 때 좌측으로 이동하는 것과 같습니다.
float speed = 30.0f;
float offset = Time.deltaTime * speed;

// (Unity 세계를 기준으로) 좌로 이동
this.transform.position += (Vector3.left * offset); // Vector3.left == (-1, 0, 0);
하지만, 위와 같은 움직임은 뭔가 어색합니다. 왜냐하면, Vector3.left가 Unity 월드의 좌표계를 기준으로 x축 방향에 대해 변화를 주는 것이기 때문에 캐릭터가 카메라를 이용해 세계를 바라본다고 했을 때의 이동과는 차이가 있습니다.
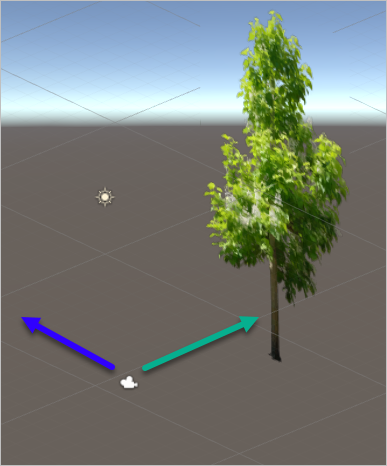
예를 들어, 카메라가 다음과 같이 바라보고 있을 때에는 (원하는 데로) 좌측으로 움직이겠지만,
[그림 1: 녹색 - 캐릭터가 바라보는 방향, 파란색 - 좌측 화살표 키로 이동 방향]
바라보는 방향이 달라진 경우에도 원칙을 고수하며 다음과 같이 순수 x축 방향으로만 움직이게 됩니다.
[그림 2: 녹색 - 캐릭터가 바라보는 방향, 파란색 - 좌측 화살표 키로 이동 방향]
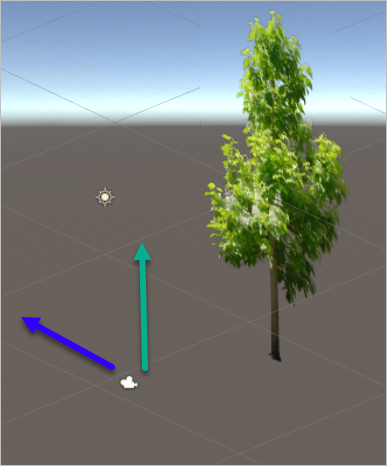
보는 바와 같이 원하는 처리가 아닙니다. 따라서 대부분의 이동에 대해 다음과 같은 식의 연산은 Unity 세계의 좌표 체계에 묶인 움직임을 하기 때문에 문제가 있습니다.
// (Unity 세계를 기준으로) 우로 이동
this.transform.position += (Vector3.right * offset); // Vector3.right == (1, 0, 0);

// (Unity 세계를 기준으로) 앞으로 이동
this.transform.position += (Vector3.forward * offset); // Vector3.forward == (0, 0, 1);

// (Unity 세계를 기준으로) 뒤로 이동
this.transform.position += (Vector3.back * offset); // Vector3.back == (0, 0, -1);

// (Unity 세계를 기준으로) 위로 이동
this.transform.position += (Vector3.up * offset); // Vector3.up == (0, 1, 0);

// (Unity 세계를 기준으로) 아래로 이동
this.transform.position += (Vector3.down * offset); // Vector3.down == (0, -1, 0);
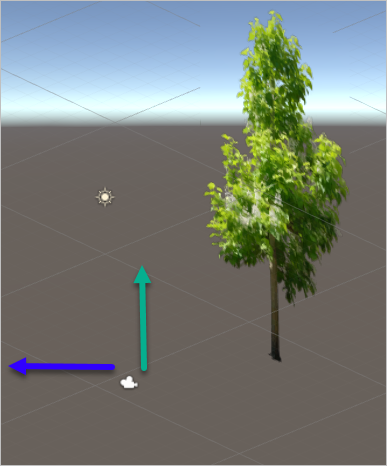
즉, 우리가 원하는 것은 "그림 2"와 같은 상황에서 카메라를 바라보는 방향을 기준으로 다음과 같이 좌측으로 움직이고 싶은 것입니다.
[그림 3: 녹색 - 캐릭터가 바라보는 방향, 파란색 - 좌측 화살표 키로 이동 방향]
이런 움직임을 하려면 Camera가 바라보는(즉, 스크립트가 연결한 객체가 향하는) 방향 벡터를 기준으로 연산을 해야 하는데, 이를 위해 다음과 같이 코딩할 수 있습니다.
// (카메라가 바라보는 방향을 기준으로) 우로 이동
this.transform.position += (this.transform.right * -offset);
이동의 경우는 그렇지만, 회전이라면 바라보는 방향을 계산할 필요 없이 현재 상태에서 회전을 하면 되므로 다음과 같이 간단하게 끝낼 수 있습니다.
// 좌로 회전
transform.Rotate(Vector3.down * offset); // Vector3.down (0, -1, 0): y 축을 기준으로 반대 방향으로 회전
이와 같은 연산을 종합해 각각 아래와 같은 키 배치에 따라,
left arrow: 좌로 이동(x축)
right arrow: 우로 이동(x축)
up arrow: 앞으로 이동(z축)
down arrow: 뒤로 이동(z축)
ctrl + up arrow: 위로 이동 (y축)
ctrl + down arrow: 아래로 이동 (y축)

shift + left arrow: 시선을 좌로 이동
shift + right arrow: 시선을 우로 이동
shift + up arrow: 시선을 위로 이동
shift + down arrow: 시선을 아래로 이동
코드는 이렇게 만들어 줄 수 있습니다.
using System.Collections;
using System.Collections.Generic;
using UnityEngine;

public class cameraMove : MonoBehaviour
{
    Vector3 _startPosition;
    Quaternion _startRotate;
    // Use this for initialization
    void Start()
    {
        _startPosition = this.transform.position;
        _startRotate = this.transform.rotation;
    }

    // Update is called once per frame
    void Update()
    {
        float speed = 30.0f;
        float offset = Time.deltaTime * speed;

        if (Input.GetKey(KeyCode.Escape) == true)
        {
            this.transform.position = _startPosition;
            this.transform.rotation = _startRotate;
            return;
        }

        if (Input.GetKey(KeyCode.UpArrow) == true)
        {
            if (Input.GetKey(KeyCode.LeftShift) == true)
            {
                transform.Rotate(Vector3.left * offset);
            }
            else if (Input.GetKey(KeyCode.LeftControl) == true)
            {
                this.transform.position += (this.transform.up * offset); // transform.up: The green axis of the transform in world space.
            }
            else
            {
                this.transform.position += (this.transform.forward * offset); // transform.forward: The blue axis of the transform in world space.
            }
        }
        else if (Input.GetKey(KeyCode.DownArrow) == true)
        {
            if (Input.GetKey(KeyCode.LeftShift) == true)
            {
                transform.Rotate(Vector3.right * offset);
            }
            else if (Input.GetKey(KeyCode.LeftControl) == true)
            {
                this.transform.position += (this.transform.up * -offset); // transform.up: The green axis of the transform in world space.
            }
            else
            {
                this.transform.position += (-this.transform.forward * offset); // transform.forward: The blue axis of the transform in world space.
            }
        }

        if (Input.GetKey(KeyCode.LeftArrow) == true)
        {
            if (Input.GetKey(KeyCode.LeftShift) == true)
            {
                transform.Rotate(Vector3.down * offset);
            }
            else
            {
                this.transform.position += (this.transform.right * -offset); // this.transform.right: The red axis of the transform in world space.
            }
        }
        else if (Input.GetKey(KeyCode.RightArrow) == true)
        {
            if (Input.GetKey(KeyCode.LeftShift) == true)
            {
                transform.Rotate(Vector3.up * offset);
            }
            else
            {
                this.transform.position += (this.transform.right * offset); // this.transform.right: The red axis of the transform in world space.
            }
        }
    }
}
우와~~~ 이제 Unity 세계 안에서 마음껏 돌아다닐 수 있게 되었습니다. ^^
[이 글에 대해서 여러분들과 의견을 공유하고 싶습니다. 틀리거나 미흡한 부분 또는 의문 사항이 있으시면 언제든 댓글 남겨주십시오.]