Raspberry PI Zero (W)에 FTDI 장치 연결 후 C/C++로 DTR 제어
지난 글에서 살펴본 FTDI 장치를,
PC에 연결해 동작하는 자신만의 USB 장치 만들어 보기
; https://www.sysnet.pe.kr/2/0/11606
제가 가지고 있는 "
라즈베리 파이 Zero W" 모델에 사용해 봤습니다. 그냥 마이크로 USB 단자에 연결 및 해제 시 dmesg 로그를 보면 다음과 같은 메시지를 확인할 수 있습니다.
[처음 연결했을 때]
Indeed it is in host mode hprt0 = 00021501
usb 1-1: new full-speed USB device number 2 using dwc_otg
Indeed it is in host mode hprt0 = 00021501
usb 1-1: New USB device found, idVendor=0403, idProduct=6001
usb 1-1: New USB device strings: Mfr=1, Product=2, SerialNumber=3
usb 1-1: Product: FT232R USB UART
usb 1-1: Manufacturer: FTDI
usb 1-1: SerialNumber: A901J4AU
NOHZ: local_softirq_pending 40
usbcore: registered new interface driver usbserial
usbcore: registered new interface driver usbserial_generic
usbserial: USB Serial support registered for generic
usbcore: registered new interface driver ftdi_sio
usbserial: USB Serial support registered for FTDI USB Serial Device
ftdi_sio 1-1:1.0: FTDI USB Serial Device converter detected
usb 1-1: Detected FT232RL
usb 1-1: FTDI USB Serial Device converter now attached to ttyUSB0

[연결 해제 시]
usb 1-1: USB disconnect, device number 2
ftdi_sio ttyUSB0: FTDI USB Serial Device converter now disconnected from ttyUSB0
ftdi_sio 1-1:1.0: device disconnected

[두 번째 연결 시]
Indeed it is in host mode hprt0 = 00021501
usb 1-1: new full-speed USB device number 3 using dwc_otg
Indeed it is in host mode hprt0 = 00021501
usb 1-1: New USB device found, idVendor=0403, idProduct=6001
usb 1-1: New USB device strings: Mfr=1, Product=2, SerialNumber=3
usb 1-1: Product: FT232R USB UART
usb 1-1: Manufacturer: FTDI
usb 1-1: SerialNumber: A901J4AU
ftdi_sio 1-1:1.0: FTDI USB Serial Device converter detected
usb 1-1: Detected FT232RL
usb 1-1: FTDI USB Serial Device converter now attached to ttyUSB0
위의 메시지에 나온 데로 tty 장치에는 다음과 같이 ttyUSB0가 열거됩니다.
$ ls /dev/ttyUSB*
/dev/ttyUSB0
자, 그럼 "
PC에 연결해 동작하는 자신만의 USB 장치 만들어 보기" 글에서 했던 대로 DTR 신호를 활성화시키는 C/C++ 프로그램을 만들어 보겠습니다. 아쉽지만 Raspberry PI Zero에서는 .NET Core가 지원이 안되므로 C/C++로 만들어야 합니다.
그렇다고는 해도 Visual Studio의 리눅스 지원이 워낙 훌륭해서,
Visual Studio 2017에서 Raspberry Pi C++ 응용 프로그램 제작
; https://www.sysnet.pe.kr/2/0/11358
윈도우에서도 쉽게 개발할 수 있습니다. 게다가 저 글을 쓸 때와는 또 다르게 자동으로 include 관련 파일들도 싱크를 맞춰주기 때문에,
IntelliSense for Remote Linux Headers
; https://blogs.msdn.microsoft.com/vcblog/2018/04/09/intellisense-for-remote-linux-headers/
인텔리센스 환경까지 제공합니다. 어쨌든 간단하게 다음과 같이 만들고,
#include <stdio.h>
#include <string>
#include <vector>
#include <iostream>
#include <stdlib.h>
#include <fcntl.h>
#include <sys/ioctl.h>
#include <unistd.h>

using namespace std;

int main(int argc, char *argv[])
{
    // http://xanthium.in/Controlling-RTS-and-DTR-pins-SerialPort-in-Linux

    string portNumber = "0";
    string portName = "/dev/ttyUSB";

    if (argc < 2)
    {
        cout << "FtdiApp [portNumber]" << endl;
        cout << "ex - set DTR on /dev/ttyUSB0" << endl;
        cout << "\t" << "FtdiApp 0" << endl;
        return 1;
    }

    portNumber = argv[1];
    portName.append(portNumber);

    int fd = open(portName.c_str(), O_RDWR | O_NOCTTY);
    if (fd == -1)
    {
        cout << "NO Port: " << portName << endl;
        return 1;
    }

    int dtrFlag = TIOCM_DTR;
    ioctl(fd, TIOCMBIS, &dtrFlag);

    cout << "Press any key to clear DTR again." << endl;

    char notUsed[80];
    fgets(notUsed, sizeof(notUsed), stdin);

    ioctl(fd, TIOCMBIC, &dtrFlag);
    close(fd);

    return 0;
}
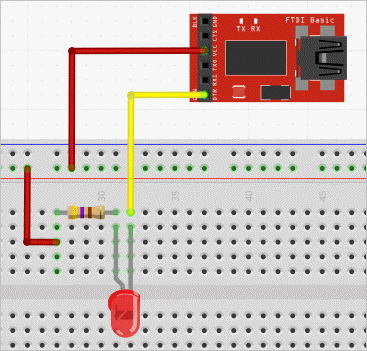
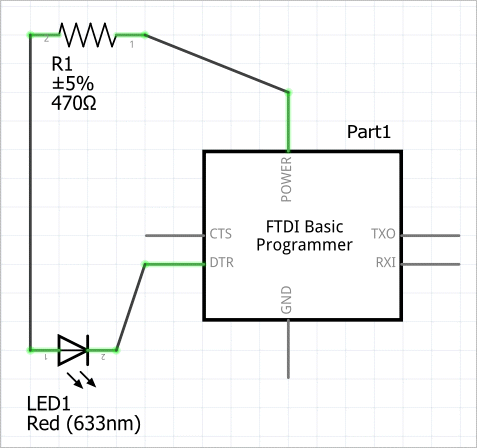
빌드하면 Raspberry PI Zero에 배포가 됩니다. 실습까지 해봐야겠죠? ^^ 이를 위해 FTDI Basic 모듈을 USB 케이블로 Raspberry pi zero와 연결하고 FTDI Basic 모듈과 LED를 다음과 같이 연결해 줍니다.
그런 다음, 라즈베리 파이의 연결 콘솔에서 다음과 같이 명령을 내리면 됩니다.
$ ./FtdiApp 0
실행 후 다음번 엔터 키를 누를 때까지 LED의 불이 들어오고 있는 것을 확인할 수 있습니다.
(
첨부 파일은 예제 C++ 프로젝트와 회로도를 포함합니다.)
참고로, 아직 Visual Studio 2017의 인텔리센스를 위한 리눅스 헤더 파일 지원이 불안정한 것 같습니다. 프로젝트를 다시 로드했더니 인텔리센스 기능이 모두 풀렸는데요, 그래서 다시 "Tools" / "Options"의 "Cross Platform" / "Connection Manager" / "Remote Headers IntelliSense Manager"를 통해 업데이트했는데도,
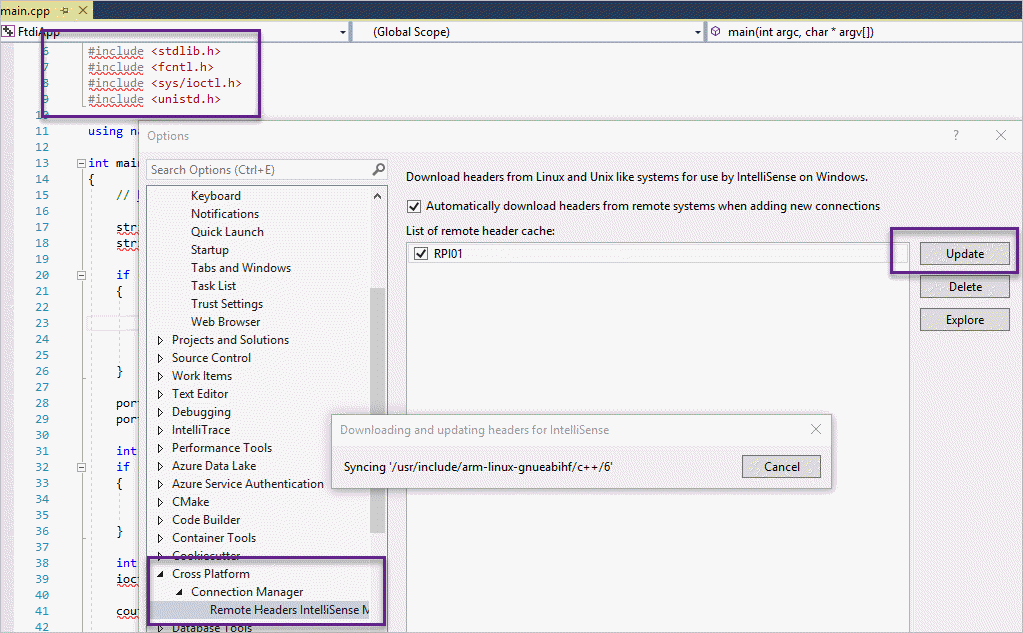
(위의 화면에서 "Explore" 버튼을 누르면 열리는) 헤더 파일에 대한 로컬 캐시가 그냥 비어 있는 체로 남아 있었습니다. 할 수 없습니다, 이런 경우에는 그냥 수작업으로 헤더 파일을 모두 복사해야 합니다. 방법은 다음의 글에도 나오지만,
Visual C++ for Linux Development
; https://blogs.msdn.microsoft.com/vcblog/2016/03/30/visual-c-for-linux-development/
pscp를 이용해,
Download PuTTY: latest release
; http://www.chiark.greenend.org.uk/~sgtatham/putty/download.html
다음과 같은 식으로 헤더 파일을 로컬 캐시에 복사하면 됩니다. (또는 네트워크 공유 폴더를 접근해 복사해도 상관없습니다.)
pscp -r [pi_user_name]@[pi_address]:/usr/include .
가령 다음과 같은 환경인 경우,
로컬 캐시 경로: %LOCALAPPDATA%\Microsoft\Linux\HeaderCache\1.0\-1370237495\usr
PI 사용자 계정: mypi
PI 주소: 192.168.100.5
다음과 같이 입력해 주면 됩니다.
C:\temp> cd %LOCALAPPDATA%\Microsoft\Linux\HeaderCache\1.0\-1370237495\usr

C:\Users\...[생략]...\-1370237495\usr> pscp -r mypi@192.168.100.5:/usr/include .
mypi@192.168.100.5's password:
Visual Studio 2017은 로컬 헤더 파일의 변경을 인식하고 곧바로 다시 인텔리센스 기능을 제공합니다.
[이 글에 대해서 여러분들과 의견을 공유하고 싶습니다. 틀리거나 미흡한 부분 또는 의문 사항이 있으시면 언제든 댓글 남겨주십시오.]