C# - REST API를 이용해 Azure Kudu 서비스 이용 - 파일 처리
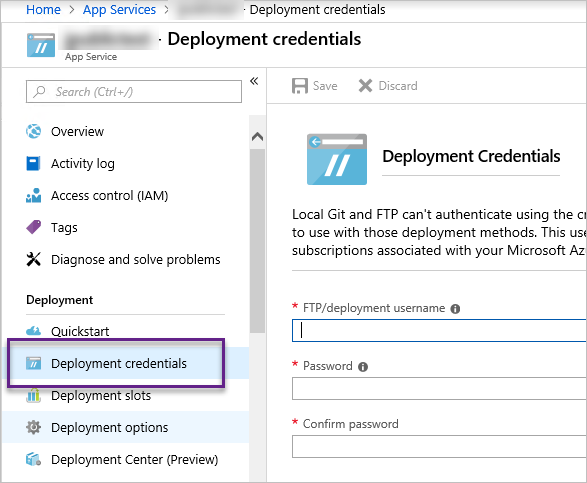
Kudu로 Azure의 Web App 서비스를 제어하기 위해서는 우선 그 서비스에 대한 배포를 할 수 있는 계정 정보를 알아내야 합니다. 이를 위해 "App Services" Azure 포탈 메뉴에서 "Deployment" / "Deployment credentials"를 이용해 명시적인 계정을 생성할 수 있을 것입니다.

단지, 제 경우에는 저걸 사용하지 않고 Get-AzureWebsite 명령어를 이용해 기본 할당되어 있는 배포 계정 정보를 가져왔습니다.
Azure Web Apps: Kudu REST API is a box of surprises
; https://geeks.ms/davidjrh/2015/09/12/azure-web-apps-kudu-rest-api-is-a-box-of-surprises/
$subscriptionName = "...[구독 화면에서 Subscription 필드로 보이는 이름]..."
$websiteName = "...[제어하려는 Web App 서비스 이름]..."
$slotName = "Production"

Add-AzureAccount
Select-AzureSubscription $subscriptionName

$website = Get-AzureWebsite $websiteName -Slot $slotName
$publishingUsername = $website.PublishingUsername
$publishingPassword = $website.PublishingPassword

Write-Host $publishingUsername
Write-Host $publishingPassword
출력 정보를 보면 기본 $publishingUsername은 Web App의 이름에 "$" 문자가 붙어 있습니다. 가령 "testweb"이라는 Web App이면 "$testweb"이 기본 사용자 계정입니다. 계정 정보를 알았으니 이제 다음과 같이 기본 Client의 뼈대를 완성할 수 있습니다.
using Newtonsoft.Json;
using System;
using System.Net;
using System.Net.Http;
using System.Text;
using System.Threading.Tasks;

namespace KuduRestClient
{
    class KuduClient
    {
        CookieContainer _cookies;
        HttpClient _httpClient;
        string _baseUrl;
        string _basicAuth;

        public KuduClient(string siteName, string userAccount, string userPassword)
        {
            HttpClientHandler handler = new HttpClientHandler();
            _cookies = new CookieContainer();
            handler.CookieContainer = _cookies;

            HttpClient hc = new HttpClient(handler);
            _httpClient = hc;

            _basicAuth = string.Format("Basic {0}", ToBase64(userAccount + ":" + userPassword));
            _httpClient.DefaultRequestHeaders.Add("Authorization", _basicAuth);

            _baseUrl = $"https://{siteName}.scm.azurewebsites.net/";
        }

        private string ToBase64(string text)
        {
            byte [] buf = Encoding.ASCII.GetBytes(text);
            return Convert.ToBase64String(buf);
        }

        public async Task<ScmInfo> GetScmInfoAsync()
        {
            string url = $"{_baseUrl}api/scm/info";

            string text = await _httpClient.GetStringAsync(url);
            return JsonConvert.DeserializeObject<ScmInfo>(text);
        }
    }

    public class ScmInfo
    {
        public int Type { get; set; }
        public string GitUrl { get; set; }
    }
}
using System;
using System.IO;
using System.Threading.Tasks;

namespace KuduRestClient
{
    class Program
    {
        public static async Task Main(string[] args)
        {
            (string account, string password) = GetAccountInfo();

            if (string.IsNullOrEmpty(account) || string.IsNullOrEmpty(password))
            {
                Console.WriteLine("Account info is null");
                return 1;
            }

            KuduClient client = new KuduClient("[...sitename...]", account, password);

            ScmInfo scmInfo = await client.GetScmInfoAsync();
            Console.WriteLine(scmInfo.GitUrl);

            return 0;
        }
    }
}


/* 출력 결과
https://[...siteName...].scm.azurewebsites.net/[..siteName...].git
*/
보는 바와 같이, Kudu는 Basic 인증을 사용하므로 반드시 https 통신이어야 합니다. 이후 호출할 수 있는 REST API 정보는 다음의 링크에서 볼 수 있습니다.
Kudu - REST API
; https://github.com/projectkudu/kudu/wiki/REST-API
그러고 보니 지난 글에서,
Azure Web App의 이벤트 로그를 확인하는 방법
; https://www.sysnet.pe.kr/2/0/11683
이벤트 로그를 다음의 경로로 확인할 수 있다고 했습니다.
https://[app service name].scm.azurewebsites.net/api/vfs/LogFiles/eventlog.xml
사실 이것도 Kudu 서비스의 하나입니다. "https://[app service name].scm.azurewebsites.net/api/vfs" 경로가 Web App 환경의 "d:\home" 경로와 일치하기 때문에 Web App의 모든 파일을 Kudu를 이용해 접근하는 것이 가능합니다.
도움말에도 나오지만 vfs 관련 API는
https://github.com/c9/vfs-http-adapter가 제공하는 것이며 기본적으로 '/' 문자로 끝나면 directory로 취급하고 없으면 file이 됩니다. 이를 이용해 파일 목록을 조회하고 삭제하는 API를 KuduClient에 다음과 같이 추가 구현할 수 있습니다.
public async Task<List<VfsFile>> GetFileListAsync(string directory)
{
    string url = $"{_baseUrl}api/vfs/{directory}/";
    string text = await _httpClient.GetStringAsync(url);

    List<VfsFile> files = new List<VfsFile>();
    files.AddRange(JsonConvert.DeserializeObject<VfsFile[]>(text).Where ( (item) => item.mime != "inode/directory") );

    return files;
}

public async Task<string> GetFileAsStringAsync(VfsFile file)
{
    return await _httpClient.GetStringAsync(file.href);
}

public async Task<FileContent> GetFileWithEtagAsync(VfsFile file)
{
    HttpResponseMessage hrm = await _httpClient.GetAsync(file.href);
    hrm.Headers.TryGetValues("ETag", out var values);

    FileContent fc = new FileContent();

    fc.etag = values.FirstOrDefault();
    if (fc.etag != null)
    {
        fc.etag = fc.etag.Trim('\"');
    }

    fc.text = await hrm.Content.ReadAsStringAsync();

    return fc;
}

public async Task<bool> DeleteFileAsync(VfsFile file, string etag = "*")
{
    _httpClient.DefaultRequestHeaders.Add("If-Match", "*");

    HttpResponseMessage hrm = await _httpClient.DeleteAsync(file.href);

    string text = await hrm.Content.ReadAsStringAsync();
    MessageResponse mr = JsonConvert.DeserializeObject<MessageResponse>(text);
    return hrm.StatusCode == HttpStatusCode.OK;
}
그리고 이것을 이용해 "LogFiles" 폴더의 내용 중 eventlog.xml 파일을 삭제하는 기능을 다음과 같이 구현할 수 있습니다.
foreach (VfsFile file in await client.GetFileListAsync("LogFiles"))
{
    Console.WriteLine(file.path);

    if (file.name == "eventlog.xml")
    {
        await client.DeleteFileAsync(file);
    }
}
대충 어떤 식으로 구현할 수 있는지 이제 감을 잡을 수 있을 것입니다. ^^
(첨부 파일은 이 글의 예제 코드를 포함합니다.)
참고로 Basic 인증 정보를 올바로 구성하지 않으면 다음과 같이 401 오류가 발생합니다.
c:\temp> KuduRestClient.exe

Unhandled Exception: System.Net.Http.HttpRequestException: Response status code does not indicate success: 401 (Unauthorized).
   at System.Runtime.CompilerServices.TaskAwaiter.ThrowForNonSuccess(Task task)
   at System.Runtime.CompilerServices.TaskAwaiter.HandleNonSuccessAndDebuggerNotification(Task task)
   at System.Runtime.CompilerServices.TaskAwaiter`1.GetResult()
   at NugetRestClient.KuduClient.<GetScmInfoAsync>d__6.MoveNext() in c:\temp\KuduRestClient\KuduClient.cs:line 42
--- End of stack trace from previous location where exception was thrown ---
   at System.Runtime.CompilerServices.TaskAwaiter.ThrowForNonSuccess(Task task)
   at System.Runtime.CompilerServices.TaskAwaiter.HandleNonSuccessAndDebuggerNotification(Task task)
   at System.Runtime.CompilerServices.TaskAwaiter.GetResult()
   at NugetRestClient.Program.<Main>d__0.MoveNext() in c:\temp\KuduRestClient\Program.cs:line 23
--- End of stack trace from previous location where exception was thrown ---
   at System.Runtime.CompilerServices.TaskAwaiter.ThrowForNonSuccess(Task task)
   at System.Runtime.CompilerServices.TaskAwaiter.HandleNonSuccessAndDebuggerNotification(Task task)
   at System.Runtime.CompilerServices.TaskAwaiter`1.GetResult()
   at NugetRestClient.Program.<Main>(String[] args)
그리고 계정 정보를 알아내기 위해 Add-AzureAccount 명령어를 수행했는데 없다고 하면,
PS C:\WINDOWS\system32> Add-AzureAccount
Add-AzureAccount : The term 'Add-AzureAccount' is not recognized as the name of a cmdlet, function, script file, or operable program. Check the spelling of the name, or if a path was included, verify that the path is correct and try again.
At line:1 char:1
+ Add-AzureAccount
+ ~~~~~~~~~~~~~~~~
    + CategoryInfo          : ObjectNotFound: (Add-AzureAccount:String) [], CommandNotFoundException
    + FullyQualifiedErrorId : CommandNotFoundException
그냥 Azure 모듈을 import 하면 됩니다.
PS C:\WINDOWS\system32> Import-Module Azure
그런데 설치가 안되었다고 하면,
PS C:\WINDOWS\system32> Import-Module Azure
Import-Module : The specified module 'Azure' was not loaded because no valid module file was found in any module directory.
At line:1 char:1
+ Import-Module Azure
+ ~~~~~~~~~~~~~~~~~~~
    + CategoryInfo          : ResourceUnavailable: (Azure:String) [Import-Module], FileNotFoundException
    + FullyQualifiedErrorId : Modules_ModuleNotFound,Microsoft.PowerShell.Commands.ImportModuleCommand
그냥 설치하시면 됩니다. ^^
PS C:\WINDOWS\system32> Install-Module Azure
[이 글에 대해서 여러분들과 의견을 공유하고 싶습니다. 틀리거나 미흡한 부분 또는 의문 사항이 있으시면 언제든 댓글 남겨주십시오.]