.NET으로 구현하는 OpenGL (11) - Per-Pixel Lighting
아래의 글에 이어,
.NET으로 구현하는 OpenGL (9), (10)
; https://www.sysnet.pe.kr/2/0/11787
11회 강좌는,
OpenGL 3D Game Tutorial 11: Per-Pixel Lighting
; https://youtu.be/bcxX0R8nnDs
확산광(Diffuse lighting)에 대한 조명 연산을 다룹니다. (예제를 위한 리소스 파일(
dragon.obj)을 다운로드합니다.)
그다음은 코드 변경인데요, 우선 조명 객체를 정의하고,
// Light.cs

namespace GameApp.Entities
{
    public class Light
    {
        Vertex3f _position;
        public Vertex3f Position
        {
            get { return _position; }
            set { _position = value; }
        }

        Vertex3f _colour;
        public Vertex3f Colour
        {
            get { return _colour; }
            set { _colour = value; }
        }

        public Light(Vertex3f position, Vertex3f colour)
        {
            this._position = position;
            this._colour = colour;
        }
    }
}
vertex shader로 광원의 위치를 알려준 후,
#version 400 core

/* layout(location = 0) */ in vec3 _position;
/* layout(location = 1) */ in vec2 _textureCoords;
/* layout(location = 2) */ in vec3 _normal;

out vec2 _pass_textureCoords;

uniform mat4 _transformationMatrix;
uniform mat4 _projectionMatrix;
uniform mat4 _viewMatrix;
uniform vec3 _lightPosition;

void main(void)
{
    gl_Position  = _projectionMatrix * _viewMatrix * _transformationMatrix * vec4(_position, 1.0);
    _pass_textureCoords = _textureCoords;
}
fragment shader로는 광원의 색을 알려줍니다.
#version 400 core

in vec2 _pass_textureCoords;

out vec4 out_Color;

uniform sampler2D textureSampler;
uniform vec3 _lightColour;

void main(void)
{
    out_Color = texture(textureSampler, _pass_textureCoords);
}
그렇다면 당연히 shader 코드에 변수 전달을 위해 StaticShader 타입을 변경해야 합니다.
// StaticShader.cs

public class StaticShader : ShaderProgram
{
    // ...[생략]...

    int _loc_lightPosition;
    int _loc_lightColour;

    // ...[생략]...

    protected override void getAllUniformLocations()
    {
        _loc_transformationMatrix  = base.getUniformLocation("_transformationMatrix");
        _loc_projectionMatrix = base.getUniformLocation("_projectionMatrix");
        _loc_viewMatrix = base.getUniformLocation("_viewMatrix");

        _loc_lightPosition = base.getUniformLocation("_lightPosition");
        _loc_lightColour = base.getUniformLocation("_lightColour");
    }

    public void loadLight(Light light)
    {
        base.loadVector(_loc_lightPosition, light.Position);
        base.loadVector(_loc_lightColour, light.Colour);
    }

    // ...[생략]...
}
이제 지난 강좌에서 obj 파일로부터 로드만 하고 사용하지 않은 normalsArray를 사용할 차례입니다. 법선 정보는 모델에 포함되므로 shader에 변수로 전달하는 것이 아닌, VAO를 통해서 전달한다고 합니다. 따라서 loadToVAO 코드가 법선 정보를 담도록 확장하게 됩니다.
// Loader.cs

public RawModel loadToVAO(float[] positions, float[] textures, float [] normals, int[] indices)
{
    uint vaoID = createVAO();

    bindIndicesBuffer(indices);
    storeDataInAttributeList(0, 3, positions);
    storeDataInAttributeList(1, 2, textures);
    storeDataInAttributeList(2, 3, normals);
    unbindVAO();

    return new RawModel(vaoID, positions.Length);
}
물론 모델 로드 시에 법선 벡터를 함께 로드하도록 코드도 바꾸고,
// OBJLoader.cs

public static RawModel loadObjModel2(string fileName, Loader loader)
{
    string filePath = Path.Combine(Path.GetDirectoryName(Assembly.GetExecutingAssembly().Location), "res", fileName + ".obj");

    AssimpContext importer = new AssimpContext();
    importer.SetConfig(new NormalSmoothingAngleConfig(66.0f));
    Scene scene = importer.ImportFile(filePath, PostProcessPreset.TargetRealTimeQuality | PostProcessSteps.FlipWindingOrder);

    if (scene == null || scene.HasMeshes == false)
    {
        return null;
    }

    float[] verticesArray = VerticesFromMesh(scene.Meshes[0]);
    float[] textureArray = TextureFromMesh(scene.Meshes[0]);
    int[] indicesArray = IndicesFromMesh(scene.Meshes[0]);
    float[] normalsArray = NormalsFromMesh(scene.Meshes[0]);

    return loader.loadToVAO(verticesArray, textureArray, normalsArray, indicesArray);
}
렌더링 시 EnableVertexAttribArray를 조정해 줍니다.
// Renderer.cs

public void Render(Entity entity, StaticShader shader)
{
    TextureModel model = entity.Model;
    RawModel rawModel = model.RawModel;

    Gl.BindVertexArray(rawModel.VaoID);
    Gl.EnableVertexAttribArray(0);
    Gl.EnableVertexAttribArray(1);
    Gl.EnableVertexAttribArray(2);

    Matrix4x4 transformationMatrix = Maths.createTransformationMatrix(entity.Position, entity.RotX, entity.RotY, entity.RotZ, entity.Scale);
    shader.loadTransformationMatrix(transformationMatrix);

    Gl.ActiveTexture(TextureUnit.Texture0);
    Gl.BindTexture(TextureTarget.Texture2d, model.Texture.ID);
    Gl.DrawElements(PrimitiveType.Triangles, rawModel.VertexCount, DrawElementsType.UnsignedInt, IntPtr.Zero);

    Gl.DisableVertexAttribArray(0);
    Gl.DisableVertexAttribArray(1);
    Gl.DisableVertexAttribArray(2);
    Gl.BindVertexArray(0);
}
자, 이제 shader 코드에서 전달받은 광원의 위치와 색상을 반영하면 됩니다.
#version 400 core

/* layout(location = 0) */ in vec3 _position;
/* layout(location = 1) */ in vec2 _textureCoords;
/* layout(location = 2) */ in vec3 _normal;

out vec2 _pass_textureCoords;
out vec3 _surfaceNormal;
out vec3 _toLightVector;

uniform mat4 _transformationMatrix;
uniform mat4 _projectionMatrix;
uniform mat4 _viewMatrix;
uniform vec3 _lightPosition;

void main(void)
{
    vec4 worldPosition = _transformationMatrix * vec4(_position, 1.0);
    gl_Position  = _projectionMatrix * _viewMatrix * worldPosition;
    _pass_textureCoords = _textureCoords;

    _surfaceNormal = (_transformationMatrix * vec4(_normal, 0.0)).xyz;
    _toLightVector = _lightPosition - worldPosition.xyz;
}
#version 400 core

in vec2 _pass_textureCoords;
in vec3 _surfaceNormal;
in vec3 _toLightVector;

out vec4 out_Color;

uniform sampler2D textureSampler;
uniform vec3 _lightColour;

void main(void)
{
    vec3 unitNormal = normalize(_surfaceNormal);
    vec3 unitLightVector = normalize(_toLightVector);

    float nDotl = dot(unitNormal, unitLightVector);
    float brightness = max(nDotl, 0.0);
    vec3 diffuse = brightness * _lightColour;

    out_Color = vec4(diffuse, 1.0) * texture(textureSampler, _pass_textureCoords);
}
사실 위의 코드 자체는 지난 글에서 다룬 것과 크게 다르지 않습니다.
Unity로 실습하는 Shader (2) - 고로 셰이딩(gouraud shading) + 퐁 모델(Phong model)
; https://www.sysnet.pe.kr/2/0/11609
마지막으로, 위의 모든 변화를 MainForm.cs에 적용하는 것으로 완성하면 됩니다.
// MainForm.cs

Camera _camera;
Entity _entity;
Light _light;

private void glControl_ContextCreated(object sender, OpenGL.GlControlEventArgs e)
{
    GlControl glControl = (GlControl)sender;
    _displayManager.createDisplay(glControl);

    bool result = Soil.NET.WrapSOIL.Initialize();
    if (result == false)
    {
        MessageBox.Show("SOIL: Not initialized: " + Soil.NET.WrapSOIL.GetSoilLastError());
        return;
    }

    _loader = new Loader();

    _model = OBJLoader.loadObjModel2("dragon", _loader);
    _staticModel = new TextureModel(_model, new ModelTexture(_loader.loadTexture("white"))); // white.png 파일은 그냥 흰색 바탕의 2의 배수 크기를 가진 이미지이면 됩니다.

    _staticModel = new TextureModel(_model, _texture);
    _shader = new StaticShader();
    _renderer = new Renderer(_shader, glControl.ClientSize.Width, glControl.ClientSize.Height);

    _camera = new Camera();
    _entity = new Entity(_staticModel, new Vertex3f(0, -4, -10), 0, 0, 0, 1);
    _light = new Light(new Vertex3f(0, 0, -20), new Vertex3f(1, 1, 1));
}

private void glControl_Render(object sender, OpenGL.GlControlEventArgs e)
{
    _renderer.Prepare();

    _shader.Start();
    {
        _shader.loadLight(_light);
        _shader.loadViewMatrix(_camera);
        _renderer.Render(_entity, _shader);
    }
    _shader.Stop();

    _displayManager.updateDisplay();
}
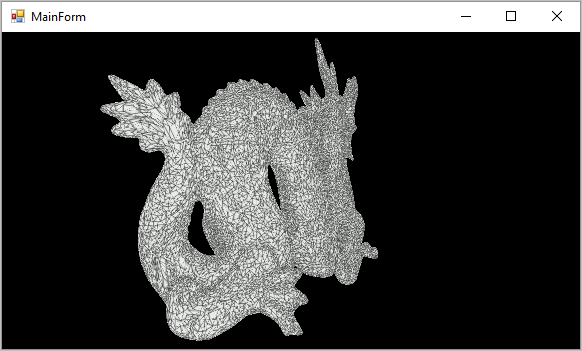
그런데, shader의 빛을 반영하는 코드를 빼고 그냥 모델과 텍스처만 로드하는 정도로만 코드를 변경해도 다음과 같이 Wireframe 식으로 나옵니다.
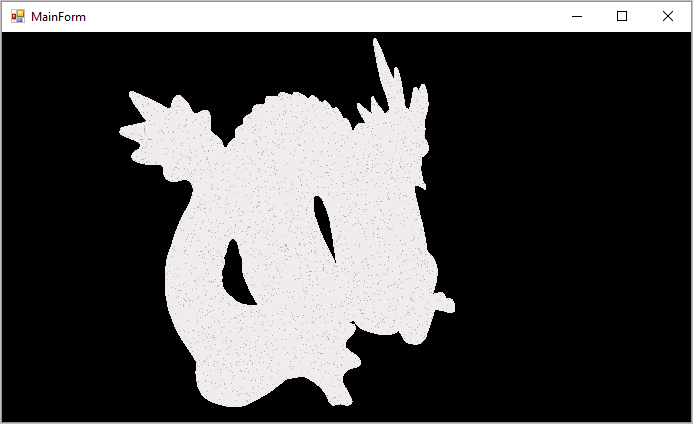
강좌의 설명 글을 보면, white.png 텍스처 파일이 2의 n 승 크기인지 확인하라고 합니다. 그래도 그런 현상이 발생한다면 다음의 코드를 넣어보라고 하는데,
int value = (int)TextureMagFilter.Linear;
Gl.TexParameteri(TextureTarget.Texture2d, TextureParameterName.TextureMagFilter, ref value);
Gl.TexParameteri(TextureTarget.Texture2d, TextureParameterName.TextureMinFilter, ref value);

value = Gl.REPEAT;
Gl.TexParameteri(TextureTarget.Texture2d, TextureParameterName.TextureWrapS, ref value);
Gl.TexParameteri(TextureTarget.Texture2d, TextureParameterName.TextureWrapT, ref value);
조금 나아지긴 했지만 여전히 아래와 같이 완벽하게 제거되지 않은 모습으로 나옵니다.
어쩔 수 없습니다. 어쨌든 이대로 진행해서 빛을 반영하는 코드를 다시 넣어 보면 이젠 다음과 같이 나옵니다.
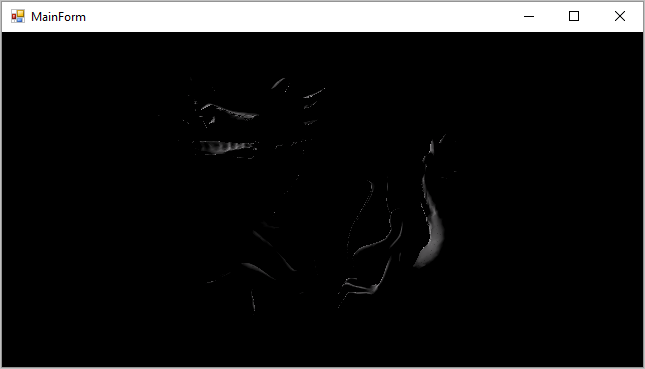
너무 어둡군요. ^^ 보정으로 다음과 같이 0.3 정도 더하면 좀 더 밝아지지만,
out_Color = (vec4(diffuse, 1.0) + 0.3) * texture(textureSampler, _pass_textureCoords);
아래와 같이 그다지 멋이 없게 음영 처리가 됩니다.
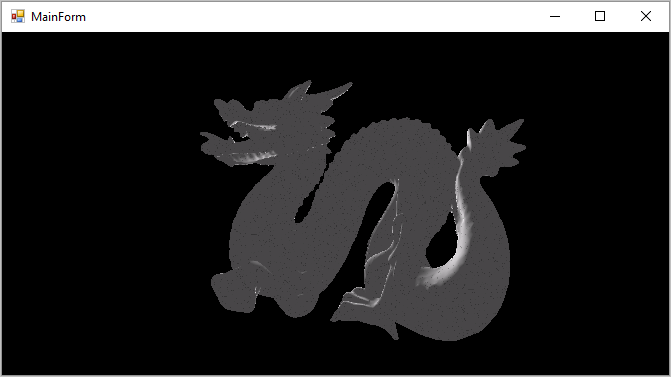
아마도 모델의 크기가 커서 조명 위치가 용의 안쪽으로 들어간 듯한데요, 그냥 하늘에서 태양을 비춘다고 여기며 Light의 좌표를 y-축으로 올리고 나면,
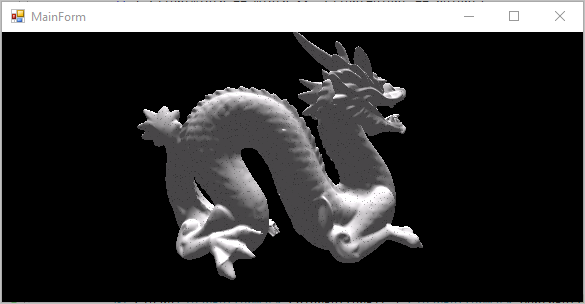
이제서야 좀 근사하게 음영 처리가 되었습니다. ^^ (그래도 화면을 키워보면 처음의 wireframe 선이 두드러지게 보입니다. 혹시 해결 방법을 아시는 분은 덧글 부탁드립니다. ^^)
(
첨부 파일은 이 글의 예제 프로젝트를 포함합니다.)
[이 글에 대해서 여러분들과 의견을 공유하고 싶습니다. 틀리거나 미흡한 부분 또는 의문 사항이 있으시면 언제든 댓글 남겨주십시오.]