smigdeploy.exe를 이용한 Windows Server 2016에서 2019로 마이그레이션 방법
Azure에서의 VM은 in-place 업그레이드가 가능하지 않으므로,
Performing an in-place system upgrade is not supported on Windows-based Azure VMs
; https://learn.microsoft.com/en-us/troubleshoot/azure/virtual-machines/in-place-system-upgrade
다른 방법을 사용해야 합니다.
Method 1: Deploy a newer system and migrate the workload
Method 2: Download and upgrade the VHD
이 중에서 VHD를 다운로드해 변경 후 업그레이드하는 것은 자칫 수백 GB 단위의 데이터가 오고 갈 수 있으므로 불편할 수 있습니다. 그래서 "Windows Server migration tools"를 제공해 준다고 하니 이쪽을 기웃거리게 되는데요, ^^;
Windows Server Migration Tools Installation, Access, and Removal
; https://learn.microsoft.com/en-us/previous-versions/windows/it-pro/windows-server-2008-R2-and-2008/dd379545(v=ws.10)
이름에서 느껴지는 그동안의 "마이그레이션 도구"에 대한 관행과는 달리 이게 클릭 몇 번으로 수행되는 방식이 아니라 좀 불편합니다. 일단, 한 번 어떤 식인지 따라가 볼까요? ^^
우선, 환경을 다음과 같다고 가정했을 때,
기존 서버: Windows Server 2016 (IP: 192.168.100.5)
신규 서버: Windows Server 2019 (IP: 192.168.100.6)
2대의 서버에 모두 다음의 명령어로 "Windows Server Migration Tools" 구성 요소를 설치합니다.
Add-WindowsFeature Migration
자, 이제부터 자신이 원하는 구성 요소에 대해 "Windows Server Migration Tools"의 환경에서 실행할 수 있는 PowerShell 명령어를 구사하면 됩니다. 아마도 제일 먼저 할 일은, 기존 서버에 구성한 "Roles and Features"일 텐데요, 이것들을 마이그레이션 하기 위해 우선 그 기능들의 목록을 알아내야 합니다. 이를 위해 "기존 서버"에서 "Server Manager"의 "Tools" / "Windows Server Migration Tools" / "Windows Server Migration Tools"를 실행해 뜨는 PowerShell 환경에서 Get-SmigserverFeature 명령어를 실행하고,
// 참고: https://www.learnesl.net/migrating-roles-from-server-2012r2-to-windows-server-2016/

PS C:\Windows\system32> cd .\ServerMigrationTools
PS C:\Windows\system32\ServerMigrationTools> Get-SmigserverFeature

WindowsFeatureName ID            Installed
------------------ --            ---------
                   BranchCache        True
WoW64 Support      WoW64-Support      True
출력된 WindowsFeatures에 대한 "ID"에 대해 하나씩 설정을 export 해 줍니다.
PS C:\Windows\system32\ServerMigrationTools> Export-SmigServerSetting -FeatureID BranchCache -Path:C:\mig_settings\1

cmdlet Export-SmigServerSetting at command pipeline position 1
Supply values for the following parameters:
Password: *************

      ItemType ID          Success DetailsList
      -------- --          ------- -----------
WindowsFeature BranchCache    True {}

PS C:\Windows\system32\ServerMigrationTools> Export-SmigServerSetting -FeatureID WoW64-Support -Path:C:\mig_settings\2

cmdlet Export-SmigServerSetting at command pipeline position 1
Supply values for the following parameters:
Password: *************

      ItemType ID          Success DetailsList
      -------- --          ------- -----------
WindowsFeature WoW64-Support  True {}
그다음 이렇게 해서 출력된 디렉터리의 내용을 신규 서버로 보내고,
robocopy C:\mig_settings \\192.168.100.6\c$\mig_settings /S
신규 서버 환경에서는 마찬가지로 "Server Manager"의 "Tools" / "Windows Server Migration Tools" / "Windows Server Migration Tools"를 실행해 뜨는 PowerShell 환경으로 들어가 해당 설정들을 import 합니다.
Import-SmigServerSetting -FeatureID BranchCache -Path:C:\mig_settings\1 -verbose -Force
Import-SmigServerSetting -FeatureID WoW64-Support -Path:C:\mig_settings\1 -verbose -Force

// 이유는 알 수 없지만 제 환경에서 WoW64-Support의 경우에는 "The Windows feature with ID WoW64-Support cannot be imported to this server" 오류가 발생합니다.
// 사실, BranchCache나 WoW64-Support는 윈도우 서버가 기본적으로 Role을 구성하기 때문에 위와 같이 굳이 export/import할 필요가 없습니다.
물론, 마이그레이션 해야 할 것이 "Windows Features"만 있는 것은 아닙니다. 사용자 계정도 로컬에 만들었다면 신규 서버로 옮겨줘야 하는데요,
What is Windows Server Migration Tools and how to use it?
; https://www.ubackup.com/windows-server/how-to-use-windows-server-migration-tools-6988.html
Windows Features를 했을 때와 마찬가지로 Export-SmigServerSetting / Import-SmigServerSetting 명령어를 이용하지만 옵션이 달라집니다.
// 소스 서버
Export-SmigServerSetting -User All -Group -Path C:\SrcUsersGroups ?Verbose
robocopy C:\SrcUsersGroups \\192.168.100.6\c$\SrcUsersGroups /S
// 대상 서버
Import-SmigServerSetting -User Enabled -Group -Path C:\SrcUsersGroups -Verbose
(export/import 후에는 개별 사용자들이 모두 "User must change password at next logon", "Account is disabled" 되어 있기 때문에 필요하다면 이를 직접 활성화해야 합니다.)
참고로, SQL Server가 설치된 경우라면 다음과 같은 식의 오류가 발생하는데요,
VERBOSE: Warning 1379: Group Performance Monitor Users was not imported because the group already exists on the local
computer.
VERBOSE: Error 1379: Member NT SERVICE\SQLSERVERAGENT cannot be added to group Performance Monitor Users.
VERBOSE: Error 1379: Member NT SERVICE\MSSQLSERVER cannot be added to group Performance Monitor Users.
문제 될 것은 없지만, 저런 오류가 거슬리는 분들은 사용자/그룹을 마이그레이션하기 전에 SQL Server를 미리 설치해 두어야 합니다.
사실, 사용자/그룹 설정을 복사하는 것보다 더 중요한 것은 "User Profile"의 내용일 것입니다. 이에 대해서는 다음의 글에서 소개하고 있으니 참고하시고.
Windows Server ? Migrating Files / Folders / Shares / User Profiles
; https://www.petenetlive.com/KB/Article/0001201
그러니까, 남은 작업이라면 결국 응용 프로그램과 그에 대한 데이터를 마이그레이션 해야 하는데, 위에서 "SQL Server"에 대해 짐작할 수 있었겠지만 "Windows Server Migration Tools"에서는 응용 프로그램에 대한 마이그레이션은 지원하지 않습니다.
단지, "폴더"를 복사하는 기능을 Send-SmigServerData / Receive-SmigServerData의 조합으로 제공합니다. 방법은, "신규 서버" 측에서 Receive-SmigServerData 명령어를 실행시켜 둔 후,
PS C:\windows\system32\ServerMigrationTools> Receive-SmigServerData

cmdlet Receive-SmigServerData at command pipeline position 1
Supply values for the following parameters:
Password: *************
"기존 서버" 측에서 어떤 데이터를 보낼지 선택해 Send-SmigServerData 명령어를 실행하면 됩니다.
[형식]
Send-SmigServerData -ComputerName {destination-computer-name} -SourcePath {path-to-source-folder} -DestinationPath {path-to-destination-folder} -include all -recurse

[예제: 기존 서버의 c:\db 폴더를 신규 서버의 c:\db 폴더로 모두 복사]
Send-SmigServerData -ComputerName vm2 -SourcePath c:\db -DestinationPath c:\db -include all -recurse
그런데, (/SEC 옵션을 준) robocopy가 있는데 굳이 이 기능을 사용해야 할 이유가 있을까요? 왜냐하면, 파일 권한까지 (비교적) 잘 전달이 되기 때문입니다. 예를 들어, 기존 서버에 "kevin", "admin" 계정에 대해 권한을 준 것을 robocopy/SEC로 복사하면 다음과 같이 계정 정보가 깨지지만,
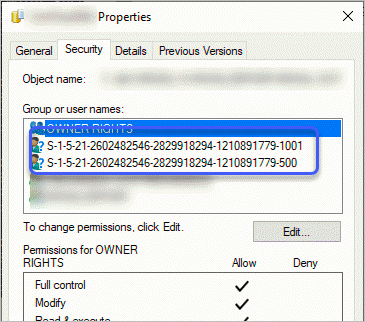
*-SmigServerData 명령어로 이전하면 계정 정보가 살아 있습니다.
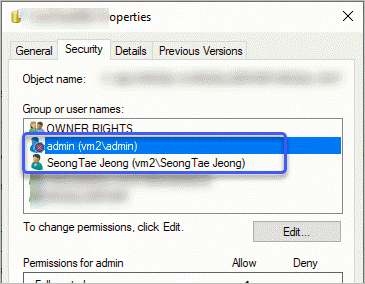
(kevin 계정의 경우 "SeongTae Jeong" 계정으로 바뀌었는데 아마도 기존 서버의 로그인 계정이 "kevin"이었고, 신규 서버의 로그인 계정이 "SeongTae Jeong"이었으므로 그렇게 된 듯합니다.) 그래도 이상한 것은 "admin"이라는 계정의 아이콘을 보면 "x" 표시가 되어 있는데 이에 대한 의미는 잘 모르겠습니다.
그래도 기존 서버처럼 깨진 SID(security identifier) 형식이 아니라 마이그레이션 한 후에 적절한 계정으로 다시 대체할 수 있도록 식별이 가능하다는 점에서*-SmigServerData 명령어가 아주 의미가 없진 않을 것입니다.
보는 바와 같이 "Windows Server migration tools"가 그다지 이름값을 하고 있지는 않습니다. 따라서 이것을 이용하기보다는 네트워크 전송이 좀 부담이 되어도 "Method 2: Download and upgrade the VHD" 방법을 쓰는 것이 어찌 보면 가장 안전하고 쉽게 업그레이드하는 방법일 수 잇습니다. (그나저나, 애당초 Azure에서 in-place 업그레이드를 지원하면 될 텐데... 그걸 못해주네요. ^^;)
[이 글에 대해서 여러분들과 의견을 공유하고 싶습니다. 틀리거나 미흡한 부분 또는 의문 사항이 있으시면 언제든 댓글 남겨주십시오.]