openssl - CA로부터 인증받은 새로운 인증서를 생성하는 방법
self-signed 인증서가 있다면 그것을 인증 기관(CA: certificate authority)의 루트 인증서라고 봐도 됩니다.
How to Create Your Own SSL Certificate Authority for Local HTTPS Development
 - Becoming a (tiny) Certificate Authority
; https://deliciousbrains.com/ssl-certificate-authority-for-local-https-development/

OpenSSL Essentials: Working with SSL Certificates, Private Keys and CSRs
; https://www.digitalocean.com/community/tutorials/openssl-essentials-working-with-ssl-certificates-private-keys-and-csrs
위의 글에서는 CA 인증서 생성 후, 다른 개인키를 만들어 앞서의 CA로부터 서명을 받아내는 방법("Creating CA-Signed Certificates for Your Dev Sites")도 설명합니다.
이와 관련해서 간단하게 정리를 해볼까요? ^^
기존에 ca.crt, ca.key 파일이 있다고 가정하고, 새롭게 apiserver.key라는 개인키 파일을 하나 만들었다고 가정해보겠습니다. 그럼 해당 개인키에 대한 인증서 요청 파일을 만들 수 있습니다.
// openssl-req

c:\temp\wsl> openssl req -key apiserver.key -new -out apiserver.csr
You are about to be asked to enter information that will be incorporated
into your certificate request.
What you are about to enter is what is called a Distinguished Name or a DN.
There are quite a few fields but you can leave some blank
For some fields there will be a default value,
If you enter '.', the field will be left blank.
-----
Country Name (2 letter code) [AU]:
State or Province Name (full name) [Some-State]:
Locality Name (eg, city) []:
Organization Name (eg, company) [Internet Widgits Pty Ltd]:
Organizational Unit Name (eg, section) []:
Common Name (e.g. server FQDN or YOUR name) []:kube-apiserver
Email Address []:

Please enter the following 'extra' attributes
to be sent with your certificate request
A challenge password []:
An optional company name []:
"Common Name"을 kube-apiserver로 지정한 것을 제외하고는 모두 기본 값을 사용하고 있습니다. 이렇게 생성된 apiserver.csr 파일은 다음과 같은 양식을 가집니다.
-----BEGIN CERTIFICATE REQUEST-----
MIICozCCAYsCAQAwXjELMAkGA1UEBhMCQVUxEzARBgNVBAgMClNvbWUtU3RhdGUx
...[생략]...
dffpjAc4Xw==
-----END CERTIFICATE REQUEST-----
이걸로 모든 준비는 끝입니다. 이제 CA 인증 기관의 개인키 파일 및 인증서를 가지고 다음과 같이 해당 인증서 요청에 대해 서명을 해 새로운 인증서를 만들 수 있습니다.
// openssl-x509

c:\temp\wsl> openssl x509 -req -days 3650 -in apiserver.csr -CA ca.crt -CAkey ca.key -CAcreateserial -out server-cert.crt
서명 후 생성된 server-cert.crt 파일은 이런 양식을 가지며,
-----BEGIN CERTIFICATE-----
MIIC+jCCAeICFEsnOV4njaMmxkP9X+5leLdWtL0KMA0GCSqGSIb3DQEBCwUAMBUx
...[생략]...
cYvuYo6gg4XKMHsR6RILj+6/WMJ7ptLSF5M5ZQLDwuKwYjbZc57+72hrHYopFw==
-----END CERTIFICATE-----
탐색기로 보면 다음과 같이 해석 결과를 보여줍니다.

기본 과정은 저렇지만, 하나씩 사용자 정의를 추가해보겠습니다.
우선 "Common Name" (속성 창에서는 Subject) 값이 "kube-apiserver, Internet Widgits Pty Ltd"라고 나옵니다. 이것은, "openssl req ..." 명령어 실행 중 기본값으로 지정된 "Organization Name" 때문에 그런 것입니다. "Common Name"에 기재한 값만 나오게 하고 싶다면 "Organization Name" 질문에 그냥 엔터만 치지 말고 콤마(.)를 입력한 후 엔터를 치면 됩니다. 또는, 아예 명령어에서 제공하는 -subj 옵션을 활용하면 그런 귀찮은 질문 단계를 없앨 수 있습니다.
C:\temp\wsl> openssl req -key apiserver.key -new -out apiserver.csr -subj "/CN=kube-apiserver"
위와 같이 해주면, "Subject"에 해당하는 값이 "CN = kube-apisevrer"로 나오게 됩니다. 하지만, 대체로 위와 같이 명령행에 지정하기보다는 이러한 구성을 가지고 있는 cnf 파일을 만드는 것이 더 편리합니다.
How to create a CSR with OpenSSL
; https://www.switch.ch/pki/manage/request/csr-openssl/
# apiserver.cnf

FQDN = kube-apiserver

[ req ]
default_bits = 2048
default_md = sha256
prompt = no
encrypt_key = no
distinguished_name = dn

[ dn ]
CN = $FQDN
이렇게 만든 cnf 파일을 "openssl req ..." 수행 시 "-config" 옵션으로 지정하면 됩니다.
C:\temp\wsl> openssl req -key apiserver.key -new -out apiserver.csr -config apiserver.cnf
필드 설정이 원하는 대로 반영이 되었는지는 crt 파일까지 생성할 필요 없이, CSR 파일을 대상으로 "opensssl req ..." 명령어를 이용해 이렇게 해석할 수 있습니다.
C:\temp\wsl> openssl req -in apiserver.csr -noout -text -nameopt sep_multiline
Certificate Request:
    Data:
        Version: 1 (0x0)
        Subject:
            CN=kube-apiserver
        Subject Public Key Info:
            Public Key Algorithm: rsaEncryption
                RSA Public-Key: (2048 bit)
                Modulus:
                    00:a5:e6:1d:1b:41:15:f2:c4:b6:24:73:b4:ad:59:
                    ...[생략]...
                    1a:8f:ae:2c:de:fd:e5:7f:ac:78:b2:b2:30:ca:05:
                    17:55
                Exponent: 65537 (0x10001)
    Signature Algorithm: sha256WithRSAEncryption
         a2:d5:a6:37:56:8e:39:ec:c8:4b:03:71:5e:bd:50:b7:45:14:
         ...[생략]...
         11:12:ae:53:62:bd:4c:75:35:ec:28:d5:8c:5d:28:c6:32:38:
         ef:7c:48:33
그다음, "Subject Alternative Name"을 지정하는 방법입니다. 이를 위해 cnf 파일에 다음의 내용을 추가하고,
# apiserver.cnf

FQDN = kube-apiserver
ALTNAMES = DNS:docker-for-desktop,DNS:kubernetes,DNS:kubernetes.default,DNS:kubernetes.default.svc,DNS:kubernetes.default.svc.cluster.local,DNS:kubernetes.docker.internal,DNS:vm.docker.internal,DNS:localhost

[ req ]
default_bits = 2048
default_md = sha256
prompt = no
encrypt_key = no
distinguished_name = dn
req_extensions = req_ext

[ dn ]
CN = $FQDN

[ req_ext ]
subjectAltName = $ALTNAMES
"openssl req ..." 명령을 실행하면 되는데,
openssl req -key apiserver.key -new -out apiserver.csr -config apiserver.cnf
재미있는 것은, 이렇게 만들어진 csr 파일을 "openssl req -in apiserver.csr -noout -text -nameopt sep_multiline" 명령어로 살펴보면 분명히 다음과 같이 "X509v3 Subject Alternative Name" 항목으로 확인이 되는데,
...[생략]...
       Attributes:
        Requested Extensions:
            X509v3 Subject Alternative Name:
                DNS:docker-for-desktop, DNS:kubernetes, DNS:kubernetes.default, DNS:kubernetes.default.svc, DNS:kubernetes.default.svc.cluster.local, DNS:kubernetes.docker.internal, DNS:vm.docker.internal, DNS:localhost
...[생략]...
정작 "openssl x509 ..." 명령어를 실행해 crt 인증서를 만들었을 때는 SAN 항목의 출력이 누락됩니다. 왜냐하면, "openssl x509 ..." 명령에서도 -extfile과 -extension 옵션을 이용해 cnf(이 글에서는 apiserver.cnf)의 확장 항목을 지정해야 하기 때문입니다.
openssl x509 -extfile apiserver.cnf -extensions req_ext -req -days 3650 -in apiserver.csr -CA ca.crt -CAkey ca.key -CAcreateserial -out server-cert.crt
이렇게 만들어진 server-cert.crt를 보면,
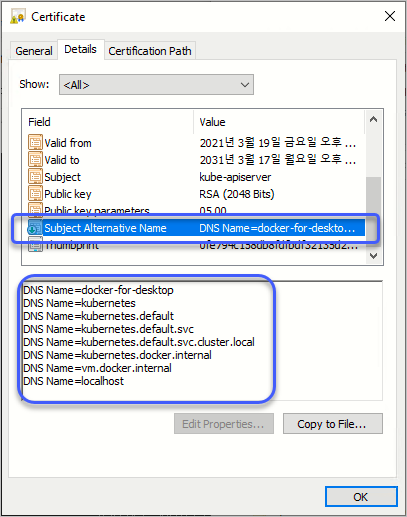
의도했던 대로 "Subject Alternative Name" 값이 들어가 있습니다.
다음으로 "Key Usage" 항목을 설정해 보겠습니다.
# apiserver.cnf

FQDN = kube-apiserver
ALTNAMES = DNS:docker-for-desktop,DNS:kubernetes,DNS:kubernetes.default,DNS:kubernetes.default.svc,DNS:kubernetes.default.svc.cluster.local,DNS:kubernetes.docker.internal,DNS:vm.docker.internal,DNS:localhost,IP:10.96.0.1,IP:0.0.0.0,IP:192.168.65.3,IP:127.0.0.1

[ req ]
default_bits = 2048
default_md = sha256
prompt = no
encrypt_key = no
distinguished_name = dn
req_extensions = req_ext

[ dn ]
CN = $FQDN

[ req_ext ]
subjectAltName = $ALTNAMES
keyUsage = digitalSignature,keyEncipherment
이 설정으로 "openssl req ...", "openssl x509 ..."를 실행하면, 인증서에는 "Key Usage" 값이 "Digital Signature, Key Enhancement (a0)" 항목이 나옵니다.
그렇다면, Enhanced Key Usage 값도 설정해 보겠습니다.
# apiserver.cnf

FQDN = kube-apiserver
ALTNAMES = DNS:docker-for-desktop,DNS:kubernetes,DNS:kubernetes.default,DNS:kubernetes.default.svc,DNS:kubernetes.default.svc.cluster.local,DNS:kubernetes.docker.internal,DNS:vm.docker.internal,DNS:localhost,IP:10.96.0.1,IP:0.0.0.0,IP:192.168.65.3,IP:127.0.0.1

[ req ]
default_bits = 2048
default_md = sha256
prompt = no
encrypt_key = no
distinguished_name = dn
req_extensions = req_ext

[ dn ]
CN = $FQDN

[ req_ext ]
extendedKeyUsage = serverAuth
authorityKeyIdentifier = keyid, issuer
subjectAltName = $ALTNAMES
keyUsage = digitalSignature,keyEncipherment
이후 인증서를 생성하면 Enhanced Key Usage 값이 "Server Authentication (1.3.6.1.5.5.7.3.1)"로 설정이 됩니다.
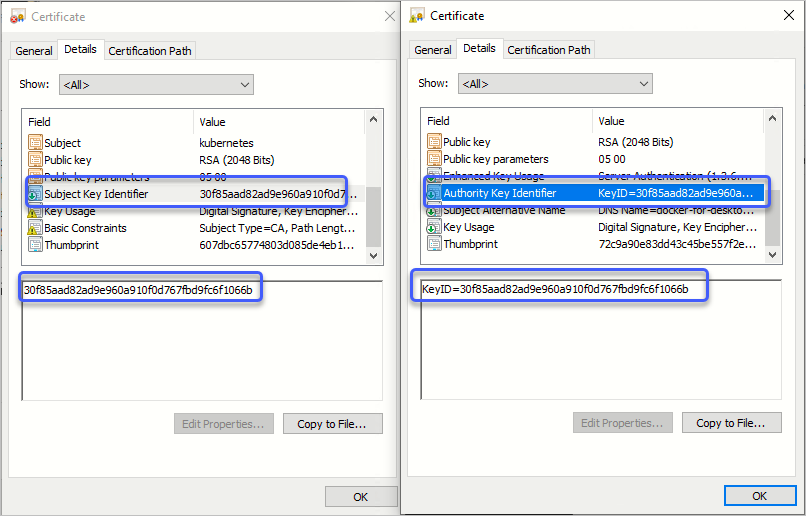
하는 김에 AKID(Authority Key Identifier)까지 설정해 보겠습니다. 이 값은, CA 인증서의 "Subject Key Identifier"가 있다면 그 값을 "Authority Key Identifier"에 그대로 이어받을 수 있습니다.
그런데, 이 값의 설정은 "openssl req ..." 단계에서는 허용되지 않는 옵션이므로 이를 위해서는 openssl cnf의 설정 단계를 "openssl req"와 "openssl x509"를 위해 나누는 것이 필요합니다.
# apiserver.cnf

FQDN = kube-apiserver
ALTNAMES = DNS:docker-for-desktop,DNS:kubernetes,DNS:kubernetes.default,DNS:kubernetes.default.svc,DNS:kubernetes.default.svc.cluster.local,DNS:kubernetes.docker.internal,DNS:vm.docker.internal,DNS:localhost,IP:10.96.0.1,IP:0.0.0.0,IP:192.168.65.3,IP:127.0.0.1,IP:192.168.65.4

[ req ]
default_bits = 2048
default_md = sha256
prompt = no
encrypt_key = no
distinguished_name = dn
req_extensions = req_ext

[ dn ]
CN = $FQDN

[ req_ext ]
extendedKeyUsage = serverAuth
subjectAltName = $ALTNAMES
keyUsage = digitalSignature,keyEncipherment

[ x509_ext ]
extendedKeyUsage = serverAuth
authorityKeyIdentifier = keyid,issuer
subjectAltName = $ALTNAMES
keyUsage = digitalSignature,keyEncipherment
아울러, 이렇게 나뉜 설정을 각각 openssl req와 openssl x509 명령에서 다음과 같이 지정해 인증서를 생성할 수 있습니다.
C:\temp\wsl> openssl req -key apiserver.key -new -out apiserver.csr -config apiserver.cnf

C:\temp\wsl> openssl x509 -extfile apiserver.cnf -extensions x509_ext -req -days 3650 -in apiserver.csr -CA ca.crt -CAkey ca.key -CAcreateserial -out server-cert.crt
Signature ok
subject=CN = kube-apiserver
Getting CA Private Key
다음은 이렇게 해서 반영된 AKID 값을 보여줍니다.
[이 글에 대해서 여러분들과 의견을 공유하고 싶습니다. 틀리거나 미흡한 부분 또는 의문 사항이 있으시면 언제든 댓글 남겨주십시오.]