NodeMCU v1 ESP8266 - LittleFS를 이용한 와이파이 접속 정보 업데이트
이전 글에서,
NodeMCU v1 ESP8266 - 펌웨어 내 파일 시스템(SPIFFS, LittleFS) 및 EEPROM 활용
; https://www.sysnet.pe.kr/2/0/12638
ESP8266은 Sketch 영역을 제외한 공간에 대해 파일 시스템처럼 사용할 수 있다고 언급했는데요, 이런 목적에 잘 부합하는 것 중의 하나가 바로 와이파이 접속 정보를 업데이트하는 것입니다.
예를 들어, 개발자 환경의 와이파이 정보로 초기화된 IoT 장치를 엔지니어가 가지고 나가 방문 설치를 하는 중에 단지 와이파이 접속 정보를 업데이트하기 위해 Sketch 프로그램까지 수정하는 것은 너무 원시적인 ^^ 대처 방법입니다. 즉, 그런 경우라면 Sketch는 건드리지 않고 별도 저장된 파일만 수정하는 식이 더 바람직합니다.
"
NodeMCU v1 ESP8266 - 펌웨어 내 파일 시스템(SPIFFS, LittleFS) 및 EEPROM 활용" 글에서 설명했듯이 기본적으로 4MB 중 2MB 영역을 파일 시스템으로 할당이 되어 있다고 했습니다.
그럼, 그 영역에 파일을 업로드해볼 텐데요, 이에 대해서는 다음의 글에서 이미 잘 설명하고 있습니다.
Install ESP8266 NodeMCU LittleFS Filesystem Uploader in Arduino IDE
; https://randomnerdtutorials.com/install-esp8266-nodemcu-littlefs-arduino/
이를 위해 별도로 Arduino IDE에 플러그인으로 설치하는 것이 있는데요,
earlephilhower/arduino-esp8266littlefs-plugin
; https://github.com/earlephilhower/arduino-esp8266littlefs-plugin

ESP8266LittleFS-2.6.0.zip
; https://github.com/earlephilhower/arduino-esp8266littlefs-plugin/releases
ESP8266LittleFS-2.6.0.zip 파일을 다운로드해 압축을 풀면 나오는 "ESP8266LittleFS\tool\esp8266littlefs.jar" 파일을 디렉터리까지 포함해서 Arduino IDE의 설치 디렉터리 하위에 있는 "\tools"에 복사합니다. 예를 들어 제 경우에는 다음과 같은 식으로 구성을 했습니다.
아두이노 설치 경로: C:\Program Files (x86)\Arduino
플러그인 복사 경로: C:\Program Files (x86)\Arduino\tools\ESP8266LittleFS\tool\esp8266littlefs.jar
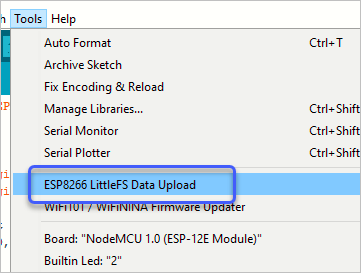
이후 다시 Arduino IDE를 실행하면 다음과 같은 식으로 "Tools"에 파일 업로드를 할 수 있는 "ESP8266 LittleFS Data Upload" 메뉴가 추가됩니다.
업로드 파일은 지정하는 방식이 아니고, 현재 열려 있는 Arduino IDE 프로젝트의 ino 파일과 동일한 위치의 "data" 디렉터리를 선택하게 되어 있습니다. 예를 들어,
INO 파일 위치:      C:\sample\WiFiUpdate\WiFiUpdate.ino
data 디렉터리 위치: C:\sample\WiFiUpdate\data
위와 같이 구성해 주고, 와이파이 정보를 담은 wifi_info.txt를 "C:\sample\WiFiUpdate\data" 디렉터리에 복사해 주면 됩니다. 이후 "ESP8266 LittleFS Data Upload" 메뉴를 선택하면 자동으로 data 디렉터리의 내용을 ESP8266 기기에 복사합니다. 그럼 다음과 같은 식으로 복사 과정이 출력되는데,
[LittleFS] data    : C:\sample\WiFiUpdate\data
[LittleFS] size    : 2024
[LittleFS] page    : 256
[LittleFS] block   : 8192
/wifi_info.txt
[LittleFS] upload  : %USERPROFILE%\AppData\Local\Temp\arduino_build_819929/WiFiUpdate.mklittlefs.bin
[LittleFS] address : 0x200000
[LittleFS] reset   : --before default_reset --after hard_reset
[LittleFS] port    : COM4
[LittleFS] speed   : 115200
[LittleFS] python   : %USERPROFILE%\AppData\Local\Arduino15\packages\esp8266\tools\python3\3.7.2-post1\python3.exe
[LittleFS] uploader : %USERPROFILE%\AppData\Local\Arduino15\packages\esp8266\hardware\esp8266\2.7.4\tools\upload.py

esptool.py v2.8
Serial port COM4
Connecting....
Chip is ESP8266EX
Features: WiFi
Crystal is 26MHz
MAC: 80:7d:3a:32:cd:33
Uploading stub...
Running stub...
Stub running...
Configuring flash size...
Auto-detected Flash size: 4MB
Compressed 2072576 bytes to 2223...
Wrote 2072576 bytes (2223 compressed) at 0x00200000 in 0.2 seconds (effective 81315.5 kbit/s)...
Hash of data verified.
0x00200000에 썼다고 하니, 2,097,152 바이트의 위치니까 대략 2MB 정도가 됩니다. 이에 기반을 둬 아마도 다음과 같은 식으로 Flash 메모리가 구획되는 것을 예측할 수 있습니다. (혹시 정확한 메모리 레이아웃을 아시는 분은 덧글 부탁드립니다. ^^)
0       ~   1097KB: Sketch 프로그램
1,097KB ~   2,194KB: (Sketch 예비 영역)
2,194KB ~   4,096KB: 파일 시스템 영역
그리고, "reset" 출력을 보면 "--after hard_reset"으로 설정이 되었는데 그런 이유로 인해 파일 업로드 후 프로그램이 자동으로 재시작합니다. 아마도 이것은 esp8266littlefs.jar 플러그인이 그렇게 reset 옵션을 설정하고 업로드하는 듯한데 어쨌든 이로 인해 업로드 완료 후 기존의 Sketch 프로그램은 setup 함수부터 다시 실행해 변경 사항이 반영됩니다.
자, 그럼 이제 지난번 조도 센서 데이터를 ThinkSpeak에 올리던 예제를 꺼내 볼까요? ^^
ThingSpeak 사물인터넷 플랫폼에 ESP8266 NodeMCU v1 + 조도 센서 장비 연동
; https://www.sysnet.pe.kr/2/0/12631
위의 예제 코드에서 WiFi 정보만 파일로부터 업데이트하는 코드를 추가해 볼 수 있습니다.
#include "ThingSpeak.h"
#include "secrets.h"
#include "LittleFS.h"

unsigned long myChannelNumber = SECRET_CH_ID;
const char * myWriteAPIKey = SECRET_WRITE_APIKEY;

#include <ESP8266WiFi.h>

int _photoSensorPin = A0;

String ssid = SECRET_SSID;
String pass = SECRET_PASS;

WiFiClient  client;

void readWifiInfo()
{
  if (!LittleFS.begin())
  {
    Serial.println("An error has occurred while mounting LittleFS");
    return;
  }

  File file = LittleFS.open("/wifi_info.txt", "r");
  if (!file)
  {
    Serial.println("Failed to open file for reading");
    return;
  }

  if (file.available())
  {
    ssid = file.readStringUntil('\n');
  }

  if (file.available())
  {
    pass = file.readStringUntil('\n');
  }

  file.close();
}


void setup() {
  Serial.begin(115200);

  WiFi.mode(WIFI_STA);
  readWifiInfo();

  delay(1000);
  ThingSpeak.begin(client);
}

void loop() {

  if (WiFi.status() != WL_CONNECTED)
  {
    WiFi.begin(ssid, pass);
    Serial.print(".");
    delay(5000);
  }

  if (WiFi.status() != WL_CONNECTED)
  {
    return;
  }

  int cdsValue = analogRead(_photoSensorPin);
  long rssi = WiFi.RSSI();

  ThingSpeak.setField(1, (float)cdsValue);
  ThingSpeak.setField(2, (float)rssi);
  int httpCode = ThingSpeak.writeFields(myChannelNumber, myWriteAPIKey);

  if (httpCode == 200) {
    Serial.println("Channel write successful.");
  }
  else {
    Serial.println("Problem writing to channel. HTTP error code " + String(httpCode));
  }

  delay(1000 * 20);
}
위와 같은 Sketch를 업로드한 다음 "data\wifi_info.txt" 파일의 내용을 오류가 있는 정보로 채운 다음 Arduino IDE에서 "ESP8266 LittleFS Data Upload" 메뉴를 선택해 파일을 올려 봅니다.
결국 부정확한 WiFi 정보를 업데이트했기 때문에 이제는 ThinkSpeak 사이트에 데이터 업로드가 안 될 것입니다. 그리고 다시 정확한 WiFi 정보를 채운 후 파일을 업로드하면 정상적으로 센서 데이터가 ThinkSpeak 사이트로 전달이 될 것이고!
(
첨부 파일은 이 글의 예제 코드를 포함합니다.)
[이 글에 대해서 여러분들과 의견을 공유하고 싶습니다. 틀리거나 미흡한 부분 또는 의문 사항이 있으시면 언제든 댓글 남겨주십시오.]