Microsoft MVP성태의 닷넷 이야기
사물인터넷: 65. C# - Arduino IDE의 Serial Monitor 기능 구현 [링크 복사], [링크+제목 복사],
조회: 8432
글쓴 사람
정성태 (techsharer at outlook.com)
홈페이지
첨부 파일
(연관된 글이 1개 있습니다.)

C# - Arduino IDE의 Serial Monitor 기능 구현

Arduino IDE의 "Tools" / "Serial Monitor (Ctrl+Shift+M)" 메뉴를 선택하면 Serial Monitor 화면이 열리면서, Sketch 프로그램에서 Serial.print...로 출력하는 내용을 확인할 수 있습니다.

해당 기능을 C#으로 한 번 구현해 볼까요? ^^ 사실, 단순한 직렬 포트 통신에 불과하기 때문에 이에 관한 예제 코드는 지난 글에서 사용한 것을 재사용하는 것도 가능합니다.

PC에 연결해 동작하는 자신만의 USB 장치 만들어 보기
; https://www.sysnet.pe.kr/2/0/11606

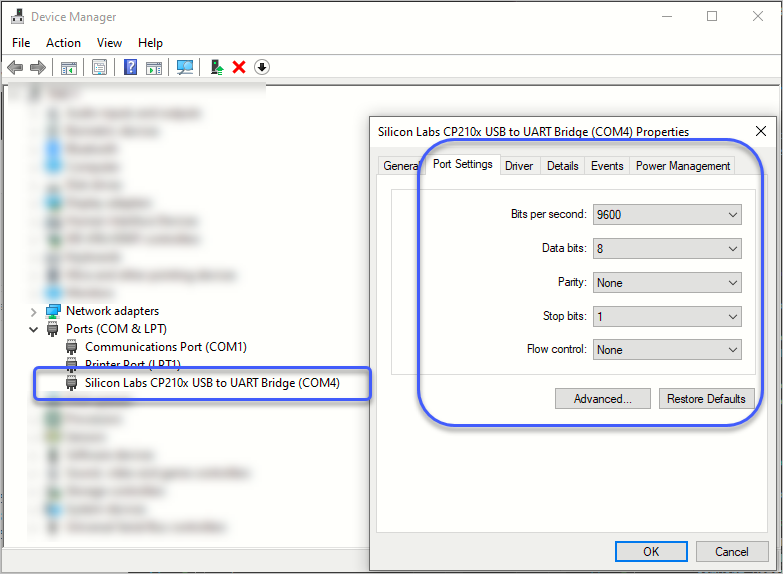
일례로, ESP8266 장치를 USB 케이블로 PC에 연결하면 (전원도 공급하면서) 다음과 같이 장치 관리자에서 COM 포트 및 UART 통신 파라미터를 확인할 수 있습니다.
esp8266_uart_comm_with_cs_1.png

Port: COM4
Bits per seconds: 9600
Data bits: 8
Parity: None
Stop bits: 1
Flow control: None

그리고, 이 정도의 정보만으로도 이제 Arduino IDE의 "Serial Monitor"를 C#으로 다음과 같이 간단하게 구현할 수 있습니다.

using System;
using System.IO.Ports;
using System.Text;

class Program
{
    static void Main(string[] args)
    {
        foreach (string portName in SerialPort.GetPortNames())
        {
            Console.WriteLine(portName);
        }

        SerialPort comPort = OpenCOM(4, 115200);
        Console.WriteLine(comPort.IsOpen); // True
        comPort.DataReceived += ComPort_DataReceived;

        Console.WriteLine("Press any key to exit...");
        Console.ReadLine();

        comPort.Close();
        Console.WriteLine(comPort.IsOpen); // False
    }

    private static void ComPort_DataReceived(object sender, SerialDataReceivedEventArgs e)
    {
        SerialPort comPort = sender as SerialPort;

        switch (e.EventType)
        {
            case SerialData.Chars:
                PrintInputBuffers(comPort);
                break;

            case SerialData.Eof:
                break;
        }
    }

    private static void PrintInputBuffers(SerialPort comPort)
    {
        int len = comPort.BytesToRead;
        byte[] buf = new byte[len];

        comPort.Read(buf, 0, len);

        Console.Write(Encoding.UTF8.GetString(buf));
    }

    private static SerialPort OpenCOM(int portNumber, int bps)
    {
        SerialPort comPort = new SerialPort();

        // 장치 관리자의 Port Settings에 따라,
        comPort.PortName = $"COM{portNumber}";
        comPort.BaudRate = bps;
        comPort.DataBits = 8;
        comPort.StopBits = StopBits.One;
        comPort.Handshake = Handshake.None;
        comPort.Parity = Parity.None;
        comPort.Open();

        return comPort;
    }
}

그런데, OpenCOM의 인자에 9600이 아닌 115200을 주고 있는데요, 그 이유는 해당 기기에서 동작하는 sketch 프로그램의 setup에서 그 속도를 변경한 경우에는 그에 맞춰져야 하기 때문입니다. 즉, 현재 기기는 다음과 같이 초기화를 시켰기 때문에,

void setup()
{
    Serial.begin(115200);
}

그에 접속하는 직렬 통신 클라이언트 프로그램도 115200을 사용한 것입니다.

이렇게 해서 프로그램을 실행하면, Sketch 프로그램에서 Serial.print...로 출력하는 내용이 C# 콘솔 프로그램 화면에 나옵니다.


출력 내용만 보면 재미없으니 ^^ 입력도 수행해 보겠습니다. 실제로 Arduino IDE의 Serial Monitor 창에는 상단에 텍스트 입력 상자가 있어 전송하는 기능도 제공합니다.

이를 테스트하기 위해 다음과 같이 간단한 Sketch 프로그램을 기기에 업로드하고,

void setup()
{
    Serial.begin(115200);
}

int _loopCount;

void loop()
{
    _loopCount ++;

    if (Serial.available())
    {
        String cmd = Serial.readStringUntil('\n');
        if (cmd == "get_count")
        {
            Serial.write(_loopCount);
            Serial.flush();            
        }
        else if (cmd == "reset")
        {
            _loopCount = 0;
            Serial.write(_loopCount);
            Serial.flush();
        }
    }

    delay(1000);
}

C# 프로그램은 다음과 같이 입력을 받아 전송하는 부분을 넣어주면,

using System;
using System.IO.Ports;
using System.Text;

class Program
{
    static EventWaitHandle _cmdExecuted = new EventWaitHandle(false, EventResetMode.AutoReset);

    static void Main(string[] args)
    {
        SerialPort comPort = OpenCOM(4, 115200);
        Console.WriteLine(comPort.IsOpen); // True
        comPort.DataReceived += ComPort_DataReceived;

        while (true)
        {
            Console.Write("serial> ");
            string cmd = Console.ReadLine();
            if (cmd == "quit" || cmd == "q")
            {
                break;
            }

            comPort.Write(cmd);

            _cmdExecuted.WaitOne(1000 * 5);
        }

        comPort.Close();
        Console.WriteLine(comPort.IsOpen); // False
    }

    private static void ComPort_DataReceived(object sender, SerialDataReceivedEventArgs e)
    {
        SerialPort comPort = sender as SerialPort;

        switch (e.EventType)
        {
            case SerialData.Chars:
                PrintInputBuffers(comPort);
                _cmdExecuted.Set();
                break;

            case SerialData.Eof:
                break;
        }
    }

    // ...[생략]...
}

다음과 같은 식으로 get_count, reset 명령어를 기기에 전송해 상호 작용할 수 있게 됩니다.

serial> get_count
_loopCount: 95

serial> reset
_loopCount: 0

serial> get_count
_loopCount: 5

(첨부 파일은 이 글의 예제 코드를 포함합니다.)


[이 글에 대해서 여러분들과 의견을 공유하고 싶습니다. 틀리거나 미흡한 부분 또는 의문 사항이 있으시면 언제든 댓글 남겨주십시오.]

[연관 글]


[최초 등록일: ]
[최종 수정일: 9/8/2023]

Creative Commons License
이 저작물은 크리에이티브 커먼즈 코리아 저작자표시-비영리-변경금지 2.0 대한민국 라이센스에 따라 이용하실 수 있습니다.
by SeongTae Jeong, mailto:techsharer at outlook.com

비밀번호

댓글 작성자


... 16  17  18  19  20  21  22  23  24  [25]  26  27  28  29  30  ...
NoWriterDateCnt.TitleFile(s)
13006정성태3/17/20227371.NET Framework: 1180. C# - ffmpeg(FFmpeg.AutoGen)를 이용한 remuxing.c 예제 포팅
13005정성태3/17/20226228오류 유형: 800. C# - System.InvalidOperationException: Late bound operations cannot be performed on fields with types for which Type.ContainsGenericParameters is true.
13004정성태3/16/20226223디버깅 기술: 182. windbg - 닷넷 메모리 덤프에서 AppDomain에 걸친 정적(static) 필드 값을 조사하는 방법
13003정성태3/15/20226377.NET Framework: 1179. C# - (.NET Framework를 위한) Oracle.ManagedDataAccess 패키지의 성능 카운터 설정 방법
13002정성태3/14/20227177.NET Framework: 1178. C# - ffmpeg(FFmpeg.AutoGen)를 이용한 http_multiclient.c 예제 포팅
13001정성태3/13/20227522.NET Framework: 1177. C# - 닷넷에서 허용하는 메서드의 매개변수와 호출 인자의 최대 수
13000정성태3/12/20227097.NET Framework: 1176. C# - Oracle.ManagedDataAccess.Core의 성능 카운터 설정 방법
12999정성태3/10/20226609.NET Framework: 1175. Visual Studio - 프로젝트 또는 솔루션의 Clean 작업 시 응용 프로그램에서 생성한 파일을 함께 삭제파일 다운로드1
12998정성태3/10/20226185.NET Framework: 1174. C# - ELEMENT_TYPE_FNPTR 유형의 사용 예
12997정성태3/10/202210627오류 유형: 799. Oracle.ManagedDataAccess - "ORA-01882: timezone region not found" 오류가 발생하는 이유
12996정성태3/9/202215724VS.NET IDE: 175. Visual Studio - 인텔리센스에서 오버로드 메서드를 키보드로 선택하는 방법
12995정성태3/8/20228055.NET Framework: 1173. .NET에서 Producer/Consumer를 구현한 BlockingCollection<T>
12994정성태3/8/20227318오류 유형: 798. WinDbg - Failed to load data access module, 0x80004002
12993정성태3/4/20227146.NET Framework: 1172. .NET에서 Producer/Consumer를 구현하는 기초 인터페이스 - IProducerConsumerCollection<T>
12992정성태3/3/20228565.NET Framework: 1171. C# - BouncyCastle을 사용한 암호화/복호화 예제파일 다운로드1
12991정성태3/2/20227725.NET Framework: 1170. C# - ffmpeg(FFmpeg.AutoGen)를 이용한 transcode_aac.c 예제 포팅
12990정성태3/2/20227327오류 유형: 797. msbuild - The BaseOutputPath/OutputPath property is not set for project '[...].vcxproj'
12989정성태3/2/20226852오류 유형: 796. mstest.exe - System.IO.FileNotFoundException: Could not load file or assembly 'Microsoft.VisualStudio.QualityTools.Tips.WebLoadTest.Tip
12988정성태3/2/20225812오류 유형: 795. CI 환경에서 Docker build 시 csproj의 Link 파일에 대한 빌드 오류
12987정성태3/1/20227305.NET Framework: 1169. C# - ffmpeg(FFmpeg.AutoGen)를 이용한 demuxing_decoding.c 예제 포팅
12986정성태2/28/20228148.NET Framework: 1168. C# -IIncrementalGenerator를 적용한 Version 2 Source Generator 실습 [1]
12985정성태2/28/20228076.NET Framework: 1167. C# -Version 1 Source Generator 실습
12984정성태2/24/20227166.NET Framework: 1166. C# - ffmpeg(FFmpeg.AutoGen)를 이용한 filtering_video.c 예제 포팅
12983정성태2/24/20227251.NET Framework: 1165. .NET Core/5+ 빌드 시 runtimeconfig.json에 설정을 반영하는 방법
12982정성태2/24/20227190.NET Framework: 1164. HTTP Error 500.31 - ANCM Failed to Find Native Dependencies
12981정성태2/23/20226801VC++: 154. C/C++ 언어의 문자열 Literal에 인덱스 적용하는 구문 [1]
... 16  17  18  19  20  21  22  23  24  [25]  26  27  28  29  30  ...