IntelliJ + Spring Framework + 새로운 Controller 추가 예제
이것저것 만지다 보니 IntelliJ의 프로젝트 관리가 좀 불편한 점이 눈에 띄는군요. IntelliJ는 IDE로서 동작하고 관련된 프로젝트 정보를 ".idea" 디렉터리 하위에 각종 파일 및 또 다른 디렉터리로 저장합니다. 그리고, 이와 함께 자바 프로젝트는 의존성 빌드를 위한 pom.xml 파일이 별도로 있습니다.
그러니까, 닷넷과 비교하면 csproj 파일 하나가 ".idea" + "pom.xml"로 쪼개져 있는 거라고 보시면 됩니다. 게다가 csproj는 노출되어 있어 개발자가 언제든 직접 편집할 정도로 친숙한 반면, ".idea"는 (점으로 시작하는 디렉터리는 숨김 효과를 갖죠!) 그 체계를 이해하기에는 csproj에 비해 너무 복잡합니다.
또한, ".idea"와 "pom.xml"은 별개로 유지/확장하고 있기 때문에 서로 따로 노는 듯합니다. csproj/msbuild 사용자로서 다소 이해가 안 되는 부분이 있다면, IntelliJ IDE에서 특정 디렉터리를 빌드 제외했는데 그것이 pom.xml에는 전혀 기록되지 않고 ".idea"에 유지된다는 점입니다. 그렇다면, maven compile을 해도 개발자가 빌드 제외한 것을 무색하게 그냥 모두 빌드하는 것과 다를 바가 없을 듯한데... (아직 제가 이 분야는 초보라서 더 깊이 논의하는 것이 좀 의미가 없을 것 같습니다. ^^)
그나저나, IntelliJ의 ".idea" 관리에도 신뢰가 잘 가지 않습니다. 실제로 제가 최근 들어 IntelliJ + Spring 예제 작성을 하면서 프로젝트의 관리의 어디가 잘못된 것인지 분간도 안 되고, 심지어 어디가 꼬여버렸는지 알 수 없어 차라리 프로젝트 정보(.idea)를 삭제하고 다시 import하는 것으로 문제를 해결하기도 했습니다. (물론, 제가 뭔가를 잘못한 게 있긴 하겠지요. ^^; 그렇다 해도 숙련된 개발자도 헷갈릴 정도라면 분명히 문제가 있어 보입니다.)
암튼, 이번 글은 그래서 쓰게 되었습니다. ^^
자, 그럼 제목에 알맞은 글을 써 볼까요? ^^ 우선, 새로운 프로젝트를 하나 다음의 설정으로 생성합니다.
Name: spring-sample-05
Location: d:\intellij\spring-sample-05
Artifact Coordinates
    - GroupId: org.example
    - ArtifactId: spring-sample-05
    - Version: 1.0-SNAPSHOT

Add Framework Support: Spring MVC(5.2.3.RELEASE)
이 상태에서 몇 가지 경고를 해결하기 위한 설정과 spring framework 관련 설정을 pom.xml에 추가합니다.
// pom.xml

    <properties>
        <maven.compiler.source>8</maven.compiler.source>
        <maven.compiler.target>8</maven.compiler.target>
        <project.build.sourceEncoding>UTF-8</project.build.sourceEncoding>
        <spring.version>5.2.3.RELEASE</spring.version>
    </properties>

    <packaging>war</packaging>

    <build>
        <plugins>
            <plugin>
                <groupId>org.apache.maven.plugins</groupId>
                <artifactId>maven-war-plugin</artifactId>
                <version>3.2.2</version>
                <configuration>
                    <webXml>web\WEB-INF\web.xml</webXml>
                </configuration>
            </plugin>
            <plugin>
                <groupId>org.apache.maven.plugins</groupId>
                <artifactId>maven-compiler-plugin</artifactId>
                <configuration>
                    <source>11</source>
                    <target>11</target>
                </configuration>
            </plugin>
        </plugins>
    </build>

    <dependencies>
        <dependency>
            <groupId>org.springframework</groupId>
            <artifactId>spring-core</artifactId>
            <version>${spring.version}</version>
        </dependency>
        <dependency>
            <groupId>org.springframework</groupId>
            <artifactId>spring-context</artifactId>
            <version>${spring.version}</version>
        </dependency>
        <dependency>
            <groupId>org.springframework</groupId>
            <artifactId>spring-web</artifactId>
            <version>${spring.version}</version>
        </dependency>
        <dependency>
            <groupId>org.springframework</groupId>
            <artifactId>spring-webmvc</artifactId>
            <version>${spring.version}</version>
        </dependency>
    </dependencies>
그다음, 원한다면 spring controller가 "/"에서도 매핑이 되도록 ./web/WEB-INF/web.xml 파일의 내용을 하나 수정하고,
// web.xml

    <servlet-mapping>
        <servlet-name>dispatcher</servlet-name>
        <url-pattern>/</url-pattern>
    </servlet-mapping>
마지막으로 ./web/WEB-INF/applicationContext.xml 파일의 내용을 다음과 같이 채워줍니다.
<?xml version="1.0" encoding="UTF-8"?>
<beans xmlns="http://www.springframework.org/schema/beans"
       xmlns:xsi="http://www.w3.org/2001/XMLSchema-instance"
       xmlns:mvc="http://www.springframework.org/schema/mvc"
       xmlns:context="http://www.springframework.org/schema/context"
       xsi:schemaLocation="http://www.springframework.org/schema/beans http://www.springframework.org/schema/beans/spring-beans.xsd http://www.springframework.org/schema/mvc http://www.springframework.org/schema/mvc/spring-mvc.xsd http://www.springframework.org/schema/context http://www.springframework.org/schema/context/spring-context.xsd" >

    <mvc:annotation-driven />
    <context:component-scan base-package="org.example" />

    <bean id="contentNegotiatingViewResolver" class="org.springframework.web.servlet.view.ContentNegotiatingViewResolver">
        <property name="viewResolvers">
            <list>
                <bean class="org.springframework.web.servlet.view.InternalResourceViewResolver">
                    <property name="prefix" value="/WEB-INF/views/" />
                    <property name="suffix" value=".jsp" />
                </bean>
            </list>
        </property>
    </bean>
</beans>
위에서 context:component-scan의 base-package를 "org.example"로 했기 때문에 이제 ./src/main/java 디렉터리 하위에 controller가 추가될 패키지를 "org.example.controller"로 생성한 다음 HomeController.java 파일 하나를 추가합니다.
package org.example.controller;

import org.springframework.stereotype.Controller;
import org.springframework.ui.Model;
import org.springframework.web.bind.annotation.RequestMapping;

@Controller
@RequestMapping("/")
public class HomeController {

    @RequestMapping
    public String home(Model model) {
        model.addAttribute("var1", "World");
        return "hello";
    }
}
그리고 위에서 "hello" 뷰를 반환하기 때문에 ./web/WEB-INF 하위에 (applicationContext.xml의 prefix/suffix 설정에 따라) "views" 디렉터리를 생성하고 hello.jsp를 만듭니다.
<%@ page contentType="text/html;charset=UTF-8" language="java"
         import="org.springframework.core.SpringVersion" %>
<html>
<head>
    <title></title>
</head>
<body>
SpringVersion: <% out.println(SpringVersion.getVersion()); %> <br />
Hello, ${var1}
</body>
</html>
또한, "/" 경로에서 controller를 매핑할 것이기 때문에 "./web/index.jsp" 파일이 필요 없으므로 삭제합니다.
일단, 위의 과정까지만 진행했으면 이제 새로운
Run/Debug Configuration을 추가하고 실행하면 정상적으로 Controller 출력이 나와야 할 것입니다. 그런데, 저 상태에서 실행해 보면 정상적으로 동작하지 않습니다. 뭔가 더 복잡한(또는 제가 알지 못하는 쉬운) 방법이 있는지 모르겠지만 그건 제쳐 두겠습니다.
이제 (제가 생각하기에 쉬운 방법으로 해결하기 위해) 잠시 프로젝트를 종료하고, ./spring-sample-05 디렉터리로 이동해 "src", "web" 디렉터리와 pom.xml 파일만 남기고 모두(.idea, lib, target 디렉터리와 spring-sample-05.iml 파일 등) 삭제합니다.
이후 다시 IntelliJ를 실행하고 ./spring-sample-05/pom.xml 파일을 프로젝트 유형으로 엽니다.
그다음, "File" / "Project Structure... (Ctrl + Shift + Alt + S)" 메뉴를 선택하고, "Project Settings" / "Modules" 범주의 "spring-sample-05" / "Web" 항목에 있는 "Web Resource Directory" 경로를 수정합니다.
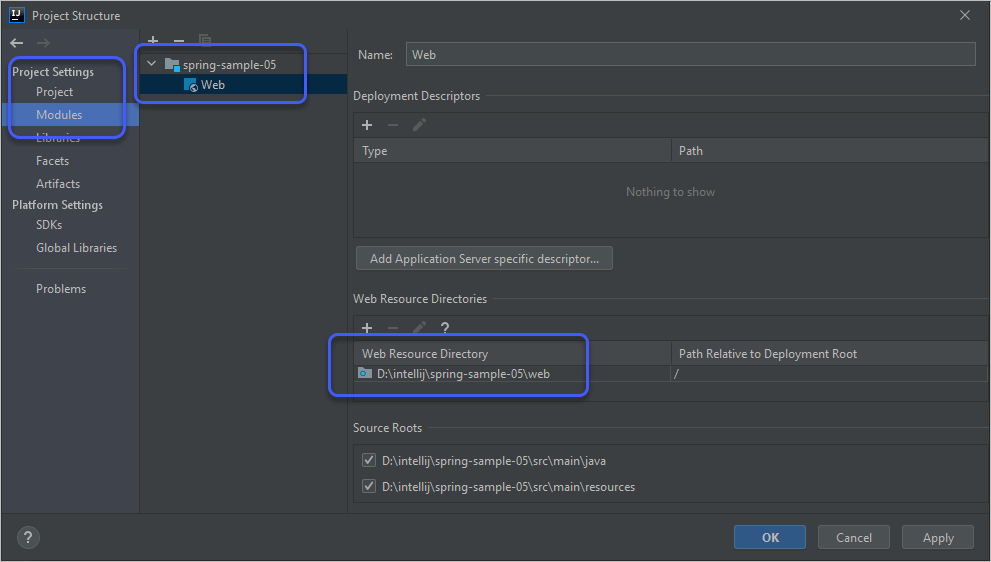
기존: d:\intellij\spring-sample-05\src\main\webapp (오류가 있는 경로이므로 빨간색으로 표시됨)
신규: d:\intellij\spring-sample-05\web
마지막으로 프로젝트 실행을 위해 "Run/Debug Configuration"을 하나 추가해 Deployment의 "Deploy at the server startup"과 "Application context" 항목을 설정하고,
Tomcat Server - Local
    Server
        Before launch:
            Build
            Build 'spring-sample-05:war exploded' artifact
    Deployment
        Deploy at the server startup
            spring-sample-05:war exploded
        Application context: /
"F5" 실행을 하면 정상적으로 "GET /" 요청에 대해 HomeController와 hello.jsp의 연동 결과가 화면에 출력될 것입니다. ^^
또한, 이렇게 하고 "maven package"로
war를 출력하면 크기도 기존 3KB에서 5.5MB로 (spring을 품은 듯한) 정상적인 크기로 나옵니다.
(
첨부 파일은 위의 내용대로 구성한 예제 프로젝트입니다.)
maven compile에서 이런 오류가 발생한다면?
package org.springframework.stereotype does not exist
package org.springframework.ui does not exist
package org.springframework.web.bind.annotation does not exist
...기타: cannot find symbol...
각각의 package 참조를,
org.springframework.stereotype - org.springframework/spring-context
org.springframework.web.bind.annotation, org.springframework.ui - org.springframework/spring-web
pom.xml에 추가합니다.
// pom.xml

// ...[생략]...

<properties>
    <maven.compiler.source>8</maven.compiler.source>
    <maven.compiler.target>8</maven.compiler.target>
    <project.build.sourceEncoding>UTF-8</project.build.sourceEncoding>

    <spring.version>5.2.3.RELEASE</spring.version>
</properties>

<dependencies>
    <dependency>
        <groupId>org.springframework</groupId>
        <artifactId>spring-context</artifactId>
        <version>${spring.version}</version>
    </dependency>
    <dependency>
        <groupId>org.springframework</groupId>
        <artifactId>spring-web</artifactId>
        <version>${spring.version}</version>
    </dependency>
</dependencies>
위에서 "5.2.3.RELEASE" 버전은 IntelliJ에서 "Add Framework Support..."로 추가한 Spring Framework의 버전을 가져온 것인데 이것은 프로젝트 경로의 './.idea/libraries' 경로에서 구할 수 있습니다.
IntelliJ에서 import 후 pom.xml 내용이 초기화되었다면? 아마도 여러분은 pom.xml을 프로젝트 유형으로 열은 것이 아니고, pom.xml이 포함된 디렉터리를 IntelliJ에서 열었을 것입니다. 그런 경우에는 pom.xml이 초기화되니, 위의 내용에 따라 다시 입력해 주면 됩니다.
<?xml version="1.0" encoding="UTF-8"?>
<beans xmlns="http://www.springframework.org/schema/beans"
       xmlns:xsi="http://www.w3.org/2001/XMLSchema-instance"
       xmlns:mvc="http://www.springframework.org/schema/mvc"
       xmlns:context="http://www.springframework.org/schema/context"
       xsi:schemaLocation="http://www.springframework.org/schema/beans http://www.springframework.org/schema/beans/spring-beans.xsd">

    <mvc:annotation-driven />
    <context:component-scan base-package="com.spring" />
</beans>
위와 같은 설정에서 실행 시 이런 오류 로그가 발생하는데요,
07-Aug-2021 23:52:54.826 SEVERE [RMI TCP Connection(3)-127.0.0.1] org.springframework.web.context.ContextLoader.initWebApplicationContext Context initialization failed
    org.springframework.beans.factory.xml.XmlBeanDefinitionStoreException: Line 8 in XML document from ServletContext resource [/WEB-INF/applicationContext.xml] is invalid; nested exception is org.xml.sax.SAXParseException; lineNumber: 8; columnNumber: 30; cvc-complex-type.2.4.c: The matching wildcard is strict, but no declaration can be found for element 'mvc:annotation-driven'.
        at org.springframework.beans.factory.xml.XmlBeanDefinitionReader.doLoadBeanDefinitions(XmlBeanDefinitionReader.java:405)
        ...[생략]...
        at org.springframework.beans.factory.xml.XmlBeanDefinitionReader.doLoadDocument(XmlBeanDefinitionReader.java:435)
        at org.springframework.beans.factory.xml.XmlBeanDefinitionReader.doLoadBeanDefinitions(XmlBeanDefinitionReader.java:393)
        ... 60 more
schemaLocation의 값이 불충분해서 발생한 오류입니다. 이렇게 바꾸면 정상적으로 실행됩니다.
[이 글에 대해서 여러분들과 의견을 공유하고 싶습니다. 틀리거나 미흡한 부분 또는 의문 사항이 있으시면 언제든 댓글 남겨주십시오.]