C# - Windows Forms의 데이터 바인딩 지원(DataBinding, DataSource)
WPF의 MVVM에 가려져 잘 알려지진 않았지만, Windows Form도 나름대로의 DataBinding 기능이 있습니다. 게다가 Control 타입 수준에서 제공하고 있기 때문에,
Control.DataBindings Property
; https://learn.microsoft.com/en-us/dotnet/api/system.windows.forms.control.databindings
WPF처럼 Windows Forms 역시 내부 구조 자체에서 MVVM과 유사한 기능을 이미 구현하고 있는 것입니다. 실제로 간단하게 테스트를 해볼까요? 다음과 같이 타입을 하나 만들고,
public class MyTitle
{
    public string Title { get; set; } = "test2";
}
이것을 TextBox를 하나 담고 있는 Windows Forms에서 다음과 같은 식으로 바인딩할 수 있습니다.
public partial class Form1 : Form
{
    MyTitle title = new MyTitle();

    public Form1()
    {
        InitializeComponent();
    }

    private void Form1_Load(object sender, EventArgs e)
    {
        var myTitleBinding = new BindingSource();
        myTitleBinding.DataSource = title;

        textBox1.DataBindings.Add(new Binding("Text", myTitleBinding, "Title", true, DataSourceUpdateMode.Never));
    }
}
보시면, (TextBox 타입인) "textBox1"의 DataBindings에 MyTitle 개체를 DataSource로 담고 있는 바인딩을 연결하고 있습니다. 따라서 위의 프로그램을 실행하면 textBox1은 실행 시에 "title" 인스턴스의 "Title" 속성으로부터 값을 가져와 textBox1.Text 속성에 자동으로 값을 설정합니다. 결국 화면에는 텍스트 상자에 "test2"라는 글자가 보이게 됩니다.
당연히, title.Title 속성 값이 변경되면 자동으로 textBox1에서 그 값을 가져오는 기능도 있습니다. 이를 위해서는 값이 바뀌는 것을 인지하기 위해 MyTitle 스스로 값이 바뀌었음을 알려야 합니다.
public class MyTitle : INotifyPropertyChanged
{
    string title = "test2";

    public string Title
    {
        get { return title; }
        set
        {
            if (title == value)
            {
                return;
            }

            title = value;
            var propArg = new PropertyChangedEventArgs(nameof(Title));
            PropertyChanged?.Invoke(this, propArg);
        }
    }

    public event PropertyChangedEventHandler? PropertyChanged;
}
그리고, DataBindings의 Binding에서도 OnPropertyChanged 상태에서 값을 업데이트하겠다는 설정을 하면,
textBox1.DataBindings.Add(new Binding("Text", myTitleBinding, "Title", true, DataSourceUpdateMode.OnPropertyChanged));
이후 MyTitle 인스턴스의 값이 바뀔 때마다
private void button1_Click(object sender, EventArgs e)
{
    this.title.Title = DateTime.Now.ToString(); // 자동으로 textBox1.Text의 값도 바뀜
}
TextBox의 글자가 함께 바뀌게 됩니다. 사실상 기능면으로 보면 WPF와 다를 바 없고, 단지 WPF가 XML로 데이터 바인딩을 지정하는 기능이 더 있다는 정도가 되겠습니다.
DataGridView도, Control로부터 상속받았기 때문에 DataBindings 속성을 그대로 가지고 있습니다. 하지만, 이것 외에도 데이터를 지정할 수 있는 방법을 몇 개 더 제공하고 있습니다.
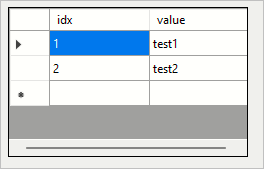
우선, DataGridView 스스로 칼럼을 지정하고 값을 설정할 수 있습니다.
private void Form1_Load(object sender, EventArgs e)
{
    this.dataGridView1.Columns.Add(new DataGridViewColumn(new DataGridViewTextBoxCell()) { HeaderText = "idx"});
    this.dataGridView1.Columns.Add(new DataGridViewColumn(new DataGridViewTextBoxCell()) { HeaderText = "value" });

    this.dataGridView1.Rows.Add(1, "test1");
    this.dataGridView1.Rows.Add(2, "test2");
}
이런 경우, 값을 변경하는 것도 단순히 Rows 속성을 통하면 됩니다.
private void button1_Click(object sender, EventArgs e)
{
    this.dataGridView1.Rows.Add("3", "test3"); // 값을 추가하고,
    this.dataGridView1.Rows.RemoveAt(0); // 값을 삭제하고.
}
또 다른 방법으로는, DataGridView에서 직접 제공하는 DataSource 속성을 이용해,
DataGridView.DataSource Property
; https://learn.microsoft.com/en-us/dotnet/api/system.windows.forms.datagridview.datasource
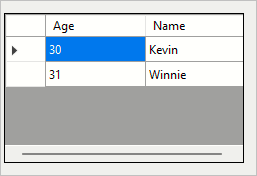
사용자가 만든 개체를,
public class MyData
{
    public int Age { get; set; }
    public string Name { get; set; } = "";
}
직접 목록으로 전달할 수 있습니다.
MyData m1 = new MyData { Age = 30, Name = "Kevin" };
MyData m2 = new MyData { Age = 31, Name = "Winnie" };

List data = new List { m1, m2 };
// 또는, MyData[] data = new MyData[] { m1, m2 };

this.dataGridView1.DataSource = data;
그럼, GridDataView는 해당 타입을 Reflection으로 접근해 읽기 가능한 공용 (필드가 아닌) 속성을 열거해 자동으로 칼럼을 구성해 값을 보여줍니다.
그런데, 이런 경우에는 후에 data 목록의 값을 변경해도 GridDataView는 그 변화를 인지하지 못합니다.
private void button1_Click(object sender, EventArgs e)
{
    List<MyData>? data = this.dataGridView1.DataSource as List<MyData>;
    data?.Add(new MyData { Age = 32, Name = "Cooper" }); // 값을 추가해도 DataGridView에는 변화 없음!
}
당연하겠죠? 이런 경우 이 글의 처음 예제에서 INotifyPropertyChanged를 구현했던 것처럼, 목록 역시 그 변화를 알리는
IBindingList.ListChanged 이벤트를 제공해야 합니다. 이를 위해 직접 IBindingList를 구현한 사용자 정의 목록 타입을 만들어도 되지만, 마이크로소프트는 이를 위한 목적으로 이미 BindingList 타입을 제공하고 있으니,
BindingList
; https://learn.microsoft.com/en-us/dotnet/api/system.componentmodel.bindinglist-1
이것을 이용해 구현하시면 됩니다.
private void Form1_Load(object sender, EventArgs e)
{
    MyData m1 = new MyData { Age = 30, Name = "Kevin" };
    MyData m2 = new MyData { Age = 31, Name = "Winnie" };

    BindingList<MyData> data = new BindingList<MyData>() { m1, m2 };
    this.dataGridView1.DataSource = data;
}

private void button1_Click(object sender, EventArgs e)
{
    BindingList<MyData>? data = this.dataGridView1.DataSource as BindingList<MyData>;
    data?.Add(new MyData { Age = 32, Name = "Cooper" }); // 추가된 값이 DataGridView에도 반영됨
}
혹은, Control.DataBindings가 그랬던 것처럼 BindingSource를 이용해 경유하는 것도 가능합니다.
private void Form1_Load(object sender, EventArgs e)
{
    MyData m1 = new MyData { Age = 30, Name = "Kevin" };
    MyData m2 = new MyData { Age = 31, Name = "Winnie" };

    BindingList<MyData> data = new BindingList<MyData>() { m1, m2 };

    var dataBindingSource = new BindingSource();
    dataBindingSource.DataSource = data;

    this.dataGridView1.DataSource = dataBindingSource;
}

private void button1_Click(object sender, EventArgs e)
{
    BindingSource? src = this.dataGridView1.DataSource as BindingSource;
    if (src == null)
    {
        return;
    }

    BindingList<MyData>? data = src.DataSource as BindingList<MyData>;
    data?.Add(new MyData { Age = 32, Name = "Cooper" });
}
마이크로소프트는 범용 데이터 컨테이너인 DataTable/DataSet에 대한 연동도 빼놓지 않고 있습니다.
DataTable _dt = new DataTable();

private void Form1_Load(object sender, EventArgs e)
{
    _dt.Columns.Add("idx");
    _dt.Columns.Add("value");
    _dt.Rows.Add(1, "test1");
    _dt.Rows.Add(2, "test2");

    this.dataGridView1.DataSource = _dt;
}

private void button1_Click(object sender, EventArgs e)
{
    _dt.Rows.Add(3, "test3"); // 추가된 값이 DataGridView에 즉각 반영
}
여기서 재미있는 것은, DataTable의 경우 BindingList와는 달리 IBindingList 인터페이스를 구현한 개체가 아니라는 점입니다. 그래도 저렇게 (button1_Click에서) 데이터를 추가해도 DataGridView에 즉각 반영되는 것은, IListSource를 구현하면서 그것의 GetList 메서드에서 IBindingList를 구현한
DataView 타입으로 감싼 타입을 활용하기 때문입니다.
마지막으로, 다중 테이블을 담고 있는 DataSet의 경우에는 위의 코드에서 DataTable을 구분 지을 수 있는 값을 DataMember에 지정하면 됩니다.
DataSet _ds = new DataSet();

private void Form1_Load(object sender, EventArgs e)
{
    DataTable dt1 = new DataTable("List");
    dt1.Columns.Add("idx");
    dt1.Columns.Add("value");
    dt1.Rows.Add(1, "test1");
    dt1.Rows.Add(2, "test2");

    DataTable dt2 = new DataTable("Person");
    dt2.Columns.Add("age");
    dt2.Columns.Add("name");
    dt2.Rows.Add(30, "Kevin");
    dt2.Rows.Add(31, "Winnie");

    _ds = new DataSet();
    _ds.Tables.Add(dt1);
    _ds.Tables.Add(dt2);

    var dataBindingSource = new BindingSource();
    dataBindingSource.DataSource = _ds;
    dataBindingSource.DataMember = "Person";

    this.dataGridView1.DataSource = dataBindingSource;
}

private void button1_Click(object sender, EventArgs e)
{
    _ds.Tables[1].Rows.Add(32, "Cooper");
}
이 정도면, 대충 설명이 되었겠죠? ^^
(
첨부 파일은 이 글의 예제 코드를 포함합니다.)
[이 글에 대해서 여러분들과 의견을 공유하고 싶습니다. 틀리거나 미흡한 부분 또는 의문 사항이 있으시면 언제든 댓글 남겨주십시오.]