DosBox를 이용한 Turbo C, Windows 3.1 설치
DosBox를 다운로드해 설치하고,
DosBox
; https://www.dosbox.com/download.php?main=1
실행하면 5.0에 준하는 DOS 운영체제가 미리 설치된 화면이 하나 뜹니다. Z 드라이브가 매핑된 상태고 0 bytes free라서 할 수 있는 것이 없습니다. 대신 현재 윈도우 시스템의 특정 폴더를 마운팅할 수 있는데요, 따라서 C:\ 드라이브 역할을 할 수 있게 아무 디렉터리나 하나 만들어서 연결합니다.
Z:\> mount c c:\temp\cdrive
Drive C is mounted as local directory c:\temp\cdrive\

Z:\> c:

C:\> dir
Directory of C:\.
.       <DIR>       09-04-2023 9:51
..      <DIR>       09-04-2023 9:52
    0 File(s)               0 Bytes
    2 Dir(s)      262,111,744 Bytes Free.
물론 위의 설정은 다시 dosbox를 실행하면 없어집니다. 게다가 Z:\에 있는 autoexec.bat 파일은 동적으로 구성되는 것이며, Z: 드라이브의 모든 내용에 대해 변경이 허용되지 않습니다.
대신 Autoexec.bat에 대한 설정을 dosbox conf 파일에 할 수 있습니다. 제가 설치한 버전의 경우 다음의 경로에서 찾을 수 있었는데,
// DOSBox Status Window에 경로가 출력됩니다.

%USERPROFILE%\AppData\Local\DOSBox\dosbox-0.74-3.conf
이 파일을 편집해 (마지막에 있을) [autoexec] 섹션에 다음과 같이 추가합니다.
[autoexec]
# Lines in this section will be run at startup.
# You can put your MOUNT lines here.

mount c c:\temp\cdrive
C:\
그럼, DOSBox 실행 시마다 C:\ 드라이브에서 Prompt를 시작할 수 있습니다.
하는 김에 Turbo C도 설치해 볼까요? ^^
방법은 지난 글에 설치한 것과 같습니다.
"Borland Turbo C 2.01 (1989) (3.5-720k)" 파일의 압축을 풀어 나온 Compiler.img, Header.img, Install.img 3개 파일도 다시 압축을 푼 다음 아래와 같은 식으로 구성하고,
.\Install
         .\Compiler
         .\Header
위의 Install 디렉터리를 C:\ 드라이브로 매핑한 c:\temp\cdrive 디렉터리에 복사합니다. 일단, 복사만 하면 실행 중인 DOSBox에 해당 디렉터리가 곧바로 인식되지 않습니다. 물론 재시작하면 되지만, 그냥 Ctrl + F4 단축키를 눌러 재인식하는 것이 가능합니다.
이제 남은 작업은, .\Install\Install.exe 파일을 실행해 Turbo C를 설치하면 됩니다. 모두 설치한 이후에는 역시 dosbox conf 파일의 autoexec 섹션에 PATH 등을 연결하는 것도 잊지 마시고.
[autoexec]
# Lines in this section will be run at startup.
# You can put your MOUNT lines here.

mount c c:\temp\cdrive
PATH=C:\TC;Z:\
C:\
역시 이번에도 Windows 3.1을 설치해 볼까요? ^^ 구독자 다운로드 센터에서 구한 en_win311.exe을 실행해 압축을 푼 후, 그 디렉터리를 c:\temp\cdrive 하위에 복사합니다. Ctrl+F4로 재인식하고, 마운팅된 디렉터리에 setup.exe를 실행해 설치해 줍니다.
완료 후, 재부팅을 해야 하는데 마찬가지로 dosbox conf에 편의상 PATH를 하나 등록해 줍니다.
[autoexec]
# Lines in this section will be run at startup.
# You can put your MOUNT lines here.

mount c c:\temp\cdrive
PATH=C:\TC;C:\Windows;Z:\
C:\
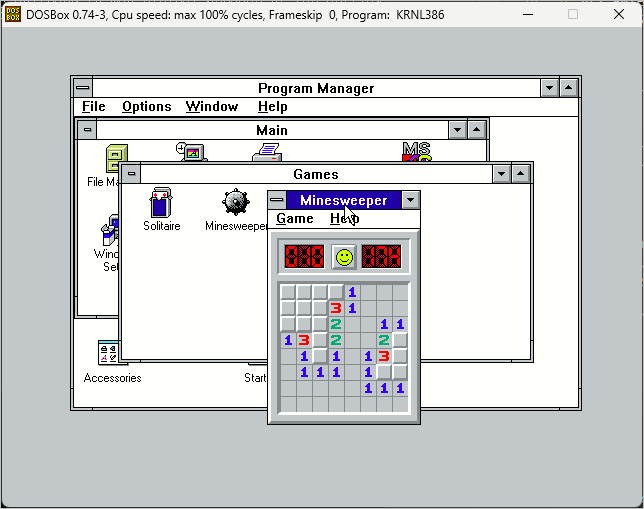
이후, win.com을 실행하면 곧바로 Windows 3.1 화면으로 진입하는데요, 오호~~~ 윈도우 내에서 마우스도 잘 동작해 아래와 같이 ^^ 지뢰찾기 게임도 할 수 있습니다.

3.1 정도의 무거운(?) 응용 프로그램을 정상적으로 호스팅할 정도면 제법 훌륭하게 도스 호환성을 구현한 것 같습니다.
참고로, 아래는 DOSBox에서의 단축키인데,
ALT-ENTER     Switch to full screen and back.
ALT-PAUSE     Pause emulation (hit ALT-PAUSE again to continue).
CTRL-F1       Start the keymapper.
CTRL-F4       Change between mounted floppy/CD images. Update directory cache for all drives.
CTRL-ALT-F5   Start/Stop creating a movie of the screen. (avi video capturing)
CTRL-F5       Save a screenshot. (PNG format)
CTRL-F6       Start/Stop recording sound output to a wave file.
CTRL-ALT-F7   Start/Stop recording of OPL commands. (DRO format)
CTRL-ALT-F8   Start/Stop the recording of raw MIDI commands.
CTRL-F7       Decrease frameskip.
CTRL-F8       Increase frameskip.
CTRL-F9       Kill DOSBox.
CTRL-F10      Capture/Release the mouse.
CTRL-F11      Slow down emulation (Decrease DOSBox Cycles).
CTRL-F12      Speed up emulation (Increase DOSBox Cycles)*.
ALT-F12       Unlock speed (turbo button/fast forward)**.
F11, ALT-F11  (machine=cga) change tint in NTSC output modes***
F11           (machine=hercules) cycle through amber, green, white colouring***
아마도 마우스와 전체 화면 정도 기능만 알아도 당장은 크게 불편함 없이 사용할 수 있을 것입니다.
이 외, 기타 도움말은 사이트에도 공개돼 있고,
Basic Setup and Installation of DosBox
; https://www.dosbox.com/wiki/Basic_Setup_and_Installation_of_DosBox

DOSBox v0.74-3 Manual
; https://www.dosbox.com/DOSBoxManual.html
"C:\Program Files (x86)\DOSBox-0.74-3\DOSBox 0.74-3 Manual.txt" 파일로도 제공됩니다.
[이 글에 대해서 여러분들과 의견을 공유하고 싶습니다. 틀리거나 미흡한 부분 또는 의문 사항이 있으시면 언제든 댓글 남겨주십시오.]