Microsoft MVP성태의 닷넷 이야기
글쓴 사람
정성태 (techsharer at outlook.com)
홈페이지
첨부 파일
(연관된 글이 1개 있습니다.)

C# - FFmpeg.AutoGen 라이브러리를 이용한 기본 프로젝트 구성 - Windows Forms

지난 글에서는,

C# - FFmpeg.AutoGen 라이브러리를 이용한 기본 프로젝트 구성
; https://www.sysnet.pe.kr/2/0/12896

콘솔 프로젝트를 예로 들었으니, 이번에는 Windows Forms로 구성해 보겠습니다. 사실, 동일한 내용인데 그사이 뭔가 바뀐 것이 있을까 싶어 다시 정리합니다. ^^


우선 버전이 바뀌었군요. Windows Forms 기본 프로젝트를 생성하고 패키지 참조를 추가하면,

// https://www.nuget.org/packages/FFmpeg.AutoGen
Install-Package FFmpeg.AutoGen

현재(2023-04-20) 6.0 버전의 패키지가 참조됩니다. 이번에도 Native ffmpeg 바이너리는 포함돼 있지 않으므로 github repo에 있는 DLL들을 다운로드해,

FFmpeg.AutoGen/FFmpeg/bin/x64/
; https://github.com/Ruslan-B/FFmpeg.AutoGen/tree/master/FFmpeg/bin/x64

avcodec-60.dll
avdevice-60.dll
avfilter-9.dll
avformat-60.dll
avutil-58.dll
postproc-57.dll
swresample-4.dll
swscale-7.dll

프로젝트 경로의 ./FFmpeg/bin/x64 하위 디렉터리에 복사하고 "Copy to Output Directory" 값을 "Copy if newer"로 바꿔줍니다. 이후, "C# - FFmpeg.AutoGen 라이브러리를 이용한 기본 프로젝트 구성" 글에서 추가했던 것과 마찬가지로 FFmpegBinariesHelper 타입을 추가해,

using FFmpeg.AutoGen;
using System.Runtime.InteropServices;

namespace FFmpegAutoGen;

public class FFmpegBinariesHelper
{
    internal static void RegisterFFmpegBinaries()
    {
        if (RuntimeInformation.IsOSPlatform(OSPlatform.Windows))
        {
            var current = Environment.CurrentDirectory;
            var probe = Path.Combine("FFmpeg", "bin", Environment.Is64BitProcess ? "x64" : "x86");

            while (current != null)
            {
                var ffmpegBinaryPath = Path.Combine(current, probe);

                if (Directory.Exists(ffmpegBinaryPath))
                {
                    Console.WriteLine($"FFmpeg binaries found in: {ffmpegBinaryPath}");
                    ffmpeg.RootPath = ffmpegBinaryPath;
                    return;
                }

                current = Directory.GetParent(current)?.FullName;
            }
        }
        else if (RuntimeInformation.IsOSPlatform(OSPlatform.Linux))
        {
            ffmpeg.RootPath = "/lib/x86_64-linux-gnu/";
        }
        else
        {
            throw new NotSupportedException(); // fell free add support for platform of your choose
        }
    }
}

Program.cs 파일에서 호출만 하면 됩니다.

using FFmpeg.AutoGen;
using FFmpegAutoGen;

namespace WinFormsApp1
{
    internal static class Program
    {
        [STAThread]
        static void Main()
        {
            FFmpegBinariesHelper.RegisterFFmpegBinaries();

#if DEBUG
            System.Diagnostics.Trace.WriteLine($"FFmpeg version info: {ffmpeg.av_version_info()}");
#endif

            ApplicationConfiguration.Initialize();
            Application.Run(new Form1());
        }
    }
}

F5 디버깅을 하면 Output 창에 다음과 같은 디버깅 메시지가 나와야 합니다.

FFmpeg version info: 6.0-full_build-www.gyan.dev

(첨부 파일은 이 글의 예제 코드를 포함합니다.)


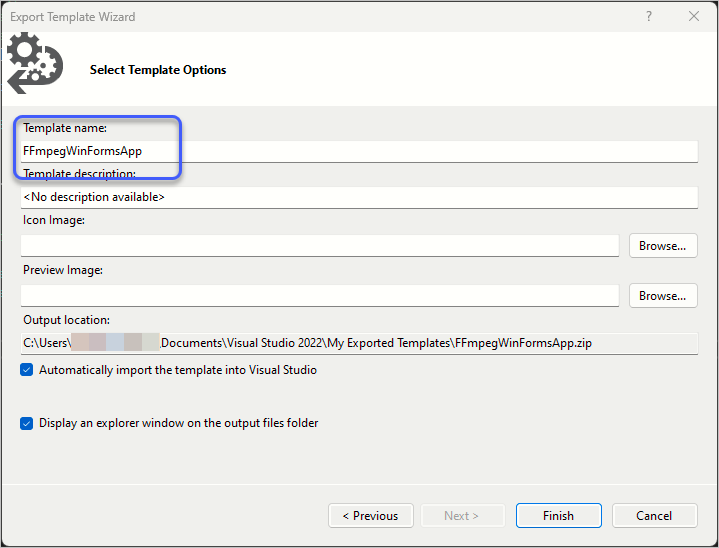
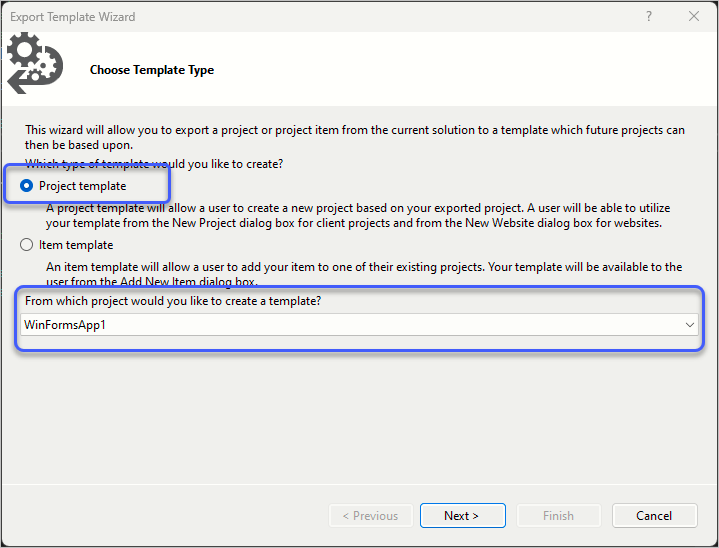
마지막으로, 매번 저런 식으로 프로젝트를 구성하는 것이 귀찮을 것이므로, "Project" / "Export Template..." 메뉴를 선택(참고: "Make a template for your template; profit")해 현재 구성의 프로젝트를,
ffmpeg_prj_template_1.png

적당한 이름의 Project Template으로 만들어주면,

ffmpeg_prj_template_2.png

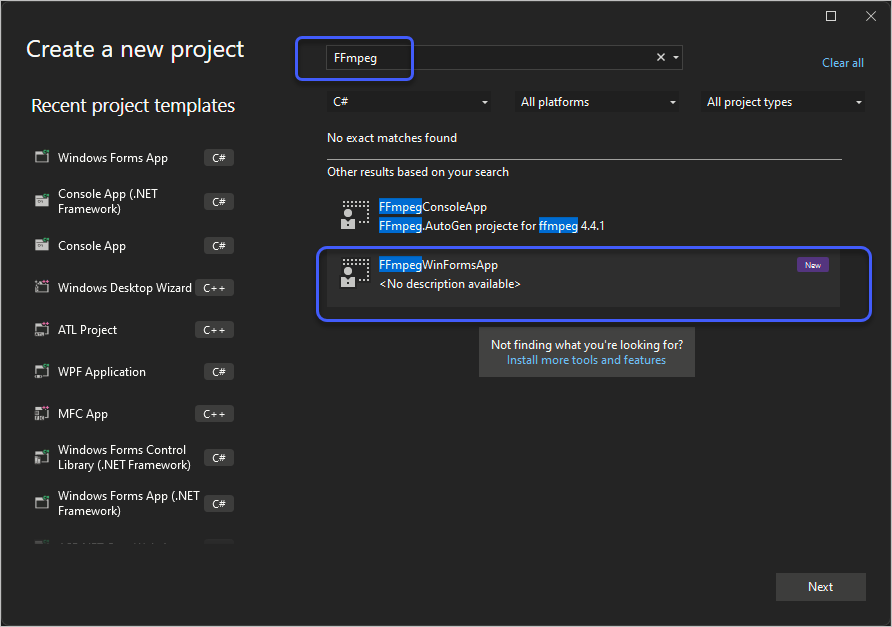
이후 "새 프로젝트"를 만들 때 다음과 같이 편하게 FFmpeg 구성의 Windows Forms 프로젝트를 만들 수 있습니다. ^^
ffmpeg_prj_template_3.png


[이 글에 대해서 여러분들과 의견을 공유하고 싶습니다. 틀리거나 미흡한 부분 또는 의문 사항이 있으시면 언제든 댓글 남겨주십시오.]

[연관 글]


[최초 등록일: ]
[최종 수정일: 11/24/2023]

Creative Commons License
이 저작물은 크리에이티브 커먼즈 코리아 저작자표시-비영리-변경금지 2.0 대한민국 라이센스에 따라 이용하실 수 있습니다.
by SeongTae Jeong, mailto:techsharer at outlook.com

비밀번호

댓글 작성자


... 31  32  33  34  35  36  37  38  39  40  41  42  43  [44]  45  ...
NoWriterDateCnt.TitleFile(s)
12549정성태3/4/20217872오류 유형: 700. VsixPublisher를 이용한 등록 시 다양한 오류 유형 해결책
12548정성태3/4/20218694개발 환경 구성: 546. github workflow/actions에서 nuget 패키지 등록하는 방법
12547정성태3/3/20219113오류 유형: 699. 비주얼 스튜디오 - The 'CascadePackage' package did not load correctly.
12546정성태3/3/20218769개발 환경 구성: 545. github workflow/actions에서 빌드시 snk 파일 다루는 방법 - Encrypted secrets
12545정성태3/2/202111524.NET Framework: 1026. 닷넷 5에 추가된 POH (Pinned Object Heap) [10]
12544정성태2/26/202111737.NET Framework: 1025. C# - Control의 Invalidate, Update, Refresh 차이점 [2]
12543정성태2/26/202110058VS.NET IDE: 158. C# - 디자인 타임(design-time)과 런타임(runtime)의 코드 실행 구분
12542정성태2/20/202112396개발 환경 구성: 544. github repo의 Release 활성화 및 Actions를 이용한 자동화 방법 [1]
12541정성태2/18/20219643개발 환경 구성: 543. 애저듣보잡 - Github Workflow/Actions 소개
12540정성태2/17/20219939.NET Framework: 1024. C# - Win32 API에 대한 P/Invoke를 대신하는 Microsoft.Windows.CsWin32 패키지
12539정성태2/16/20219871Windows: 189. WM_TIMER의 동작 방식 개요파일 다운로드1
12538정성태2/15/202110298.NET Framework: 1023. C# - GC 힙이 아닌 Native 힙에 인스턴스 생성 - 0SuperComicLib.LowLevel 라이브러리 소개 [2]
12537정성태2/11/202111338.NET Framework: 1022. UI 요소의 접근은 반드시 그 UI를 만든 스레드에서! - 두 번째 이야기 [2]
12536정성태2/9/202110290개발 환경 구성: 542. BDP(Bandwidth-delay product)와 TCP Receive Window
12535정성태2/9/20219457개발 환경 구성: 541. Wireshark로 확인하는 LSO(Large Send Offload), RSC(Receive Segment Coalescing) 옵션
12534정성태2/8/20219946개발 환경 구성: 540. Wireshark + C/C++로 확인하는 TCP 연결에서의 closesocket 동작 [1]파일 다운로드1
12533정성태2/8/20219633개발 환경 구성: 539. Wireshark + C/C++로 확인하는 TCP 연결에서의 shutdown 동작파일 다운로드1
12532정성태2/6/202110137개발 환경 구성: 538. Wireshark + C#으로 확인하는 ReceiveBufferSize(SO_RCVBUF), SendBufferSize(SO_SNDBUF) [3]
12531정성태2/5/20219141개발 환경 구성: 537. Wireshark + C#으로 확인하는 PSH flag와 Nagle 알고리듬파일 다운로드1
12530정성태2/4/202113369개발 환경 구성: 536. Wireshark + C#으로 확인하는 TCP 통신의 Receive Window
12529정성태2/4/202110358개발 환경 구성: 535. Wireshark + C#으로 확인하는 TCP 통신의 MIN RTO [1]
12528정성태2/1/20219754개발 환경 구성: 534. Wireshark + C#으로 확인하는 TCP 통신의 MSS(Maximum Segment Size) - 윈도우 환경
12527정성태2/1/20219937개발 환경 구성: 533. Wireshark + C#으로 확인하는 TCP 통신의 MSS(Maximum Segment Size) - 리눅스 환경파일 다운로드1
12526정성태2/1/20217765개발 환경 구성: 532. Azure Devops의 파이프라인 빌드 시 snk 파일 다루는 방법 - Secure file
12525정성태2/1/20217488개발 환경 구성: 531. Azure Devops - 파이프라인 실행 시 빌드 이벤트를 생략하는 방법
12524정성태1/31/20218648개발 환경 구성: 530. 기존 github 프로젝트를 Azure Devops의 빌드 Pipeline에 연결하는 방법 [1]
... 31  32  33  34  35  36  37  38  39  40  41  42  43  [44]  45  ...