C# - Windows Hello 사용자 인증 다이얼로그 표시하기
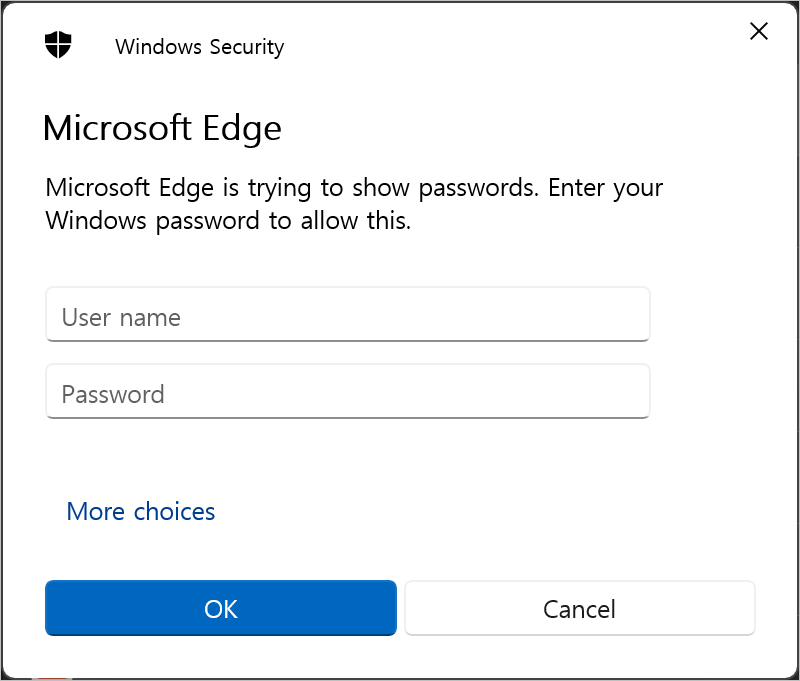
Edge 브라우저에서 "edge://settings/profiles" 화면을 통해 "Passwords" 링크로 특정 웹 사이트의 로그인 정보를 보고 싶다면, 아래의 화면처럼 윈도우 사용자 인증을 먼저 해야 합니다.

이런 요청을, Windows Runtime에서 제공하는 UserConsentVerifier를 사용하면 쉽게 구현할 수 있는데요,
The UserConsentVerifier confirms that the user is there, but it doesn’t protect any data
; https://devblogs.microsoft.com/oldnewthing/20240924-00/?p=110308

Another example of the Windows Runtime interop pattern: Using the UserConsentVerifier from a Win32 program
; https://devblogs.microsoft.com/oldnewthing/20240925-00/?p=110312
따라서,
.NET 응용 프로그램에서도 아래와 같이 UserConsentVerifier를 사용하여 사용자 인증 다이얼로그를 표시할 수 있습니다.
using System.Runtime.InteropServices;

class Program
{
    [DllImport("kernel32.dll")]
    static extern IntPtr GetConsoleWindow();

    // UserConsentVerifier Class - [Examples] Desktop apps using C#
    // https://learn.microsoft.com/en-us/uwp/api/windows.security.credentials.ui.userconsentverifier#desktop-apps-using-c

    static async Task Run()
    {
        IntPtr hwnd = GetConsoleWindow();

        string returnMessage = "";
        var consentResult =
            await Windows.Security.Credentials.UI.UserConsentVerifierInterop
                    .RequestVerificationForWindowAsync(hwnd, "auth...");

        switch (consentResult)
        {
            case Windows.Security.Credentials.UI.UserConsentVerificationResult.Verified:
                returnMessage = "User verified.";
                break;
            case Windows.Security.Credentials.UI.UserConsentVerificationResult.DeviceBusy:
                returnMessage = "Authentication device is busy.";
                break;
            case Windows.Security.Credentials.UI.UserConsentVerificationResult.DeviceNotPresent:
                returnMessage = "No authentication device found.";
                break;
            case Windows.Security.Credentials.UI.UserConsentVerificationResult.DisabledByPolicy:
                returnMessage = "Authentication device verification is disabled by policy.";
                break;
            case Windows.Security.Credentials.UI.UserConsentVerificationResult.NotConfiguredForUser:
                returnMessage = "Please go to Account Settings to set up PIN or other advanced authentication.";
                break;
            case Windows.Security.Credentials.UI.UserConsentVerificationResult.RetriesExhausted:
                returnMessage = "There have been too many failed attempts. Device authentication canceled.";
                break;
            case Windows.Security.Credentials.UI.UserConsentVerificationResult.Canceled:
                returnMessage = "Device authentication canceled.";
                break;
            default:
                returnMessage = "Authentication device is currently unavailable.";
                break;
        }

        Console.WriteLine(returnMessage);
    }

    [MTAThread]
    public static void Main()
    {
        Run().Wait();
    }
}
그리고, WinRT를 사용하는 것이기 때문에 위의 소스코드를 빌드하려면 TargetFramework에 "-windows..."를 추가해야 합니다.
<Project Sdk="Microsoft.NET.Sdk">

  <PropertyGroup>
    <OutputType>Exe</OutputType>
    <TargetFramework>net8.0-windows10.0.19041.0</TargetFramework>
    <ImplicitUsings>enable</ImplicitUsings>
    <Nullable>enable</Nullable>
  </PropertyGroup>

</Project>
당연히 저 기능은 Windows 10 이상에서만 동작합니다.
그런데, 이 예제가 정상적으로 동작하기 위해서는 선행 조건이 하나 있습니다. 바로 Windows Hello 인증, 보통 "Facial recognition", "Fingerprint recognition", "PIN" 3가지 방식이 제공되는데, 그중 하나는 반드시 활성화시켜야만 합니다.
이 설정은 "Settings"의 "Accounts" / "Sign-in options"에서 할 수 있는데요, 아래의 화면은 그 3가지 중 "PIN"을 설정한 상태를 보여줍니다.

이런 상태에서 예제 코드를 실행하면 다음과 같은 PIN 인증을 요구하는 창이 뜹니다.

(
CredUIPromptForWindowsCredentials API 호출 결과로 보이는) Edge에서 뜬 창과 비교하면 모양도 약간 다른데요, 왜냐하면 Edge는 말 그대로 사용자 인증 창을 띄운 반면, UserConsentVerifier는 Windows Hello를 위한 인증 창을 띄울 뿐이기 때문입니다.
만약 그 어떤 Windows Hello 인증도 사용하지 않고 있다면 UserConsentVerifier.RequestVerificationForWindowAsync 메서드의 반환 값은 DeviceNotPresent가 됩니다.
사실, Windows Hello 인증 설정이 강제가 아니기 때문에 무심코 이걸 사용하지 않는 유저 층을 감안하면 일반적으로 쓸 수 있는 방법은 아닙니다. 게다가 Remote Desktop으로 접속한 화면에서는 (PIN을 설정했어도) "Windows Hello" 인증을 사용할 수 없기 때문에 무조건 DeviceNotPresent가 반환됩니다.
또 하나 아쉬운 점이 있다면, RequestVerificationForWindowAsync 메서드의 인자에는 "Making sure it's you"라는 (왠지 촌스러운) 문구를 수정할 수 있는 여지가 없다는 점입니다.
참고로, 정상적으로 인증을 하면 UserConsentVerificationResult.Verified를 반환하고, Cancel 버튼을 누르면UserConsentVerificationResult.Canceled를 반환합니다.
(
첨부 파일은 이 글의 예제 코드를 포함합니다.)
[이 글에 대해서 여러분들과 의견을 공유하고 싶습니다. 틀리거나 미흡한 부분 또는 의문 사항이 있으시면 언제든 댓글 남겨주십시오.]