파이썬 웹 앱을 Azure App Service에 배포하기
관련 문서가 너무 잘 돼 있어서,
빠른 시작: Azure App Service에 Python(Django, Flask 또는 FastAPI) 웹앱 배포
; https://learn.microsoft.com/ko-kr/azure/app-service/quickstart-python
굳이 설명할 필요도 없을 것 같은데, 그래도 나름 정리를 해봤습니다. ^^;
먼저 시작은, Azure Portal에서 "App Services"를 선택하고, "새 앱 서비스"를 만든 다음,
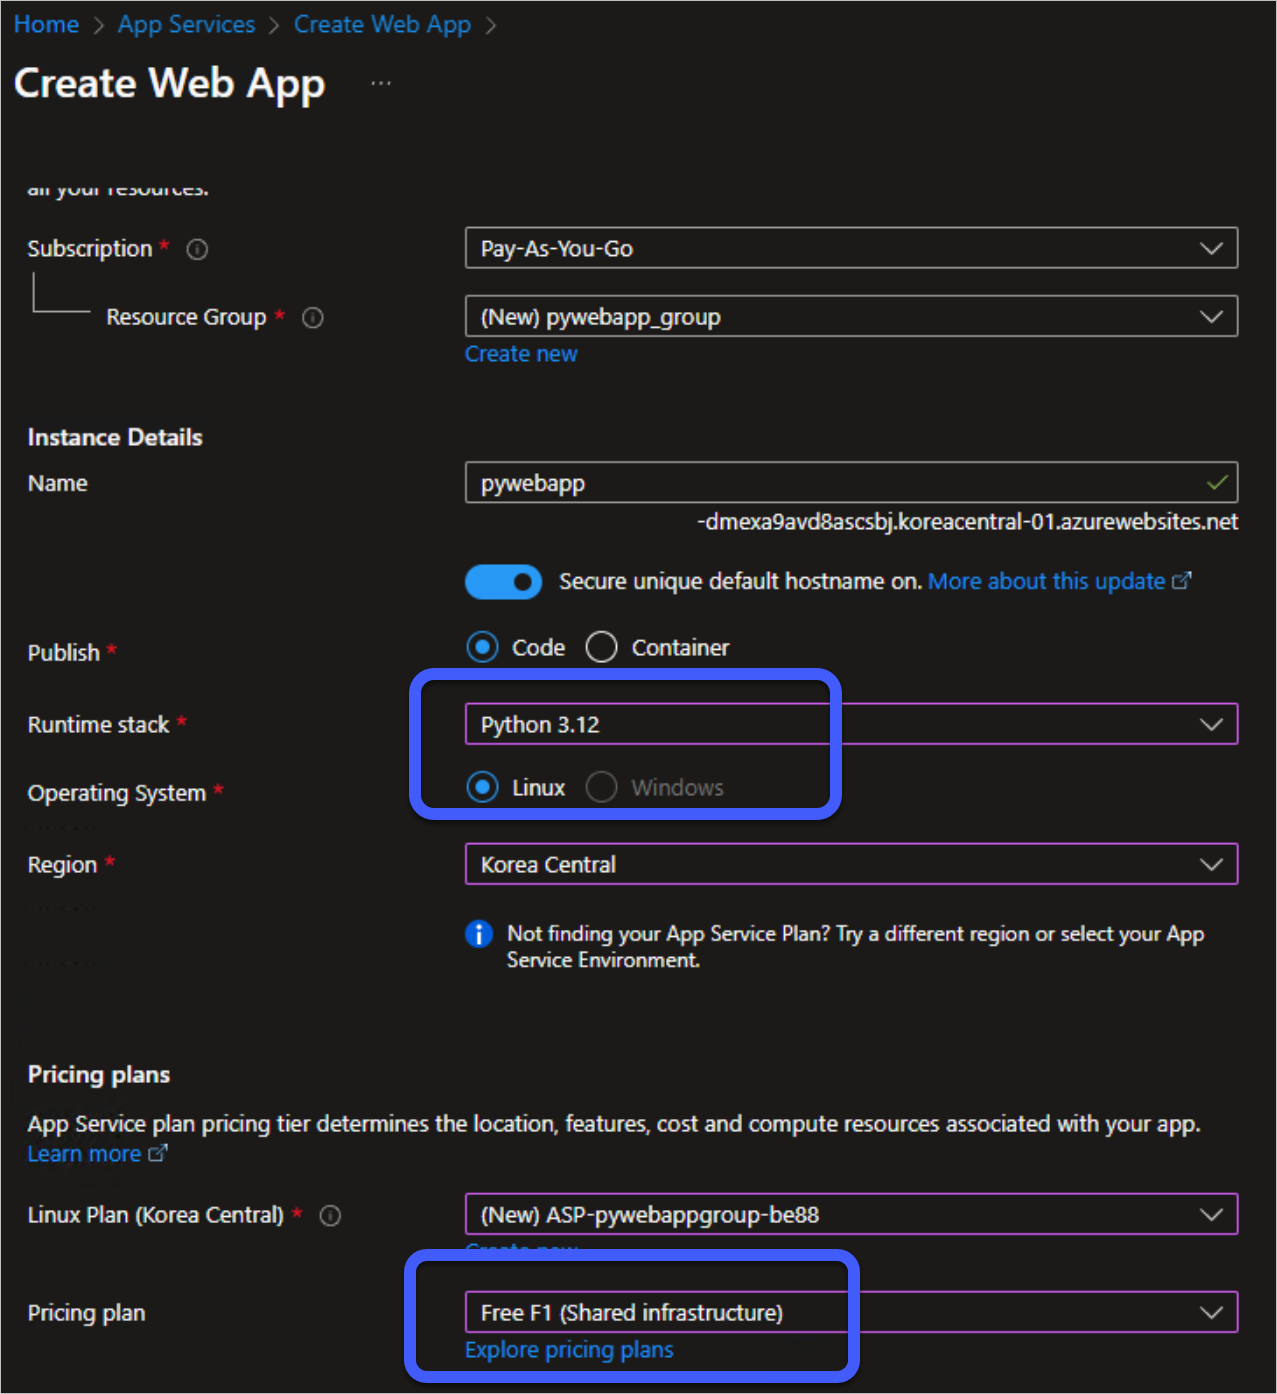
- "Instance Details"의 "Name"이 이제는 "-dmexa9avd8ascsbj" 같은 랜덤 문자열이 접미사로 붙는데, 문서에 2024년 6월 1일부터 "<app-name>-<random-hash>.<region>.azurewebsites.net" 규칙으로 바뀌었다고.
- 파이썬을 위한 Runtime stack으로는 현재 기준으로 3.8 ~ 3.12까지 지원하고 있으며 운영체제는 오직 Linux로 고정
- "Free F1" 요금제는 "60 minutes/day compute", "1GB 메모리", "1GB 저장소"를 제공
가지고 있는 파이썬 앱이 없다면 (어차피 테스트이므로) 마이크로소프트가 제공하는 예제를 사용할 수 있습니다. 여기서는 fastapi 예제를 사용할 텐데요,
c:\temp> git clone https://github.com/Azure-Samples/msdocs-python-fastapi-webapp-quickstart.git

c:\temp> cd msdocs-python-fastapi-webapp-quickstart

c:\temp\msdocs-python-fastapi-webapp-quickstart>
이후,
py.exe를 이용해 가상 환경을 만들고,
c:\temp\msdocs-python-fastapi-webapp-quickstart> py -m venv .venv

c:\temp\msdocs-python-fastapi-webapp-quickstart> .venv\scripts\activate

(.venv) c:\temp\msdocs-python-fastapi-webapp-quickstart>
필요한 패키지를 설치한 다음, 로컬에서 동작을 잘하는지 예제를 실행해 봅니다. (
윈도우 환경에서 gunicorn은 실행이 안 돼도, uvicorn은 잘 되는군요. ^^)
(.venv) c:\temp\msdocs-python-fastapi-webapp-quickstart> pip install -r requirements.txt

(.venv) c:\temp\msdocs-python-fastapi-webapp-quickstart> uvicorn main:app --reload
INFO:     Will watch for changes in these directories: ['c:\\temp\\msdocs-python-fastapi-webapp-quickstart']
INFO:     Uvicorn running on http://127.0.0.1:8000 (Press CTRL+C to quit)
INFO:     Started reloader process [42652] using StatReload
INFO:     Started server process [15180]
INFO:     Waiting for application startup.
INFO:     Application startup complete.
자, 그럼 정상 동작하고 있다면 Azure App Service에 az 명령어를 이용해 배포하면 되는데요, 우선 로그인 먼저 하고,
// How to install the Azure CLI
// https://learn.microsoft.com/en-us/cli/azure/install-azure-cli

// Install Azure CLI on Windows
// https://learn.microsoft.com/en-us/cli/azure/install-azure-cli-windows?tabs=azure-cli

// Latest MSI of the Azure CLI (64-bit)
// https://aka.ms/installazurecliwindowsx64

C:\temp> az login
...[생략]...
이후 배포를 하는데, 만약 web app을 미리 만들지 않았다면 다음의 명령어로 한방에 만드는 것이 가능합니다.
// 현재 디렉터리의 내용으로 web app을 만들어 배포

C:\temp\msdocs-python-fastapi-webapp-quickstart> az webapp up --runtime PYTHON:3.12 --sku B1 --logs
하지만, 저는 위에서 web app을 미리 만들어 두었기 때문에,
// Configure Python version
// https://learn.microsoft.com/en-us/azure/app-service/configure-language-python#configure-python-version

// 구성한 web app의 파이썬 런타임 버전 확인

c:\temp> az webapp config show --resource-group pywebapp_group --name pywebapp --query linuxFxVersion
"PYTHON|3.12"
현재
디렉터리의 내용을 압축한 다음, 그 파일을 올리는 명령어만 사용하면 됩니다.
c:\temp> az webapp deploy --resource-group pywebapp_group --name pywebapp --src-path publish.zip
참고로, 위에서 실습하는 과정 중에 가상 환경 등을 구성하느라 현재 작업 디렉터리의 크기가 (거의 40MB 정도) 압축한 경우 14MB 정도 나옵니다. 물론, 저 정도면 그냥 압축해서 올려도 됩니다.
반면, 순수하게 앱과 관련한 파일만 압축해서 올리고 싶다면, 즉 "pip install -r requirements.txt" 등의 과정을 거치지 않은 파일만 올리고 싶다면 그것도 가능합니다.
단지, 그런 경우라면 올려진 파일만 가지고는 fastapi 서비스가 되지 않기 때문에 "pip install" 관련 작업을 해야 합니다. Azure의 경우 바로 그와 같은 작업을 해주는 자동화 기능을 제공하는데요, 단순히 SCM_DO_BUILD_DURING_DEPLOYMENT 환경변수만 "true"로 설정해 주면 됩니다.
// 아래와 같이 명령행으로 하거나, 혹은 Azure Portal에서 해당 Web App의 "Settings" / "Environment variables"에서 직접 설정해도 됩니다.

c:\temp> az webapp config appsettings set --resource-group pywebapp_group --name pywebapp --settings SCM_DO_BUILD_DURING_DEPLOYMENT=true
App settings have been redacted. Use `az webapp/logicapp/functionapp config appsettings list` to view.
[
  {
    "name": "SCM_DO_BUILD_DURING_DEPLOYMENT",
    "slotSetting": false,
    "value": null
  }
]
SCM_DO_BUILD_DURING_DEPLOYMENT 값이 1 (또는, True)인 경우, 이후 압축 파일을 올려 주면,
c:\temp\> az webapp deploy --resource-group pywebapp_group --name pywebapp --src-path publish.zip
...[생략]...
Azure는 저 파일의 압축을 해제한 다음, 차례대로 다음의 절차를 진행합니다.
Customize build automation
; https://learn.microsoft.com/en-us/azure/app-service/configure-language-python#customize-build-automation
- Run a custom pre-build script, if that step is specified by the PRE_BUILD_COMMAND setting. (The script can itself run other Python and Node.js scripts, pip and npm commands, and Node-based tools like yarn, for example, yarn install and yarn build.)
- Run pip install -r requirements.txt. The requirements.txt file must be present in the project's root folder. Otherwise, the build process reports the error: "Could not find setup.py or requirements.txt; Not running pip install."
- If manage.py is found in the root of the repository (indicating a Django app), run manage.py collectstatic. However, if the DISABLE_COLLECTSTATIC setting is true, this step is skipped.
- Run custom post-build script, if that step is specified by the POST_BUILD_COMMAND setting. (Again, the script can run other Python and Node.js scripts, pip and npm commands, and Node-based tools.)
우리가 올린 예제의 경우 manage.py도 없기 때문에 저것들 중에서 2번째 단계만 실행되는데요, 실제로 Azure Portal로 SSH 접속을 한 후 내용을 확인해 보면, 아래와 같이 "antenv"라는 가상 환경에 requirements.txt에 해당하는 패키지들이 설치된 것을 확인할 수 있습니다.
// Azure Portal의 SSH 접근으로 확인

(antenv) root@pywebapp_39d0682007:/tmp/8dd0cf9739b3950# ls -l
total 40
drwxr-xr-x 5 root root 4096 Nov 25 02:33 antenv
-rwxr-xr-x 1 root root  148 Nov 25 02:33 CHANGELOG.md
-rwxr-xr-x 1 root root 4017 Nov 25 02:33 CONTRIBUTING.md
-rwxr-xr-x 1 root root 1160 Nov 25 02:33 LICENSE.md
-rwxr-xr-x 1 root root 1368 Nov 25 02:33 main.py
-rwxr-xr-x 1 root root 1446 Nov 25 02:33 README.md
-rwxr-xr-x 1 root root   54 Nov 25 02:33 requirements.txt
-rwxr-xr-x 1 root root   43 Nov 25 02:33 startup.sh
drwxr-xr-x 4 root root 4096 Nov 25 02:33 static
drwxr-xr-x 2 root root 4096 Nov 25 02:33 templates
일단, 저렇게 배포가 끝나고 빌드 후 자동화 과정을 거쳤음에도 불구하고, 파이썬의 App Service 주소를 방문해 보면 정상적으로 서비스가 안 될 것입니다. (Azure에서 제공하는 기본 페이지가 뜹니다.)
그 이유를 프로세스 목록을 보면 알 수 있습니다.
// Azure Portal의 SSH 접근으로 확인

# ps aux
USER         PID %CPU %MEM    VSZ   RSS TTY      STAT START   TIME COMMAND
root           1  0.0  0.0   2480    68 ?        SNs  05:59   0:00 /bin/sh /opt/startup/startup.sh
root          29  0.0  0.0  13352   400 ?        SNs  05:59   0:00 sshd: /usr/sbin/sshd [listener] 0 of 10-100 startups
root          44  0.0  0.0   6896   216 ?        SN   05:59   0:00 bash /run-diag.sh
root          45  0.8  2.2 12551176 44328 ?      SNl  05:59   0:01 ./DiagServer
root          76  0.0  0.0   6744   276 ?        SNs  05:59   0:00 /usr/sbin/cron
root          87  0.1  1.4 189592 28664 ?        SNl  05:59   0:00 /tmp/8dd0ab96853ad5e/antenv/bin/python /tmp/8dd0ab96853ad5e/antenv/bin/gunicorn application:app
root          96  0.1  1.8 289100 35128 ?        SNl  05:59   0:00 /tmp/8dd0ab96853ad5e/antenv/bin/python /tmp/8dd0ab96853ad5e/antenv/bin/gunicorn application:app
root          98  0.4  1.7 287028 33988 ?        SN   05:59   0:00 /tmp/8dd0ab96853ad5e/antenv/bin/python /tmp/8dd0ab96853ad5e/antenv/bin/gunicorn application:app
root          99  0.4  1.7 287052 33224 ?        SN   05:59   0:00 /tmp/8dd0ab96853ad5e/antenv/bin/python /tmp/8dd0ab96853ad5e/antenv/bin/gunicorn application:app
root         111  0.0  0.2  13464  4840 ?        SNs  05:59   0:00 sshd: root@pts/0
root         113  0.0  0.1   7160  3348 pts/0    SNs  05:59   0:00 -bash
root         132  0.0  0.1   9756  3268 pts/0    RN+  06:02   0:00 ps aux

# cat /opt/startup/startup.sh
#!/bin/sh

echo 'export APP_PATH="/tmp/8dd0ab96853ad5e"' >> ~/.bashrc
echo 'cd $APP_PATH' >> ~/.bashrc

# Enter the source directory to make sure the script runs where the user expects
cd /tmp/8dd0ab96853ad5e

export APP_PATH="/tmp/8dd0ab96853ad5e"
if [ -z "$HOST" ]; then
                export HOST=0.0.0.0
fi

if [ -z "$PORT" ]; then
                export PORT=80
fi

export PATH="/opt/python/3.12.6/bin:${PATH}"
echo 'export VIRTUALENVIRONMENT_PATH="/tmp/8dd0ab96853ad5e/antenv"' >> ~/.bashrc
echo '. antenv/bin/activate' >> ~/.bashrc
PYTHON_VERSION=$(python -c "import sys; print(str(sys.version_info.major) + '.' + str(sys.version_info.minor))")
echo Using packages from virtual environment 'antenv' located at '/tmp/8dd0ab96853ad5e/antenv'.
export PYTHONPATH=$PYTHONPATH:"/tmp/8dd0ab96853ad5e/antenv/lib/python$PYTHON_VERSION/site-packages"
echo "Updated PYTHONPATH to '$PYTHONPATH'"
. antenv/bin/activate
GUNICORN_CMD_ARGS="--timeout 600 --access-logfile '-' --error-logfile '-' -c /opt/startup/gunicorn.conf.py --chdir=/opt/defaultsite" gunicorn application:app
보는 바와 같이, Azure는 압축 파일을 해제 후 SCM_DO_BUILD_DURING_DEPLOYMENT 단계를 거친 다음, 기본적으로 /opt/startup/startup.sh 파일을 실행했던 것입니다.
이것이 아닌, 사용자가 제공하는 명령어를 실행해야 하는데요, 예제의 경우 startup.sh를 제공하므로,
c:\temp> type "C:\temp\msdocs-python-fastapi-webapp-quickstart\startup.sh"
python -m uvicorn main:app --host 0.0.0.0
저 명령어를 실행하도록 "
az webapp config set" 명령어로 이렇게 설정하면 됩니다.
// 또는 Azure Portal에서 "Settings" / "Configuration"으로 들어가 "General settings"의 "Startup Command"를 설정해도 됩니다.

c:\temp> az webapp config set --resource-group pywebapp_group --name pywebapp --startup-file "python -m uvicorn main:app --host 0.0.0.0"

c:\temp> az webapp restart --resource-group pywebapp_group --name pywebapp
마지막으로, "Startup Command"에는 shell 파일도 지정할 수 있는데, 예를 들어 "./startup.sh"로 설정해 보면 Web App을 시작하지 못하는 경우가 있습니다.
c:\temp> az webapp config set --resource-group pywebapp_group --name pywebapp --startup-file "./startup.sh"

c:\temp> az webapp deploy --resource-group pywebapp_group --name pywebapp --src-path publish.zip
Deployment type: zip. To override deployment type, please specify the --type parameter. Possible values: war, jar, ear, zip, startup, script, static
Initiating deployment
Deploying from local path: publish.zip
Polling the status of sync deployment. Start Time: 2024-11-21 05:34:33.496967+00:00 UTC
Status: Build successful. Time: 0(s)
Status: Site started successfully. Time: 15(s)
Status: Site started successfully. Time: 30(s)
...[생략: 계속 체크하면서 반복]...
원인 파악을 해보면, 해당 파일(위의 경우 startup.sh)을 "CRLF" 형식으로 저장하는 경우 그런 현상이 있었습니다. 따라서 "LF" 형식으로 저장하면 정상적으로 동작합니다. (만약 포함하고 있는 명령이 한 줄이라면 CRLF 형식이어도 끝에 개행 문자만 없으면 됩니다.)
[이 글에 대해서 여러분들과 의견을 공유하고 싶습니다. 틀리거나 미흡한 부분 또는 의문 사항이 있으시면 언제든 댓글 남겨주십시오.]