WCF RIA 서비스 + Silverlight 사용 예제
이번 글은 아래의 내용을 실습해 본 것입니다.
WCF RIA Services Part 1: Getting Started
; http://www.silverlightshow.net/items/WCF-RIA-Services-Part-1-Getting-Started.aspx
그래도 뭐가 다르긴 달라야 하니까 ^^ 굳이 차이점을 설명해 보면 Visual Studio 2012에서 실습을 진행한다는 정도가 있습니다. (실제로 약간 달라진 점이 있습니다.)
편의상, 설명도 위의 글과 유사하게 진행해 보겠습니다. ^^
Step 1: 실버라이트 프로젝트 생성
새 프로젝트 생성에서 "Silverlight" / "Silverlight Application"을 선택해서 생성합니다. 그럼, 다음과 같은 상자가 뜨는데 "Enable WCF RIA Services" 항목을 체크해 줍니다. (물론, 체크하지 않고 생성해도 나중에 수작업으로 구성하는 것이 가능합니다.)
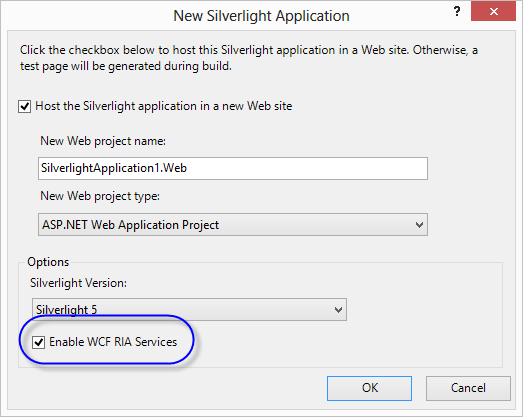
그럼, Silverlight 프로젝트 한 개와 그 모듈이 포함될 HTML 페이지를 호스팅할 Web 프로젝트가 하나 생성됩니다.
2. Entity Data Model 생성
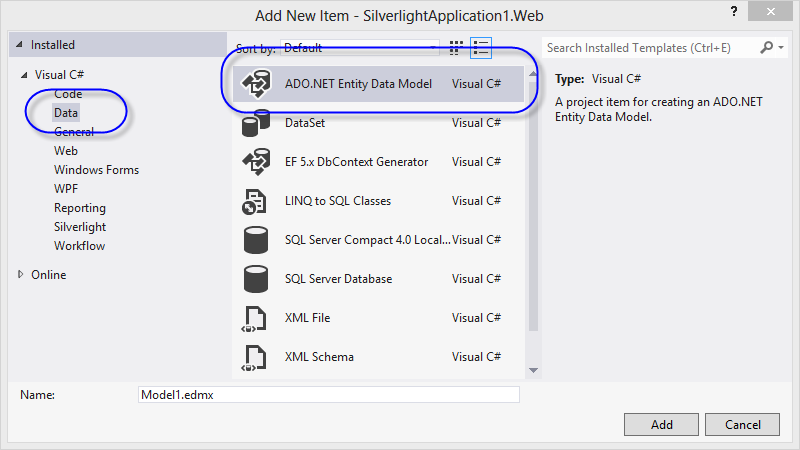
WCF RIA 서비스를 통해 노출시킬 데이터베이스의 Entity Framework 모델을 생성합니다. 서비스는 웹에서 할 것이므로, 웹 프로젝트에 "새 항목" 추가를 이용해 "ADO.NET Entity Data Model"을 생성합니다.
위의 화면에서 '확인(OK)' 버튼을 누르면 Model을 선택하는 화면이 뜨는데 제 경우에는 간단하게 기존에 만들어 둔 테스트 DB로부터 "Entity Data Model"을 자동 생성할 것이므로 "Generate from Database" 옵션을 선택했습니다.
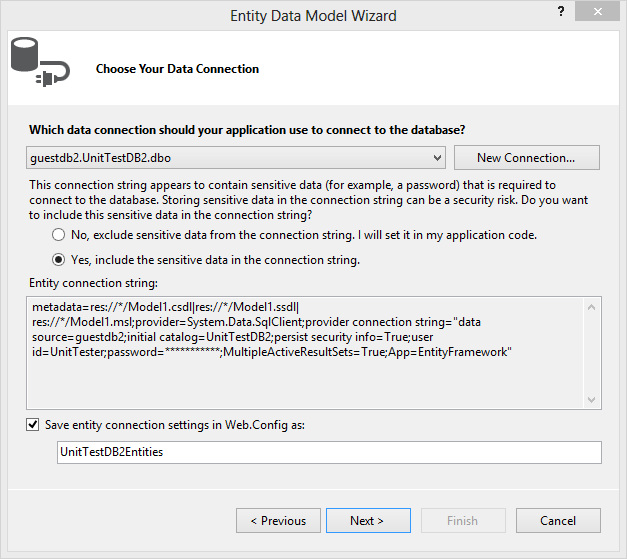
그럼, DB 연결 문자열을 설정해야 하는 대화창이 뜨고 거기서 데이터베이스를 선택해 지정합니다. 제 경우에는 다음과 같이 설정이 되었습니다.
그다음 화면에서는 "Tables" 항목만 선택했습니다. 테스트 DB라서 ^^ 단순하게 "Account", "mytable" 2개의 테이블만 있습니다.
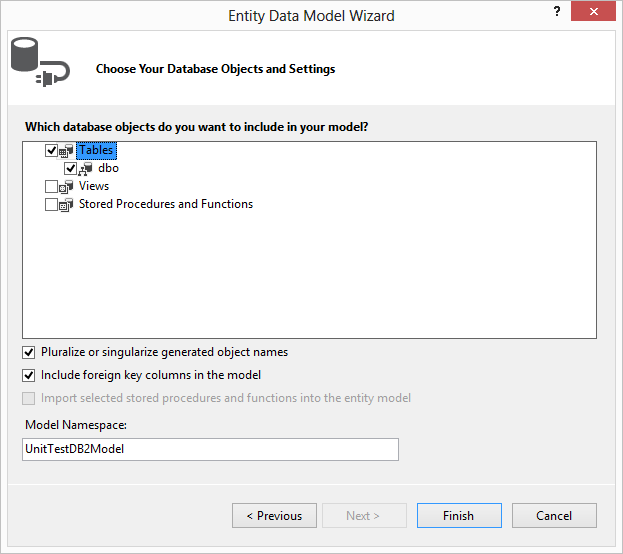
모든 과정을 완료하면 .edmx 파일이 웹 프로젝트에 추가되고 연결 문자열은 web.config에 보관됩니다.
3. WCF RIA 서비스 정의
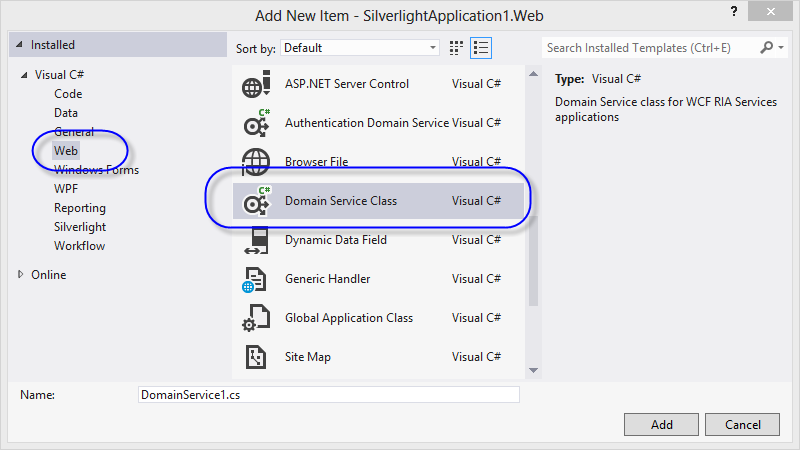
2번 단계에서 생성한 모델을 이제 WCF로 노출시켜야 할 텐데요. 이를 위해 "새 항목" / "Web" / "Domain Service Class"를 하나 생성합니다.
여기서 문제가 하나 발생합니다. "
WCF RIA Services Part 1: Getting Started" 글에서는 "Add New Domain Service Class" 창에서 선택할 수 있는 DataContext/ObjectContext 항목이 있다고 나오는데요. Visual Studio 2012에 포함된 "Domain Service Class"는 반드시 ObjectContext로부터 상속받은 Entity Data Model만이 가능합니다.
이에 대해서는 다음의 글을 참조합니다.
"Some Entity Framework context classes may have been excluded" message when adding a new Domain Service Class
; http://support.microsoft.com/kb/2745294
해결 방법을 정리하면 다음과 같습니다.
- .edmx 파일을 디자인 모드로 열고, 엔티티가 없는 영역을 마우스로 누른 후 "Properties" 창에서 "Code Generation Strategy" 옵션을 "Default"로 변경
- .edmx 파일의 하위에 있는 파일 중에 .tt 확장자를 가진 2개의 파일을 삭제
- 프로젝트 다시 빌드
이렇게 조정하고 다시 "Domain Service Class"를 추가하면, 이번엔 정상적으로 2번 단계에서 추가한 .edmx가 보입니다. 노출하기를 원하는 Entity에 대해서 선택하고 확인(OK) 버튼을 누릅니다.

이걸로, 준비는 모두 끝났습니다. ^^
(참고로, 위의 화면에서 "Expose OData endpoint"가 있는데요. 이 부분은 나중에 수작업으로 쉽게 추가하는 것을 보여드리겠습니다.)
4. Silverlight UI에서 데이터 목록 보여주기
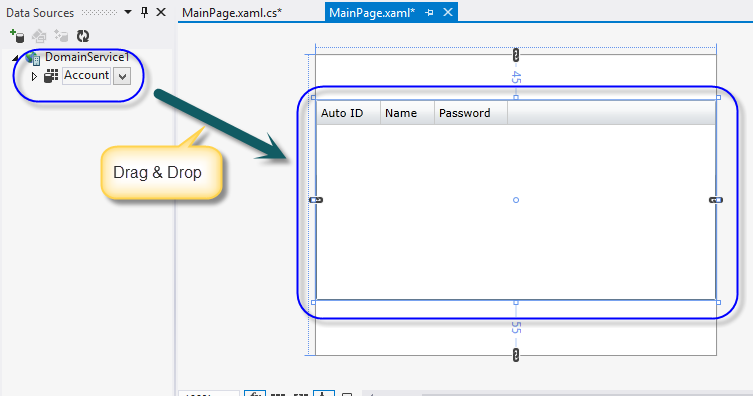
이전 단계에서 한 작업들이 이상이 없는지 이쯤에서 솔루션 전체 빌드를 한 번 해줍니다. 그런 후, 실버라이트 프로젝트의 MainPage.xaml을 디자인 모드로 열고 "VIEW" / "Other Windows" / "Data Sources" 메뉴를 선택합니다. 그럼, 잠시 후 "Data Sources" 창이 열리면서 3번 단계에서 만들어 두었던 웹 프로젝트의 Domain Service 항목이 보입니다. (혹시, 안 보이면 솔루션 전체 빌드를 해줍니다.) 그 하위의 테이블을 XAML 화면에 끌어다 놓기 하면 자동으로 목록을 보여주는 xaml이 생성됩니다.
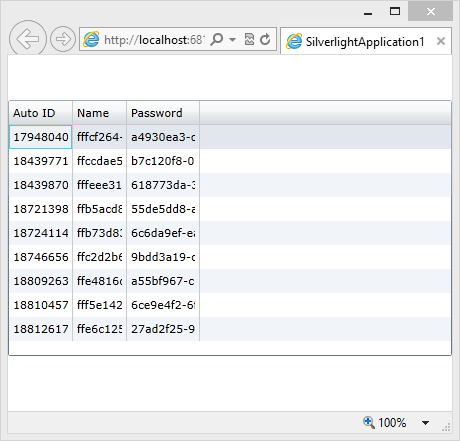
F5 키를 눌러 디버깅으로 진입하면 다음과 같이 동작하는 Silverlight 응용 프로그램을 볼 수 있습니다.
여기까지 아주 기초적인 개념을 잡는 것이고, 보다 자세한 정보는 다음의 글을 참조하시면 도움이 될 것입니다.
WCF RIA Services Part 2: Querying Data
; http://www.silverlightshow.net/items/WCF-RIA-Services-Part-2-Querying-Data.aspx

WCF RIA Services Part 3: Updating Data
; http://www.silverlightshow.net/items/WCF-RIA-Services-Part-3-Updating-Data.aspx

WCF RIA Services Part 4 - Integrating with the Model-View-ViewModel Pattern
; http://www.silverlightshow.net/items/WCF-RIA-Services-Part-4-Integrating-with-the-Model-View-ViewModel-Pattern.aspx

WCF RIA Services Part 5 - Metadata and Shared Classes
; http://www.silverlightshow.net/items/WCF-RIA-Services-Part-5-Metadata-and-Shared-Classes.aspx

WCF RIA Services Part 6 - Validating Data
; http://www.silverlightshow.net/items/WCF-RIA-Services-Part-6-Validating-Data.aspx

WCF RIA Services Part 7 - Authentication and Authorization
; http://www.silverlightshow.net/items/WCF-RIA-Services-Part-7-Authentication-and-Authorization.aspx

WCF RIA Services Part 8 - Testing and Debugging
; http://www.silverlightshow.net/items/WCF-RIA-Services-Part-8-Testing-and-Debugging.aspx

WCF RIA Services Part 9 - Structuring Your Application
; http://www.silverlightshow.net/items/WCF-RIA-Services-Part-9-Structuring-Your-Application.aspx

WCF RIA Services Part 10 - Exposing Domain Services To Other Clients
; http://www.silverlightshow.net/items/WCF-RIA-Services-Part-10-Exposing-Domain-Services-To-Other-Clients.aspx
개인적으로 WCF RIA 서비스가 마음에 드는 점이 있다면, 데이터를 무거운 XML 직렬화를 사용하지 않고, 바이너리와 유사한 포맷으로 했다는 것입니다. "
JMeter로 XML 웹 서비스 호출에 대한 부하 테스트 방법" 글에서 설명했던 것처럼, IE에서 개발자 도구를 이용해 WCF RIA 서비스 호출을 확인할 수 있는데요.
요청부터 재미있습니다. ^^
GET /ClientBin/SilverlightApplication1-Web-DomainService1.svc/binary/GetAccounts HTTP/1.1
Accept: */*
Referer:    http://localhost:6813/ClientBin/SilverlightApplication1.xap
Accept-Language:    ko,en-US;q=0.7,en;q=0.3
Accept-Encoding:    gzip, deflate
User-Agent: Mozilla/5.0 (compatible; MSIE 10.0; Windows NT 6.2; WOW64; Trident/6.0)
Host:   localhost:6813
DNT:    1
Connection: Keep-Alive
사실, 웹 프로젝트의 물리적인 파일 상으로는 종래의 WCF와는 달리 확장자가 .svc인 파일을 찾아볼 수 없습니다. 그런데, 위의 요청을 보면 .svc가 명시되어 있고 경로는 DomainService1 클래스가 구현된 네임스페이스 정보까지 '-' 문자로 이어진 형태입니다. ("/ClientBin/" 경로는 silverlight을 포함하는 웹 페이지가 놓인 폴더 경로입니다.)
실제로 웹 브라우저를 이용해 "http://localhost:6813/ClientBin/SilverlightApplication1-Web-DomainService1.svc/binary/GetAccounts"로 곧바로 조회하는 것이 가능합니다. (Web Application만 같다면 /ClientBin 경로는 생략해도 됩니다.) 대신 응답 유형은 HTML이나 XML이 아닙니다.
HTTP/1.1 200 OK
Cache-Control:  no-cache
Pragma: no-cache
Content-Length: 1260
Content-Type:   application/msbin1
Expires:    -1
Server: Microsoft-IIS/8.0
X-AspNet-Version:   4.0.30319
X-SourceFiles:  =?UTF-8?B?ZDpcc2V0dGluZ3NcRGVz...[생략]...uc3ZjXGJpbmFyeVxHZXRBY2NvdW50cw==?=
X-Powered-By:   ASP.NET
Date:   Fri, 08 Mar 2013 07:52:37 GMT
Response Body의 내용은 파일로 저장해서 확인할 수 있는데, 다음과 같습니다.
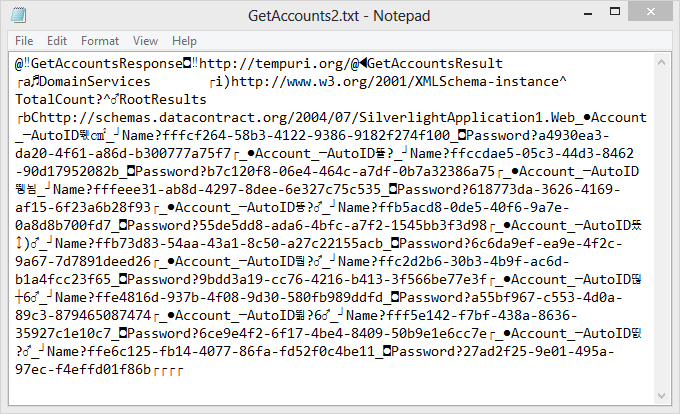
보시는 것처럼, 거의 바이너리 유형에 가깝습니다. Content-Type이 "application/msbin1"인 이유가 있었던 것입니다. Silverlight과의 연동이라면 둘다 닷넷 플랫폼일 테니 일면 타당하기도 합니다.
물론, WCF RIA 서비스를 다른 식으로 직렬화하는 것도 가능합니다. 본문에서 "Expose OData endpoint"에 대해 넘어갔었는데, 이제 추가를 해보겠습니다.
우선, 웹 프로젝트에 "System.ServiceModel.DomainServices.Hosting.OData" 어셈블리에 대한 참조를 합니다. 그다음, web.config 파일을 열어 configSections에 domainServices 노드를 추가하고,
<configuration>
  <configSections>
    <section name="entityFramework" type="System.Data.Entity.Internal.ConfigFile.EntityFrameworkSection, EntityFramework, Version=4.4.0.0, Culture=neutral, PublicKeyToken=b77a5c561934e089" requirePermission="false" />

    <sectionGroup name="system.serviceModel">
      <section name="domainServices" type="System.ServiceModel.DomainServices.Hosting.DomainServicesSection, System.ServiceModel.DomainServices.Hosting, Version=4.0.0.0, Culture=neutral, PublicKeyToken=31bf3856ad364e35" allowDefinition="MachineToApplication" requirePermission="false" />
    </sectionGroup>
  </configSections>

  ...[생략]...

<configuration>
그다음, system.serviceModel 하위에 domainServices 노드를 추가하고 OData 항목을 포함시킵니다.
<system.serviceModel>

    <domainServices>
        <endpoints>
            <add name="OData" type="System.ServiceModel.DomainServices.Hosting.ODataEndpointFactory, System.ServiceModel.DomainServices.Hosting.OData, Version=4.0.0.0, Culture=neutral, PublicKeyToken=31bf3856ad364e35" />
        </endpoints>
    </domainServices>

    <serviceHostingEnvironment aspNetCompatibilityEnabled="true"
    multipleSiteBindingsEnabled="true" />
</system.serviceModel>
마지막으로, OData로 노출시켜줄 Domain Service의 메소드에 Query 특성을 부여합니다.
namespace SilverlightApplication1.Web
{
...[생략]...

    [EnableClientAccess()]
    public class DomainService1 : LinqToEntitiesDomainService<UnitTestDB2Entities1>
    {
        [Query(IsDefault = true)]
        public IQueryable<Account> GetAccounts()
        {
            return this.ObjectContext.Accounts;
        }
    }
}
이제 빌드하고 다음의 URL로 OData가 노출되는 API 목록을 확인할 수 있습니다.
http://localhost:6813/ClientBin/SilverlightApplication1-Web-DomainService1.svc/odata/
API 호출은 웹 브라우저로도 확인이 되는데요. 위의 화면에서 확인된 API 이름을 그대로 이어서 붙여주면 됩니다.
http://localhost:6813/ClientBin/SilverlightApplication1-Web-DomainService1.svc/odata/AccountSet
마지막으로, 관련된 오류 상황 정리해 봅니다. ^^
1) 실습하는 중에 Silverlight를 실행시킨 후 서비스 호출 시 다음과 같은 오류 메시지를 만날 수 있습니다.
System.ServiceModel.DomainServices.Client.DomainOperationException: Load operation failed for query '...'. The specified named connection is either not found in the configuration, not intended to be used with the EntityClient provider, or not valid.
그럼, 브라우저를 이용해 직접 .svc 호출을 한 후 좀 더 상세한 오류 정보를 response body로 받을 수 있는데요.
@�Fault�5http://schemas.microsoft.com/ws/2005/05/envelope/none@�Code@�Value?Sender�@�Reason@�Text��xml�lang?ko-KR삇The specified named connection is either
not found in the configuration, not intended to be used with the EntityClient provider, or not valid.��@�Detail@�DomainServiceFault��DomainServices
�i)http://www.w3.org/2001/XMLSchema-instance@ ErrorCode뗵�@�ErrorMessage삇The specified named connection is either not found in the configuration, not
intended to be used with the EntityClient provider, or not valid.�@�IsDomainException?
StackTrace?� at
System.Data.EntityClient.EntityConnection.ChangeConnectionString(String newConnectionString)
at System.Data.EntityClient.EntityConnection..ctor(String connectionString)
at System.Data.Objects.ObjectContext.CreateEntityConnection(String connectionString)
at System.Data.Objects.ObjectContext..ctor(String connectionString, String defaultContainerName)
at SilverlightApplication1.Web.UnitTestDBEntities..ctor() in d:\...\RIAServicesLibrary1\SilverlightApplication1.Web\Model1.Designer.cs:line 34
����
보시는 것처럼, 오류 메시지도 살짝 바이너리로 인코딩되어 있어서 다소 이상하지만, UnitTestDBEntities 생성자에서 오류가 발생한 것은 알 수 있습니다.
기본 생성자가 실행되는 경우, .edmx 생성 당시의 연결 문자열 키가 들어가게 되는데요. 여기서 제가 실행한 예제의 경우 "UnitTestDBEntities"가 기본으로 지정되어 있습니다. 문제는 이것이 web.config에 없을 때 발생합니다. 따라서, 명시적으로 web.config에 다음의 설정으로 자신의 상황에 맞게 .edmx를 위한 연결 문자열을 추가해 주시면 됩니다.
  <connectionStrings>
    <add name="UnitTestDBEntities" connectionString="metadata=res://*/Model1.csdl|res://*/Model1.ssdl|res://*/Model1.msl;provider=System.Data.SqlClient;provider connection string='data source=[dbsrv];initial catalog=[dbname];user
id=[mydbaccnt];Password=[mydbpw];MultipleActiveResultSets=True;App=EntityFramework'" providerName="System.Data.EntityClient" />
  </connectionStrings>
2) 그리고, 어떤 경우에는 이런 오류도 발생할 수 있습니다.
Server Error in '/' Application.
--------------------------------------------------------------------------------

Object reference not set to an instance of an object.
  Description: An unhandled exception occurred during the execution of the current web request. Please review the stack trace for more information about the error and where it originated in the code.

 Exception Details: System.NullReferenceException: Object reference not set to an instance of an object.

Source Error:

 An unhandled exception was generated during the execution of the current web request. Information regarding the origin and location of the exception can be identified using the exception stack trace below.

Stack Trace:

[NullReferenceException: Object reference not set to an instance of an object.]
   System.Runtime.AsyncResult.End(IAsyncResult result) +324
   System.ServiceModel.Activation.HostedHttpRequestAsyncResult.End(IAsyncResult result) +501
   System.Web.AsyncEventExecutionStep.OnAsyncEventCompletion(IAsyncResult ar) +107

--------------------------------------------------------------------------------
Version Information: Microsoft .NET Framework Version:4.0.30319; ASP.NET Version:4.0.30319.272
이유는, web.config에서 system.serviceModel의 하위에 serviceHostingEnvironment 옵션이 누락되었기 때문입니다. 따라서, 다음과 같이 추가해 주시면 위의 오류가 발생하지 않습니다.
    <system.serviceModel>
        <serviceHostingEnvironment aspNetCompatibilityEnabled="true"
          multipleSiteBindingsEnabled="true" />

        ...[생략]...
[이 글에 대해서 여러분들과 의견을 공유하고 싶습니다. 틀리거나 미흡한 부분 또는 의문 사항이 있으시면 언제든 댓글 남겨주십시오.]