Xamarin.Forms - 2. XAML을 이용한 페이지 개발
이번에도 역시 "Xamarin.Forms - 1. Forms 시작하기" 글의 모델이었던 원본 시리즈의 2번째 글을 참고해서 작성한 것입니다. (거의 배꼈다고 보시면 됩니다. ^^)
Learning Xamarin: Forms and XAML
; http://blog.falafel.com/Blogs/jesse-liberty/2014/06/13/learning-xamarin-forms-and-xaml
"
Xamarin.Forms - 1. Forms 시작하기" 글에서 UI를 코드로 작성했는데요. 그것만 보면 별로 매력이 별로 없을 텐데, 다행히 Xamarin은 WPF의 XAML을 최대한의 호환을 유지하며 Xamarin.Forms에 녹아냈습니다. 그것이 훌륭하지요. ^^
그래서, 지난번에 작성했던 MonkeyPage나 DetailPage를 코드가 아닌 XAML로 표현하는 것이 가능합니다. 바로 이것이 이번 글의 실습 주제입니다.
프로젝트는 이전에 만들어 둔 것에 이어서 시작해보겠습니다. 일단 코드로 페이지를 작성했던 MonkeyPage.cs를 삭제하고 "Forms Xaml Page" 항목으로 새롭게 MonkeyPage.cs를 추가합니다.
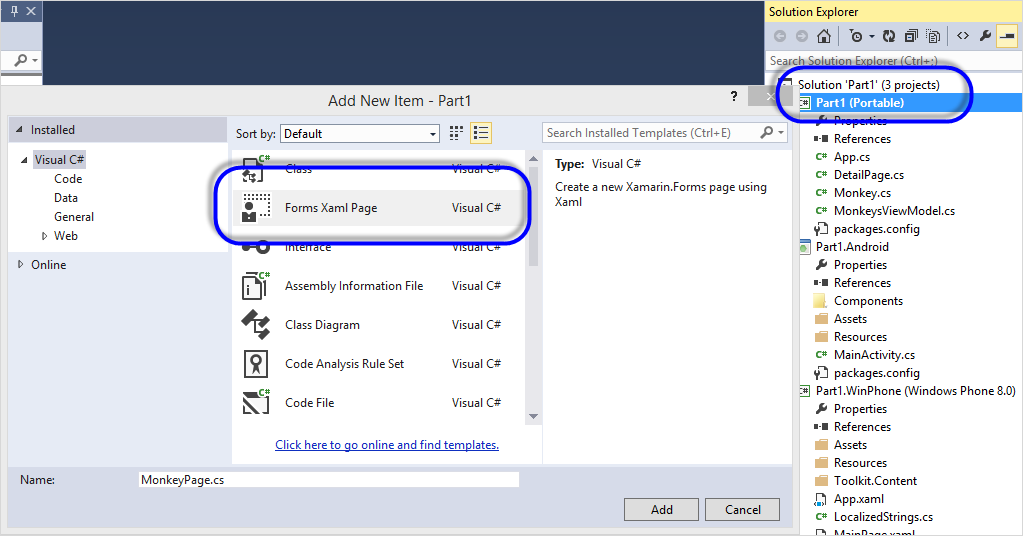
그럼, WPF와 마찬가지로 MonkeyPage.xaml과 MonkeyPage.xaml.cs 파일이 생성됩니다. (하지만, 아쉽게도 XAML과 유사할 뿐 마이크로소프트가 지원하는 XAML과 동일하지는 않기 때문에 디자이너 화면은 제공되지 않습니다.)
<?xml version="1.0" encoding="utf-8" ?>
<ContentPage xmlns="http://xamarin.com/schemas/2014/forms"
                       xmlns:x="http://schemas.microsoft.com/winfx/2009/xaml"
                       x:Class="Part1.MonkeyPage">
    <Label Text="{Binding MainText}" VerticalOptions="Center" HorizontalOptions="Center" />
</ContentPage>
using System;
using System.Collections.Generic;
using System.Linq;
using System.Text;
using System.Threading.Tasks;

namespace Part1
{
    public partial class MonkeyPage
    {
        public MonkeyPage()
        {
            InitializeComponent();
        }
    }
}
그래도 보시는 바와 같이 WPF처럼 Data Binding 구문도 지원되고 속성도 거의 유사하게 제공하고 있기 때문에 편안하게 느껴집니다. ^^ 이제 지난번에 코드로 구성했던 UI를 XAML로 넣어줍니다.
<?xml version="1.0" encoding="utf-8" ?>
<ContentPage xmlns="http://xamarin.com/schemas/2014/forms"
                       xmlns:x="http://schemas.microsoft.com/winfx/2009/xaml"
                       x:Class="Part1.MonkeyPage">
    <ListView x:Name="list" ItemsSource="{Binding Monkeys}">
        <ListView.ItemTemplate>
            <DataTemplate>
                <TextCell Text="{Binding Name}"
                    Detail="{Binding Location}">
                </TextCell>
            </DataTemplate>
        </ListView.ItemTemplate>
    </ListView>
</ContentPage>
UI요소를 xaml 파일이 가져갔으므로 MonkeyPage.xaml.cs의 코드는 한결 더 가벼워집니다.
using Monkeys.ViewModels;

namespace Part1
{
    public partial class MonkeyPage
    {
        public MonkeyPage()
        {
            InitializeComponent();

            this.BindingContext = new MonkeysViewModel();
        }
    }
}
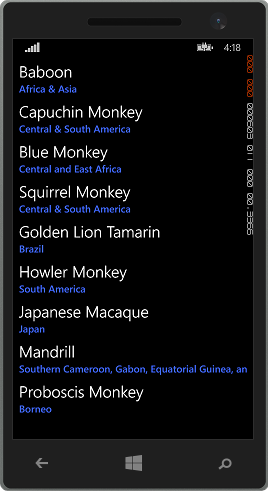
여기까지 변경하고 윈도우 폰 에뮬레이터로 실행하면, "
지난번 글에서 코드로 구성한 예제"와 정확히 같은 실행 화면을 보여줍니다.
ListView의 항목을 클릭한 것에 대한 상세 보기 페이지로 이동하는 기능도 추가해 볼까요? ^^ 이를 위해 기존 실습으로 작성된 DetailPage.cs 파일을 삭제하고 역시 이번에도 "Forms Xaml Page" 항목으로 새롭게 DetailPage.cs 파일을 다시 추가해줍니다.
<?xml version="1.0" encoding="utf-8" ?>
<ContentPage xmlns="http://xamarin.com/schemas/2014/forms"
                       xmlns:x="http://schemas.microsoft.com/winfx/2009/xaml"
                       x:Class="Part1.DetailPage">
    <Label Text="{Binding MainText}" VerticalOptions="Center" HorizontalOptions="Center" />
</ContentPage>
using System;
using System.Collections.Generic;
using System.Linq;
using System.Text;
using System.Threading.Tasks;

namespace Part1
{
    public partial class DetailPage
    {
        public DetailPage()
        {
            InitializeComponent();
        }
    }
}
XAML에 기본 생성된 <Label /> 태그를 삭제하고 이전에 코드로 작성했던 상세 보기 페이지의 ScrollView/Label를 각각 추가합니다.
<?xml version="1.0" encoding="utf-8" ?>
<ContentPage xmlns="http://xamarin.com/schemas/2014/forms"
                       xmlns:x="http://schemas.microsoft.com/winfx/2009/xaml"
                       x:Class="Part1.DetailPage" Title="{Binding Name}">
    <ScrollView Padding="20">
        <Label Text="{Binding Details}" />
    </ScrollView>
</ContentPage>
마찬가지로 DetailPage.xaml.cs 코드 역시 BindingContext만 지정하는 것으로 끝납니다.
namespace Part1
{
    public partial class DetailPage
    {
        public DetailPage(Monkey monkey)
        {
            InitializeComponent();
            this.BindingContext = monkey;
        }
    }
}
DetailPage XAML이 완성되었으니, 이제 MonkeyPage XAML에서 ListView 항목이 선택된 경우 이벤트를 처리하기 위해 XAML에 ItemTapped 이벤트를 추가합니다.
<?xml version="1.0" encoding="utf-8" ?>
<ContentPage xmlns="http://xamarin.com/schemas/2014/forms"
                       xmlns:x="http://schemas.microsoft.com/winfx/2009/xaml"
                       x:Class="Part1.MonkeyPage">
    <ListView x:Name="list" ItemsSource="{Binding Monkeys}"
               ItemTapped="OnItemSelected">
        ...[생략]...
    </ListView>
</ContentPage>
그리고 MonkeyPage.xaml.cs 파일에 그에 대응되는 코드를 만들어 줍니다.
public void OnItemSelected(object sender, ItemTappedEventArgs args)
{
    var monkey = args.Item as Monkey;
    if (monkey == null)
        return;

    Navigation.PushAsync(new DetailPage(monkey));
    list.SelectedItem = null;
}
실행하면, 역시 모든 동작은 "
지난번 글에서 코드로 구성한 예제"와 동일합니다.
어떠세요? WPF의 경험을 살릴 수 있는 Xamarin.Forms! 마음에 드시나요? ^^ 사실 갈 길이 멉니다. XAML에 대한 디자이너 화면도 없고, 인텔리센스도 제공되지 않습니다. (Xamarin Studio에서는 xaml 페이지에 인텔리센스가 제공됩니다.) 게다가 간단한 UI 화면임에도 불구하고 윈도우 폰과 안드로이드 폰에서 다르게 나오기 때문에 이런 부분을 맞춰주어야 하는 상황이 오면 피곤할 수도 있습니다.
따라서, 원본의 "
Learning Xamarin: Forms and XAML" 글에서도 나오지만, 아직은 LOB 성격의 앱으로 적당할 것 같습니다. 그 외의 앱을 제작한다면, 미리 신중하게 기술검토를 하시는 것이 좋을 것 같습니다. ^^
(
첨부된 파일은 이번 글의 실습을 반영한 프로젝트입니다.)
[이 글에 대해서 여러분들과 의견을 공유하고 싶습니다. 틀리거나 미흡한 부분 또는 의문 사항이 있으시면 언제든 댓글 남겨주십시오.]