Lync 2013 서버 설치 방법
예전에 Lync의 전신인 "Office Communicator Server"를 설치해 봤었는데요.
기업용 메신저를 위한 Office Communicator Server 2007 설치
; https://www.sysnet.pe.kr/2/0/1383
이번에는 최신 버전인 Lync 2013을 구성해 보기로 했습니다. 근데... 방법이 꽤나 복잡하군요. ^^;
Step by Step Installing Lync Server 2013 Standard Edition Front End on Windows 2012 ? Part 1
; http://windowspbx.blogspot.kr/2012/07/step-by-step-installing-lync-server.html
위의 글은 "Part 1"이라고 되어 있지만, 일단 저 글대로만 하면 서비스 구성은 완료되므로 다른 글은 볼 필요가 없습니다.
Lync 설치를 위해서는 우선 기본적인 환경 구성이 있어야 하는데, 이게 은근히 복잡합니다.
- Active Directory 서버
    - 같은 서버에 DNS, Certificate Authority 서비스 설치 (물론, DNS/CA 서비스를 다른 컴퓨터에 설치해도 됩니다.)
    - (AD 도메인 명은 제 경우에 "testad.com"입니다.)
    - (AD 서버의 이름은 제 경우에 "testpdc"입니다.)

- Lync를 설치할 Windows Server 2012 (AD 가입)
    - (제 경우에 컴퓨터 이름은 "lync2013"입니다. 따라서, Lync 서버의 FQDN은 "lync2013.testad.com"입니다.)
이렇게 2대의 서버가 구성되었으면 이제, Lync를 설치할 서버에 다음과 같은 설정을 추가합니다.
1. 실버라이트 설치
    Get Silverlight | Microsoft Silverlight
    ; http://www.microsoft.com/getsilverlight/

2. Add Roles and Features
    * Roles
        - Web Server (IIS)
            Common HTTP Features
                Default Document
                HTTP Errors
                Static Content

            Health and Diagnostics
                HTTP Logging
                Logging Tools
                Tracing

            Performance
                Static Content Compression
                Dynamic Content Compression

            Security
                Request Filtering
                Client Certificate Mapping Authentication
                Windows Authentication

            Application Development
                .NET Extensibility 3.5
                .NET Extensibility 4.5
                ASP.NET 3.5
                ASP.NET 4.5
                ISAPI Extensions
                ISAPI Filters

        - Management Tools
            IIS Management Console
            IIS Management Scripts and Tools


    * Features
        - .NET Framework 3.5 Features
            .NET Framework 3.5
            HTTP Activation
            Non-HTTP Activation

        - .NET Framework 4.5 하위의 모든 옵션

        - Message Queuing | Message Queuing Services
        - Remote Server Administration Tools | Role Administration Tools | AD DS and AD LDS Tools
        - User Interfaces and Infrastructure | Desktop Experience


3. 재부팅하고, 도메인 관리자 권한의 사용자로 로그인
여기까지가 "prerequisite" 단계입니다. ^^ 이제는 본격적으로 Lync 서비스를 설치할 텐데요. 저는 "
Step by Step Installing Lync Server 2013 Standard Edition Front End on Windows 2012 - Part 1 " 글에 따라 다음과 같이 구성을 했습니다.
1. 설치 CD로부터 .\Setup\amd64\setup.exe 실행
2. Visual C++ x64 Runtime 설치를 할 것인지 여부를 묻는 창이 뜨는데, "Yes"를 선택하고,
3. Lync 설치 폴더를 묻는 창이 뜨는데 제 경우에는 "d:\Program Files\Microsoft Lync Server 2013"으로 설치 시작
4. 파일 복사가 완료되자마자 "Lync Server 2013 - Deployment Wizard" 창이 뜹니다.
5. Wizard 창 메뉴에서 "Prepare Active Directory" 링크를 클릭하면 "Active Directory Preparation" 단계로 바뀌고,
Step1 - Run
Step2 - 수작업으로 확인을 한다는 것인데, 구체적인 방법은 다음의 글에 있습니다.
스키마 파티션의 복제 확인
; https://docs.microsoft.com/en-us/skypeforbusiness/help-topics/help-depwiz/verify-replication-of-schema-partition
2대의 AD가 있는 경우에 복제가 잘 되는지 확인하라는 것입니다. AD의 정상 동작 여부가 중요하기 때문에
이쯤에서 미리 한번 확인을 하는 것이 권장됩니다. 방법은 adsiedit.msc를 입력해서 실행,
관리 콘솔에서 2대의 AD 서버에 접속한 후,
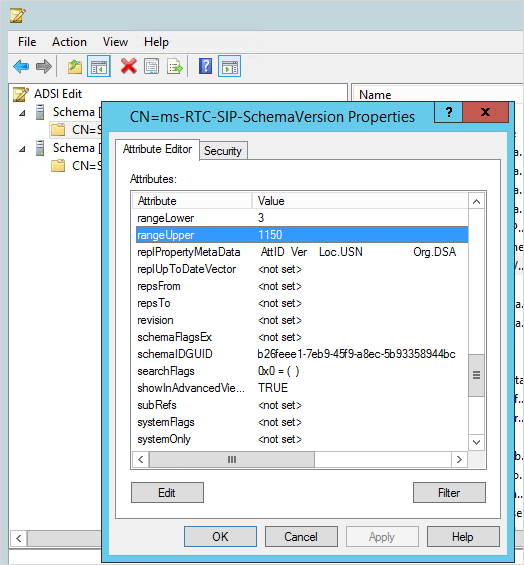
"Schema" 노드에서 "rangeUpper" 속성 값이 1150, "rangeLower" 속성 값이 3임을 확인.
Step3 - Run - "Local domain"과 "Domain FQDN" 중에서 선택하는데, 제 경우에는 "Local domain"을 선택하고 진행.
Step4 - 역시 Step2처럼 검증하고, (제 경우에는 생략)
Step5 - Run
Step6 - Step2처럼 검증 (제 경우에는 생략)
Step7 - 이 단계의 설명이 좀 애매한데요. 저는 AD 서버에서 "Active Directory Users and Computers" 관리 콘솔을 실행,
"Users" 폴더에 "CSAdministrator" 그룹이 추가되어 있는데 이곳에 "Domain Admins" 그룹을 추가했습니다.
(또는 실제 Lync 서비스를 관리할 사용자 계정만을 추가해도 되는 듯합니다.)
자세한 사항은 다음의 글을 참고하세요.
Lync Server 제어판 관리자 만들기
; https://docs.microsoft.com/en-us/skypeforbusiness/help-topics/help-depwiz/create-skype-for-business-server-control-panel-administrators
6. Step 7까지 마친 후 "Back" 버튼을 눌러 Wizard의 첫 화면으로 이동
우측 상단에 "Prepare first Standard Edition server" 링크를 클릭해서 구성 시작을 합니다. (6~10분 정도 소요)
7. Active Directory에 설치된 DNS 서비스가 있는 서버에 로그인 한 후 DNS 관리자를 실행하고,
"Other New Records" / "Service Location (SRV)" 레코드 생성
Service = _sipinternaltls
Protocol = _tcp
Port number = 5061
Host Offering the service = [fqdn of Lync Std. FE server or Pool.] (제 경우에는 이 값으로 "testad.com")
3개의 "New Host (A or AAAA)…" 레코드 생성
meet
dialin
admin
위의 3개 A 레코드에 대한 IP 주소는 lync2013.testad.com의 IP 주소를 입력
8. "Lync Server 2013 - Deployment Wizard" 창으로 돌아가서 "Install Administrative Tools" 링크 눌러서 설치
9. Window 키를 눌러 2012 서버의 "시작" 화면으로 가서 "Lync Server Topology Builder" 아이콘을 눌러 실행,
"New Topology"를 선택하고 "OK", "Save New Topology As" 파일 저장 대화창이 뜨면 원하는 아무 이름이나 입력하고 "Save" 버튼을 누릅니다.
참고로, 저장되는 파일의 위치는 "C:\Users\[계정명]\AppData\Roaming\Microsoft\Windows\Recent"입니다.
그럼, "Primary SIP domains:"를 묻는 창이 나오고 여기에 Active Directory 도메인(testad.com)을 입력
그럼, "Specify additional supported domains"가 나오는데, 그냥 넘어감
그럼, "Define the first site" 단계가 나오고 "Name"에 (임의의) 원하는 Lync 사이트 명을 입력합니다. (제 경우에, Lync2013Site1)
그럼, "Specify site details"에서 "City", "State/Province", "Country/Region Code"가 나오는데 역시 (임의의) 원하는 값을 입력하고,
그럼, "New topology was successfully defined" 단계가 나오고 그대로 "Finish" 버튼을 누름.
그럼, "Define New Front End Pool" 창이 뜨고, 첫화면은 그냥 "Next"로 넘어가고,
그럼, "Define the Front End pool FQDN" 단계로 넘어가는데,
"FQDN"에는 이전 7번 단계에서 "AD DNS" 서버에 _sipinternaltls 레코드의 Host 값으로 입력한 FQDN 값을 입력(제 경우에 testad.com),
그리고 "Standard Edition Server"를 선택.
그럼, "Select features" 단계로 넘어가고, "Conferencing", "Enterprise Voice", "Call Admission Control" 3개만 선택하고 "Next"
그럼, "Select collocated server roles" 단계가 나오고, "Collocate Mediation Server" 선택된 체로 "Next"
그럼, "Associate server roles with this Front End pool" 단계가 나오고,
"Enable an Edge pool to be used by the media component of this Front End pool."은 선택되지 않은 체로 그냥 "Next"
그럼, "Define the SQL Server store"가 나오는데, 기본값 그대로 두고 "Next"하면 됩니다.
하지만, 이 단계에서 "share"라는 이름의 공유 폴더를 생성해 두는 것이 좋습니다.
제 경우에는 "d:\share" 폴더를 만들었고 그 공유 이름을 "share"로 한 후, 아래의 4개 계정에 대해
RTCHSUniversalServices
RTCComponentUniversalServices
RTCUniversalServerAdmins
RTCUniversalConfigReplicator
각각 Read/Write 권한을 부여했습니다. Read/Write 권한은 "공유 폴더의 권한"에도 주고, "폴더 자체의 권한"에도 주어야 합니다.
그럼, "Define the file store"가 나오는데, 역시 기본값 그대로 두고 "Next"
그럼, "Specify the Web Services URL"이 나오고, 기본값 그대로 두고 "Next"
그럼, "Select an Office Web Apps Server"가 나오는데 제 경우에는 구성을 안했지만 "OWA.testad.com"으로 그냥 해두라고 해서 그렇게 하고,
"Finish" 버튼을 누르면 "Lync Server Topology Builder" 화면으로 돌아갑니다.
10. "Lync Server Topology Builder"의 좌측 트리뷰에 "Lync Server" 항목을 마우스 우측 버튼을 눌러 나오는 메뉴의 "Edit Properties..."를 선택,
그럼, "Edit Properties" 창이 뜨고, 하단으로 내려 "Administrative access URL" 란에 "https://admin.[your domain name]"을 입력하고 "OK"
11. "Lync Server Topology Builder"의 "Action" / "Publish Topology..."를 선택하고 2번의 묻는 질문에 그냥 "Next" 버튼을 누르면 구성 시작.
12. 다시 "Lync Server 2013 - Deployment Wizard"로 가서, "Install or Update Lync Server System" 링크를 클릭
Step1 - "Run" 시키면 "Install Local Configuration Store" 창이 뜨고,
"Configure Local Replica of Central Management Store" 단계에서
"Retrieve directly from the Central Management store or imported from a file." 옵션 선택 그대로 두고 "Next"
Step2 - "Run" 시키면 "Set Up Lync Server Components" 대화창이 뜨고 "Install" 버튼을 눌러 실행만 하면 됨.
실행이 완료된 후 "IIS 관리자"를 실행시켜 "Lync Server External Web Site", "Lync Server Internal Web Site" 웹 사이트가 있는지 확인.
만약 그 2개의 사이트가 없다면, 재부팅 후 다시 Step 2를 반복.
Step3 - "Run" 시키면 "Certificate Wizard" 창이 뜨고 "Default certificate" 항목을 선택 후 "Request" 버튼을 누릅니다.
그럼, "Certificate Request" 대화창이 뜨고, "Next"
그럼, "Delayed or Immediate Requests" 창이 뜨고, "Send the request immediately to an online certification authority"를 기본값 선택 그대로 "Next"
그럼, "Choose a Certificate Authority (CA)" 단계가 나오고,
대부분의 경우 CA 이름은 다를 텐데, 이 이름은 CA 서비스가 설치된 서버에 "Certification Authority" 관리 콘솔에 보여지는
(왼쪽) 트리 뷰의 CA 노드 이름을 CA 서버의 FQDN과 합쳐서 입력해야 합니다. (참조: https://www.sysnet.pe.kr/2/0/1011)
예를 들어, CA 인증서가 설치된 서버가 "testpdc.testad.com"이고
CA 인증 서버 이름이 "testad-TESTPDC-CA"이면 "testpdc.testad.com\testad-TESTPDC-CA"가 되고,
이 문자열을 "Specify another certification authority" 입력란에 넣어줘야 합니다.
그럼, "Certification Authority Account" 단계가 나오고,
"Specify alternate credentials for the certification authority"에 대해 위에서 입력한 "testpdc.testad.com" 서버로의 접속 권한이
현재 로그인 계정에 없다면 입력해야 하지만, 있다면 체크 박스를 해제하고 "Next"
그럼, "Specify Alternative Certificate Template" 단계가 나오고, 그대로 "Next"
그럼, "Name and Security Settings" 단계가 나오고 "Friendly name"에 원하는 임의의 이름을 넣고 "Next" (제 경우에 예제처럼 "Primary FE Cert"로 입력)
그럼, "Organization Information" 단계가 나오고 역시 원하는 임의의 텍스트를 넣고 "Next"
그럼, "Geographical Information" 단계가 나오고 역시 원하는 임의의 값을 선택 및 입력하고 "Next"
그럼, "Subject Name/Subject Alternative Names" 단계가 나오고 "Next"
그럼, "SIP Domain setting on Subject Alternative Names" 단계가 나오고 "Configured SIP domains"에 여러분의 Active Directory 도메인을 선택하고 "Next"
그럼, "Configure Additional Subject Alternative Names" 단계가 나오고 "Next"
그럼, "Certificate Request Summary" 단계가 나오고 "Next"
그럼, "Assign..." 단계가 나오고 "Next"
'Assign...' 단계를 정상적으로 마쳤으면 다시 "Step3"의 처음으로 가서,
이번에는 "Default certificate" 다음에 나오는 "OAuthTokenIssuer"를 선택하고 "Request" 버튼을 눌러 과정을 반복.
Step4 - "Start Service" 단계를 "Run" 시킵니다. 완료 후 서비스 관리자에서 "Lync Server"로 시작하는 (16개의) 서비스들이 모두 실행 중인지 확인합니다.
13. "시작" 메뉴를 통해 "Lync Server Control Panel"을 실행합니다.
여기까지가 Lync 서비스 설치입니다. 정상적으로 설치가 되었다면 "Lync Server Control Panel"이 잘 실행될 것입니다.
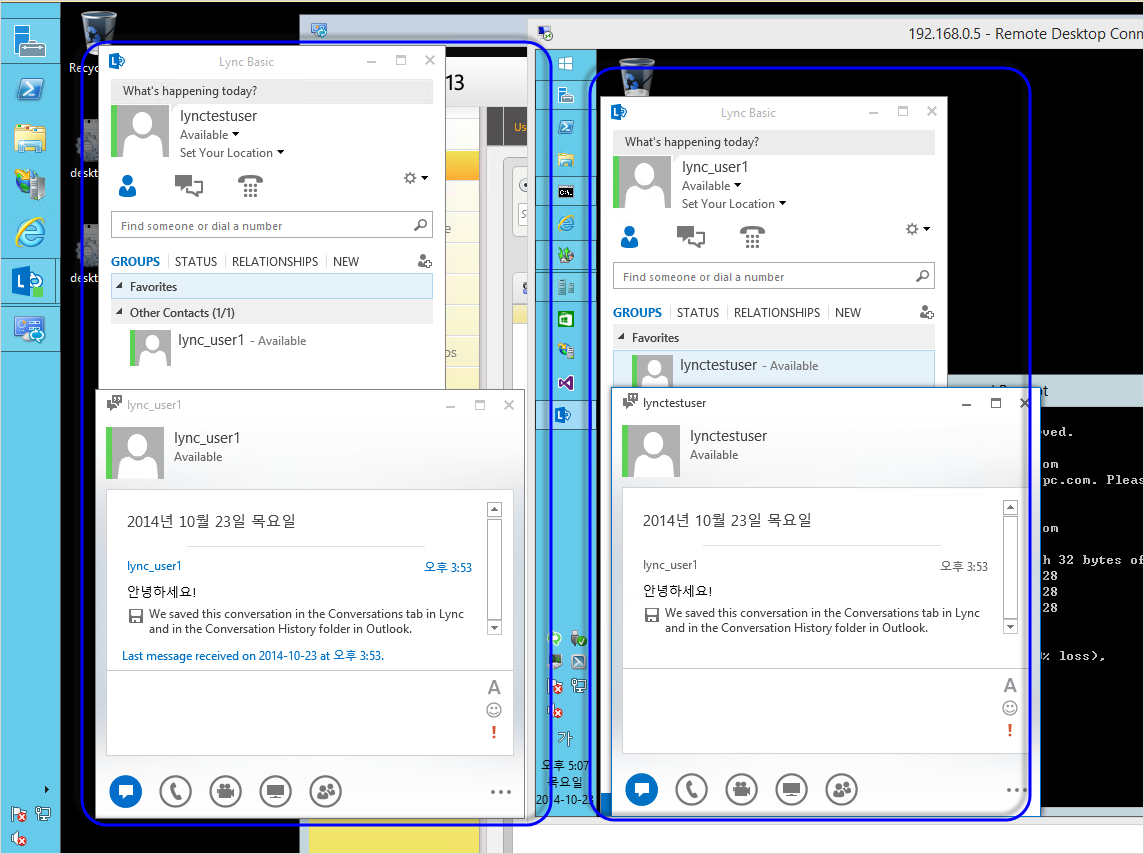
서비스는 이제 구성했으니, 정말로 잘 동작하는지 Lync 클라이언트로 테스트를 해볼까요? ^^ 제 경우에 AD에 등록된 다음의 두 사용자 계정으로 Lync 클라이언트를 실행시켜 서로 통신이 되는지 확인해 볼 것입니다.
lynctestuser@testad.com
lync_user1@testad.com
이를 위해 "Lync Server Control Panel" 프로그램에서 좌측 "Users" 메뉴를 선택한 후 나타나는 우측 패널에서 "Enable users" 버튼을 눌러 저 2개의 계정을 추가했습니다.
"Lync 2013 클라이언트" 프로그램은 무료로 배포 중인 Basic 버전이 있고,
Microsoft Lync Basic 2013 (64 Bit)
; http://www.microsoft.com/en-us/download/details.aspx?id=35450
유료 버전인 "마이크로소프트 오피스" 제품에 포함된 "Lync 2013 Pro"가 있습니다. 당연히 프로 버전이 기능이 많겠지만, 기본적인 테스트는 Basic 버전으로도 충분하니 여건이 되는데로 아무거나 실행하시면 됩니다.
Active Directory에 참여한 2대의 PC에 Lync를 설치하고 실행하면, 자동으로 현재 로그인한 AD 사용자 계정으로 Lync 로그인 시도가 됩니다. (물론, 다른 사용자로 로그인 하는 것도 가능합니다.)
와~~~~ ^^ 정말, Lync 메신저가 잘 실행이 되고 있습니다.
이제부터는 설치를 하면서 겪었던 오류 상황을 나열해 보았습니다.
만약 설치 시, 다음의 오류가 발생한다면?
Creating Central Management store - Failure

Error: An error occurred: "Microsoft.Rtc.Management.Deployment.DeploymentException" "Cannot find any suitable disks for database files. You must manually specify database paths."
아래의 글에 해답이 나오는데요.
Lync Server 2013 Standard Command execution failed: Cannot find any suitable disks for database files. You must manually specify database paths.
; https://social.technet.microsoft.com/Forums/lync/en-US/290b0104-c82c-49cd-85ab-30103fe5b7d1/lync-server-2013-standard-command-execution-failed-cannot-find-any-suitable-disks-for-database?forum=ocsplanningdeployment
제 경우에는 Lync 서비스를 d 드라이브에 설치한다고 했는데도 SQL 서버가 기본적으로 c 드라이브에 설치되기 때문에 그것 때문에 C 드라이브도 16GB가 넘는 여유 공간이 필요합니다.
설치 시 다음의 오류를 접한다면?
Created trusted service entry for type=Microsoft.Rtc.Applications.Cps, port=5075, routable=True, gruuId=65417098-179d-5c3a-b5f2-abecd4f2b09e and FQDN=lync2013.testad.com.

Creating the contact for the application.

Creating application data directory.

InvalidFolder: Invalid share.
Error: Cannot create directory because the path is read only: \\lync2013.testad.com\share\1-ApplicationServer-1\AppServerFiles\CPS

Type: DeploymentException

Stack Trace
    at Microsoft.Rtc.Management.Deployment.Core.DeploymentCommon.CreateDirectory(String path)
    at Microsoft.Rtc.Management.Deployment.Roles.InternalApplication.CreateApplicationDataDirectory(UcasApplication application, IService service)
다음의 글에 따라,
Enabling Topology - Completed with Errors (Error Code 2310)
; http://blogs.technet.com/b/dodeitte/archive/2010/09/15/enabling-topology-completed-with-errors-error-code-2310.aspx
d:\share 폴더를 만들고, 해당 폴더를 공유한 다음, 그 폴더의 공유 권한에 다음의 그룹을 추가하고,
RTCHSUniversalServices
RTCComponentUniversalServices
RTCUniversalServerAdmins
RTCUniversalConfigReplicator
각각 Read/Write 권한을 부여하면 됩니다.
설치 시 다음의 오류를 접한다면?
Role: FileStore:1   2014-10-21 오후 5:53:29
                     └    Requires setup: True   2014-10-21 오후 5:53:29
                     └    Successfully created directory \\lync2013.testad.com\share\1-WebServices-1\ABFiles.   2014-10-21 오후 5:53:29
                     └    Found "RTCComponentUniversalServices": True   2014-10-21 오후 5:53:29
                     └    ACLError: Access permissions error.   2014-10-21 오후 5:53:29   Error
                     └    Error: Failed to save permissions on "\\lync2013.testad.com\share".
? Details
└ Type: DeploymentException
└ ? Stack Trace
    └   at Microsoft.Rtc.Management.Deployment.Core.LcsObjectSecurity.CommitSecurity()
at Microsoft.Rtc.Management.Deployment.Roles.ActivationDriver.AddRights(DeploymentContext context, Member member, Right right, LcsObjectSecurity fs)

└ ? Additional Details
    └   Error: Attempted to perform an unauthorized operation.
? Details
└ Type: UnauthorizedAccessException
└ ? Stack Trace
    └   at System.Security.AccessControl.Win32.SetSecurityInfo(ResourceType type, String name, SafeHandle handle, SecurityInfos securityInformation, SecurityIdentifier owner, SecurityIdentifier group, GenericAcl sacl, GenericAcl dacl)
at System.Security.AccessControl.NativeObjectSecurity.Persist(String name, SafeHandle handle, AccessControlSections includeSections, Object exceptionContext)
at System.Security.AccessControl.NativeObjectSecurity.Persist(String name, AccessControlSections includeSections)
at Microsoft.Rtc.Management.Deployment.Core.LcsObjectSecurity.CommitSecurity()

                    2014-10-21 오후 5:53:29   Error
                     └    ACLError: Failed adding "AccessRead" permissions for "RTCComponentUniversalServices" on "\\lync2013.testad.com\share". Access control list (ACL) might fail on UNIX file shares. Refer to the deployment guide to manually set the ACLs in the file share.   2014-10-21 오후 5:53:29
                     └    ACLErrorResolution: Re-run Enable-CSTopology and/or Enable-CSComputer.   2014-10-21 오후 5:53:29
                     └    Access control list (ACL) was added.   2014-10-21 오후 5:53:29
                     └    Acl: "AccessRead" permissions for "RTCComponentUniversalServices" on "\\lync2013.testad.com\share\1-WebServices-1\ABFiles".
위의 "d:\share" 공유 폴더의 "공유 보안"뿐만 아니라, 해당 폴더 자체의 보안까지 Read/Write 권한을 줘야 합니다.
"Lync Server 2013 - Deployment Wizard"의 "Install or Update Lync Server System" 링크에서 "Step3" 인증서 구성 시, 다음의 오류가 발생한다면?
Error: An error occurred: "System.ArgumentException" "Unable to contact certification authority (CA) "testpdc.testad.com\TESTPDC" or the parameter is incorrect."
이런 경우 "Choose a Certificate Authority (CA)" 단계에서 "Select a CA from the list detected in your environment"의 리스트 박스에 보여지는 기본값(testpdc.testad.com\TESTPDC)을 선택했기 때문입니다. 대부분의 경우 CA 이름은 다를 텐데, 이 이름은 CA 서비스가 설치된 서버에 "Certification Authority" 관리 콘솔에 보여지는 왼쪽 트리 뷰의 CA 노드 이름을 CA 서버의 FQDN과 합쳐서 입력해야 합니다.
다음의 글에 CA 노드 이름을 구하는 방법이 설명되어 있으니 참고하세요.
인증서 갱신 오류 - The request contains no certificate template information.
; https://www.sysnet.pe.kr/2/0/1011
예를 들어, CA 인증서가 설치된 서버가 "testpdc.testad.com"이고 CA 인증 서버 이름이 "testad-TESTPDC-CA"이면 "testpdc.testad.com\testad-TESTPDC-CA"가 되고, 이 문자열을 "Specify another certification authority" 입력란에 넣어줘야 합니다.
"Lync Server 2013 - Deployment Wizard"의 "Install or Update Lync Server System" 링크에서 "Step3" 인증서 구성 시 인증서 요청을 성공적으로 마치고 현재 서버에 Assign하는 단계에서 다음과 같은 오류가 발생할 수 있습니다.
WARNING: Set-CSCertificate failed.
WARNING: Detailed results can be found at "C:\Users\[사용자계정]\AppData\Local\Temp\Set-CSCertificate-[2014_10_22][16_42_22].html".
Command execution failed: Https binding not found on the website.

Error: Https binding not found on the website.
▼ Details
└ Type: InvalidOperationException
└ ▼ Stack Trace
    └   at Microsoft.Rtc.Management.Deployment.Core.Certificate.BindCertiticate(X509Certificate2 cert, Int64 siteId, Boolean addBinding)
at Microsoft.Rtc.Management.Deployment.Core.Certificate.SetCertificate(CertificateData certData)
at Microsoft.Rtc.Management.Deployment.Core.Certificate.SetCertificate(String thumbprint, Nullable`1 effectiveTime, Boolean isRoll)
at Microsoft.Rtc.Management.Deployment.Tasks.SetCertificateTask.Action()
at Microsoft.Rtc.Management.Internal.Utilities.LogWriter.InvokeAndLog(Action action)

   2014-10-22 오후 4:42:26   Error
 └    Error: An error occurred: "System.InvalidOperationException" "Https binding not found on the website."   2014-10-22 오후 4:42:26   Error
Step2였던 "Set Up Lync Server Components" 단계에서 "Lync Server External Web Site", "Lync Server Internal Web Site" 2개의 웹 사이트가 IIS에 등록되는데, 그 사이트들이 없으면 이런 오류가 발생합니다. 따라서, 서버를 재부팅하고 Step2 단계를 다시 실행해서 그 사이트들이 IIS에 생성되는 지 확인하고 나서 다시 Step 3를 실행하면 됩니다.
"Lync Server 2013 - Deployment Wizard"의 "Install or Update Lync Server System" 링크에서 "Step3" 인증서 구성 시 인증서 요청을 성공적으로 마치고 현재 서버에 OAuthTokenIssuer에 Assign 하는 단계에서 다음과 같은 오류가 발생할 수 있습니다.
> Assign Certificate

Set-CSCertificate -Identity Global -Type OAuthTokenIssuer -Thumbprint 8F154D71031FB3867DDC2F1D4553547DCFA0565B -Confirm:$false -Report "C:\Users\[사용자계정]\AppData\Local\Temp\Set-CSCertificate-[2014_10_23][13_52_08].html"
 WARNING: Set-CSCertificate failed.
 WARNING: Detailed results can be found at "C:\Users\[사용자계정]\AppData\Local\Temp\Set-CSCertificate-[2014_10_23][13_52_08].html".
Command execution failed: The private key of the certificate is not marked exportable and cannot be stored in the central management store.

Error: The private key of the certificate is not marked exportable and cannot be stored in the central management store.
▼ Details
└ Type: CertificateException
└ ▼ Stack Trace
    └   at Microsoft.Rtc.Management.Deployment.Core.Certificate.ExportCerts(X509Certificate2Collection certs)
at Microsoft.Rtc.Management.Deployment.Core.Certificate.SetCMSCertificate(IScopeAnchor scope, X509Certificate2 foundCert, X509Certificate2Collection certs, Nullable`1 effectiveTime, Boolean isRoll)
at Microsoft.Rtc.Management.Deployment.Core.Certificate.SetCMSCertificate(IScopeAnchor scope, String thumbprint, Nullable`1 effectiveTime, Boolean isRoll)
at Microsoft.Rtc.Management.Deployment.Tasks.SetCertificateTask.Action()
at Microsoft.Rtc.Management.Internal.Utilities.LogWriter.InvokeAndLog(Action action)

└ ▼ Additional Details
    └   Error: Key not valid for use in specified state.
? Details
└ Type: CryptographicException
└ ? Stack Trace
    └
   2014-10-23 오후 1:52:09   Error
 └    Error: An error occurred: "Microsoft.Rtc.Management.Common.Certificates.CertificateException" "The private key of the certificate is not marked exportable and cannot be stored in the central management store."
이것은 이전 "Default certificate" 단계에서 Assign을 성공한 다음 곧바로 "OAuthTokenIssuer"에 대해 Assign 과정을 시도했기 때문입니다. 그렇게 하면 안되고, 반드시 "Step3"의 첫 단계로 돌아가서 "OAuthTokenIssuer"를 위한 인증서 요청 단계를 차례로 거친 후에 Assign을 해야 합니다.
[이 글에 대해서 여러분들과 의견을 공유하고 싶습니다. 틀리거나 미흡한 부분 또는 의문 사항이 있으시면 언제든 댓글 남겨주십시오.]