WCF - webHttpBinding + IIS 6.0 윈도우 인증 구현 예제
지난번 이야기에 이어서.
WCF - webHttpBinding 구현 예제
; https://www.sysnet.pe.kr/2/0/833

WCF - webHttpBinding 윈도우 인증 구현 예제
; https://www.sysnet.pe.kr/2/0/834
이번에는 IIS 6.0 서버에 얹어 보겠습니다. 이를 위해, 지난번 까지는 코드를 이용해서 WCF를 초기화하던 것을 web.config으로 바꿔보겠습니다. 사실 IIS의 web.config은 독립 실행형의 app.config 구성과 비교해서 baseAddress를 제거해 준다는 점을 빼고는 동일합니다.
웹 프로젝트를 만들고, web.config의 내용에 다음과 같이 system.serviceModel을 구성합니다.
<system.serviceModel>
    <services>
      <service name="WcfService1.CHelloWorld">
        <endpoint address="" binding="webHttpBinding"
                  bindingConfiguration="webHttpBindingConfiguration"
                  behaviorConfiguration="webBehavior"
                  contract="ContractLibrary.IHelloWorld"/>
      </service>
    </services>

    <bindings>
      <webHttpBinding>
        <binding name="webHttpBindingConfiguration">
          <security mode="TransportCredentialOnly">
            <transport clientCredentialType="Windows" />
          </security>
        </binding>
      </webHttpBinding>
    </bindings>

    <behaviors>
        <endpointBehaviors>
            <behavior name="webBehavior">
                <webHttp />
            </behavior>
        </endpointBehaviors>
    </behaviors>
</system.serviceModel>
그다음, 실제로 인증이 정상적으로 되었는지 확인하기 위해 WCF 메서드의 가장(impersonation) 기능을 켜도록 하겠습니다.
[OperationBehavior(Impersonation = ImpersonationOption.Required)]
public string GetDate(string year, string month, string day)
{
    string text = WindowsIdentity.GetCurrent().Name;
    return text + ":" + new DateTime(Convert.ToInt32(year),
        Convert.ToInt32(month), Convert.ToInt32(day)).ToShortDateString();
}
이제 해당 서비스를 IIS 6.0에 올립니다.
[그림 1: IIS 6.0에 올라온 CHelloWorld.svc]
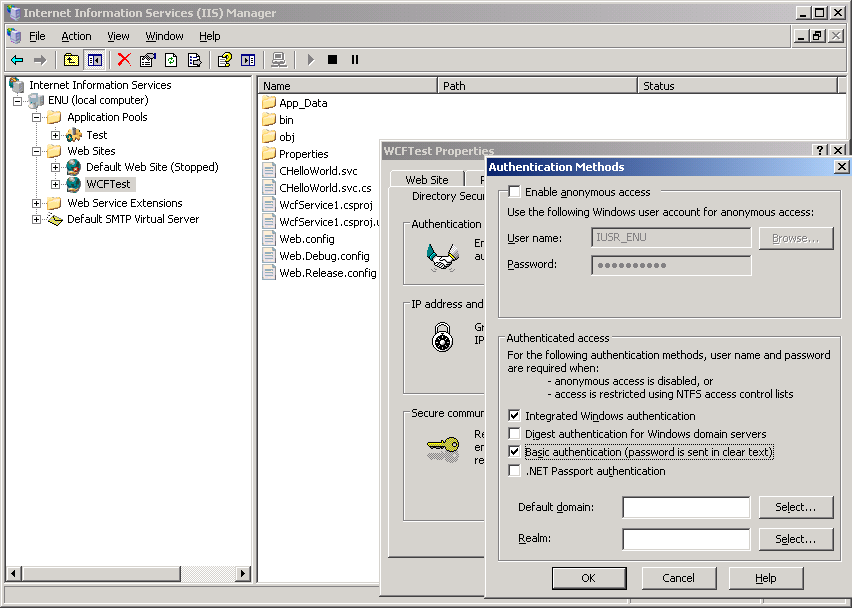
사실, 질문하신 분이 "Basic authenticaion"을 켰기 때문에 저도 위에서는 켜놓은 상태로 설정했지만 WCF의 Windows 인증 자체가 "Integrated Windows authentication"을 요구하기 때문에 "기본 인증"의 on/off 상태에 관계없이 동작합니다.
클라이언트 측 코드는 지난번과 비교해서 svc 확장자가 URL에 들어가는 것을 제외하고는 차이가 없습니다.
static void Main(string[] args)
{
    string baseAddress = "http://...URL...:9091/CHelloWorld.svc";

    string reqAddress = string.Format("{0}/date/1990/05/05", baseAddress);
    HttpWebRequest req = WebRequest.Create(reqAddress) as HttpWebRequest;

    //req.UseDefaultCredentials = true; // 같은 PC 또는 로그인한 계정이 대상 PC에도 동일하게 있는 경우
    req.Credentials = new NetworkCredential("계정", "암호");

    WebResponse response = req.GetResponse();
    Stream stream = response.GetResponseStream();
    StreamReader sr = new StreamReader(stream);
    string text = sr.ReadToEnd();
    Console.WriteLine(text);
}
구성 끝! 이제 클라이언트 프로그램을 실행하면 요청에 따라 IIS는 w3wp.exe 작업자 프로세스를 올리고 결과를 보내주어 클라이언트 측 콘솔 화면에는 다음과 같은 출력이 나오게 됩니다.
<string xmlns="http://schemas.microsoft.com/2003/10/Serialization/">TESTPC\test:5/5/1990</string>
첨부한 파일은 테스트가 바로 가능한 프로젝트 소스 코드를 포함하고 있습니다.
[이 토픽에 대해서 여러분들과 의견을 공유하고 싶습니다. 틀리거나 미흡한 부분 또는 의문 사항이 있으시면 언제든 댓글 남겨주십시오.]