webHttpBinding + PUT 메서드 구현
지난 이야기에 이어서.
WCF - webHttpBinding + IIS 6.0 윈도우 인증 구현 예제
; https://www.sysnet.pe.kr/2/0/835
이번에는 RESTful 서비스에 허용되는 PUT 메서드에 대해서 알아보겠습니다.
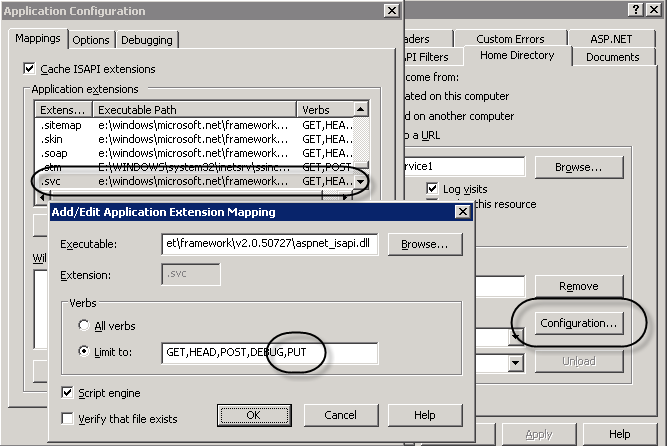
참고로, Windows 2003에서는 PUT 메서드가 svc 확장자에 대해 기본적으로는 허용되어 있지 않기 때문에, 우선 "웹 사이트" 속성창에서 다음과 같이 SVC 확장자에 대한 PUT 메서드 전달을 허용해 두어야 합니다.
GET 메서드의 경우 WebGet 특성으로 지정되었던 반면, PUT 메서드에 대해서는 WebInvoke 특성을 지정해야 합니다. 예를 들면 더 직관적이겠죠!
[ServiceContract(Namespace = "http://www.wcftest.com/")]
public interface IHelloWorld
{
    [WebGet(...)]
    [OperationContract]
    string GetDate(string year, string month, string day);

    [WebInvoke(Method = "PUT", UriTemplate = "putData/{year}")]
    [OperationContract]
    string PutData(string year);
}
위에서 정의된 PutData 메서드에서는 UriTemplate을 사용해서 인자 전달을 받고 있는데요. 이처럼 단순 인자뿐만 아니라 PUT/GET에 대한 웹 메서드들은 모두 구조체를 전달할 수 있습니다. GET 방식의 경우에는 UriTemplate에서 보는 것처럼 Query String으로 전달이 가능한데요. 이에 대해서는 다음의 글에서 잘 설명해 주고 있습니다.
Passing a JSON object to a WCF service with jQuery
; http://www.dennydotnet.com/post/Passing-a-JSON-object-to-a-WCF-service-with-jQuery.aspx
즉, (JSON 포맷의 경우) 아래와 같이 주소에 이은 Query Parameter로 전달하면 되는데,
http://www.dennydotnet.com/Service.svc/DoWork/?p={ "Name":"Denny", "Age":23, "Shoes":["Nike","Osiris","Etnies"] }
그냥 전달하면 안되고, Url Encoding을 해줘야 한다고 합니다.
http://www.dennydotnet.com/Service.svc/DoWork/?p=%7b+%22Name%22%3a%22Denny%22%2c+%22Age%22%3a23%2c+%22Shoes%22%3a%5b%22Nike%22%2c%22Osiris%22%2c%22Etnies%22%5d+%7d%3b
반면에, PUT 메서드의 경우는 HTTP Body 영역을 이용한 전달까지 가능합니다.
이 경우에 직렬화 하는 방법은 Xml과 Json 방식이 있는데, Json 방식은 인자의 타입을 그대로 적용하는 것이 가능하지만 Xml 방식은 XmlElement로 전달받아서 처리해야 합니다.
// XML 직렬화
[WebInvoke(Method = "PUT", UriTemplate = "/putData2", BodyStyle = WebMessageBodyStyle.Bare)]
[OperationContract]
string PutData2(XmlElement my);

// JSON 직렬화
[WebInvoke(Method = "PUT", UriTemplate = "/putData3", RequestFormat = WebMessageFormat.Json
                                                    , ResponseFormat = WebMessageFormat.Json)]
[OperationContract]
string PutData3(Person my);
이제 위의 코드를 호출하기 위한 클라이언트 측 코드를 살펴볼까요?
지난 예제에서도 살펴본 것처럼, webHttpBinding은 WCF 프록시 뿐만 아니라 HttpWebRequest로도 호출이 됩니다. 실제로 요청 Payload를 확인해 보면 다음과 같은데,
====== XML 포맷의 경우 ======
PUT /HelloService/CHelloWorld.svc/myPut2 HTTP/1.1
Content-Length: 154
Content-Type: text/xml
Authorization: Negotiate oXcwdaADCgEBoloEWE5UTE1TU1AAAwAAAAAAAABYAAAAAAAAAFgAAAAAAAAAWAAAAAAAAABYAAAAAAAAAFgAAAAAAAAAWAAAADXCiOIGAbAdAAAADxLbmbM6Ne2M6pm8P8w30VKjEgQQAQAAAPUXp1AtIpqEAAAAAA==
Host: localhost

<?xml version="1.0"?>
<Person xmlns:xsi="http://www.w3.org/2001/XMLSchema-instance" xmlns:xsd="http://www.w3.org/2001/XMLSchema" Name="Test2" Age="17" />

====== JSON 포맷의 경우 ======
PUT /HelloService/CHelloWorld.svc/putData3 HTTP/1.1
Content-Length: 24
Content-Type: application/json
Authorization: Negotiate oXcwda...[생략]...AA==
Host: localhost

{"Age":16,"Name":"Test"}
그러하니 당연히 코드는 위의 내용을 맞춰주면 되겠지요! ^^
// PUT 메서드 테스트 + XML 포맷
reqAddress = string.Format("{0}/putData2", baseAddress);
req = WebRequest.Create(reqAddress) as HttpWebRequest;
req.Method = "PUT";
req.ContentType = "text/xml";
req.UseDefaultCredentials = true;

Person person = new Person();
person.Name = "Test2";
person.Age = 17;

MemoryStream ms = new MemoryStream();
XmlSerializer xs = new XmlSerializer(typeof(Person));
xs.Serialize(ms, person);
ms.Position = 0;
req.ContentLength = ms.Length;

Stream oStream = req.GetRequestStream();
oStream.Write(ms.GetBuffer(), 0, (int)ms.Length);
oStream.Close();

using (WebResponse response = req.GetResponse())
{
    Stream stream = response.GetResponseStream();
    StreamReader sr = new StreamReader(stream);
    string text = sr.ReadToEnd();
    Console.WriteLine(text);
}

// PUT 메서드 테스트 + JSON 포맷
reqAddress = string.Format("{0}/putData3", baseAddress);
req = WebRequest.Create(reqAddress) as HttpWebRequest;
req.Method = "PUT";
req.ContentType = "application/json";
req.UseDefaultCredentials = true;

oStream = req.GetRequestStream();

DataContractJsonSerializer ser =
      new DataContractJsonSerializer(typeof(Person));

person = new Person();
person.Name = "Test";
person.Age = 16;

ms = new MemoryStream();
ser.WriteObject(ms, person);
ser.WriteObject(oStream, person);
ms.Position = 0;
StreamReader sReader = new StreamReader(ms);
string serialized = sReader.ReadToEnd();
Console.WriteLine(serialized);
oStream.Close();

using (WebResponse response = req.GetResponse())
{
    Stream stream = response.GetResponseStream();
    StreamReader sr = new StreamReader(stream);
    string text = sr.ReadToEnd();
    Console.WriteLine(text);
}
마지막으로, XML 직렬화의 경우에도 JSON 방식처럼 XmlElement가 아닌 해당 타입을 직접 받는 것이 가능합니다. 방법이 매우 간단한데요. 다음과 같이 XmlSerializerFormat 특성만 추가해 주면 됩니다.
// XML 직렬화 + XmlSerializerFormat
[WebInvoke(Method = "PUT", UriTemplate = "/putData4")]
[OperationContract]
[XmlSerializerFormat]
string PutData4(Person my);
이 정도면, webHttpBinding 사용에 대해서는 웬만큼 다 살펴본 것 같군요. ^^
첨부한 파일은 위의 코드를 모두 담고 있는 예제 솔루션입니다.
[이 토픽에 대해서 여러분들과 의견을 공유하고 싶습니다. 틀리거나 미흡한 부분 또는 의문 사항이 있으시면 언제든 댓글 남겨주십시오.]