Unity로 실습하는 Shader (4) - 퐁 셰이딩(phong shading)
게임 프로그래머가 아니라서, ^^; 용어가 너무 혼란스럽군요.
'Phong reflection(퐁 반사)' 과 'Phong shading(퐁 쉐이딩)'
; http://puppystep.tistory.com/10 [멍뭉이 발자국]

Phong shading
; https://en.wikipedia.org/wiki/Phong_shading

Phong reflection model
; https://en.wikipedia.org/wiki/Phong_reflection_model
위의 글을 보면, "Ambient" + "Diffuse" + "Specular" 연산을 조합한 것이 "Phone Reflection model(Phong illumination or Phong lighting)"이라고 합니다. 그리고 저것이 pixel shader에서 행해지면 "Phong shading"이라고.
그러니까, 지난번에 작성한 고로 셰이딩이,
Unity로 실습하는 Shader (2) - 고로 셰이딩(gouraud shading) + 퐁 모델(Phong model)
; https://www.sysnet.pe.kr/2/0/11609

Unity로 실습하는 Shader (3) - 고로 셰이딩(gouraud shading) + 퐁 모델(Phong model) + Texture
; https://www.sysnet.pe.kr/2/0/11610
정점(vertex) 단위에서 "Ambient" + "Diffuse" + "Specular" 연산을 조합하긴 했지만 "Phong shading"은 아니고, "퐁 모델"을 따른 것입니다. 그리고, 이번 글에서 설명할 shader는 "고로 셰이딩"에서 했던 로직과 동일하지만 그것을 pixel shader에서 할 것이므로 "Phong shader"가 됩니다. (맞나요? ^^;)
이번에는 지난번에서 다룬 고로 셰이딩과 동일한 로직을 Pixel 단위에서 수행하도록 바꿀 것입니다. 자, 그럼 단계별로 구현해 볼까요? ^^ 우선 기본 shader 코드는 다음에서 시작하겠습니다.
Shader "My/phongShader"
{
    Properties
    {
        _Color("Main Color", Color) = (1.0, 0.0, 0.0, 1.0)
    }
    SubShader
    {
        Pass
        {
            CGPROGRAM
            #pragma vertex vert
            #pragma fragment frag

            #include "UnityCG.cginc"

            float4 _Color;

            struct appdata
            {
                float4 vertex : POSITION;
            };

            struct v2f
            {
                float4 vertex : SV_POSITION;
            };

            v2f vert (appdata v)
            {
                v2f o;
                o.vertex = UnityObjectToClipPos(v.vertex);
                return o;
            }

            fixed4 frag (v2f i) : SV_Target
            {
                fixed4 col = _Color;
                return col;
            }
            ENDCG
        }
    }
}
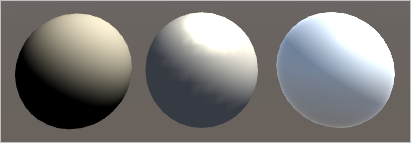
실행해 보면,

좌측부터, 위의 shader로 출력했기 때문에 현재 흰색으로만 나오고, 중간은 정점 단위의 gouraud shader, 우측은 unity의 Default-Material입니다.
계산하는 코드의 위치가 기존 VS(vertex shader)에서 PS(pixel shader)로 넘겨주는 것이니까, normal 정보를 받고 빛의 방향 벡터(lightDir)와, Camera가 향하는 벡터(viewDir) 등을 VS에서 계산하고 출력으로 PS 측에 넘겨 줍니다.
struct appdata
{
    float4 vertex : POSITION;
    float3 normal : NORMAL;
};

struct v2f
{
    float4 vertex : SV_POSITION;
    float3 worldNormal : TEXCOORD0;
    float3 viewDir : TEXCOORD1;
    float3 lightDir : TEXCOORD2;
};

v2f vert (appdata v)
{
    v2f o;
    o.vertex = UnityObjectToClipPos(v.vertex);

    o.worldNormal = UnityObjectToWorldNormal(v.normal);

    float3 lightDir = normalize(_WorldSpaceLightPos0);
    o.lightDir = lightDir;
    o.viewDir = normalize(_WorldSpaceCameraPos - o.worldNormal);

    return o;
}
이후, 계산은 pixel shader에서 합니다. 우선, 확산광 먼저 걸어보겠습니다.
fixed4 frag (v2f i) : SV_Target
{
    // 확산광
    float3 worldNormal = normalize(i.worldNormal);
    float3 lightDir = i.lightDir;
    float3 diffuseReflection = 1.0 * _LightColor0.rgb * saturate(dot(worldNormal, lightDir));

    fixed4 col = _Color * float4(diffuseReflection, 1.0);
    return col;
}
반사광도 추가해 보고,
fixed4 frag (v2f i) : SV_Target
{
    // 확산광
    float3 worldNormal = normalize(i.worldNormal);
    float3 lightDir = i.lightDir;
    float3 diffuseReflection = 1.0 * _LightColor0.rgb * saturate(dot(worldNormal, lightDir));

    // 반사광
    float3 reflectedDir = reflect(-lightDir, worldNormal);
    float3 viewDir = normalize(_WorldSpaceCameraPos - worldNormal);
    float reflectIntensity = saturate(dot(reflectedDir, viewDir));

    float n = 4.0;
    reflectIntensity = pow(reflectIntensity, n);
    float3 specularReflection = 1.0 * _LightColor0 * reflectIntensity;

    fixed4 col = _Color * float4(diffuseReflection, 1.0) + float4(specularReflection, 1.0);
    return col;
}
마지막으로 Phong Model 방식의 주변광을 추가합니다.
fixed4 frag (v2f i) : SV_Target
{
    // 주변광
    float4 ambientReflection = 1.0 * UNITY_LIGHTMODEL_AMBIENT;

    // 확산광
    float3 worldNormal = normalize(i.worldNormal);
    float3 lightDir = i.lightDir;
    float3 diffuseReflection = 1.0 * _LightColor0.rgb * saturate(dot(worldNormal, lightDir));

    // 반사광
    float3 reflectedDir = reflect(-lightDir, worldNormal);
    float3 viewDir = normalize(_WorldSpaceCameraPos - worldNormal);
    float reflectIntensity = saturate(dot(reflectedDir, viewDir));

    float n = 4.0;
    reflectIntensity = pow(reflectIntensity, n);
    float3 specularReflection = 1.0 * _LightColor0 * reflectIntensity;

    fixed4 col = _Color * float4(ambientReflection + diffuseReflection, 1.0) + float4(specularReflection, 1.0);
	return col;
}
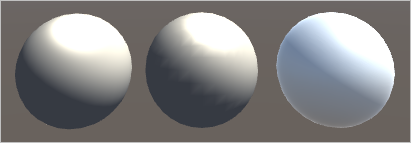
중간 것이
지난번에 만든 Vertex에서 계산한 gouraud shader라고 했는데, 맨 왼쪽의 현재 shader의 출력 결과와 비교해 보면 확실히 명암 경계가 더 부드러운 것을 볼 수 있습니다.
아래는 위에서 실습한 shader의 전체 소스 코드입니다.
Shader "My/phongShader"
{
    Properties
    {
        _Color("Main Color", Color) = (1.0, 0.0, 0.0, 1.0)
    }
    SubShader
    {
        Pass
        {
            Tags{ "LightMode" = "ForwardBase" }

            CGPROGRAM
            #pragma vertex vert
            #pragma fragment frag

            #include "UnityCG.cginc"
            #include "Lighting.cginc"

            float4 _Color;

            struct appdata
            {
                float4 vertex : POSITION;
                float3 normal : NORMAL;
            };

            struct v2f
            {
                float4 vertex : SV_POSITION;
                float3 worldNormal : TEXCOORD0;
                float3 viewDir : TEXCOORD1;
                float3 lightDir : TEXCOORD2;
            };

            v2f vert (appdata v)
            {
                v2f o;
                o.vertex = UnityObjectToClipPos(v.vertex);

                o.worldNormal = UnityObjectToWorldNormal(v.normal);

                float3 lightDir = normalize(_WorldSpaceLightPos0);
                o.lightDir = lightDir;
                o.viewDir = normalize(_WorldSpaceCameraPos - o.worldNormal);

                return o;
            }

            fixed4 frag (v2f i) : SV_Target
            {
                // 주변광
                float4 ambientReflection = 1.0 * UNITY_LIGHTMODEL_AMBIENT;

                // 확산광
                float3 worldNormal = normalize(i.worldNormal);
                float3 lightDir = i.lightDir;
                float3 diffuseReflection = 1.0 * _LightColor0.rgb * saturate(dot(worldNormal, lightDir));

                // 반사광
                float3 reflectedDir = reflect(-lightDir, worldNormal);
                float3 viewDir = normalize(_WorldSpaceCameraPos - worldNormal);
                float reflectIntensity = saturate(dot(reflectedDir, viewDir));

                float n = 4.0;
                reflectIntensity = pow(reflectIntensity, n);
                float3 specularReflection = 1.0 * _LightColor0 * reflectIntensity;

                fixed4 col = _Color * float4(ambientReflection + diffuseReflection, 1.0) + float4(specularReflection, 1.0);
                return col;
            }
            ENDCG
        }
    }
}
그렇다면 texture를 적용해 보면 어떨까요? 아래는 위의 소스 코드에서 texture를 입력받아 처리하는 코드가 추가된 것입니다.
Shader "My/phongTextureShader"
{
    Properties
    {
        _MainTex("Texture", 2D) = "white" {}
        _Ka("Ambient Reflectance", Float) = 1.0
    }
    SubShader
    {
        Pass
        {
            Tags{ "LightMode" = "ForwardBase" }

            CGPROGRAM
    #pragma vertex vert
    #pragma fragment frag

    #include "UnityCG.cginc"
    #include "Lighting.cginc"

            uniform float _Ka;
            sampler2D _MainTex;

            struct appdata
            {
                float4 vertex : POSITION;
                float3 normal : NORMAL;
                float2 uv : TEXCOORD0;
            };

            struct v2f
            {
                float4 vertex : SV_POSITION;
                float2 uv : TEXCOORD0;
                float3 worldNormal : TEXCOORD1;
                float3 viewDir : TEXCOORD2;
                float3 lightDir : TEXCOORD3;
            };

            v2f vert(appdata v)
            {
                v2f o;
                o.vertex = UnityObjectToClipPos(v.vertex);
                o.uv = v.uv;

                o.worldNormal = UnityObjectToWorldNormal(v.normal);

                float3 lightDir = normalize(_WorldSpaceLightPos0);
                o.lightDir = lightDir;
                o.viewDir = normalize(_WorldSpaceCameraPos - o.worldNormal);

                return o;
            }

            fixed4 frag(v2f i) : SV_Target
            {
                // 주변광
                float4 ambientReflection = 1.0 * UNITY_LIGHTMODEL_AMBIENT;

                // 확산광
                float3 worldNormal = normalize(i.worldNormal);
                float3 lightDir = i.lightDir;
                float3 diffuseReflection = 1.0 * _LightColor0.rgb * saturate(dot(worldNormal, lightDir));

                // 반사광
                float3 reflectedDir = reflect(-lightDir, worldNormal);
                float3 viewDir = normalize(_WorldSpaceCameraPos - worldNormal);
                float reflectIntensity = saturate(dot(reflectedDir, viewDir));

                float n = 4.0;
                reflectIntensity = pow(reflectIntensity, n);
                float3 specularReflection = 1.0 * _LightColor0 * reflectIntensity;

                fixed4 col = tex2D(_MainTex, i.uv);
                col = col * float4(ambientReflection + diffuseReflection, 1.0) + float4(specularReflection, 1.0);
                return col;
            }

            ENDCG
        }
    }
}
그리고 다음의 그림이 좌측부터 phong shader, vertex 단위의 gouraud shader, texture만 씌운 shader입니다.
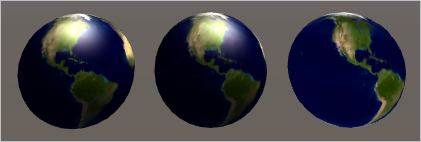
texture만 씌운 shader가 약간 밋밋한 정도이고 나머지 2개는 기본 texture 색상이 너무 부각되다 보니 texture가 없을 때와는 달리 특별한 차이가 나지 않습니다.
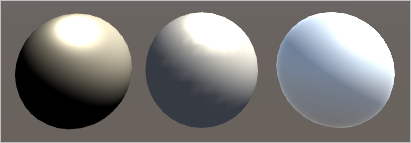
재미있는 것이 하나 있는데요, pixel shader(frag)에서 넘겨받은 i.worldNormal이 vertex shader 측에서 이미 정규화를 시켰는데도 불구하고 다시 normalize로 정규화를 시켜 주고 있습니다. 이것 때문에 제법 애를 먹었는데요, 만약 이것을 해주지 않으면 출력이 약간... 설명은 좀 그렇고 ^^ 아래의 그림을 보시면 됩니다.
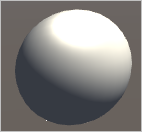
좌측 하단에 하얀색 점이 나오는 거 보이시죠? 저게 다음과 같이 vertex shader에서 넘어온 값을 그대로 사용하면 발생하는 현상입니다.
float3 worldNormal = i.worldNormal;
검색해 보니 아래의 글에 그 해답이 있었습니다.
[포프의 쉐이더 입문강좌] 04. 기초적인 조명쉐이더 Part 3
; https://kblog.popekim.com/2012/01/04-part-3.html
위의 내용을 보면, vertex shader의 출력 데이터가 pixel shader에 전달될 때 보간을 거친다는 것입니다. 사실, 이 때문에 vertex shader에서 빛을 계산하는 코드를 모두 담는 gouraud shader와 이번 글의 shader가 차이점이 나는 것입니다. 그런데, "[포프의 쉐이더 입문강좌] 04. 기초적인 조명쉐이더 Part 3" 글에 보면, vertex shader에서 단위 벡터로 만들었던 것들조차도 보간기를 거치는 동안 그 값이 흐트러질 수 있으므로 다시 정규화를 해야 한다고 나옵니다.
실제로 정규화를 해주면,
float3 worldNormal = normalize(i.worldNormal);
하얀색 점이 더 이상 나타나질 않습니다.
[이 글에 대해서 여러분들과 의견을 공유하고 싶습니다. 틀리거나 미흡한 부분 또는 의문 사항이 있으시면 언제든 댓글 남겨주십시오.]