Visual Studio 확장(VSIX)을 이용해 사용자 매크로를 추가하는 방법
지난 2개의 글을 통해 Visual Studio에 사용자 정의 메뉴를 추가하는 방법을 알아봤습니다.
Visual Studio 확장(VSIX)을 이용해 사용자 메뉴 추가하는 방법
; https://www.sysnet.pe.kr/2/0/11184

Visual Studio 확장(VSIX)을 이용해 사용자 메뉴 추가하는 방법 (2) - 동적 메뉴 구성
; https://www.sysnet.pe.kr/2/0/11185
사실, 위의 2개 글만 해도 "매크로" 기능을 추가하는 것은 구현된 것이나 다름없습니다. 왜냐하면, 매크로 함수 자체는 "EnvDTE80.DTE2 dte" 객체만 알고 있으면 대부분의 기능을 구현할 수 있는 데다 단지 메뉴와 연결해 주면 끝이기 때문입니다.
그런데, 여기서 한 가지 문제가 있습니다. 바로 "단축키"의 구현입니다. 자주 사용하는 매크로를 일일이 메뉴로 선택하는 것은 불편하기 때문에 단축키의 구현이 필수인데요. 문제는, 동적 메뉴의 경우 단축키를 위한 설정이 Visual Studio에는 제공되지 않는다는 점입니다. 이 때문에 다음과 같은 Q&A가 나오는데요.
Can one assign keyboard shortcuts to Visual Studio 2012 extensibility package commands that use DynamicItemStart?
; http://stackoverflow.com/questions/15487894/can-one-assign-keyboard-shortcuts-to-visual-studio-2012-extensibility-package-co
해결 방법을 보면, 동적 메뉴 스타일이 아닌 평범한 메뉴를 100개 정도 .vsct에 등록한 후 OnBeforeQueryStatus 콜백에서 show/hide를 하는 식으로 처리하라는 것입니다.
실제로, Visual Studio Marketplace에 등록된 매크로 확장인 Visual Commander를 보면,
Visual Commander
; https://marketplace.visualstudio.com/items?itemName=SergeyVlasov.VisualCommander
; https://vlasovstudio.com/visual-commander/
소개 페이지에 다음과 같은 문구를 볼 수 있습니다.
- the free edition supports only 10 commands and 5 extensions
- The Professional Edition supports up to 99 commands and 50 extensions
상용인 Pro 버전까지도 등록 가능한 명령어의 수를 99개로 제한하고 있는 것입니다. 아마도 제 생각에는, 단축키 문제만 아니었다면 동적 메뉴를 구성하면 되므로 100 개 이상의 명령어 지원이 더 쉬웠을 것입니다.
자, 그래서 우리가 지금까지 구현했던 동적 메뉴가 단축키 구현으로 인해 쓸모 없게 되었습니다. 이제는 다시
첫 번째 글로 돌아가서 100개 정도의 dummy 메뉴를 등록하는 것으로 시작해야 합니다.
첫 단계로 기본 그룹을 부모로 하는 메뉴를 하나 등록하고,
<Menus>
    <Menu guid="guidMacroCommandPackageCmdSet" id="MyMenu" priority="0x1000" type="Menu">
    <Parent guid="guidMacroCommandPackageCmdSet" id="MyMenuGroup" />
    <CommandFlag>AlwaysCreate</CommandFlag>
    <Strings>
        <ButtonText>MyMacro List</ButtonText>
    </Strings>
    </Menu>
</Menus>
그것의 서브 메뉴로 펼쳐질 "임시 메뉴"를 많이(?) 등록합니다. (우리는 예제를 위한 것이니, 4개의 dummy 메뉴만 만들겠습니다.)
<Buttons>
    <Button guid="guidMacroCommandPackageCmdSet" id="MacroCommandId_1" priority="0x0100" type="Button">
    <Parent guid="guidMacroCommandPackageCmdSet" id="MySubMenuGroup" />
    <CommandFlag>DynamicVisibility</CommandFlag>
    <CommandFlag>TextChanges</CommandFlag>
    <Strings>
        <ButtonText>CMD 1</ButtonText>
    </Strings>
    </Button>

    <Button guid="guidMacroCommandPackageCmdSet" id="MacroCommandId_2" priority="0x0100" type="Button">
    <Parent guid="guidMacroCommandPackageCmdSet" id="MySubMenuGroup" />
    <CommandFlag>DynamicVisibility</CommandFlag>
    <CommandFlag>TextChanges</CommandFlag>
    <Strings>
        <ButtonText>CMD 2</ButtonText>
    </Strings>
    </Button>

    <Button guid="guidMacroCommandPackageCmdSet" id="MacroCommandId_3" priority="0x0100" type="Button">
    <Parent guid="guidMacroCommandPackageCmdSet" id="MySubMenuGroup" />
    <CommandFlag>DynamicVisibility</CommandFlag>
    <CommandFlag>TextChanges</CommandFlag>
    <Strings>
        <ButtonText>CMD 3</ButtonText>
    </Strings>
    </Button>

    <Button guid="guidMacroCommandPackageCmdSet" id="MacroCommandId_4" priority="0x0100" type="Button">
    <Parent guid="guidMacroCommandPackageCmdSet" id="MySubMenuGroup" />
    <CommandFlag>DynamicVisibility</CommandFlag>
    <CommandFlag>TextChanges</CommandFlag>
    <Strings>
        <ButtonText>CMD 4</ButtonText>
    </Strings>
    </Button>
</Buttons>
마지막으로 위의 설정들에 대한 ID 값들을 GuidSymbol에 등록합니다.
<GuidSymbol name="guidMacroCommandPackageCmdSet" value="{abe0296d-5394-4dff-8453-5440c28f4696}">
    <IDSymbol name="MyMenuGroup" value="0x1020" />
    <IDSymbol name="MySubMenuGroup" value="0x1030" />
    <IDSymbol name="MyMenu" value="0x2000" />
    <IDSymbol name="MacroCommandId_1" value="0x3001" />
    <IDSymbol name="MacroCommandId_2" value="0x3002" />
    <IDSymbol name="MacroCommandId_3" value="0x3003" />
    <IDSymbol name="MacroCommandId_4" value="0x3004" />
</GuidSymbol>
여기까지의 .vsct 파일 변경만 하고 실행해 보면, "Tools" 메뉴에 "MyMacro List" 메뉴가 생성되고, 그 서브 메뉴로 "CMD 1", "CMD 2", "CMD 3, "CMD 4"가 생성된 것을 확인할 수 있습니다.
이후의 구현은 매크로 등록 방법만 여러분들이 임의로 결정하시면 됩니다. 매크로를 선택했을 때 실행될 명령어를 C# 소스 코드 파일로 유지하고 그 정보를 동적으로 로딩해 메뉴를 구성할 수 있습니다. 이 예제에서는 4개의 메뉴를 미리 생성해 두었는데, 가령 2개의 매크로를 여러분들이 정의했다고 가정하면 다음과 같은 식으로 코딩할 수 있습니다.
private MacroCommand(Package package)
{
    if (package == null)
    {
        throw new ArgumentNullException("package");
    }

    this.package = package;
    dte2 = (DTE2)this.ServiceProvider.GetService(typeof(DTE));

    OleMenuCommandService commandService = this.ServiceProvider.GetService(typeof(IMenuCommandService)) as OleMenuCommandService;
    if (commandService != null)
    {
        for (int i = 0; i < 4; i++)
        {
            var menuCommandID = new CommandID(CommandSet, CommandId + i);
            var menuItem = new OleMenuCommand(this.MenuItemCallback, menuCommandID);
            menuItem.BeforeQueryStatus += MenuItem_BeforeQueryStatus;
            commandService.AddCommand(menuItem);
        }
    }
}

private void MenuItem_BeforeQueryStatus(object sender, EventArgs e)
{
    OleMenuCommand menu = sender as OleMenuCommand;
    if (menu != null)
    {
        if (menu.CommandID.ID >= 0x3003) // 3번째 메뉴 이후의 것을 비활성
        {
            menu.Enabled = false;
            menu.Visible = false;
            return;
        }

        if (menu.CommandID.ID == 0x3001)
        {
            menu.Text = "MakeAHref"; // 첫 번째 메뉴
        }
    }
}
또한, 2개의 매크로 명령이 선택되었을 때 사용자가 입력해 두었던 C# 소스 코드를 동적으로 컴파일한 다음 delegate로 읽어들여 DTE2 dte2 객체를 인자로 넘겨주면 됩니다. 예를 들어, "
Visual Commander"의 경우 다음과 같은 식으로 소스 코드를 정의하도록 하고 있습니다.
using EnvDTE;
using EnvDTE80;

public class C : VisualCommanderExt.ICommand
{
    public void Run(EnvDTE80.DTE2 dte, Microsoft.VisualStudio.Shell.Package package)
    {
    }
}
결국, 매크로의 모든 동작이 dte/package 객체만 있으면 된다는 것인데 일단 이 글에서는 그 모든 것을 구현할 수는 없고 메뉴가 선택되었을 때 내부 함수를 실행하는 것으로 다음과 같이 구현해 봤습니다.
private void MenuItemCallback(object sender, EventArgs e)
{
    MenuCommand menu = sender as MenuCommand;

    if (menu != null)
    {
        RunCommand(menu.CommandID.ID);
    }
}

private void RunCommand(int id)
{
    switch (id)
    {
        case 0x3001:
            MakeAHref(this.dte2, this.package);
            break;
    }
}
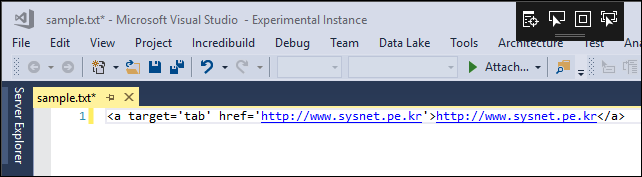
위의 MakeAHref 메서드는 사용자가 선택한 텍스트 영역을 <a />로 감싸는 문자열을 생성해 줍니다.
private void MakeAHref(EnvDTE80.DTE2 dte, Package package)
{
if (dte.ActiveDocument == null)
{
return;
}
TextSelection selection = dte.ActiveDocument.Selection as TextSelection;
var str = "<a target='tab' href='" + DoHtmlEncode(selection.Text) + "'>" + selection.Text + "</a>";
SetText(dte, selection, str);
}
public string DoHtmlEncode(string text)
{
text = text.Replace("&", "&");
text = text.Replace("<", "<");
text = text.Replace(">", ">");
return text;
}
public void SetText(EnvDTE80.DTE2 dte, TextSelection iSelection, string iText)
{
try
{
dte.UndoContext.Open("SetTextMakeAHref");
}
catch
{
dte.UndoContext.SetAborted();
return;
}
var prop = dte.DTE.Properties["TextEditor", "PlainText"].Item("IndentStyle");
var oldIndent = prop.Value;
prop.Value = 0;
iSelection.Text = iText;
prop.Value = oldIndent;
dte.UndoContext.Close();
}
자, 이제 빌드하고 실행하면 테스트 환경의 Visual Studio가 뜨고 다음과 같이 2개의 메뉴를 볼 수 있습니다.
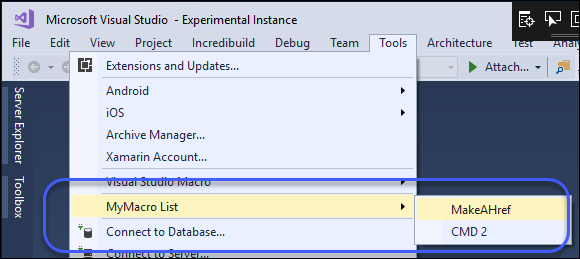
텍스트 파일 하나 열어서 다음과 같은 식으로 URL을 입력한 다음 문자열을 선택한 후,
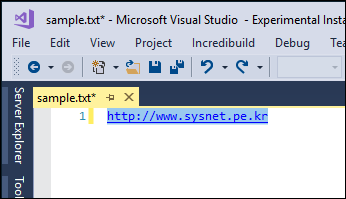
"Tools" / "MyMacro List"의 "MakeAHref" 명령어를 선택해 주면 이렇게 바뀝니다.
이쯤에서 잠깐 잊고 있었던 단축키 이야기로 돌아가 보겠습니다. 위와 같이 코딩한 상태에서 "Tools" / "Options" 메뉴를 선택해 "Keyboard"로 가보면 다음과 같이 단축키 목록이 나옵니다.
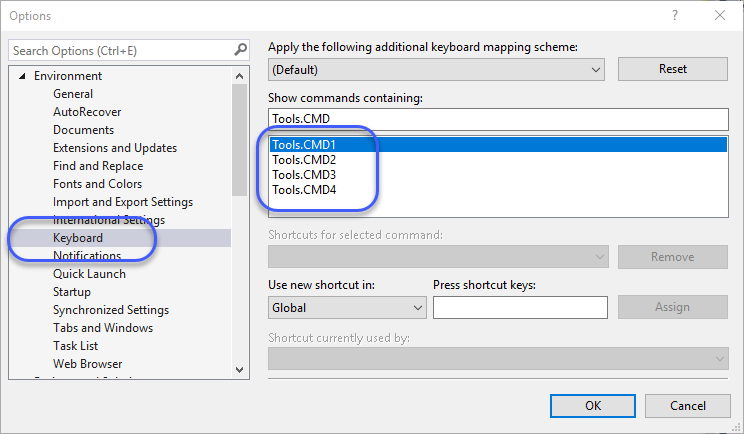
물론 해당 메뉴에 대해 단축키를 지정할 수 있습니다. 그런데, 여기서 새로운 문제가 있는데 모든 명령어의 이름이 ".vsct"에 등록된 문자열로만 나온다는 점입니다. 즉, BeforeQueryStatus에서 바꾼 현재의 메뉴 이름이 반영되지 않고 있는데, 저도 이 해결 방법은 아직 모르겠습니다. 하지만 방법은 분명히 있는 것 같습니다. ^^ 실제로 "
Visual Commander"의 유료 버전을 보면 그 이름을 바꿔서 표현하는 기능이 있습니다. (혹시, 이 글을 보시는 분 중에 방법을 아시는 분은 덧글 부탁드립니다. ^^)
만약 범용성을 포기한다면 자신만의 매크로 명령어 확장(VSIX)을 이 글을 통해 쉽게 만드실 수 있을 것입니다. 게다가 단축키 명령어도 처음부터 특정 명령어에 고정해서 미리 제공하는 것이 가능합니다. 방법은 .vsct 파일에 다음과 같이 원하는 메뉴의 명령어 ID에 해당하는 KeyBinding을 지정하면 됩니다. 가령, 다음과 같이 정의해주면,
<KeyBindings>
    <KeyBinding guid="guidMacroCommandPackageCmdSet" id="MacroCommandId_1" editor="guidVSStd97" mod1="Control" key1="E" key2="1" />
    <KeyBinding guid="guidMacroCommandPackageCmdSet" id="MacroCommandId_2" editor="guidVSStd97" mod1="Control" key1="E" key2="2" />
    <KeyBinding guid="guidMacroCommandPackageCmdSet" id="MacroCommandId_3" editor="guidVSStd97" mod1="Control" key1="E" key2="3" />
    <KeyBinding guid="guidMacroCommandPackageCmdSet" id="MacroCommandId_4" editor="guidVSStd97" mod1="Control" key1="E" key2="4" />
</KeyBindings>
4개의 명령어에 대해 각각 "Ctrl + E, 1", "Ctrl + E, 2", "Ctrl + E, 3", "Ctrl + E, 4"에 대해 단축키가 부여됩니다.
(
첨부 파일은 이 글의 예제 코드를 포함합니다.)
[이 글에 대해서 여러분들과 의견을 공유하고 싶습니다. 틀리거나 미흡한 부분 또는 의문 사항이 있으시면 언제든 댓글 남겨주십시오.]