Visual Studio - ML.NET Model Builder 소개
이번 Microsoft Build 2019 행사 세션 중에 ML.NET에 관한 내용이 있습니다.
Welcome to the world of Machine Learning with ML.NET 1.0
; https://mybuild.techcommunity.microsoft.com/sessions/76977
세션 중에 보면 ML.NET을 좀 더 친숙하게 사용할 수 있도록 Visual Studio의 확장인 "ML.NET Model Builder"를 시연하는데,
ML.NET Model Builder
; https://dotnet.microsoft.com/apps/machinelearning-ai/ml-dotnet/model-builder?fbclid=IwAR21OxWEFvr-N_uETfkx9uy_Y28u2R2voiV95e2mM0LQ0EKMsfN7pgnJDrw
다음의 경로에서 vsix 파일을 다운로드해 비주얼 스튜디오(2017/2019)에 직접 설치해 볼 수 있습니다.
ML.NET Model Builder (Preview)
; https://marketplace.visualstudio.com/items?itemName=MLNET.07
게다가 굳이 세션 비디오를 시청하지 않아도 도움말 자체가 너무 잘 되어 있어서 ^^ 실습이 매우 쉽습니다.
ML.NET Tutorial - Get started in 10 minutes
; https://dotnet.microsoft.com/learn/machinelearning-ai/ml-dotnet-get-started-tutorial/intro
튜토리얼이기 때문에 기존 만들어진 예제 데이터를 사용하겠지만 현실적으로는 여러분들이 데이터를 이미 구축해놓아야 합니다. 일단 예제 데이터는,
Wikipedia detox dataset  - wikipedia-detox-250-line-data.tsv
; https://raw.githubusercontent.com/dotnet/machinelearning/master/test/data/wikipedia-detox-250-line-data.tsv
칼럼이 단 2개로써 "문자열 데이터"가 "SentimentText" 칼럼으로, 그 문자열이 부정적인 내용임을 판정(보통 Label이라고)하는 Sentiment 결괏값(0: 긍정, 1: 부정) 칼럼의 tsv 파일입니다.
Sentiment	SentimentText
1	        ==RUDE== Dude, you are rude upload that carl picture back, or else.
1	        == OK! ==  IM GOING TO VANDALIZE WILD ONES WIKI THEN!!!
0	        I hope this helps.
간단하죠. 자, 그럼 이걸 가지고 ML.NET Model Builder를 사용해 보겠습니다.
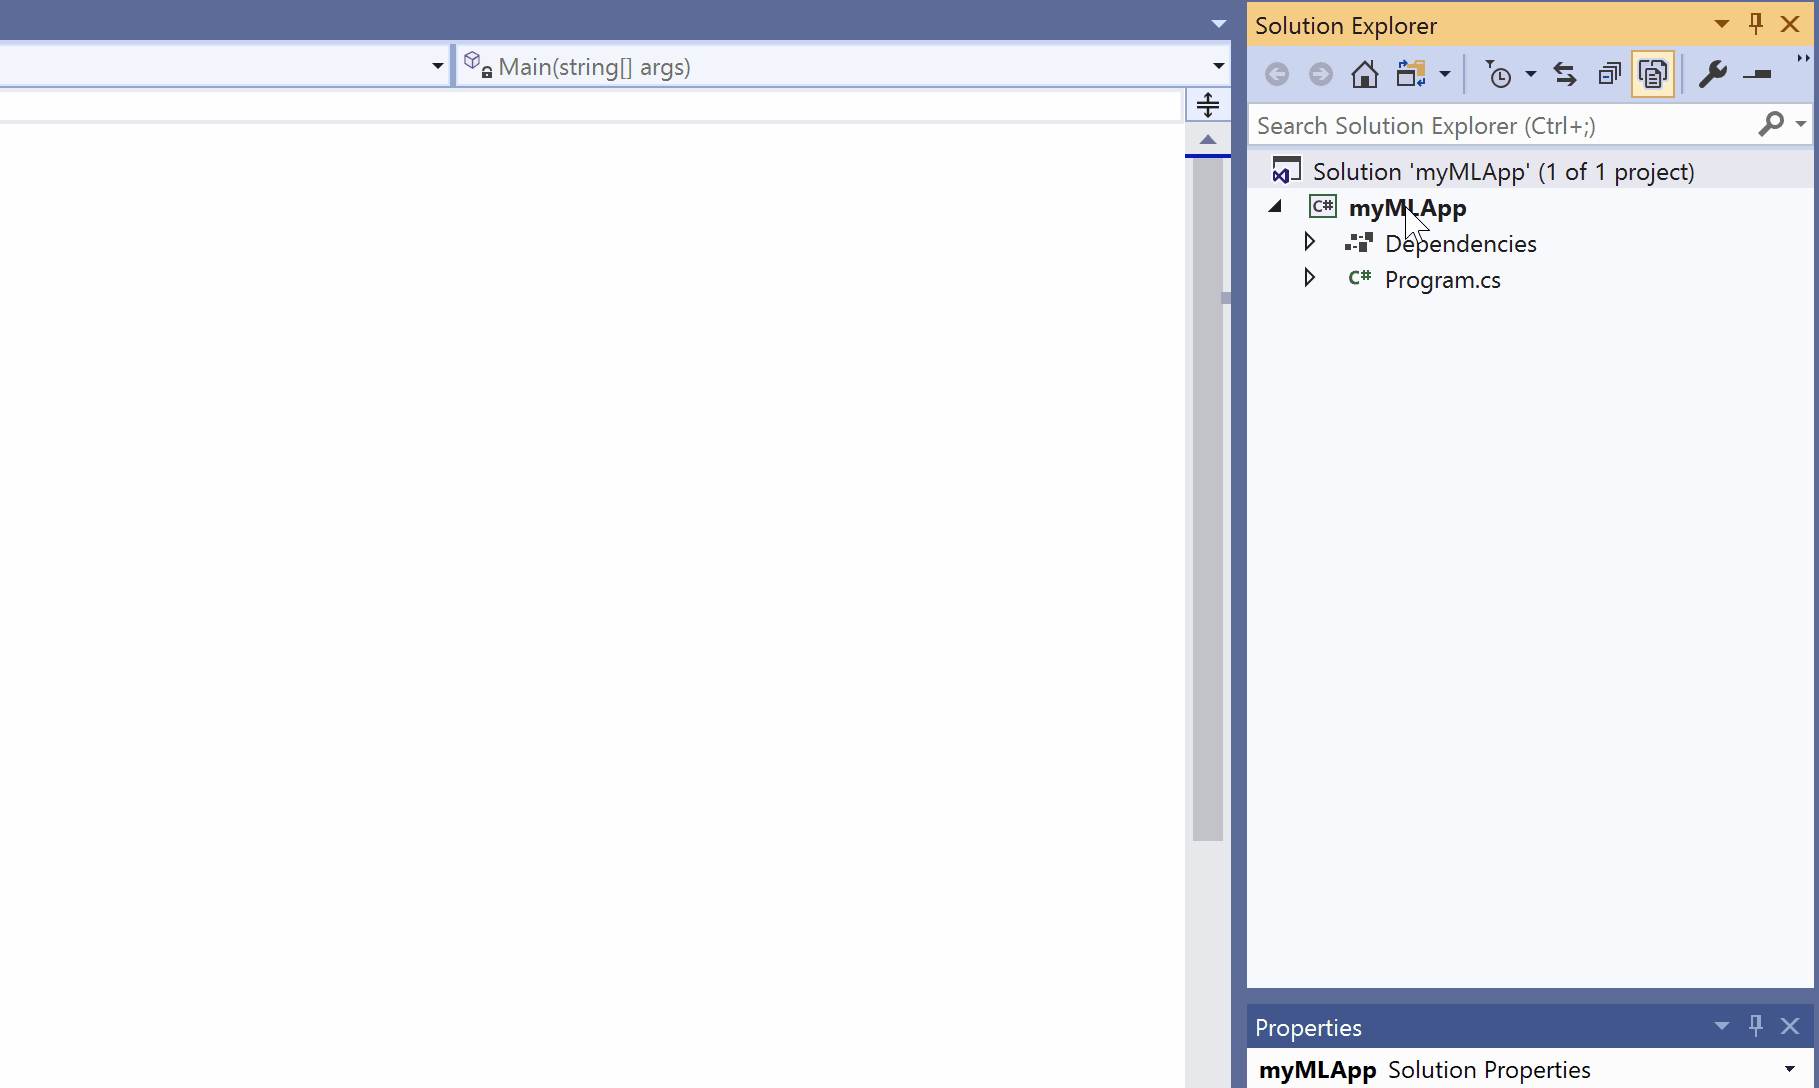
우선, .NET Core/Framework 콘솔 프로젝트를 생성하는 것으로 시작합니다. 사실 이후의 "Model Builder" 사용으로 해당 프로젝트에 어떤 변화가 있는 것은 아닙니다. 단지 Machine Learning 메뉴를 선택하기 위한 과정에 지나지 않는데, 어쨌든 생성된 프로젝트 노드를 통해 다음과 같이 "Add" / "Machine Learning"을 실행할 수 있습니다.
그럼 "1. Scenario" 단계로 진입하는데,
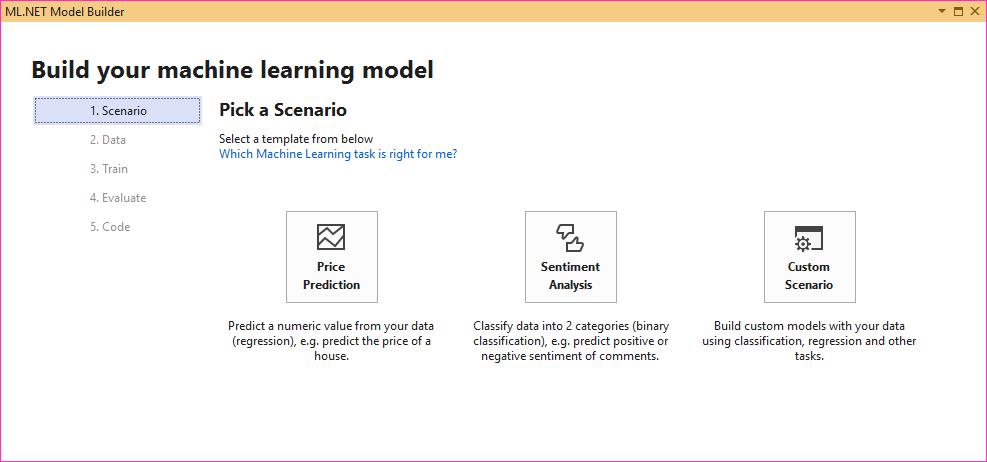
- Price Prediction
- Sentiment Analysis
- Custom Scenario
첫 번째 "Price Prediction"은 기계학습의 "회귀(Regression)", 두 번째 "Sentiment Analysis"는 "분류(Classification)" 중에서도 "Yes or No"에 해당하는 2진 분류(Binary classification)에 해당합니다. 그리고 세 번째 "Custom Scenario"는 앞의 2가지를 포함해 다중 분류(Multi-class classification)까지 선택할 수 있는 옵션을 제공합니다. (사실 Custom Scenario의 경우와 다른 2개의 옵션이 UI 상 크게 다른 면이 없기 때문에 제 개인적인 생각으로는 "1. Scenario" 단계는 "Custom Scenario" 하나만 포함해도 크게 무리가 없었을 거라고 보입니다.)
wikipedia-detox-250-line-data.tsv 파일의 경우에는 "Classify data into 2 categories (binary classification), e.g. predict positive or negative sentiment of comments" 시나리오가 맞습니다. 따라서, 여기서는 "Sentiment Analysis"를 선택합니다. (시험 삼아 "Custom Scenario"로 선택해도 이후의 진행에 무리가 없습니다.)
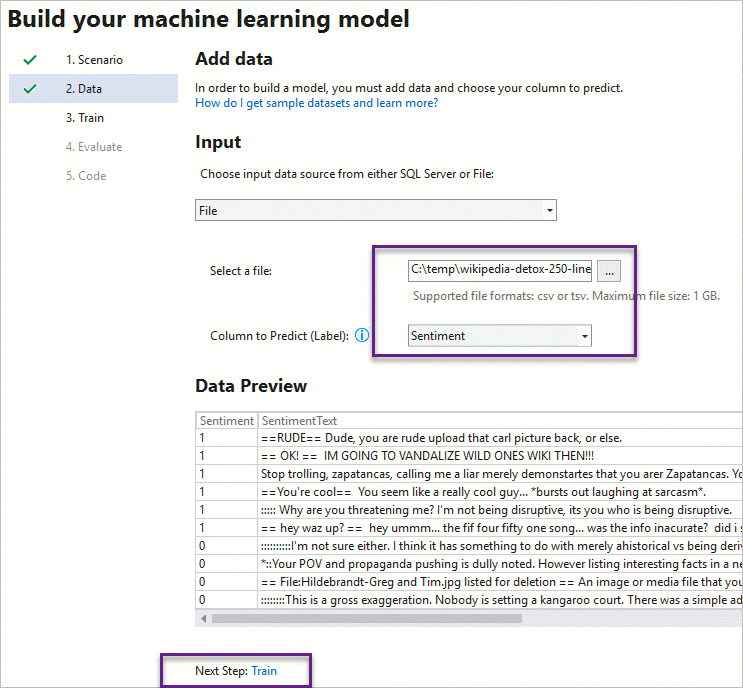
이제 "2. Data" 단계로 넘어가면 "File"로 "wikipedia-detox-250-line-data.tsv"를 선택, 2진 분류의 결괏값을 가지고 있는 "Sentiment" 칼럼을 "Column to Predict (Label)"로 지정하고,
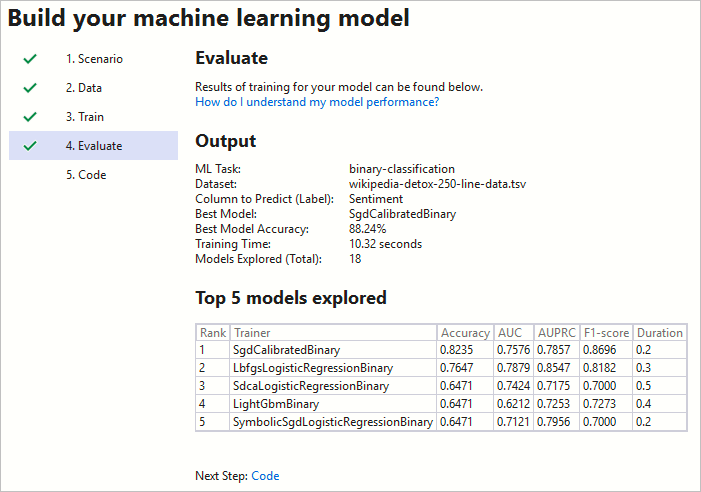
하단의 "Tran" 링크를 누르면 "3. Train" 단계로 넘어갑니다. 여기서는 모델의 학습 시간을 설정하는데 도움말에 따르면,
ML.NET Model Builder Guide - Train
; https://github.com/dotnet/machinelearning-samples/blob/master/modelbuilder/readme.md#train
Dataset 크기에 따라 "Avg. Time to train"의 시간을 적절하게 설정하면 된다고 합니다. 실습에 사용하는 wikipedia-detox-250-line-data.tsv 파일은 겨우 70KB에 불과하므로 10초 기본값을 그대로 설정하겠습니다. "Start training" 버튼을 눌러 학습을 완료시킨 후 "4. Evaluate" 단계로 넘어가면 대체적인 학습 결과를 볼 수 있습니다.
마지막으로 "5. Code" 단계로 넘어가면 위의 학습 결과를 바탕으로 "ML.NET 모델 파일"을 포함한 C# 코드가 자동 생성됩니다.
자동 생성된 코드를 보면,
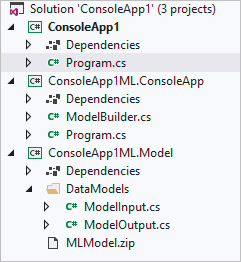
사실상 Model Builder가 만들어준 재활용 가능한 ML 기반의 라이브러리인 "ConsoleApp1ML.Model" 프로젝트가 가장 중요합니다. 여러분들은 이 프로젝트를 참조해 향후 웹 사이트의 덧글에 넘겨진 텍스트의 긍정/부정적인 내용을 판단하면 됩니다. (물론 예제 데이터가 영문이므로 한글을 위해서는 그에 맞는 데이터로 별도 학습을 시켜야 합니다.) 해당 ConsoleApp1ML.Model 라이브러리를 어떻게 사용하는지는 "ConsoleApp1ML.ConsoleApp" 예제 프로젝트를 통해 알 수 있습니다.
//*****************************************************************************************
//*                                                                                       *
//* This is an auto-generated file by Microsoft ML.NET CLI (Command-Line Interface) tool. *
//*                                                                                       *
//*****************************************************************************************

using System;
using System.IO;
using System.Linq;
using Microsoft.ML;
using ConsoleApp1ML.Model.DataModels;


namespace ConsoleApp1ML.ConsoleApp
{
    class Program
    {
        //Machine Learning model to load and use for predictions
        private const string MODEL_FILEPATH = @"MLModel.zip";

        //Dataset to use for predictions
        private const string DATA_FILEPATH = @"c:\temp\ConsoleApp1\ConsoleApp1\wikipedia-detox-250-line-data.tsv";

        static void Main(string[] args)
        {
            MLContext mlContext = new MLContext();

            // Training code used by ML.NET CLI and AutoML to generate the model
            //ModelBuilder.CreateModel();

            ITransformer mlModel = mlContext.Model.Load(GetAbsolutePath(MODEL_FILEPATH), out DataViewSchema inputSchema);
            var predEngine = mlContext.Model.CreatePredictionEngine<ModelInput, ModelOutput>(mlModel);

            // Create sample data to do a single prediction with it
            ModelInput sampleData = CreateSingleDataSample(mlContext, DATA_FILEPATH);

            // Try a single prediction
            ModelOutput predictionResult = predEngine.Predict(sampleData);

            Console.WriteLine($"Single Prediction --> Actual value: {sampleData.Sentiment} | Predicted value: {predictionResult.Prediction}");

            Console.WriteLine("=============== End of process, hit any key to finish ===============");
            Console.ReadKey();
        }

        // Method to load single row of data to try a single prediction
        // You can change this code and create your own sample data here (Hardcoded or from any source)
        private static ModelInput CreateSingleDataSample(MLContext mlContext, string dataFilePath)
        {
            // Read dataset to get a single row for trying a prediction
            IDataView dataView = mlContext.Data.LoadFromTextFile<ModelInput>(
                                            path: dataFilePath,
                                            hasHeader: true,
                                            separatorChar: '\t',
                                            allowQuoting: true,
                                            allowSparse: false);

            // Here (ModelInput object) you could provide new test data, hardcoded or from the end-user application, instead of the row from the file.
            ModelInput sampleForPrediction = mlContext.Data.CreateEnumerable<ModelInput>(dataView, false)
                                                                        .First();
            return sampleForPrediction;
        }

        public static string GetAbsolutePath(string relativePath)
        {
            FileInfo _dataRoot = new FileInfo(typeof(Program).Assembly.Location);
            string assemblyFolderPath = _dataRoot.Directory.FullName;

            string fullPath = Path.Combine(assemblyFolderPath, relativePath);

            return fullPath;
        }
    }
}
그래도 너무 복잡한가요? ^^ 그럼 좀 더 간단하게 축소해 보겠습니다. 여기서 엄밀하게는 MODEL_FILEPATH, 즉 ConsoleApp1ML.Model이 가지고 있는 MLModel.zip 파일이 핵심입니다. 따라서 MLModel.zip 파일만 있으면 다른 모든 것은 부수적인 요소에 불과합니다. 그렇다면, 이를 바탕으로 우리들의 "ConsoleApp1" 프로젝트를 완성해 볼 수도 있겠지요. ^^
우선, 프로젝트에 Microsoft.ML 라이브러리를 Nuget으로부터 참조 추가합니다.
Install-Package Microsoft.ML
그다음 ConsoleApp1ML.Model 프로젝트에 있는 MLModel.zip, ModelInput.cs, ModelOutput.cs 파일만 복사해 프로젝트에 추가합니다. 그리고 그중에서 MLModel.zip 파일은 "
Copy to Output Directory" 설정을 "Copy if newer"로 합니다.
끝입니다. 이제 MLModel.zip 파일을 로드해 예측 엔진 타입을 만들고 원하는 문장을 ModelInput 타입에 실어 결과를 받아오면 됩니다. 그에 해당하는 코드는 다음과 같이 정리가 됩니다.
using ConsoleApp1ML.Model.DataModels;
using Microsoft.ML;
using System;

namespace ConsoleApp1
{
    class Program
    {
        static void Main(string[] args)
        {
            MLContext mlContext = new MLContext();

            ITransformer mlModel = mlContext.Model.Load("MLModel.zip", out DataViewSchema inputSchema);
            var predEngine = mlContext.Model.CreatePredictionEngine(mlModel);

            ModelInput mi = new ModelInput { SentimentText = "Test it" };
            ModelOutput predictionResult = predEngine.Predict(mi);

            Console.WriteLine($"{predictionResult.Prediction}");
        }
    }
}
참고로, Model Builder에 설정해 "train"시키는 과정은 "ConsoleApp1ML.ConsoleApp" 프로젝트에 있는 "ModelBuilder.cs"의 코드 내용으로 남습니다. 그렇기 때문에 일단 한번 ModelBuilder.cs 파일이 생성되었으면 이후에는 UI를 통해서 데이터를 학습하기보다는 직접 ModelBuilder.cs의 코드를 재사용하는 것이 더 효율적입니다.
그나저나... 이젠 ML 분야도 개발자의 기본 소양이 되어가는 듯한 모습이군요. ^^
[이 글에 대해서 여러분들과 의견을 공유하고 싶습니다. 틀리거나 미흡한 부분 또는 의문 사항이 있으시면 언제든 댓글 남겨주십시오.]