윈도우 데스크톱 응용 프로그램(예: Console)에서 알림 메시지(Toast notifications) 띄우기
이 글은 다음의 내용을 실습한 글입니다.
How to send Windows Toast notifications from Console apps
; http://blog.plasticscm.com/2016/08/how-to-send-windows-toast-notifications.html
자, 그럼 간단하게 Console Application으로 시작해보겠습니다.
결국 데스크톱 응용 프로그램에서 UWP의 Toast 알림을 사용하는 것은 UWP 라이브러리를 참조하는 것으로 해결할 수 있습니다. 그리고 이를 위해서는 약간의 사전 작업이 필요한데, 이에 대해서는 전에 다음의 글을 통해 설명한 적이 있습니다.
일반 닷넷 프로젝트에서 WinRT API를 호출하는 방법
; https://www.sysnet.pe.kr/2/0/1508
즉, StoreApp/UWP 환경은 윈도우 8부터 제공되는 것이기 때문에 UWP 라이브러리를 사용하려면 우선 여러분들의 응용 프로그램을 Windows 8 이후의 버전만 지원한다는 표시를 해야 합니다. 이를 위해 csproj 파일을 열어 TargetPlatformVersion을 지정합니다.
<?xml version="1.0" encoding="utf-8"?>
<Project ToolsVersion="14.0" ...[생략]...>
  <Import ...[생략]... />
  <PropertyGroup>
    <TargetPlatformVersion>8.0</TargetPlatformVersion>
  </PropertyGroup>
    ...[생략]...
</Project>
그다음, 관련 UWP 라이브러리만 추가해주면 됩니다. ^^ (아래의 경로는 개발자마다 다를 수 있습니다.)
C:\Program Files (x86)\Windows Kits\8.1\References\CommonConfiguration\Neutral\Windows.winmd
C:\Program Files (x86)\Reference Assemblies\Microsoft\Framework\.NETFramework\v4.5\WindowsBase.dll
C:\Program Files (x86)\Reference Assemblies\Microsoft\Framework\.NETFramework\v4.5\Facades\System.Runtime.dll
이후, UWP에서와 동일하게 Toast 알림 메시지를 띄우는 코드를 작성하면 됩니다.
static void Main(string[] args)
{
    Console.WriteLine("Type 'exit' to quit. ENTER to show a notification");

    while (true)
    {
        string txt = Console.ReadLine();
        if (txt == "exit")
        {
            break;
        }

        ShowToast("ConsoleToast.App", DateTime.Now.ToLongTimeString(), "this is a message: " + txt, null);
    }
}

static void ShowToast(string appId, string title, string message, string image)
{
    XmlDocument toastXml = ToastNotificationManager.GetTemplateContent(
        string.IsNullOrEmpty(image) ? ToastTemplateType.ToastText02 :
        ToastTemplateType.ToastImageAndText02);

    XmlNodeList stringElements = toastXml.GetElementsByTagName("text");
    stringElements[0].AppendChild(toastXml.CreateTextNode(title));
    stringElements[1].AppendChild(toastXml.CreateTextNode(message));

    if (string.IsNullOrEmpty(image) == false)
    {
        // Specify the absolute path to an image
        String imagePath = "file:///" + image;
        XmlNodeList imageElements = toastXml.GetElementsByTagName("image");
        imageElements[0].Attributes.GetNamedItem("src").NodeValue = imagePath;
    }

    ToastNotification toast = new ToastNotification(toastXml);

    toast.Activated += Toast_Activated;
    toast.Dismissed += Toast_Dismissed;
    toast.Failed += Toast_Failed;

    ToastNotificationManager.CreateToastNotifier(appId).Show(toast);
}

private static void Toast_Failed(ToastNotification sender, ToastFailedEventArgs args)
{
}

private static void Toast_Dismissed(ToastNotification sender, ToastDismissedEventArgs args)
{
}

private static void Toast_Activated(ToastNotification sender, object args)
{
}
그런데, 여기서 한 가지 문제가 있습니다. 문서에 보면 데스크톱 응용 프로그램의 경우 Toast 알림을 보내려면 다음과 같은 부가적인 절차가 필요하다고 합니다.
- For a desktop app to display a toast, the app must have a shortcut on the Start screen.
- The shortcut must have an AppUserModelID.
- Desktop apps cannot schedule a toast.
관련 코딩 작업이 함께 제공되는데,
How to enable desktop toast notifications through an AppUserModelID
; https://docs.microsoft.com/en-us/previous-versions/windows/desktop/legacy/hh802762(v=vs.85)

Sending toast notifications from desktop apps sample
; https://code.msdn.microsoft.com/windowsdesktop/sending-toast-notifications-71e230a2/
그냥 베껴서 써도 됩니다. ^^
static class ShortCutCreator
{
    // In order to display toasts, a desktop application must have
    // a shortcut on the Start menu.
    // Also, an AppUserModelID must be set on that shortcut.
    // The shortcut should be created as part of the installer.
    // The following code shows how to create
    // a shortcut and assign an AppUserModelID using Windows APIs.
    // You must download and include the Windows API Code Pack
    // for Microsoft .NET Framework for this code to function

    internal static bool TryCreateShortcut(string appId, string appName)
    {
        String shortcutPath = Environment.GetFolderPath(
            Environment.SpecialFolder.ApplicationData) +
            "\\Microsoft\\Windows\\Start Menu\\Programs\\" + appName + ".lnk";
        if (!File.Exists(shortcutPath))
        {
            InstallShortcut(appId, shortcutPath);
            return true;
        }
        return false;
    }

    static void InstallShortcut(string appId, string shortcutPath)
    {
        // Find the path to the current executable
        String exePath = Process.GetCurrentProcess().MainModule.FileName;
        IShellLinkW newShortcut = (IShellLinkW)new CShellLink();

        // Create a shortcut to the exe
        VerifySucceeded(newShortcut.SetPath(exePath));
        VerifySucceeded(newShortcut.SetArguments(""));

        // Open the shortcut property store, set the AppUserModelId property
        IPropertyStore newShortcutProperties = (IPropertyStore)newShortcut;

        using (PropVariant applicationId = new PropVariant(appId))
        {
            VerifySucceeded(newShortcutProperties.SetValue(
                SystemProperties.System.AppUserModel.ID, applicationId));
            VerifySucceeded(newShortcutProperties.Commit());
        }

        // Commit the shortcut to disk
        IPersistFile newShortcutSave = (IPersistFile)newShortcut;

        VerifySucceeded(newShortcutSave.Save(shortcutPath, true));
    }

    static void VerifySucceeded(UInt32 hresult)
    {
        if (hresult <= 1)
            return;

        throw new Exception("Failed with HRESULT: " + hresult.ToString("X"));
    }
}
단지, 위의 소스 코드에서 사용된 PropVariant같은 타입이 Microsoft.WindowsAPICodePack에 포함되어 있어서 이에 대한 라이브러리를 NuGet을 통해 추가해야 합니다.
PM> Install-Package Microsoft.WindowsAPICodePack.Core
PM> Install-Package Microsoft.WindowsAPICodePack.Shell
이것으로 준비는 모두 끝입니다. 그냥 우리들의 응용 프로그램 또는 그것의 설치 파일에서 다음과 같은 메서드를 한 번만 호출해 주면 됩니다.
ShortCutCreator.TryCreateShortcut("ConsoleToast.App", "ConsoleToast");
위의 코드가 불리면 다음과 같은 경로에 .lnk 단축 아이콘이 생성됩니다.
%USERPROFILE%\AppData\Roaming\Microsoft\Windows\Start Menu\Programs
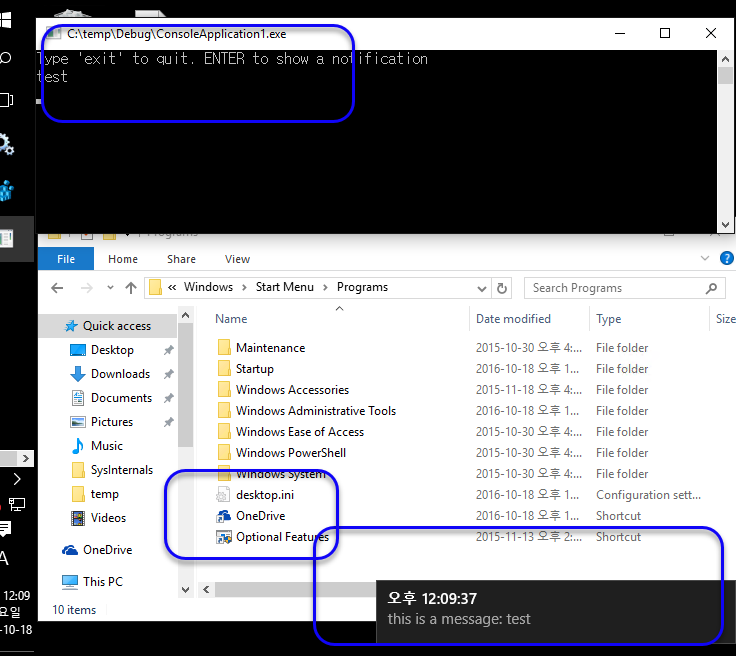
이제 실행시키면 Windows 8 / 10에서 Toast 알림 메시지가 정상적으로 나오는 것을 확인할 수 있습니다.
(
첨부 파일은 이 글의 예제 코드를 포함합니다.)
재미있는 점이 있다면, Windows 8에서는 AppModel과 연결된 .lnk 단축 아이콘이 반드시 생성되어야 했지만, Windows 10부터는 이런 제약이 사라진 것 같습니다. 실제로 테스트해보면 10에서는 ShortCutCreator.TryCreateShortcut 메서드를 호출하지 않은 상태에서도 Toast 알림이 잘 생성되었습니다. (단지, 최초 응용 프로그램을 실행 후 첫 번째 알림은 나타나지 않았습니다.)
다음은 "%USERPROFILE%\AppData\Roaming\Microsoft\Windows\Start Menu\Programs" 경로에 단축 아이콘 등록 없이 Toast 알림을 생성한 것을 보여줍니다.
[이 글에 대해서 여러분들과 의견을 공유하고 싶습니다. 틀리거나 미흡한 부분 또는 의문 사항이 있으시면 언제든 댓글 남겨주십시오.]