Hyper-V에 CentOS 설치하기
이번에는 또 어떤 리눅스를 설치해볼까요? ^^
VPC에 Linux 설치하는 방법
; https://www.sysnet.pe.kr/2/0/352

Hyper-V에 Linux 설치 - SUSE Linux Enterprise Server 11
; https://www.sysnet.pe.kr/2/0/707
수학 정석은 집합만 푼다고 하더니 ^^; 이러다 설치만 하다 끝날지도 모르겠군요. 그래도 이번에는 조금 더 큰맘 먹고 Linux에 다가서기로 했습니다. 뭐랄까, Linux를 좀 더 이해하기로 작정했기 때문입니다. ^^
하는 김에 2개의 리눅스를 설치해 보았습니다. 회사에 놀고 있는 노트북에는 우분투를 설치하고 Hyper-V의 가상 머신에는 CentOS를 설치했습니다. 기왕이면 "Redhat Enterprise" 버전을 설치하려 했는데 유료라서 못하고 Fedora는 Hyper-V의 "Integration Services"가 지원하지 않아서 제외해야만 했는데요. 할 수 없이, 남은 것 중에서 조금 생소한 CentOS를 선택했습니다.
CentOS
; http://www.centos.org/download
; http://wiki.centos.org/Download

CentOS Stream
; https://www.centos.org/centos-stream/
위의 사이트에 가서, CentOS-6으로 32비트 버전인 i386을 선택했습니다. (VM 메모리 할당을 1GB로 했기 때문에 굳이 64비트 일 필요가 없겠다 싶었습니다.)
그럼, Mirroring 사이트가 쭉 뜨는데 제 경우에는 다음의 경로에 방문해서,
The Community Enterprise Operating System
; http://data.nicehosting.co.kr/os/CentOS/6.0/isos/i386/

CentOS-Stream-9-latest-x86_64-dvd1.iso
; https://mirrors.centos.org/mirrorlist?path=/9-stream/BaseOS/x86_64/iso/CentOS-Stream-9-latest-x86_64-dvd1.iso&redirect=1&protocol=https
그중에서 CentOS-6.0-i386-bin-DVD.iso를 다운로드 받았습니다. 이어서 Hyper-V 가상 머신을 하나 생성했는데 다음과 같은 환경으로 구성했습니다.
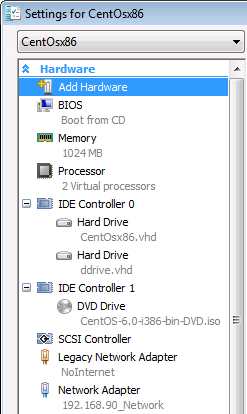
참고로, Network 어댑터에 "Legacy Network Adapter"와 "Network Adapter"를 선택해 두었는데요. (Legacy의 경우에는 Hyper-V의 "Integration Services"가 지원하지 않는 Linux를 설치하는 경우에 쓸 수 있는 유형이고, 일반적인 "Network Adapter"는 "Integration Services"가 정상적으로 설치된 이후에만 인식이 되는 차이가 있습니다.) 저처럼, 리눅스 운영체제에 익숙하지 않은 분은 위와 같이 2개를 선택해 주시면 IS가 설치되기 이전에도 웹 브라우저를 사용할 수 있으므로 편리합니다.
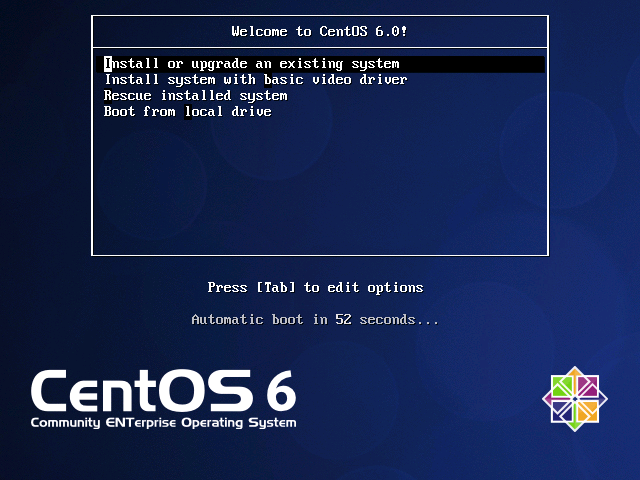
이제 VM을 시작시키고, 아래와 같이 첫 번째 옵션이 제공되면 "Install or upgrade an existing system" 메뉴를 선택합니다.
이후, 다음과 같은 변경 사항만 반영했습니다.
설치시 사용언어: English (주의: 한글로 설정하니, Hyper-V 콘솔 화면에서는 키 인식이 안되는 현상이 발생)
시스템에 사용할 키보드: Korean
Storage: Basic Storage Devices - Re-initialize all
Hostname: ...[원하는 이름]...
Time Zone: Seoul, Asia
        System clock uses UTC - 설정
설치 유형: Use All Space

Install Target Devices에 한 개
Data Storage Devices에 한 개 할당

설치 유형: Web Server
        Customize now 선택

        Base System - Networking Tools
                      iSCSI Storage Client
        Servers     - Directory Server
                        E-mail server
                        FTP server
                        System administration tools
        Desktops    - Legacy X Windows System compatibility 제외하고 모두 선택

        Applications - Internet Applications, Internet Browser

        Development - 전체 선택

        Language - Korean Support
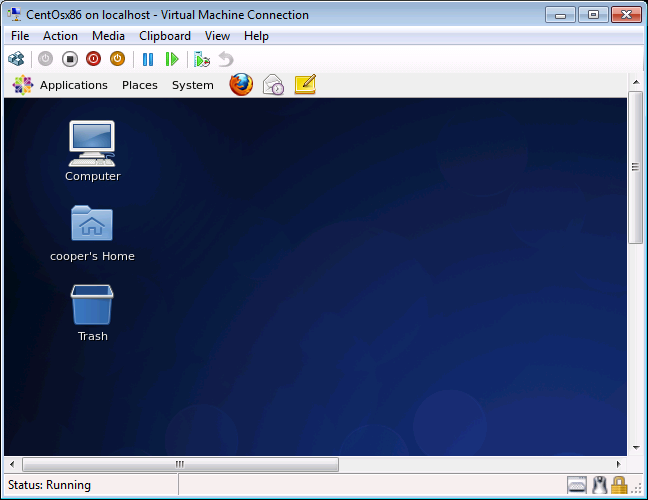
설치 완료 후 재부팅 하면 약간의 설정이 추가되는데, 1GB 메모리를 VM에 할당한 것이 부족했는지, "Insufficient memory to configure kdump!" 메시지가 나오긴 했지만 테스트 용도의 VM이므로 큰 장애는 아니라고 판단해서 계속했습니다. 재부팅하고 나면 설치가 완료되는데 아래는 첫 화면입니다.
아쉬운 것은, (RDP로 접속한 상태에서) 위와 같이 Hyper-V 콘솔 화면으로는 마우스 입력도 안되고, 단축키를 이용한 키보드로 동작을 해야만 해서 무척 불편한 상태입니다.
그래도 ^^ 제가 리눅스 설치를 전에도 해보았기 때문에 그나마 약간의 기억이 나더군요. ^^ Ctrl + Alt + F2을 눌러서 다음과 같이 명령어 쉘로 빠져나갔습니다.
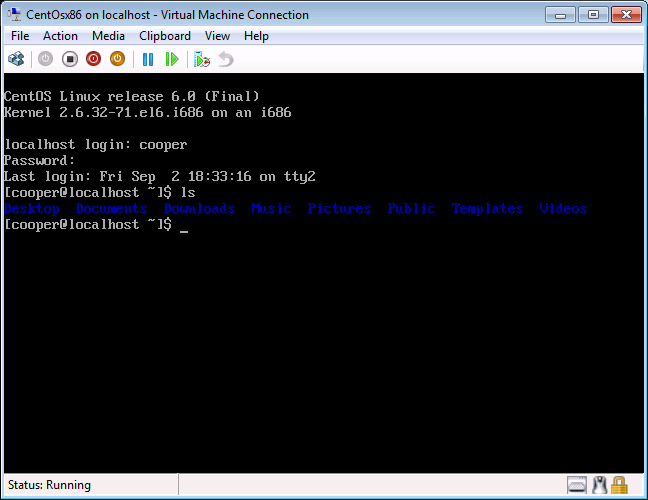
(처량하군요. 아는 명령어가 ls뿐이 없습니다.)
다행히 "Linux Integration Services"가 3.1 버전부터는 CentOS를 지원하기 때문에 IS(Integration Services)를 설치해줄 수 있는데요.
Linux Integration Services 3.1 for Hyper-V
; http://blogs.msdn.com/b/virtual_pc_guy/archive/2011/08/04/linux-integration-services-3-1-for-hyper-v.aspx
; https://www.microsoft.com/en-us/download/details.aspx?id=55106
IS를 설치했다고 해서 Guest OS가 윈도우인 경우처럼 마우스 입력까지 매끄럽게 지원되는 것은 아닙니다. 지원되는 서비스에 대한 공식적인 문서는 다음의 경로를 참조하시고,
About Virtual Machines and Guest Operating Systems
; https://docs.microsoft.com/en-us/previous-versions/windows/it-pro/windows-server-2008-R2-and-2008/cc794868(v=ws.10)
CentOS의 경우에는 아래의 서비스들이 제공됩니다.
Drivers: IDE, SCSI, and networking
Services: Time synchronization, operating system shutdown, and heartbeat
그래도 저 정도만 해도 어디입니까! ^^ 이제 설치를 해보도록 할 텐데요. 우선 아래의 경로에서 "Hyper-V Integration Services"를 다운로드합니다.
Linux Integration Services Version 3.1 for Hyper-V
; http://www.microsoft.com/download/en/details.aspx?id=26837

Linux Integration Services Version 3.4 for Hyper-V
; https://www.microsoft.com/en-us/download/details.aspx?id=55106
저처럼, 리눅스 초보자라면 위의 경로에서 "Linux IC v3.0.iso" 파일과 함께 "Linux Integration Services v3 Read Me.pdf" 파일을 다운로드하시는 것이 좋습니다. 왜냐하면 IS를 설치하는 방법이 윈도우에서처럼 설치 파일 하나 실행하는 정도로 끝나는 것이 아니기 때문에 윈도우만 사용해본 경우라면 문서 없이는 할 수 없을 것입니다.
참고로, PDF 문서에는 "Red Hat Enterprise Linux 6" 기준으로 설명되어 있는데, CentOS도 동일하게 진행할 수 있습니다.
일단, Hyper-V 관리자에서 CentOS VM에 대해 "Linux IC v3.0.iso" 파일을 "DVD Drive"로 연결하고 CentOS의 터미널 콘솔에서 아래의 명령어들을 차례대로 실행합니다.
(* 이후의 작업을 하려면 root 권한으로 로그인해야 합니다.)
[root@localhost ~]# mount /dev/cdrom /media
mount: block device /dev/sr0 is write-protected, mounting read-only

[root@localhost ~]# rpm -ivh /media/x86/kmod-microsoft-hyper-v-rhel6-60.1.i686.rpm
warning: /media/x86/kmod-microsoft-hyper-v-rhel6-60.1.i686.rpm: Header V3 DSA/SHA1 Signature, key ID af81e0c6: NOKEY
Preparing...                ########################################### [100%]
   1:kmod-microsoft-hyper-v ########################################### [100%]

[root@localhost ~]# rpm -ivh /media/x86/microsoft-hyper-v-rhel6-60.1.i686.rpm
warning: /media/x86/microsoft-hyper-v-rhel6-60.1.i686.rpm: Header V3 DSA/SHA1 Signature, key ID af81e0c6: NOKEY
Preparing...                ########################################### [100%]
   1:microsoft-hyper-v      ########################################### [100%]
Saving old initramfs
Installing new initramfs
Linux Integration Services for Hyper-V has been installed. Please reboot your system.
재부팅 후,
[root@localhost ~]# reboot
설치가 정상적으로 되어 있는지 (root 권한이 아니어도 됨) 터미널 창에서 다음과 같이 확인할 수 있습니다.
# /sbin/lsmod | grep hv
hv_netvsc 19138 0
hv_utils 3943 0
hv_timesource 691 0 [permanent]
hv_storvsc 8650 0
hv_blkvsc 10106 3
hv_vmbus 26964 5 hv_netvsc,hv_utils,hv_timesource,hv_storvsc,hv_blkvsc,[permanent]

# /sbin/modinfo hv_vmbus
filename: /lib/modules/2.6.32-71.el6.i686/extra/microsoft-hyper-v/hv_vmbus.ko
version: 3.1
license: GPL
srcversion: 56F00728DAE99444BE1FD9B
alias: acpi*:VMBus:*
alias: acpi*:VMBUS:*
alias: pci:v00001414d00005353sv*sd*bc*sc*i*
depends:
vermagic: 2.6.32-71.el6.i686 SMP mod_unload modversions 686
parm: vmbus_loglevel:int

# /sbin/modinfo hv_netvsc
filename: /lib/modules/2.6.32-71.el6.i686/extra/microsoft-hyper-v/hv_netvsc.ko
description: Microsoft Hyper-V network driver
version: 3.1
license: GPL
srcversion: 1092C7A7219A53035F442BB
alias: dmi*:svn*MicrosoftCorporation*:pn*VirtualMachine:rn*VirtualMachine*:
depends: hv_vmbus
vermagic: 2.6.32-71.el6.i686 SMP mod_unload modversions 686
parm: ring_size:Ring buffer size (# of pages) (int)

# /sbin/modinfo hv_storvsc
filename: /lib/modules/2.6.32-71.el6.i686/extra/microsoft-hyper-v/hv_storvsc.ko
description: Microsoft Hyper-V virtual storage driver
version: 3.1
license: GPL
srcversion: B9B6B04500ED2B9E96A3337
alias: dmi*:svn*MicrosoftCorporation*:pn*VirtualMachine:rn*VirtualMachine*:
depends: hv_vmbus
vermagic: 2.6.32-71.el6.i686 SMP mod_unload modversions 686
parm: storvsc_ringbuffer_size:Ring buffer size (bytes) (int)

# /sbin/modinfo hv_blkvsc
filename: /lib/modules/2.6.32-71.el6.i686/extra/microsoft-hyper-v/hv_blkvsc.ko
description: Microsoft Hyper-V virtual block driver
version: 3.1
license: GPL
srcversion: 36CD2AD96D7DC1C494F8274
depends: hv_vmbus
vermagic: 2.6.32-71.el6.i686 SMP mod_unload modversions 686
param: blkvsc_ringbuffer_size:int
parm: ring_size:Ring buffer size (in bytes)

# /sbin/modinfo hv_utils
filename: /lib/modules/2.6.32-71.el6.i686/extra/microsoft-hyper-v/hv_utils.ko
license: GPL
version: 3.1
description: Hyper-V Utilities
srcversion: 09F2DEF23F34650574810F7
alias: pci:v00001414d00005353sv*sd*bc*sc*i*
alias: dmi*:svn*MicrosoftCorporation*:pn*VirtualMachine:rn*VirtualMachine*:
depends: hv_vmbus
vermagic: 2.6.32-71.el6.i686 SMP mod_unload modversions 686
자, 그럼 가장 중요한 네트워크 어댑터가 정상적으로 잡혀 있는지도 확인해 볼까요? ^^
# /sbin/ifconfig
eth0    Link encap:Ethernet HWaddr 00:15:5D:00:C2:3E
        inet6 addr: fe80::215:5dff:fe00:c23e/64 Scope:Link
        UP BROADCAST RUNNING MULTICAST  MTU:1500    Metric:1
        RX  packets:12  errors:0    dropped:0   overruns:0  frame:0
        TX  packets:6   errors:0    dropped:0   overruns:0  carrier:0
        collisions:0    txqueuelen:1000
        RX bytes:4104 (4.0 KiB) TX bytes:468 (468.0 b)
        Interrupt:9

eth1    Link encap:Ethernet HWaddr 00:15:5D:00:C2:3D
        inet addr:192.168.0.30 Bcast:192.168.90.255    Mask:255.255.255.0
        inet6 addr: fe80::215:5dff:fe00:c23d/64 Scope:Link
        UP BROADCAST RUNNING MULTICAST  MTU:1500    Metric:1
        RX  packets:5899  errors:0    dropped:0   overruns:0  frame:0
        TX  packets:3494  errors:0    dropped:0   overruns:0  carrier:0
        collisions:0    txqueuelen:1000
        RX bytes:8052017 (7.6 MiB) TX bytes:271265 (264.9 KiB)

lo      Link encap:Local Loopback
        inet addr:127.0.0.1     Mask:255.0.0.0
        inet6 addr: ::1/128 Scope:Host
        UP LOOPBACK RUNNING MTU:16436    Metric:1
        RX  packets:8   errors:0    dropped:0   overruns:0  frame:0
        TX  packets:8   errors:0    dropped:0   overruns:0  carrier:0
        collisions:0    txqueuelen:0
        RX bytes:480 (480.0 b) TX bytes:480 (480.0 b)
        Interrupt:9
보아하니, eth0은 "Legacy Network Adapter"이고, eth1이 "Integration Services" 설치로 인식된 "Network Adapter"로 보입니다.
마지막으로, 불편한 GUI 쉘에서 최소한의 작업이라도 할 수 있도록 몇 가지 단축키를 익혀야 할 필요가 있는데요. (
FreeNX라도 설치가 된다면 좋을 텐데... ^^;)
아래는 제가 임의로 키 조합을 통해 발견한 것들인데, 이 중에서 가장 많이 쓰이는 것이 "Alt+F1"이더군요. ^^
Alt+F1: 상단의 풀다운 메뉴 (윈도우와 비교하면, Control + ESC 키조합)
Alt+F2: Run Application 대화창 (윈도우와 비교하면, Window + R 키조합)
Alt+F4: 실행 중인 프로그램 종료
Alt+F12: 상단의 풀다운 메뉴에 있는 노트 아이콘의 메뉴 펼침
Alt+Tab: 프로세스 전환
Shift+F2: Rename
Control + I: Properties
Control + O: Open
Control + F: Search
Ctrl + F10: 메뉴 - Open in Termianl 메뉴 포함 (윈도우와 비교하면, 마우스 우측 버튼 메뉴)
그 외에 KVP 서비스에 대해서는 나중에 심심하면 테스트 해봐야 겠습니다. ^^
Sending data from parent to virtual machine via KVP
; http://blogs.msdn.com/b/virtual_pc_guy/archive/2008/12/02/sending-data-from-parent-to-virtual-machine-via-kvp.aspx
; http://poleexpertise.canalblog.com/archives/2008/12/03/11617815.html
[이 글에 대해서 여러분들과 의견을 공유하고 싶습니다. 틀리거나 미흡한 부분 또는 의문 사항이 있으시면 언제든 댓글 남겨주십시오.]