"Zhang Suen 알고리즘(세선화, Thinning/Skeletonization)"의 C# 버전
세선화(Thinning, Skeletonization)라... ^^
[AS3] 세선화, Thinning
; http://broneri.tistory.com/entry/AS3-%EC%84%B8%EC%84%A0%ED%99%94-Thinning
재미있을 것 같아서, C#으로 포팅해 보았습니다. 로직은 위의 글에 나온 것을 그대로 적용했고 단지 이미지 파일을 직접 읽어들여서 이를 true/false 배열로 변경하는 것과 그 반대의 작업을 할 수 있는 코드를 추가했습니다.
============ 이미지 파일을 읽어서 true/false 배열로 반환 ============
Image img = Bitmap.FromFile("triangle.png");
Bitmap bmp = new Bitmap(img);

bool[,] imgBinaries = ConvertToBool(bmp);

bool[,] ConvertToBool(Bitmap bmp)
{
    bool[,] imgData = new bool[bmp.Width, bmp.Height];

    for (int x = 0; x < bmp.Width; x++)
    {
        for (int y = 0; y < bmp.Height; y++)
        {
            Color c = bmp.GetPixel(x, y);
            imgData[x, y] = (uint)c.ToArgb() != 0xff000000; // 단일 색과 비교해서 true로 설정
        }
    }

    return imgData;
}

============ true/false 배열을 이미지로 변환 ============
Bitmap ToBitmaps(bool[,] imgBinaries)
{
    int width = imgBinaries.GetLength(0);
    int height = imgBinaries.GetLength(1);

    Bitmap bmp = new Bitmap(width, height);

    for (int x = 0; x < bmp.Width; x++)
    {
        for (int y = 0; y < bmp.Height; y++)
        {
            if (imgBinaries[x, y] == true)
            {
                bmp.SetPixel(x, y, Color.Black);
            }
        }
    }

    return bmp;
}
물론, 세선화하기 위해서는 단일 색으로 가정하는 것이 코딩이 편하기 때문에 제 경우는 위에서 본 것처럼 하얀색(0xff000000)으로 지정해 두었습니다.
이하 나머지 코드는 원 글에서 공개된 ActionScript를 거의 그대로 포팅한 것인데,
첨부 파일에도 "WindowsFormsApplication1" 프로젝트로 포함해 두었지만 간단하니 아래에 그대로 실었습니다.
public partial class Form1 : Form
{
    public Form1()
    {
        InitializeComponent();
    }

    private void Form1_Load(object sender, EventArgs e)
    {
        Image img = Bitmap.FromFile("triangle.png");
        picBefore.Image = img;

        Bitmap bmp = new Bitmap(img);

        bool[,] imgBinaries = ConvertToBool(bmp);

        this.tableLayoutPanel1.RowStyles[0].SizeType = SizeType.Absolute;
        this.tableLayoutPanel1.RowStyles[0].Height = bmp.Height + 10;

        OutputData(txtBefore, imgBinaries);

        thin_image(imgBinaries, bmp.Width, bmp.Height);

        bmp = ToBitmaps(imgBinaries);
        picAfter.Image = bmp;

        OutputData(txtAfter, imgBinaries);
    }

    void thin_image(bool[,] img, int width, int height)
    {
        while (true)
        {
            if (thin_loop1(img, width, height) == 0)
            {
                break;
            }
        }
        while (true)
        {
            if (thin_loop2(img, width, height) == 0)
            {
                break;
            }
        }
    }

    private int thin_loop1(bool[,] img, int width, int height)
    {
        bool[,] del = new bool[width, height];

        int thin_flag = 0;
        int y = 1;
        int x = 1;
        for (y = 1; y < height - 1; y++)
        {
            for (x = 1; x < width - 1; x++)
            {
                if (thin_pixel_loop1(img, x, y) == true)
                {
                    del[y, x] = true;
                }
            }
        }

        for (y = 1; y < height - 1; y++)
        {
            for (x = 1; x < width - 1; x++)
            {
                if (del[y, x] == true)
                {
                    img[y, x] = false;
                    thin_flag = 1;
                }
            }
        }
        return thin_flag;
    }

    private bool thin_pixel_loop1(bool[,] img, int x, int y)
    {
        if (thin_pixel_common(img, x, y) == 0)
            return false;

        if ((img[y - 1, x] == false || img[y, x - 1] == false || img[y, x + 1] == false) &&
                (img[y, x - 1] == false || img[y - 1, x] == false || img[y, x + 1] == false))
        {
            return true;
        }
        return false;
    }

    private int thin_pixel_common(bool[,] img, int x, int y)
    {
                // pixel removal condition
        // 1. pixel is black
        if ( img[y, x] == false )
            return 0;

        bool [] near = new bool[] {
        img[y-1, x-1], img[y-1, x], img[y-1, x+1], img[y, x+1],
        img[y+1, x+1], img[y+1, x], img[y+1, x-1], img[y, x-1], img[y-1, x-1]
        };

        int count = 0;
        for( int i = 0; i <= 7; i++ ) {
            if( near[i] == true ) count ++;
        }

            // 2. near pixels
        // check black pixels are >=2 and <=6
        if ( count < 2 || count > 6 )
            return 0;

        int connect = 0;
        for( int i = 0; i <= 7; i++ ) {
            if( near[i] == true && near[i+1] == false ) connect ++;
        }

            // 3. connectivity is 1
        if ( connect != 1 )
            return 0;

        return 1;
    }

    private int thin_loop2(bool[,] img, int width, int height)
    {
        bool[,] del = new bool[width, height];

        int thin_flag = 0;
        int y= 1;
        int x= 1;
        for ( y = 1; y < height-1; y++ ) {
            for ( x = 1; x < width-1; x++ ) {
                if ( thin_pixel_loop2( img, x,y ) == 1 ) {
                    del [y, x] = true;
                }
            }
        }

        for ( y = 1; y < height-1; y++ ) {
            for ( x = 1; x < width-1; x++ ) {
                if ( del [y, x] == true ) {
                    img[y, x] = false;
                    thin_flag = 1;
                }
            }
        }
        return thin_flag;
    }

    private int thin_pixel_loop2(bool[,] img, int x, int y)
    {
        if (thin_pixel_common(img, x, y) == 0)
            return 0;
        if ((img[y - 1, x] == false || img[y, x + 1] == false || img[y + 1, x] == false) &&
                (img[y, x - 1] == false || img[y + 1, x] == false || img[y, x + 1] == false))
        {
            return 1;
        }
        return 0;
    }

    private void OutputData(TextBox txtOutput, bool[,] imgBinaries)
    {
        StringBuilder sb = new StringBuilder();

        sb.AppendLine("{");
        for (int x = 0; x < imgBinaries.GetLength(0); x++)
        {
            sb.Append("\t{ ");
            for (int y = 0; y < imgBinaries.GetLength(1); y++)
            {
                if (imgBinaries[y, x] == true)
                {
                    sb.Append("1,");
                }
                else
                {
                    sb.Append("0,");
                }
            }

            sb.AppendLine(" },");
        }
        sb.AppendLine("}");

        txtOutput.Text = sb.ToString();
    }

    bool[,] ConvertToBool(Bitmap bmp)
    {
        bool[,] imgData = new bool[bmp.Width, bmp.Height];

        for (int x = 0; x < bmp.Width; x++)
        {
            for (int y = 0; y < bmp.Height; y++)
            {
                Color c = bmp.GetPixel(x, y);
                imgData[x, y] = (uint)c.ToArgb() != 0xff000000;
            }
        }

        return imgData;
    }

    Bitmap ToBitmaps(bool[,] imgBinaries)
    {
        int width = imgBinaries.GetLength(0);
        int height = imgBinaries.GetLength(1);

        Bitmap bmp = new Bitmap(width, height);

        for (int x = 0; x < bmp.Width; x++)
        {
            for (int y = 0; y < bmp.Height; y++)
            {
                if (imgBinaries[x, y] == true)
                {
                    bmp.SetPixel(x, y, Color.Black);
                }
            }
        }

        return bmp;
    }

}
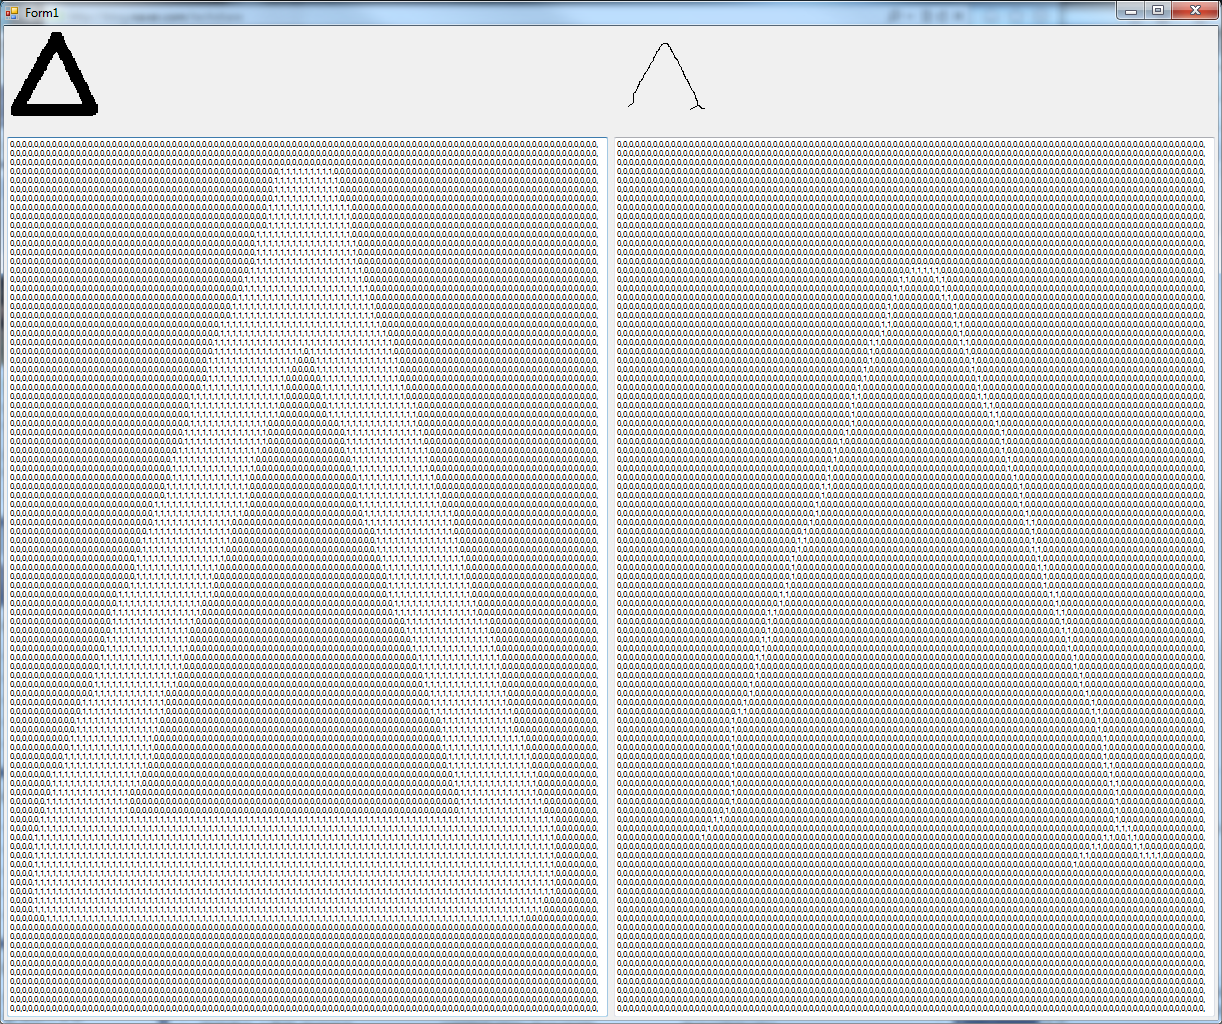
그런데 버그가 있더군요. 원글에서 공개된 예제는 정상적으로 처리되지만, 제가 임의로 그린 아래의 98*98 이미지는,

(참고로, 저는 색상을 반전시켜서 하얀색을 1로 처리한 후, 검정색으로 출력했습니다.)
다음과 같이 밑변이 날아가는 오류가 있습니다. (게다가 위의 소스 코드는 입력 이미지가 정사각형 이미지만 정상적으로 처리한다는 단점도 있습니다.)
음... 호기심이 생기더군요. 그래도 "Zhang Suen 알고리즘"이라고 불릴 정도면 이런 식의 오류가 있을 것 같지는 않은데 어쩌면 ActionScript로 포팅된 소스가 잘못 옮겨진 것이 아닐까 하는 생각이 들었습니다.
그래서, 인터넷 검색 결과 C 버전의 "Zhang Suen 알고리즘" 코드를 발견할 수 있었습니다.
Zhang-Suen thinning
; http://pages.cpsc.ucalgary.ca/~parker/thin.c
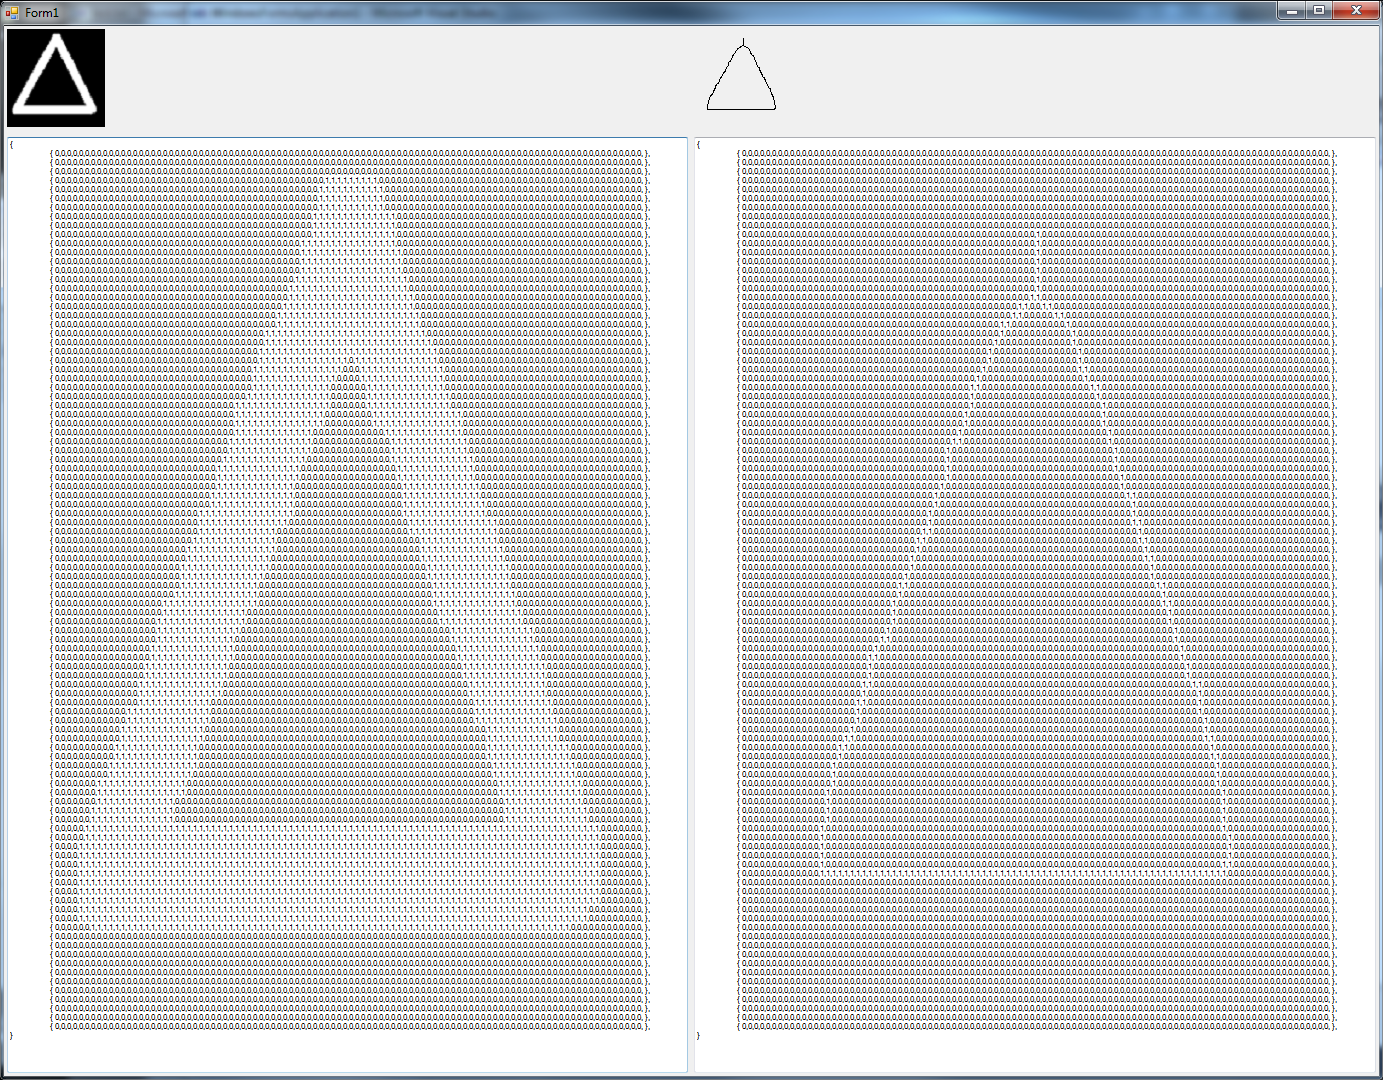
오호~~~ 위의 코드로 테스트 해보니 정상적으로 삼각형 이미지에 대해서 thinning이 되었습니다. (위의 소스 코드를 Visual C++ 2010 프로젝트로 그대로 옮긴 것을
첨부 파일의 Thinning 프로젝트에 추가했으니 참고하십시오.)
C#으로는 다음과 같이 옮겼고,
public partial class Form1 : Form
{
    public Form1()
    {
        InitializeComponent();
    }

    ...[OnLoad 이벤트 생략]...

    int[,] y;

    void thin_b(int[,] image, int width, int height)
    {
        int i, j, n, m, k, cont, br, ar, p1, p2;
        br = 0;
        int[] a = new int[8];

        cont = 1;
        while (cont != 0)
        {
            cont = 0;

            /*  Sub-iteration 1: */
            for (i = 0; i < width; i++)
                for (j = 0; j < height; j++)
                {       /* Scan the entire image */
                    if (image[i, j] == 0)
                    {
                        y[i, j] = 0;
                        continue;
                    }

                    ar = t1a(image, i, j, a, ref br, width, height);    /* Function A */

                    p1 = a[0] * a[2] * a[4];
                    p2 = a[2] * a[4] * a[6];
                    if ((ar == 1) && ((br >= 2) && (br <= 6)) &&
                        (p1 == 0) && (p2 == 0))
                    {
                        y[i, j] = 1;
                        cont = 1;
                    }
                    else y[i, j] = 0;
                }
            subtr(y, image, width, height);

            /* Sub iteration 2: */
            for (i = 0; i < width; i++)
                for (j = 0; j < height; j++)
                {       /* Scan the entire image */
                    if (image[i, j] == 0)
                    {
                        y[i, j] = 0;
                        continue;
                    }
                    ar = t1a(image, i, j, a, ref br, width, height);    /* Function A */

                    p1 = a[0] * a[2] * a[6];
                    p2 = a[0] * a[4] * a[6];
                    if ((ar == 1) && ((br >= 2) && (br <= 6)) &&
                        (p1 == 0) && (p2 == 0))
                    {
                        y[i, j] = 1;
                        cont = 1;
                    }
                    else y[i, j] = 0;
                }

            subtr(y, image, width, height);
        }
    }

    int t1a(int[,] image, int i, int j, int[] a, ref int b, int nn, int mm)
    {
        /*  Return the number of 01 patterns in the sequence of pixels
        P2 p3 p4 p5 p6 p7 p8 p9.                    */

        int n,m;

        for (n=0; n<8; n++) a[n] = 0;
        if (i-1 >= 0) {
            a[0] = image[i-1,j];
            if (j+1 < mm) a[1] = image[i-1,j+1];
            if (j-1 >= 0) a[7] = image[i-1,j-1];
        }
        if (i+1 < nn) {
            a[4] = image[i+1,j];
            if (j+1 < mm) a[3] = image[i+1,j+1];
            if (j-1 >= 0) a[5] = image[i+1,j-1];
        }
        if (j+1 < mm) a[2] = image[i,j+1];
        if (j-1 >= 0) a[6] = image[i,j-1];

        m= 0;   b = 0;
        for (n=0; n<7; n++) {
            if ((a[n]==0) && (a[n+1]==1)) m++;
            b = b + a[n];
        }
        if ((a[7] == 0) && (a[0] == 1)) m++;
        b = b + a[7];
        return m;
    }

    void subtr(int[,] a, int[,] b, int n, int m)
    {
        int i, j;

        for (i = 0; i < n; i++)
            for (j = 0; j < m; j++)
            {
                b[i, j] -= a[i, j];
            }
    }
}
결과는 아래와 같이 밑변이 사라지지 않았습니다. (게다가, 정사각형 이미지가 아니어도 정상적으로 처리가 잘 되더군요. ^^)
첨부된 파일은 위의 코드를 포함한 예제 프로젝트입니다.
[이 글에 대해서 여러분들과 의견을 공유하고 싶습니다. 틀리거나 미흡한 부분 또는 의문 사항이 있으시면 언제든 댓글 남겨주십시오.]