Unity로 실습하는 Shader (7) - Blur (평균값, 가우스, 중간값) 필터
지난 글에서,
Unity로 실습하는 Shader (6) - Mosaic Shading
; https://www.sysnet.pe.kr/2/0/11619
for 루프를 이용한 처리를 봤는데, 그렇다면 texture를 본연의 이미지 데이터라 보고 OpenCV를 통해했던 이미지 프로세싱까지 - 가령 mask 처리 같은 것도 가능하다는 시나리오가 나옵니다. 그중에서 3가지 스무딩 효과를 Unity shader로 구현해 보겠습니다.
우선, OpenCV의 box filter인 평균값 필터를 다음과 같이 구현해 볼 수 있습니다.
fixed4 frag(v2f i) : SV_Target
{
    float maskWidth = 5; // 외부 변수 처리 권장
    float maskOffset = -floor(maskWidth / 2.0);

    float homogeneousBlurFilter = 1.0 / (maskWidth * maskWidth);
    float2 texelSize = _MainTex_TexelSize;

    float2 xy = UVtoXY(i.uv, texelSize);
    float4 color = float4(0.0, 0.0, 0.0, 0.0);

    for (float x = 0; x < maskWidth; x++)
    {
        float offsetX = x + maskOffset;

        for (float y = 0; y < maskWidth; y++)
        {
            float offsetY = y + maskOffset;

            float2 newXY = float2(xy.x + offsetX, xy.y + offsetY);
            float2 newUV = XYtoUV(newXY, texelSize);

            color += (tex2D(_MainTex, newUV) * homogeneousBlurFilter);
        }
    }

    color = color * i.diffuse + i.specular;
    return color;
}
위의 코드는 maskWidth == 5이므로 5x5 크기의 1.0 / 25 평균값을 지정한 것과 같습니다.
${
\begin{split}K = \frac{1}{25} \begin{bmatrix} 1 & 1 & 1 & 1 & 1 \\ 1 & 1 & 1 & 1 & 1 \\ 1 & 1 & 1 & 1 & 1 \\ 1 & 1 & 1 & 1 & 1 \\ 1 & 1 & 1 & 1 & 1 \end{bmatrix}\end{split}
}$
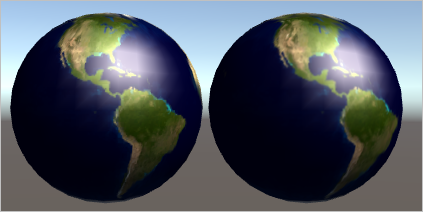
이것을 적용해 보면, 지구본의 이미지 texture가 너무 커서(2048 * 1024) 별로 차이가 안 납니다.
[그림 1: 왼쪽은 원본, 오른쪽은 5x5 box filter가 적용된 셰이딩]
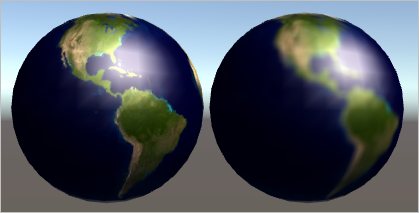
변수를 조정해서 25로 늘리면,
maskWidth = 25;
즉, 25x25 크기의 1.0 / 625 필터를 적용하면 제법 눈에 띄는 blurring 효과가 나오는 것을 확인할 수 있습니다.
[그림 1: 왼쪽은 원본, 오른쪽은 25x25 box filter가 적용된 셰이딩]
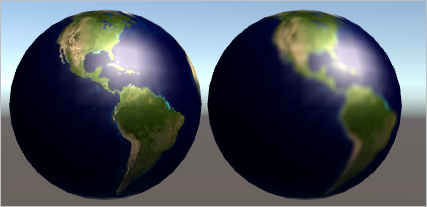
그나저나, 실습을 위해 texture 크기를 2048 * 1024 크기에서 512 * 256으로 해상도를 낮춘 지구본 이미지를 사용하겠습니다. 다음은 512 * 256이었을 때 고로 셰이딩(왼쪽)과 5x5 평균값 필터를 적용했을 때의 결과를 보여줍니다.
위의 코드를 기반으로 하면, 가중 평균 값 필터(weighted mean filter)도 어렵지 않게 적용할 수 있습니다.
두 번째로, blurring 효과 하면 유명한 가우스 필터를 안 해볼 수 없습니다. ^^ 우선, 멋있게 1차원과 2차원 가우스 분포 함수를 써 두지만,
${ G(x) = \frac{1}{{\sigma \sqrt {2\pi } }}e^{{{ -{x}^2 } \mathord{\left/ \right. } {2\sigma ^2 }}}
}$
${ G(x, y) = \frac{1}{{\sigma ^2 {2\pi } }}e^{{{ - \left( x^2 + y^2 \right) } \mathord{\left/ \right. } {2\sigma ^2 }}}
}$
tex2D 함수는 2차원 texture를 대상으로 하기 때문에 2차원 가우스 분포 함수가 적용됩니다. 따라서, σ 값에 따라 적절한 gaussian kernel을 생성하는데,
Gaussian Kernel Calculator
; http://dev.theomader.com/gaussian-kernel-calculator/
일례로 σ = 1.0으로 5x5 크기의 커널을 사용해 다음과 같이 코딩을 할 수 있습니다.
fixed4 frag(v2f i) : SV_Target
{
    // sigma = 1.0
    float gaussian5x5BlurFilter[25] =
    {
        0.003765, 0.015019, 0.023792, 0.015019, 0.003765,
        0.015019, 0.059912, 0.094907, 0.059912, 0.015019,
        0.023792, 0.094907, 0.150342, 0.094907, 0.023792,
        0.015019, 0.059912, 0.094907, 0.059912, 0.015019,
        0.003765, 0.015019, 0.023792, 0.015019, 0.003765,
    };

    float maskWidth = 5;
    float maskOffset = -floor(maskWidth / 2.0);

    float2 texelSize = _MainTex_TexelSize;

    float2 xy = UVtoXY(i.uv, texelSize);
    float4 color = float4(0.0, 0.0, 0.0, 0.0);

    for (float y = 0; y < maskWidth; y++)
    {
        float offsetY = y + maskOffset;

        for (float x = 0; x < maskWidth; x++)
        {
            float offsetX = x + maskOffset;

            float2 newXY = float2(xy.x + offsetX, xy.y + offsetY);
            float2 newUV = XYtoUV(newXY, texelSize);

            fixed filterPos = y * 5 + x;

            float filter = gaussian5x5BlurFilter[filterPos];
            color += (tex2D(_MainTex, newUV) * filter);
        }
    }

    color = color * i.diffuse + i.specular;
    return color;
}
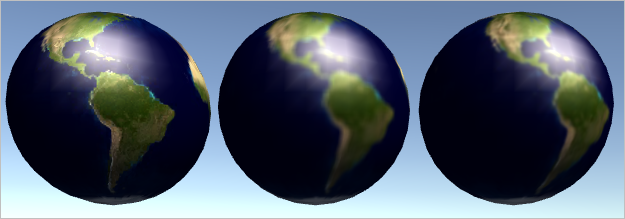
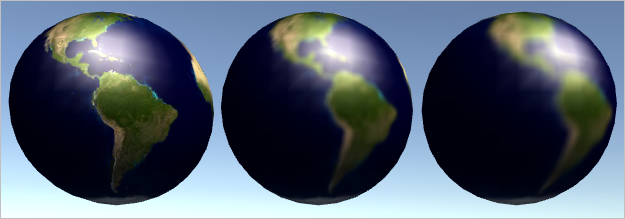
아래의 그림은 좌측부터, 원본, 5x5 평균 값 필터링, 5x5 가우스 필터링 효과를 보여줍니다. (3개의 이미지를 함께 출력하느라 이미지가 이지러지는 것을 볼 수 있는데 그 부분은 무시하시면 됩니다.)
참고로, sigma = 25.0으로 9x9의 mask를 적용하면,
// sigma = 25.0
float gaussian9x9BlurFilter[81] =
{
    0.012162, 0.012231, 0.01228 , 0.012309, 0.012319, 0.012309, 0.01228 , 0.012231, 0.012162,
    0.012231, 0.012299, 0.012349, 0.012378, 0.012388, 0.012378, 0.012349, 0.012299, 0.012231,
    0.01228 , 0.012349, 0.012398, 0.012428, 0.012438, 0.012428, 0.012398, 0.012349, 0.01228 ,
    0.012309, 0.012378, 0.012428, 0.012458, 0.012468, 0.012458, 0.012428, 0.012378, 0.012309,
    0.012319, 0.012388, 0.012438, 0.012468, 0.012478, 0.012468, 0.012438, 0.012388, 0.012319,
    0.012309, 0.012378, 0.012428, 0.012458, 0.012468, 0.012458, 0.012428, 0.012378, 0.012309,
    0.01228 , 0.012349, 0.012398, 0.012428, 0.012438, 0.012428, 0.012398, 0.012349, 0.01228 ,
    0.012231, 0.012299, 0.012349, 0.012378, 0.012388, 0.012378, 0.012349, 0.012299, 0.012231,
    0.012162, 0.012231, 0.01228 , 0.012309, 0.012319, 0.012309, 0.01228 , 0.012231, 0.012162,
};

float maskWidth = 9;
다음과 같이 좀 더 blurring된 것을 볼 수 있습니다.
[좌: 원본, 중간: 평균값, 우: σ = 25.0, 9x9 gaussian filter]
 그런데 2차원 가우시안 함수는 x와 y 방향에 대해 각각 1차원의 가우시안 함수의 곱으로 나타낼 수 있으므로 NxN 마스크가 아닌, 1xN 마스크를 x축과 (2 pass를 이용해) y 축 방향으로 사용할 수 있습니다.
(단일 객체로 2 pass를 지정해 blurring 처리하는 것이 가능할까요?)
마지막으로, 중간값 필터(Median Filter)를 적용해 보겠습니다. 중간값이 의미하는 것처럼, mask에 속하는 영역 중 중간값에 해당하는 컬러를 선택하는 것이기 때문에 정렬이 필요한 기능이기도 합니다. 중간값을 반환하기 위한 정렬은 간단하게 다음과 같이 해결할 수 있습니다.
float4 getMedian(float4 buf[25], fixed len)
{
    float4 temp;

    // 버블 정렬
    for (float i = 0; i < len - 1; i ++)
    {
        for (float j = i + 1 ; j < len; j ++)
        {
            if (colorToFloat(buf[i]) < colorToFloat(buf[j]))
            {
                temp = buf[i];
                buf[i] = buf[j];
                buf[j] = temp;
            }
        }
    }

    return buf[len / 2]; // 중간값 반환
}
아쉬운 것은 함수의 인자로 배열을 전달할 때 반드시 크기를 명시해야 한다는 점입니다.
// 반드시 배열 크기 명시
float4 getMedian(float4 buf[25], fixed len)

// 아래와 같이 전달하면 (컴파일 오류 없이) 동작하지 않음
float4 getMedian(float4 buf[], fixed len)
그래서 getMedian과 같이 함수를 만들면 배열 크기에 따른 함수를 별도로 만들어줘야 합니다. 이하 나머지 코드는 평균값 필터와 크게 다르지 않습니다.
fixed4 frag(v2f i) : SV_Target
{
    float maskWidth = 5;
    float4 colorArray[5 * 5];

    float maskOffset = -floor(maskWidth / 2.0);

    float2 texelSize = _MainTex_TexelSize;

    float2 xy = UVtoXY(i.uv, texelSize);
    float4 color = float4(0.0, 0.0, 0.0, 0.0);

    for (float x = 0; x < maskWidth; x++)
    {
        float offsetX = x + maskOffset;

        for (float y = 0; y < maskWidth; y++)
        {
            float offsetY = y + maskOffset;

            float2 newXY = float2(xy.x + offsetX, xy.y + offsetY);
            float2 newUV = XYtoUV(newXY, texelSize);

            colorArray[y * maskWidth + x] = tex2D(_MainTex, newUV);
        }
    }

    float4 col = getMedian(colorArray, maskWidth * maskWidth);
    color = col * i.diffuse + i.specular;

    return color;
}
실행 결과는 다음과 같습니다.
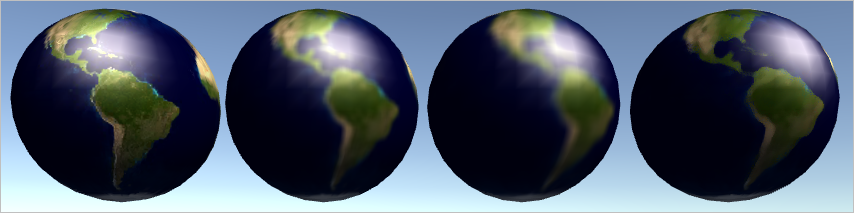
[좌측부터 원본, 5x5 평균값 필터, σ = 25.0 and 9x9 가우스 필터, 5x5 중간값 필터]
참고로, 아래의 소스 코드를 보면 min, max를 활용해 (정렬 없이) 3x3 크기의 중간값 필터를 구현하고 있습니다.
3x3 Median - Morgan McGuire and Kyle Whitson
; http://casual-effects.com/research/McGuire2008Median/median.pix
(
첨부 파일은 이 글에서 구현한 3가지 shader 소스 코드를 모두 포함합니다.)
shader에서 컬러를 비교하려고 다음과 같이 코딩을 하면,
fixed4 frag(v2f i) : SV_TARGET
{
    float4 color1 = tex2D(_MainTex, uv1);
    float4 color2 = tex2D(_MainTex, uv2);

    if (color1 < color2)
    {
    }
}
컴파일 오류가 발생합니다.
if statement conditional expressions must evaluate to a scalar
사실 단색이 아닌 color 값 비교라는 게 좀 이상하긴 하지만, 다음과 같이 우회해 볼 수는 있습니다.
float colorToFloat(float4 color)
{
    // tex2D가 반환하는 컬러는 0 ~ 1 사이의 값임.
    return color.r + color.g + color.b;
}

fixed4 frag(v2f i) : SV_TARGET
{
    float4 color1 = tex2D(_MainTex, uv1);
    float4 color2 = tex2D(_MainTex, uv2);

    if (colorToFloat(color1) < colorToFloat(color2))
    {
    }
}
[이 글에 대해서 여러분들과 의견을 공유하고 싶습니다. 틀리거나 미흡한 부분 또는 의문 사항이 있으시면 언제든 댓글 남겨주십시오.]