Unity - shader의 World matrix(unity_ObjectToWorld)를 수작업으로 구성
지난 shader의 글에서,
Unity로 실습하는 Shader (1) - 컬러 반전 및 상하/좌우 뒤집기
; https://www.sysnet.pe.kr/2/0/11608
UnityObjectToClipPos 함수의 사용을 다음과 같이 MVP 행렬 연산으로 대체할 수 있다고 했는데요.
v2f vert(appdata v)
{
    v2f o;

    // 직접 World, View, Projection 행렬로 연산
    float4 pos = mul(unity_ObjectToWorld, v.vertex);
    pos = mul(UNITY_MATRIX_V, pos);
    pos = mul(UNITY_MATRIX_P, pos);
    o.vertex = pos;

    o.uv = v.uv;
    return o;
}
이번 글에서는 unity_ObjectToWorld 행렬에 대해 간단하게 분해를 해보겠습니다. 예제는 다음의 기본 shader 코드로,
Shader "My/worldMatrixShader"
{
    Properties
    {
        _MainTex ("Texture", 2D) = "white" {}
    }
    SubShader
    {
        Tags { "RenderType"="Opaque" }
        LOD 100

        Pass
        {
            CGPROGRAM
            #pragma vertex vert
            #pragma fragment frag

            #include "UnityCG.cginc"

            struct appdata
            {
                float4 vertex : POSITION;
                float2 uv : TEXCOORD0;
            };

            struct v2f
            {
                float2 uv : TEXCOORD0;
                float4 vertex : SV_POSITION;
            };

            sampler2D _MainTex;
            float4 _MainTex_ST;

            v2f vert (appdata v)
            {
                v2f o;

                float4 pos = mul(unity_ObjectToWorld, v.vertex);
                pos = mul(UNITY_MATRIX_V, pos);
                pos = mul(UNITY_MATRIX_P, pos);
                o.vertex = pos;

                o.uv = TRANSFORM_TEX(v.uv, _MainTex);
                return o;
            }

            fixed4 frag (v2f i) : SV_Target
            {
                // sample the texture
                fixed4 col = tex2D(_MainTex, i.uv);
                return col;
            }
            ENDCG
        }
    }
}
Plane 3D 객체에 나무 texture를 입힌 상태에서부터 시작하겠습니다. 지난 글에서도 언급했지만,
Unity로 실습하는 Shader (9) - 투명 배경이 있는 텍스처 입히기
; https://www.sysnet.pe.kr/2/0/11631
최초 shader를 입힌 상태에서는 다음과 같이 Plane 3D 객체가 누워있는 체로 나옵니다.
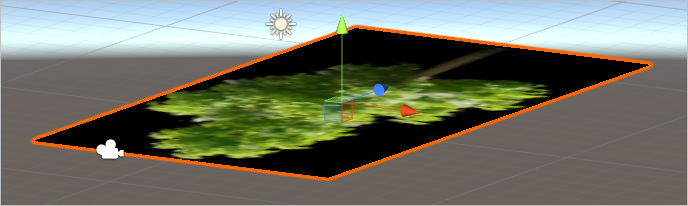
이 상태에서 해당 Plane 객체의 Inspector 창에서 입력하는 "Transform"의 "Position", "Rotation", "Scale"에 해당하는 내용을,
직접 shader 코드 내에서 구현해 보겠습니다.
우선, 가장 자주 사용하는 Position부터 시작할 텐데 동차 좌표계 기준으로 4x4 아핀 변환 행렬로 다음과 같이 표현이 됩니다.
${
T = \begin{bmatrix} 1 & 0 & 0 & x \\ 0 & 1 & 0 & y \\ 0 & 0 & 1 & z \\ 0 & 0 & 0 & 1 \end{bmatrix}
}$
따라서, shader에서 Position에 대한 x, y, z 값을 다음의 행렬로 구성해 unity_ObjectToWorld 행렬을 대체할 수 있습니다.
float4 pos = v.vertex;

float x = 2;
float y = 1;
float z = -1;

float4x4 moveMatrix;

moveMatrix[0] = float4(1, 0, 0, x);
moveMatrix[1] = float4(0, 1, 0, y);
moveMatrix[2] = float4(0, 0, 1, z);
moveMatrix[3] = float4(0, 0, 0, 1);

pos = mul(moveMatrix, pos);

pos = mul(UNITY_MATRIX_V, pos);
pos = mul(UNITY_MATRIX_P, pos);
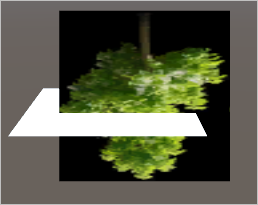
위의 shader를 적용한 모델은 무조건 x,y,z = (2,1,-1)의 좌표에 렌더링이 됩니다. 비교를 위해 아래의 그림에서 "흰색 Plane"은 (0,0,0)에 있는 객체이고, 나무 그림이 있는 Plane은 x-축 방향으로 +2, y-축 방향으로 +1, z-축 방향으로 -1로 움직인 상태를 보여줍니다.

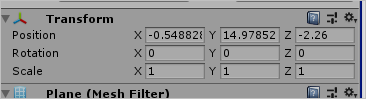
만약, Inspector 창에서 사용자가 입력한 Position의 값을 그대로 반영하고 싶다면 unity_ObjectToWorld의 위치 값을 재사용할 수 있습니다.
moveMatrix[0] = float4(1, 0, 0, unity_ObjectToWorld._m03);
moveMatrix[1] = float4(0, 1, 0, unity_ObjectToWorld._m13);
moveMatrix[2] = float4(0, 0, 1, unity_ObjectToWorld._m23);
moveMatrix[3] = float4(0, 0, 0, unity_ObjectToWorld._m33);
그다음 다룰 것이 회전입니다. 회전의 경우 Inspector 창의 Transform에서도 입력 값이 "축"을 기준으로 하고 있습니다. 이 글에서도 축에 대한 회전을 행렬로 다뤄볼 텐데요, 각각의 축에 대한 회전 행렬은 다음의 글에서 자세하게 설명하고 있으니 생략하겠습니다.
Direct3D : 월드행렬 (World Matrix) 2 - 회전행렬
; http://egloos.zum.com/EireneHue/v/982268
위의 글에 따라 x축에 대한 회전 행렬은 4x4로 다음과 같이 구성할 수 있고,
${
Rx = \begin{bmatrix} 1 & 0 & 0 & 0 \\ 0 & cos \theta & -sin \theta & 0 \\ 0 & sin \theta & cos \theta & 0 \\ 0 & 0 & 0 & 1 \end{bmatrix}
}$
따라서, 라디안 값을 기준으로 x-축에 대한 회전을 다음의 함수로 제작할 수 있습니다.
float4 RotateAroundX(float4 vertex, float radian)
{
    float sina, cosa;
    sincos(radian, sina, cosa);

    float4x4 m;

    m[0] = float4(1, 0, 0, 0);
    m[1] = float4(0, cosa, -sina, 0);
    m[2] = float4(0, sina, cosa, 0);
    m[3] = float4(0, 0, 0, 1);

    return mul(m, vertex);
}
이 함수를 이용해 우리가 원하는 각도로 회전할 수 있도록 shader 코드에서 다음과 같이 사용할 수 있습니다.
v2f vert (appdata v)
{
    v2f o;

    float4 pos = v.vertex;

    // x-축에 대해 -45도 회전
    pos = RotateAroundX(pos, radians(-45));

    // ...[생략]...

    pos = mul(moveMatrix, pos);

    pos = mul(UNITY_MATRIX_V, pos);
    pos = mul(UNITY_MATRIX_P, pos);
    o.vertex = pos;

    o.uv = TRANSFORM_TEX(v.uv, _MainTex);
    return o;
}
지난 글에서 누워 있는 Plane 객체를 세우기 위해 x-축의 방향으로 -90도 회전해야 한다고 했습니다. 따라서 다음과 같이 -90도로 회전을 주면,
pos = RotateAroundX(pos, radians(-90));
이렇게 나무가 세워졌습니다.
texture가 거꾸로 나오는 것도 역시
지난 글에서 설명했고, 이를 위해 material 설정에서 tiling 값을 x, y에 대해 모두 -1로 줍니다.

x-축 기준으로 회전했으니 이제 y-축과 z-축에 대해서도 다음과 같이 함수를 만들 수 있습니다.
float4 RotateAroundY(float4 vertex, float radian)
{
    float sina, cosa;
    sincos(radian, sina, cosa);

    float4x4 m;

    m[0] = float4(cosa, 0, sina, 0);
    m[1] = float4(0, 1, 0, 0);
    m[2] = float4(-sina, 0, cosa, 0);
    m[3] = float4(0, 0, 0, 1);

    return mul(m, vertex);
}

float4 RotateAroundZ(float4 vertex, float radian)
{
    float sina, cosa;
    sincos(radian, sina, cosa);

    float4x4 m;

    m[0] = float4(cosa, -sina, 0, 0);
    m[1] = float4(sina, cosa, 0, 0);
    m[2] = float4(0, 0, 1, 0);
    m[3] = float4(0, 0, 0, 1);

    return mul(m, vertex);
}
회전 행렬의 특성상, x-y-z나 z-y-x 축의 순서 적용에 따라 결과가 달라질 수 있습니다. Unity의 경우 테스트를 해보면, Z-X-Y 순으로 적용한다는 것을 알 수 있습니다. 가령, 비교를 위해 만들었던 Plane 객체를 Rotation(x=-90, y=20, z=45) 값으로 회전시킨 결과와 제가 만든 Rotate... 함수를 다음의 순으로 적용했을 때가 같습니다.
pos = RotateAroundZ(pos, radians(45));
pos = RotateAroundX(pos, radians(-90));
pos = RotateAroundY(pos, radians(20));
실행해 보면, 다음과 같이 (Position이 다르므로) 평행하게 출력이 됩니다.

(카메라 설정을 투영 좌표계에서 직교 좌표계로 바꾸면 완전히 평행한 것을 확인할 수 있습니다.)
행렬의 특성상, 결합 법칙이 적용되기 때문에 위와 같이 3개의 행렬을 적용할 것이 아니라 다음과 같이 하나의 행렬로 만들어 계산할 수 있습니다.
float4x4 GetRotationMatrix(float xRadian, float yRadian, float zRadian)
{
    float sina, cosa;
    sincos(xRadian, sina, cosa);

    float4x4 xMatrix;

    xMatrix[0] = float4(1, 0, 0, 0);
    xMatrix[1] = float4(0, cosa, -sina, 0);
    xMatrix[2] = float4(0, sina, cosa, 0);
    xMatrix[3] = float4(0, 0, 0, 1);

    sincos(yRadian, sina, cosa);

    float4x4 yMatrix;

    yMatrix[0] = float4(cosa, 0, sina, 0);
    yMatrix[1] = float4(0, 1, 0, 0);
    yMatrix[2] = float4(-sina, 0, cosa, 0);
    yMatrix[3] = float4(0, 0, 0, 1);

    sincos(zRadian, sina, cosa);

    float4x4 zMatrix;

    zMatrix[0] = float4(cosa, -sina, 0, 0);
    zMatrix[1] = float4(sina, cosa, 0, 0);
    zMatrix[2] = float4(0, 0, 1, 0);
    zMatrix[3] = float4(0, 0, 0, 1);

    return mul(mul(yMatrix, xMatrix), zMatrix);
}
따라서 이를 사용하면 다음과 같이 회전을 적용할 수 있습니다.
float4x4 rotationMatrix = GetRotationMatrix(radians(-90), radians(20), radians(45));
pos = mul(rotationMatrix, pos);
마지막으로, scale 적용은 너무 쉽습니다. ^^ 행렬 자체가 쉬워서,
${
S = \begin{bmatrix} Sx & 0 & 0 & 0 \\ 0 & Sy & 0 & 0 \\ 0 & 0 & Sz & 0 \\ 0 & 0 & 0 & 1 \end{bmatrix}
}$
코드로는 다음과 같이 작성할 수 있습니다.
float4x4 scaleMatrix;

float scaleX = 0.5;
float scaleY = 1.5;
float scaleZ = 1.3;

scaleMatrix[0] = float4(scaleX, 0, 0, 0);
scaleMatrix[1] = float4(0, scaleY, 0, 0);
scaleMatrix[2] = float4(0, 0, scaleZ, 0);
scaleMatrix[3] = float4(0, 0, 0, 1);

pos = mul(scaleMatrix, pos);
이제까지 크기(Scale), 회전(Rotation), 이동(Position)에 대한 행렬을 모두 다뤄봤는데요, 당연히 그 3개의 행렬도 결합 법칙이 성립하므로 1개의 행렬로 만들어 둘 수 있습니다.
float4x4 transformMatrix = mul(mul(moveMatrix, rotationMatrix), scaleMatrix);
pos = mul(transformMatrix, pos);
그리고 바로 저 transformMatrix가 Unity 에디터에서 Inspector 창에 있는 Transform(Position, Rotation, Scale) 값에 따라 만들어진 행렬과 동일하며 이 값을 unity는 shader에 unity_ObjectToWorld 내장 변수로 전달해 주고 있는 것입니다.
다음은 예제로 사용한 shader의 소스 코드입니다.
Shader "My/worldMatrixShader"
{
    Properties
    {
        _MainTex ("Texture", 2D) = "white" {}
    }
    SubShader
    {
        Tags { "RenderType"="Opaque" }
        LOD 100

        Pass
        {
            CGPROGRAM
            #pragma vertex vert
            #pragma fragment frag

            #include "UnityCG.cginc"

            struct appdata
            {
                float4 vertex : POSITION;
                float2 uv : TEXCOORD0;
            };

            struct v2f
            {
                float2 uv : TEXCOORD0;
                float4 vertex : SV_POSITION;
            };

            sampler2D _MainTex;
            float4 _MainTex_ST;

            float4x4 GetRotationMatrix(float xRadian, float yRadian, float zRadian)
            {
                float sina, cosa;
                sincos(xRadian, sina, cosa);

                float4x4 xMatrix;

                xMatrix[0] = float4(1, 0, 0, 0);
                xMatrix[1] = float4(0, cosa, -sina, 0);
                xMatrix[2] = float4(0, sina, cosa, 0);
                xMatrix[3] = float4(0, 0, 0, 1);

                sincos(yRadian, sina, cosa);

                float4x4 yMatrix;

                yMatrix[0] = float4(cosa, 0, sina, 0);
                yMatrix[1] = float4(0, 1, 0, 0);
                yMatrix[2] = float4(-sina, 0, cosa, 0);
                yMatrix[3] = float4(0, 0, 0, 1);

                sincos(zRadian, sina, cosa);

                float4x4 zMatrix;

                zMatrix[0] = float4(cosa, -sina, 0, 0);
                zMatrix[1] = float4(sina, cosa, 0, 0);
                zMatrix[2] = float4(0, 0, 1, 0);
                zMatrix[3] = float4(0, 0, 0, 1);

                return mul(mul(yMatrix, xMatrix), zMatrix);
            }

            v2f vert (appdata v)
            {
                v2f o;

                float4 pos = v.vertex;

                float4x4 scaleMatrix; // Scale 행렬

                float scaleX = 0.5;
                float scaleY = 1.5;
                float scaleZ = 1.3;

                scaleMatrix[0] = float4(scaleX, 0, 0, 0);
                scaleMatrix[1] = float4(0, scaleY, 0, 0);
                scaleMatrix[2] = float4(0, 0, scaleZ, 0);
                scaleMatrix[3] = float4(0, 0, 0, 1);

                float4x4 rotationMatrix = GetRotationMatrix(radians(-90), radians(20), radians(45)); // Rotation 행렬

                float x = 2;
                float y = 1;
                float z = -1;

                float4x4 moveMatrix; // Position 행렬

                moveMatrix[0] = float4(1, 0, 0, x);
                moveMatrix[1] = float4(0, 1, 0, y);
                moveMatrix[2] = float4(0, 0, 1, z);
                moveMatrix[3] = float4(0, 0, 0, 1);

                // transformMatrix == unity_ObjectToWorld
                float4x4 transformMatrix = mul(mul(moveMatrix, rotationMatrix), scaleMatrix);
                pos = mul(transformMatrix, pos);

                pos = mul(UNITY_MATRIX_V, pos);
                pos = mul(UNITY_MATRIX_P, pos);
                o.vertex = pos;

                o.uv = TRANSFORM_TEX(v.uv, _MainTex);
                return o;
            }

            fixed4 frag (v2f i) : SV_Target
            {
                fixed4 col = tex2D(_MainTex, i.uv);
                return col;
            }
            ENDCG
        }
    }
}
[이 글에 대해서 여러분들과 의견을 공유하고 싶습니다. 틀리거나 미흡한 부분 또는 의문 사항이 있으시면 언제든 댓글 남겨주십시오.]