Bitvise SSH Client의 인증서 모드에서 자동 로그인 방법
다음과 같이 개인키를 이용한 SSH Client로 접속하는 경우,
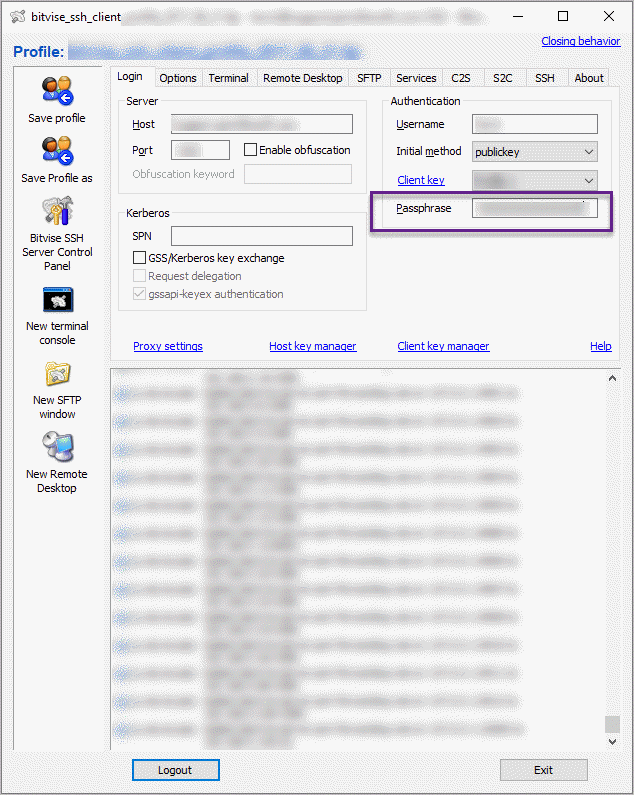
반드시 "Passphrase"를 직접, 매번 입력해야만 합니다. 문제는, 저 값이 저장이 안 된다는 점인데요, 음... 그동안 참고 계속 입력했는데 오늘은 문득 너무 귀찮다는 생각이 들었습니다. ^^ 그래서 검색한 결과 stnlc.exe가 있다는 것을 새롭게 알았습니다.
C:\Program Files (x86)\Bitvise SSH Client> stnlc
Bitvise SSH Client 7.41 - stnlc, a command line SSH tunnel client
Copyright (C) 2000-2018 by Bitvise Limited.

ERROR: Missing host or -profile parameter.

USAGE:
stnlc [username@]host[:port] OR -profile=file [-host=host] [-port=port] [-obfs=y|n] [-obfsKw=keyword] [-spn=SPN]
      [-gkx=y|n] [-gkxDlg=y|n]
      [-user=username] [-gka] [-gma [-krb OR -ntlm] [-gmaDlg]] [-pk=location [-pp=passphrase]] [-pw=password
      [-kbdiFallback=y|n]] [-pwKbdi=password] [-kbdi [-sub=submethods]]
      [-unat=y|n] [-trustLsp=y|n]
      [-encr=list] [-mac=list] [-cmpr=list] [-kex=list] [-hkey=list] [-ka=y|n] [-kre=y|n]
      [-noRegistry OR -baseRegistry=registry-key]
      [-proxy=y|n [-proxyType=type] -proxyServer=server [-proxyPort=port] [-proxyUsername=username
      [-proxyPassword=password]] [-proxyResolveLocally=y|n]]
      [-hostKeyFp=fingerprints] [-hostKeyFile=file]
      [-keypairFile=file [-keypairPassphrase=passphrase]]
      [-traceLog] [-flowDebugFile=file]
      [-title=title]
      [-ftpBridge=y|n] [-ftpListIntf=interface] [-ftpListPort=port] [-ftpPassword=password] [-ftpPasvPortStart=port]
      [-ftpPasvPortEnd=port] [-sftpNewline=auto|crlf|lf|cr] [-sftpStartDir=sftp-path] [-sftpPipelineSize=kbytes]
      [-proxyFwding=y|n] [-proxyListInt=interface] [-proxyListPort=port] [-proxyBindIp4Intf=ip4-interface]
      [-proxyBindIp6Intf=ip6-interface] [-proxyPublicIp4=ip4-address] [-proxyPublicIp6=ip6-address]
      [-c2s=rules OR -c2sFile=file-path] [-c2sAccept=y|n]
      [-s2c=rules OR -s2cFile=file-path] [-s2cAccept=y|n]

To learn more about stnlc, try:
  stnlc -help-params   (display help for parameters in general)
  stnlc -help-<param>  (display help for a particular parameter)
  stnlc -help-examples (display examples)
  stnlc -help-codes    (display return codes)
가령, "c:\temp\ssh_client_profile.tlp" 경로에 저장한 파일의 "Profile 1"로 설정한 경우 passphrase가 0000이라면 다음과 같이 명령행에서 입력하면 자동으로 로그인까지 이어집니다.
stnlc -profile=c:\temp\ssh_client_profile.tlp -pk="Profile 1" -pp=0000
그런데, 저렇게 대놓고 passphrase를 적어 놓은 것을 사용하려니 너무 허술합니다. Passphrase를 DPAPI를 이용해,
Protected?Data  Class
; https://docs.microsoft.com/en-us/dotnet/api/system.security.cryptography.protecteddata?view=netframework-4.7.2
암호화해서 파일에 저장한 다음 이를 읽어서 실행해 주는 다음과 같은 간단한 프로그램을 윈도우 레지스트리의 "HKEY_CURRENT_USER\Software\Microsoft\Windows\CurrentVersion\Run"에 등록하는 것이 쪼끔 더 안전할 수 있겠습니다. ^^
using System;
using System.Diagnostics;
using System.IO;
using System.Security.Cryptography;
using System.Text;

namespace BitviseAutoLogin
{
    class Program
    {
        static byte[] entropy = { ...암호화했을 때 사용한 값을 그대로 사용... };

        static void Main(string[] args)
        {
            string passphrase = GetKey();

            string tlpPath = @"c:\temp\ssh_client_profile.tlp";
            string profileKey = "Profile 1";

            ProcessStartInfo psi = new ProcessStartInfo();
            psi.Arguments =
                string.Format("-profile={0} -pk=\"{1}\" -pp={2}", tlpPath, profileKey, passphrase);
            psi.FileName = @"C:\Program Files (x86)\Bitvise SSH Client\stnlc.exe";
            Process.Start(psi);
        }

        private static string GetKey()
        {
            string text = File.ReadAllText("c:\\temp\\passphrase.txt"); // 현재 사용자에게만 Read 권한이 주어진 파일
            byte [] buf = Convert.FromBase64String(text);
            byte [] decryped = ProtectedData.Unprotect(buf, entropy, DataProtectionScope.CurrentUser);

            return Encoding.Unicode.GetString(decryped);
        }
    }
}
(
첨부 파일은 이 글의 예제 프로젝트를 포함합니다.)
[이 글에 대해서 여러분들과 의견을 공유하고 싶습니다. 틀리거나 미흡한 부분 또는 의문 사항이 있으시면 언제든 댓글 남겨주십시오.]